Table of Contents
Advertisement
Available languages
Available languages
Quick Links
Advertisement
Table of Contents

Related Manuals for Whirlpool AXMT 6634/IX


Summary of Contents for Whirlpool AXMT 6634/IX
- Page 1 AXMT 6634/IX AXMT 6634/WH...
-
Page 2: Table Of Contents
Français Mode d’emploi CUISINIERE ET FOUR Sommaire Mode d’emploi,1 CONSIGNES DE SÉCURITÉ,3 Description de l’appareil-Vue d’ensemble, 11 Description de l’appareil-Tableau de bord, 11 Installation,13 Mise en marche et utilisation,15 Utilisation du plan de cuisson,16 Utilisation du plan,20 Nettoyage et entretien,25 English Operating Instructions COOKER AND OVEN... -
Page 3: Consignes De Sécurité,3
Avant d’utiliser l’appareil, lisez attentivement les guides de sécurité, d’utilisation et d’entretien. Gardez ces documents à portée de main pour toute référence future. Ces instructions sont également disponibles sur le site Web : www.whirlpool.eu VOTRE SÉCURITÉ ET CELLE DES AUTRES EST TRÈS IMPORTANTE Ce manuel et l’appareil lui-même fournissent des avertissements de sécurité... - Page 4 USAGE PRÉVU DE L’APPAREILPRODUCT Le présent appareil a été conçu à des fins domestiques uniquement. Tout usage à des fins professionnelles est prohibé. Le fabri- cant décline toute responsabilité pour un usage inapproprié ou un réglage incorrect des commandes. Cet appareil est conçu pour être utilisé dans les maisons et les endroits similaires tels que : Les espaces cuisines dans les boutiques, bureaux et autres environnements de travail ;...
- Page 5 N’utilisez pas cet appareil si le cordon d’alimentation ou la fiche est endommagé, s’il ne fonctionne pas correctement, s’il est endommagé ou s’il est tombé. Ne plongez pas le cordon d’alimentation ou la fiche dans de l’eau. Éloignez le cordon des surfaces chaudes. Les composants électriques ne doivent pas être accessibles à...
- Page 6 CONSEILS POUR ÉCONOMISER DE L’ÉNERGIE Ne préchauffez le four que cela est spécifié dans la table de cuisson ou votre recette. Utilisez des modules de cuisson laqués ou émaillés sombres étant donné qu’ils absorbent beaucoup mieux la chaleur. Éteignez le four 10/15 minutes avant le temps de cuisson défini. Les aliments nécessitant une cuisson prolongée continue de cuire à...
- Page 7 Before using the appliance carefully read Health and Safety and Use and Care guides. Keep these instructions close at hand for future reference. These instructions shall also be available on website: www.whirlpool.eu SAFETY OF OTHERS IS VERY IMPORTANT YOUR SAFETY AND This manual and the appliance itself provide important safety warnings, to be read and observed at all times.
- Page 8 CAUTION : The appliance is not intended to be operated by means of an external timer or separate remote controlled supply system. Do not store explosive or flammable substances such as aerosol cans and do not place or use gasoline or other flammable materials in or near the appliance: a fire may break out if the appliance is inadvertently switched on.
- Page 9 CORRECT USE CAUTION : The cooking process has to be supervised. A short cooking process has to be supervised continuously. WARNING : Unattended cooking on a hob with fat or oil can be dangerous and may result in fire. Never try to extinguish a fire with water, but switch off the appliance and then cover flame e.g. with a lid or a fire blanket.
- Page 10 DECLARATION OF CONFORMITY This appliance meets the Eco Design requirements of European Regulations n. 65/2014, and n. 66/2014 in conformity to the European standard EN 60350-1. TABLE OF CHARACTERISTICS Oven dimensions 34,0x42,4x42,4cm (HxWxD) 57 l Volume Useful width 42 cm measurements depth 44 cm relating to the oven...
-
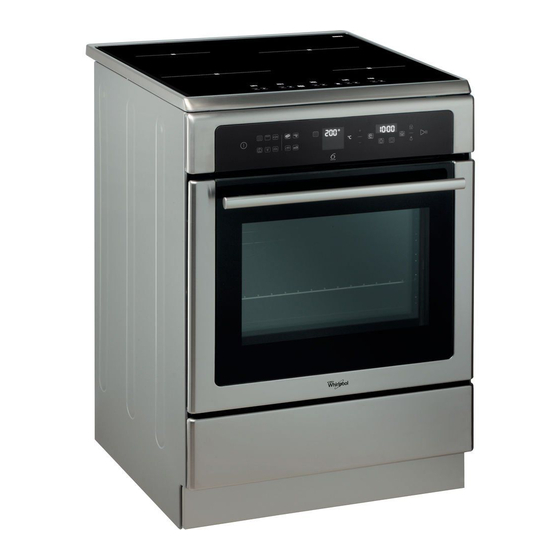
Page 11: Description De L'appareil-Vue D'ensemble
Description de l’appareil Description de l’appareil Vue d’ensemble AFFICHEUR 1. Table de cuisson céramique 1. Icône PROGRAMME BASSE TEMPERATURE 2. Icônes 2. Tableau de bord PROGRAMMES AUTOMATIQUE 6TH SENSE 3. Indicateur de Préchauffage 3. Support GRILLE 4. Voyant PORTE VERROUILLEE 4. - Page 12 1920 11 12 17 Touche AUGMENTATION DU TEMPS* pour augmenter Description de l’appareil la durée en cas d’utilisation du minuteur ou en cas de Tableau de bord programmation (voir Mise en marche et utilisation). 18 Touche DIMINUTION DU TEMPS* pour diminuer la durée Le tableau de bord qui est décrit n.a qu.une valeur d.exemple : en cas d’utilisation du minuteur ou en cas de programmation...
-
Page 13: Installation,13
Installation Positionnement et nivellement Raccordement électrique L’appareil peut être installé à côté de meubles dont la hauteur ne dépasse pas celle du plan de cuisson. Montage du cordon d’alimentation Ouverture du bornier: S’assurer que le mur en contact avec la paroi arrière de l’appareil est réalisé... - Page 14 • fixez le câble d’alimentation dans le serre-câble fournie avec l’appareil) au mur derrière l’appa- correspondant et fermez le couvercle. reil, à la même hauteur que sur la cuisinière. Choisissez une vis et un système d’ancrage Branchement du câble d’alimentation au réseau adapté...
-
Page 15: Mise En Marche Et Utilisation,15
Mise en marche et utilisation Mise à l’heure de l’horloge 3. L’extinction de l’indicateur de préchauffage le déclenchement du signal sonore indiquent la fin du Son réglage est possible que le four soit éteint préchauffage: il est temps d’enfourner les plats. ou allumé... - Page 16 Programmes de cuisson manuels Tous les programmes ont une température de cuisson présélectionnée. Il est possible de la régler manuellement, entre 40°C et 250°C au choix. Pour le programme TOURNEBROCHE, la valeur présélectionnée est 270°C. Fonction Fonction Description UTILISATION ET ENTRETIEN L'élément chauffant arrière et le ventilateur sont allumés, garantissant ainsi la répartition délicate et uniforme de la chaleur dans l'ensemble du four.
- Page 17 Comment programmer une cuisson Conseils de cuisson La programmation n’est possible qu’après avoir sélectionné Pour les cuissons ventilées ne pas utiliser les gradins 1et 5: un programme de cuisson. ils sont directement frappés par l’air chaud qui pourrait brûler les mets délicats. Programmer la durée de cuisson 1.
- Page 18 Tableau de cuisson au four Table de cuisson Grille (depuis Recette Fonction Préchauffage la partie Temp. (°C) Durée (min) Accessoires et observations inférieure) MULTINIVEAU 160 - 180 30 - 90 Moule à gâteaux sur l'étagère grillagée Grille 3 : moule à gâteaux sur l'étagère Gâteaux à...
- Page 19 Poisson cuit au four / cuit dans une Plateau de dégivrage / plaque de MULTINIVEAU 180 - 200 30 - 60 feuille d'aluminium cuisson sur l'étagère grillagée (filet, entier) Tomates, courges, Plateau de dégivrage / plaque de FOUR TRADITION aubergines farcies aux 180 - 200 50 - 60 cuisson sur l'étagère grillagée...
- Page 20 Mise en marche et utilisation La colle utilisée pour les joints laisse des traces de Allumage des foyers graisse sur le verre. Nous conseillons de les éliminer Pour mettre en marche un foyer, sélectionner la touche du avant d’utiliser l’appareil à l’aide d’un produit d’entretien foyer souhaité...
- Page 21 2. Régler le niveau de puissance du foyer. 3. Appuyer sur la touche pour valider. 3. Appuyer sur la touche de programmation . Le voyant Le compte à rebours du minuteur démarre aussitôt. Une fois correspondant au foyer sélectionné clignote. le temps écoulé, un signal sonore retentit (pendant 1 minute).
- Page 22 Conseils d’utilisation de l’appareil la table est à nouveau utilisable dès que la température est redescendue à un niveau acceptable. ! Utiliser des récipients dont le matériau est compatible avec l’induction (matériau ferromagnétique). Nous Interrupteur sécurité recommandons l’utilisation de casseroles en: fonte, L’appareil est équipé...
- Page 23 Mode CONNEXION ZONE Accessoires CONNEXION ZONE La zone permet de régler le Pour un bon fonctionnement de la zone de cuisson CONNEXION ZONE , nous conseillons d’utiliser même niveau de puissance sur deux plaques „ reliées des cocottes à fond elliptique ou allongé et ayant „...
- Page 24 Conseils utiles pour la cuisson Friture Mise en pression Autocuisser Grillade Ebullition Crepes Saise et coloration (Rotis, Steack, Escalope, Filets de poisson, Oeufs au plat) Réduction rapide (Sauce liquides) Eau Frémissante (Pates, Riz, Légumes) Lait Réduction lente (Sauce épaisses) Cuisson au bain-marie Cuisson Autocuiseur après chuchotement Mijotage (Ragouts) Réchauffage des préparations...
-
Page 25: Nettoyage Et Entretien,25
Nettoyage et entretien Mise hors tension Ne pas utiliser la lampe du four comme éclairage Avant toute opération de nettoyage ou d’entretien de la pièce. couper l’alimentation électrique de l’appareil. Nettoyage du plan de cuisson Nettoyage du four vitrocéramique Ne jamais nettoyer l’appareil avec des nettoyeurs vapeur ou haute pression. - Page 26 Nettoyage automatique par PYROLYSE • en cas d’anomalie de fonctionnement, l’alimentation des résistances est automatiquement coupée ; Pendant le programme PYROLYSE, la température à l’intérieur du four atteint 500°C et lance le processus • une fois que la porte est verrouillée, aucune modification de sélection de durée et de fin de cycle de pyrolyse, autrement dit, la carbonisation n’est plus possible.
- Page 27 Description of the appliance Description of the appliance DISPLAY Overall view 1. LOW TEMPERATURE MODE icon icons AUTOCOOKING FUNCTION 6TH SENSE 3. Indicator Preheating 1.Glass ceramic hob 4. indicator DOOR LOCK 2.Control panel 5. icon STOP 3..Sliding grill rack 6. icon DURATION 4.DRIPPING pan 7.
- Page 28 1920 11 12 Description of the appliance 17 INCREASE TIME* button increases the cooking duration while the timer is running or while a set programme is Control panel underway (see Start-up and use). The control panel described in this manual is only a representative 18 DECREASE TIME* button decreases the cooking duration example: it may not exactly match the panelon your appliance.
-
Page 29: Installation,29
Installation Positioning and levelling Electrical connection The appliance may be installed alongside any Fitting the power supply cable cupboards whose height does not exceed that of the To open the terminal board: hob surface. • Insert a screwdriver into the side tabs of the Make sure that the wall which is in contact with the terminal board cover. - Page 30 • Secure the power supply cable by fastening the The cooker is fitted with a safety chain to be fixed by cable clamp screw then put the cover back on. means of a screw (not supplied with the cooker) to the wall behind the appliance, at the same height as Connecting the supply cable to the electricity mains the chain is attached to the appliance.
-
Page 31: Start-Up And Use,31
Start-up and use Setting the clock The temperature may be changed by turning the THERMOSTAT knob The clock may be set when the oven is switched 3. When the preheating indicator switches off off or when it is switched on, provided that the end and a buzzer sounds the preheating process is time of a cooking cycle has not been programmed complete: you may now place the food in the oven. - Page 32 Manual cooking modes All cooking modes have a default cooking temperature which may be adjusted manually to a value between 40°C and 250°C as desired. In the SPIT ROAST mode, the default power level value is 270°C. Funzione Funzione Descrizione USE AND CARE The rear heating element and the fan are switched on, thus guaranteeing the distribution of heat in a delicate and uniform manner throughout the entire oven.
- Page 33 Practical cooking advice Programming cooking Do not place racks in position 1 and 5 during fan-assisted A cooking mode must be selected before programming can take cooking. This is because excessive direct heat can burn place. temperature sensitive foods. Programming the cooking duration In the SPIT ROAST and ROASTING cooking modes, place the 1.
- Page 34 Oven cooking table advice Shelf (from Recipe Function Preheating Temp. (°C) Time (min) Accessories and notes bottom) MULTILEVEL 160 - 180 30 - 90 Cake tin on wire shelf Leavened cakes Shelf 3: cake tin on wire shelf MULTILEVEL 1 - 3 160 - 180 30 - 90 Shelf 1: cake tin on wire shelf...
- Page 35 Shelf 3: spit roast Pollo arrosto 1-1,3 Kg GRILL/SPIT ROAST 70 - 80 Shelf 1: drip tray with water Shelf 2: wire shelf Roast Beef al sangue ROASTING 200 - 210 35 - 50 Shelf 1: drip tray Drip tray / oven tray on wire shelf (turn Patate arrosto ROASTING 30 - 55...
- Page 36 Start-up and use - hob The glue applied on the gaskets leaves traces of grease power level, or towards the left to decrease the on the glass. Before using the appliance, we recommend power level. you remove these with a special non-abrasive cleaning The min/med/max buttons can also be pressed product.
- Page 37 3. Press the programming button. The indicator light Control panel lock corresponding to the selected zone will start flashing. When the hob is switched on, it is possible to lock the 4. Set the cooking duration using the buttons. oven controls in order to avoid accidental changes being made to the settings (by children, during cleaning, etc.).
- Page 38 Practical advice on using the appliance Safety switch The appliance has a safety switch which automatically Use cookware made from materials which are compatible switches the cooking zones off after they have been in with the induction principle (ferromagnetic material). We operation for a certain amount of time at a particular power especially recommend pans made from: cast iron, coated level.
- Page 39 Accessories Accessories To exit this mode, follow the procedure described above. The display will show the text DE and OF and the hob will For optimal EXTENSO TECHNOLOGY performance, we recommend the use of pans with an elliptical or be switched off. When it is next switched on, the hob will function normally.
- Page 40 Practical cooking advice Frying Pressure cooking Pressure cooker Grilling Boiling Crêpes Cooking on a high flame and browning (roasts, steaks, escalopes, fish fillets, fried eggs) Fast thickening (liquid juices) Boiling water (pasta, rice, vegetables) Milk Slow thickening (dense juices) Bain-marie cooking Pressure cooking after whistle Low-flame cooking (stews) Reheating dishes...
-
Page 41: Care And Maintenance,41
Care and maintenance 1. Remove the glass cover using a screwdriver. Switching the appliance off 2. Unscrew the light bulb and replace it with a similar one: Wattage 25 W, cap G9. Disconnect your appliance from the electricity supply Replace the glass cover, making sure the seal is before carrying out any work on it. - Page 42 Automatic cleaning using the • The icon indicates that the cleaning cycle PYROLYTIC cycle may be cancelled at any time by pressing the button. During the PYROLYTIC cycle, the internal • If a malfunction occurs, the heating elements will temperature of the oven reaches 500°C. The be switched off.
- Page 44 Indesit Company S.P.A. Viale Aristide Merloni,47 60044 Fabriano (AN) 03/2016-195136687.02 www.whirlp p p p p p p ool.com XEROX FABRIANO...