Mitsubishi Electric 800 Series Instruction Manual
600v class specification inverter
Hide thumbs
Also See for 800 Series:
- Instruction manual (727 pages) ,
- Instruction manual (function (534 pages) ,
- Manual (183 pages)
Advertisement
INVERTER
A800
FR-A860 (600V CLASS SPECIFICATION INVERTER)
INSTRUCTION MANUAL (STARTUP)
FR-A860-00027-00450-N6
FR-A860-00680-04420
Thank you for choosing this Mitsubishi Electric Inverter.
This Instruction Manual and the enclosed CD-ROM give handling information and precautions for use of this
product.
Do not use this product until you have a full knowledge of the equipment, safety information and instructions.
Please forward this Instruction Manual and the enclosed CD-ROM to the end user.
1
INVERTER INSTALLATION AND PRECAUTIONS ...................................................... 5
2
WIRING........................................................................................................................... 6
3
FAILSAFE SYSTEM WHICH USES THE INVERTER ................................................. 14
4
PRECAUTIONS FOR USE OF THE INVERTER ......................................................... 14
5
INVERTER FUNCTION SETTING................................................................................ 16
6
TROUBLESHOOTING ................................................................................................. 23
7
SPECIFICATIONS........................................................................................................ 25
─CONTENTS─
800
Advertisement

Related Manuals for Mitsubishi Electric 800 Series


Summary of Contents for Mitsubishi Electric 800 Series
-
Page 1: Table Of Contents
INSTRUCTION MANUAL (STARTUP) FR-A860-00027-00450-N6 FR-A860-00680-04420 Thank you for choosing this Mitsubishi Electric Inverter. This Instruction Manual and the enclosed CD-ROM give handling information and precautions for use of this product. Do not use this product until you have a full knowledge of the equipment, safety information and instructions. - Page 2 If halogen-based materials (fluorine, chlorine, bromine, iodine, etc.) Any person who is involved in wiring or inspection of this equipment shall infiltrate into a Mitsubishi Electric product, the product will be damaged. be fully competent to do the work.
- Page 3 Application of caution labels WARNING Caution labels are used to ensure safety during use of Mitsubishi Electric inverters. Usage Apply the following labels to the inverter if the "retry function" and/or Everyone must stay away from the equipment when the retry function is "automatic restart after instantaneous power failure"...
- Page 4 MEMO...
-
Page 5: Inverter Installation And Precautions
INVERTER INSTALLATION AND PRECAUTIONS Inverter model • FR-A860-00450 or lower FR - A8 0 00320 -1 -N6 Symbol Voltage class Symbol Description Circuit board coating UL Type 1 Symbol Plated conductor (conforming to IEC60721-3-3 3C2/3S2) certification 600 V class 00027 to 00450 Inverter SLD rated current (A) With Without... -
Page 6: Wiring
Terminal connection diagrams WIRING Terminal connection diagrams FR-A860-00320 Brake resistor ∗7,∗8 DC reactor ∗1 Brake resistor ∗8 DC reactor ∗1 Sink logic Main circuit terminal Control circuit terminal Jumper Earth Jumper (Ground) Earth (Ground) MCCB R/L1 Inrush current Three-phase Motor S/L2 limit circuit AC power T/L3... - Page 7 Main circuit terminals Main circuit terminals Terminal arrangement and wiring FR-A860-00027 to 00090 FR-A860-00170 FR-A860-00320 P/+ PR Jumper Jumper R1/L11 S1/L21 Jumper Jumper R1/L11 S1/L21 Jumper ∗1 Jumper R/L1 S/L2 T/L3 P/+ PR Jumper R/L1 S/L2 T/L3 Charge lamp R1/L11 S1/L21 R/L1 S/L2...
- Page 8 Main circuit terminals Wiring cover and handling (FR-A860-00450 or lower) • Removal of the wiring cover Remove the inverter front cover (lower side). (For the details on how to remove the front cover (lower side), refer to the Instruction Manual (Detailed).) Loosen the fixing screws, and remove the front lid of the wiring cover.
- Page 9 Main circuit terminals • Punching out the knockout holes Punch out the knockout holes by firmly tapping it with an object, such as a hammer. Remove any sharp edges and burrs from knockout holes of the wiring cover. For the FR-A860-00090 or lower using a provided brake resistor, punch out the knockout hole on the wiring cover for wiring the provided brake resistor. (For how to connect the provided brake resistor, refer to page 11.)
- Page 10 Main circuit terminals Total wiring length With general-purpose motor Connect one or more general-purpose motors within the total wiring length shown in the following table. (The wiring length should be 100 m or less under vector control.) • When fast response current limit is enabled (Pr.156 = "0, 2, 4, 6, 8, 10, 12, 14, 16, 18, 20, 22, 24, 26, 28, or 30"), the wiring length should be within the value in the table below.
- Page 11 Main circuit terminals Connection of the provided brake resistor (FR-A860-00090 or lower) Connecting the brake resistor provided with the unit to the FR-A860-00090 or lower will improve regeneration capability. • Installation procedure Remove the wiring cover of the inverter, and punch out the knockout hole on the wiring cover for wiring the provided brake resistor. After making the knockout hole, reinstall the wiring cover of the inverter.
- Page 12 Control circuit terminal Control circuit terminal Terminal layout ∗1 1 F/C +24 SD So SOC S1 S2 PC Recommended cable gauge: 0.3 to 0.75 mm 5 10E 10 SE SE SU IPF OL FU PC RL RM RH RT AU STP MRS RES SD SD STF STR JOG...
- Page 13 Control circuit terminal • Wire removal Pull the wire while pushing the open/close button all the way down firmly with a flathead screwdriver. Open/close button Flathead screwdriver NOTE • When using stranded wires without a blade terminal, twist enough to avoid short circuit with a nearby terminals or wires. •...
-
Page 14: Failsafe System Which Uses The Inverter
When a fault is detected by the protective function, the protective function is activated and output a Fault (ALM) signal. However, a fault signal may not be output at an inverter's fault occurrence when the detection circuit or output circuit fails, etc. Although Mitsubishi Electric assures the best quality products, provide an interlock which uses inverter status output signals to prevent accidents such as damage to the machine when the inverter fails for some reason. - Page 15 • Electrical corrosion of the bearing When a motor is driven by the inverter, axial voltage is generated on the motor bearing, which may cause electrical corrosion of the bearing in rare cases depending on: condition of the grease used for the bearing, wiring, load, operating conditions of the motor, or specific inverter settings (high carrier frequency).
-
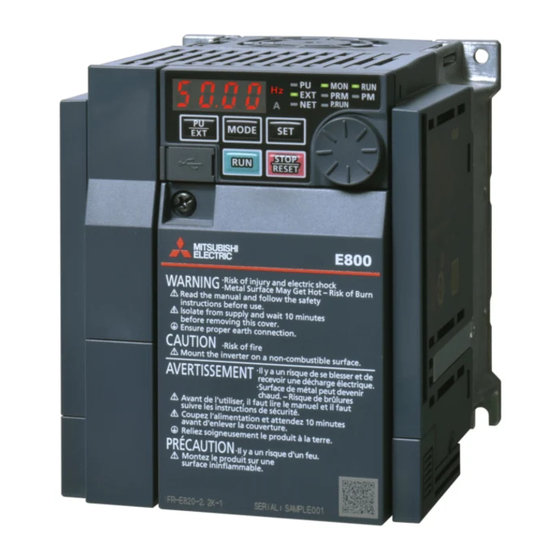
Page 16: Inverter Function Setting
Operation panel (FR-LU08) INVERTER FUNCTION SETTING Operation panel (FR-LU08) The operation panel can be used for setting the inverter parameters, monitoring various items, and checking fault indications. Removal and installation of the accessory cover • Loosen the two fixing screws on the accessory cover. •... - Page 17 Parameter list Parameter list For simple variable-speed operation of the inverter, the initial values of the parameters may be used as they are. Set the necessary parameters to meet the load and operational specifications. Parameter setting, change and check can be performed from the operation panel. Setting Initial Setting...
- Page 18 Parameter list Setting Initial Setting Initial Setting Initial Name Name Name range value range value range value PID upper limit 0 to 100%, 9999 9999 RH terminal function Middle-speed setting 0 to 400% 100% selection minimum current PID lower limit 0 to 100%, 9999 9999 RT terminal function Current averaging...
- Page 19 Parameter list Setting Initial Setting Initial Setting Initial Name Name Name range value range value range value Communication startup In-position width 0 to 32767 pulse 100 pulse Ninth target position 0 to 2, 10, 12 mode selection lower 4 digits 0 to 400K pulse, Excessive level error 40K pulse...
- Page 20 Parameter list Setting Initial Setting Initial Setting Initial Name Name Name range value range value range value Output interruption Increased magnetic Pre-charge fault 0 to 590Hz excitation current level 0 to 300% 100% 0, 1 detection level selection Output interruption Control circuit Pre-charge ending level 0 to 100%, 9999 9999...
- Page 21 Parameter list Setting Initial Setting Initial Setting Initial Name Name Name range value range value range value Torque control integral Energy saving monitor Rated 101 to 131, 0.1 to 55kW 0 to 500ms, 9999 9999 time 2 reference (motor inverter 201 to 229, 0 to 3600kW...
- Page 22 Parameter list Setting Initial Setting Initial Setting Initial Name Name Name range value range value range value Speed control integral Sixth positioning Travel distance after 1115 0 to 9998ms 1242 0.01 to 360s term clear time acceleration time 1287 proximity dog ON lower 0 to 9999 2048 4 digits...
-
Page 23: Troubleshooting
Reset method for the protective functions TROUBLESHOOTING When a fault occurs in the inverter, the protective function is activated, and the operation panel display automatically changes to one of the fault or alarm indications on page If the fault does not correspond to any of the following faults or if you have any other problem, please contact your sales representative. •... - Page 24 List of fault displays List of fault displays Abbreviation Name Abbreviation Name E.IOH Inrush current limit circuit fault LOCD Password locked E.SER Communication fault (inverter) Er1 to Er4 Parameter write error E.AIE Analog input fault E.OS Overspeed occurrence rE1 to rE8 Copy operation error E.OSD Speed deviation excess detection...
-
Page 25: Specifications
Rating SPECIFICATIONS Rating FR-A860-00450 or lower Model FR-A860-[ ]-N6 00027 00061 00090 00170 00320 00450 Inverter capacity (kW) 0.75 15.0 22.0 11.0 22.0 30.0 1.12 18.5 30.0 Applicable motor capacity (kW) ND (initial setting) 0.75 15.0 22.0 11.0 18.5 17.0 32.0... - Page 26 Rating FR-A860-00680 or higher Model FR-A860-[ ] 00680 01080 01440 01670 02430 02890 03360 04420 Inverter capacity (kW) 37.0 55.0 75.0 90.0 110.0 132.0 185.0 220.0 45.0 75.0 110.0 110.0 185.0 220.0 260.0 335.0 45.0 75.0 90.0 110.0 150.0 185.0 220.0 300.0...
- Page 27 Outline dimensions Outline dimensions FR-A860-00027 to 02430 FR-A860-02890 to 04420 3-φC 2-φC (Unit: mm) Inverter model FR-A860-00027 FR-A860-00061 FR-A860-00090 FR-A860-00170 FR-A860-00320 FR-A860-00450 517.3 FR-A860-00680 FR-A860-01080 FR-A860-01440 FR-A860-01670 FR-A860-02430 FR-A860-02890 FR-A860-03360 1010 FR-A860-04420 When a provided brake resistor is used (FR-A860-00090 or lower) (Unit: mm) SPECIFICATIONS...
- Page 28 Appendix Appendix 1 Instructions for UL and cUL (Standard to comply with: UL 508C, CSA C22.2 No.274-13) General precaution CAUTION - Risk of Electric Shock - The bus capacitor discharge time is 10 minutes. Before starting wiring or inspection, switch power off, wait for more than 10 minutes, and check for residual voltage between terminal P/+ and N/- with a meter etc., to avoid a hazard of electrical shock.
- Page 29 Appendix 2 Restricted Use of Hazardous Substances in Electronic and Electrical Products The mark of restricted use of hazardous substances in electronic and electrical products is applied to the product as follows based on the “Management Methods for the Restriction of the Use of Hazardous Substances in Electrical and Electronic Products” of the People's Republic of China. 电器电子产品有害物质限制使用标识要求...
- Page 30 MEMO...
- Page 31 MEMO...
- Page 32 MEMO...
- Page 33 4. Exclusion of loss in opportunity and secondary loss from warranty liability Regardless of the gratis warranty term, Mitsubishi Electric shall not be liable for compensation to: Damages caused by any cause found not to be the responsibility of Mitsubishi Electric.
- Page 34 • The copyright and other rights of the enclosed CD-ROM all belong to Mitsubishi Electric Corporation. • No part of the enclosed CD-ROM may be copied or reproduced without the permission of Mitsubishi Electric Corporation. • Specifications of the enclosed CD-ROM are subject to change for modification without notice.
- Page 35 REVISIONS *The manual number is given on the bottom left of the back cover. Revision Date *Manual Number Revision Nov. 2014 IB-0600562ENG-A First edition Jan. 2015 IB-0600562ENG-B Addition • FR-A860-00027 to 00170 May 2015 IB-0600562ENG-C Addition • Location change of earth (ground) terminals for the FR-A860-00027 to 00170 Oct.
- Page 36 FR-A800 Series Instruction Manual Supplement Support for CC-Link IE TSN Using the plug-in option FR-A8NCG enables CC-Link IE TSN communication. For the details, refer to the FR-A8NCG Instruction Manual. Main circuit capacitor residual-life estimation function Even when the power supply cannot be turned OFF, the remaining life of the main circuit capacitor can be estimated without stopping the operation.
- Page 37 • The Life alarm (Y90) signal turns ON when either the control circuit capacitor life, main circuit capacitor life, cooling fan life, inrush current limit circuit life, internal air circulation fan life or the estimated residual life of the main circuit capacitor reaches the level set to output the life alarm.
- Page 38 FR-A800 Series Instruction Manual Supplement Direct multi-speed operation When the RLF (RLR) signal is input, the operation is the same as the one when the STF (STR) signal and RL signal are input. Input terminal function assignment • Use Pr.178 to Pr.189 to set the functions of the input terminals. •...
- Page 39 Vector control for PM motor with encoder supported When the FR-A8AL or FR-A8TP is installed, the PM motor with an encoder, as well as the induction motor with an encoder, can be driven under vector control. (For the setting of vector control for an induction motor, refer to the Instruction Manual (Detailed) of the inverter).
- Page 40 Vector control for PM motor with encoder Pr.80 (Pr.453), Pr.71 Pr.800 Pr.451 Control method Control mode Remarks Pr.81 (Pr.450) setting setting (Pr.454) 0, 100 Speed control ― 3, 103 Position control ― Speed control/position MC signal: ON Position control Vector control 4, 104 ...
- Page 41 NOTE • If the offline auto tuning is started before the encoder position tuning for a PM motor is finished (Pr.1105 (Pr.887) = "65535"), the protective function (E.MP) is activated. Encoder position tuning Vector Vector Vector Encoder position tuning is required when a PM motor with an encoder is driven. The measured offset value between the motor home magnetic pole position and the encoder home position is stored.
- Page 42 • The displays/indicator on the operation panel (FR-DU08), the parameter unit (FR-PU07), and the LCD operation panel (FR- LU08) will change as shown below. Operation panel (FR-DU08) display/ Status Parameter unit (FR-PU07) display LCD operation panel (FR-LU08) display indicator AutoTune 12:34 READ:List TUNE...
- Page 43 • Setting "10 to 17" in Pr.73 Analog input selection enables the polarity reversible operation of the main speed command to which PID manipulated amount added. (Polarity reversible operation of the main speed command without addition is not possible.) • When the polarity reversible operation is enabled, the integral term cannot be limited by the maximum and minimum frequency when Pr.1015 Integral stop selection at limited frequency = "0 or 10".
- Page 44 Monitoring I/O terminals on the operation panel (FR-DU08) (Pr.52, Pr.774 to Pr.776, Pr.992) • When Pr.52 (Pr.774 to Pr.776, Pr.992) = "55", the I/O terminal state can be monitored on the operation panel (FR-DU08). • When a terminal is ON, the corresponding LED segment is ON. The center LED segments are always ON. Pr.52, Pr.774 to Pr.776, Monitor item Monitor description...
- Page 45 • The deterioration degree of the main circuit capacitor is displayed in Pr.258. • With the main circuit capacitor capacity at factory shipment as 100%, the capacitor life is displayed in Pr.258 every time measurement is made. When the measured value falls to 85% or lower, bit 1 of Pr.255 is turned ON (set to 1) and the Y90 signal is also output as an alert.
- Page 46 Load characteristics fault detection This section describes how to set the load characteristics reference for the existing load characteristics fault detection function. The following shows the procedure to set the load characteristics reference manually. Initial Setting Name Description value range 1481 Load characteristics load reference 1 9999...
- Page 47 FR-A800 Series Instruction Manual Supplement Cooling fan operation selection during the test operation The cooling fan can be stopped during Vector control test operation or PM sensorless vector control test operation. Initial Setting Name Description value range Cooling fan ON/OFF control is disabled. (The cooling fan is always ON at power ON) The cooling fan operates at power ON.
- Page 48 Inverter parts life display The degree of deterioration of the control circuit capacitor, main circuit capacitor, cooling fan, inrush current limit circuit, and relay contacts of terminals A, B, and C can be diagnosed on the monitor. When the life span of each part is near its end, the self-diagnostic warning is output to prevent a fault.
- Page 49 • The Life alarm (Y90) signal turns ON when the life alarm output level is reached for either of the following: the control circuit capacitor life, main circuit capacitor life, cooling fan life, inrush current limit circuit life, internal air circulation fan life, estimated residual-life of the main circuit capacitor, ABC1 relay contact life, or ABC2 relay contact life.
- Page 50 DriveControl writing restriction selection (P.N242) • The command source to change the DriveControl settings can be restricted to only the command source selected by Pr.550 NET mode operation command source selection. Setting value Description Communication reset Ready bit status selection selection Reset DriveControl...
- Page 51 GR-18542 Piraeus SE- 223 55 Lund Phone: +30 (0)211 / 1206-900 Phone: +46 (0) 8 625 10 00 Fax: +30 (0)211 / 1206-999 Mitsubishi Electric Turkey Elektrik Ürünleri A.Ş. TURKEY MELTRADE Kft. HUNGARY Fabrika Otomasyonu Merkezi Fertő utca 14. Şerifali Mahallesi Nutuk Sokak No.5 HU-1107 Budapest TR-34775 Ümraniye-İSTANBUL...