
Related Manuals for WEEDO TINA 2


Summary of Contents for WEEDO TINA 2
- Page 1 JIANGSU WIIBOOX TECHNOLOGY CO.,LTD 3D PRINTER TINA 2 USER MANUAL ◆ This user manual is for standard TINA 2. ◆ Because of software or hardware upgrades and model differences, new revisions may not be listed in this guide.
-
Page 2: Table Of Contents
Content 1.Application Notices....................................1 1.1. About the User Manual................................1 1.2. Safety Precautions..................................1 1.3. 3D printing Filament..................................2 1.4. Environment requirements.................................2 2. Product Appearance and Introduction..............................3 3.Specification......................................4 4. Unboxing......................................4 5. Accessory List...................................... 5 6.Operation Introduction...................................6 6.1 Connect Power Supply................................6 6.2 Loading Filament..................................6 6.3 Start Printing Test.................................. -
Page 3: Application Notices
1.Application Notices 1.1. About the User Manual This User Manual contains important information on the installation, use, maintenance and other questions frequently raised up about the 3D printer. Please read this user guide carefully before using this 3D printer. For damages to the 3D printer and other losses caused by the violation of safety precautions and operational processes given in this User Guide, the user should take all the responsibilities. -
Page 4: Printing Filament
The input voltage of the 3D printer is 100-220V. Please feel free to use it in or outside the mainland China. If unexpected power outages are frequent in your area, please equip the 3D printer with UPS power. 1.3. 3D printing Filament Please use the printing filament provided by our company for this printer. -
Page 5: Product Appearance And Introduction
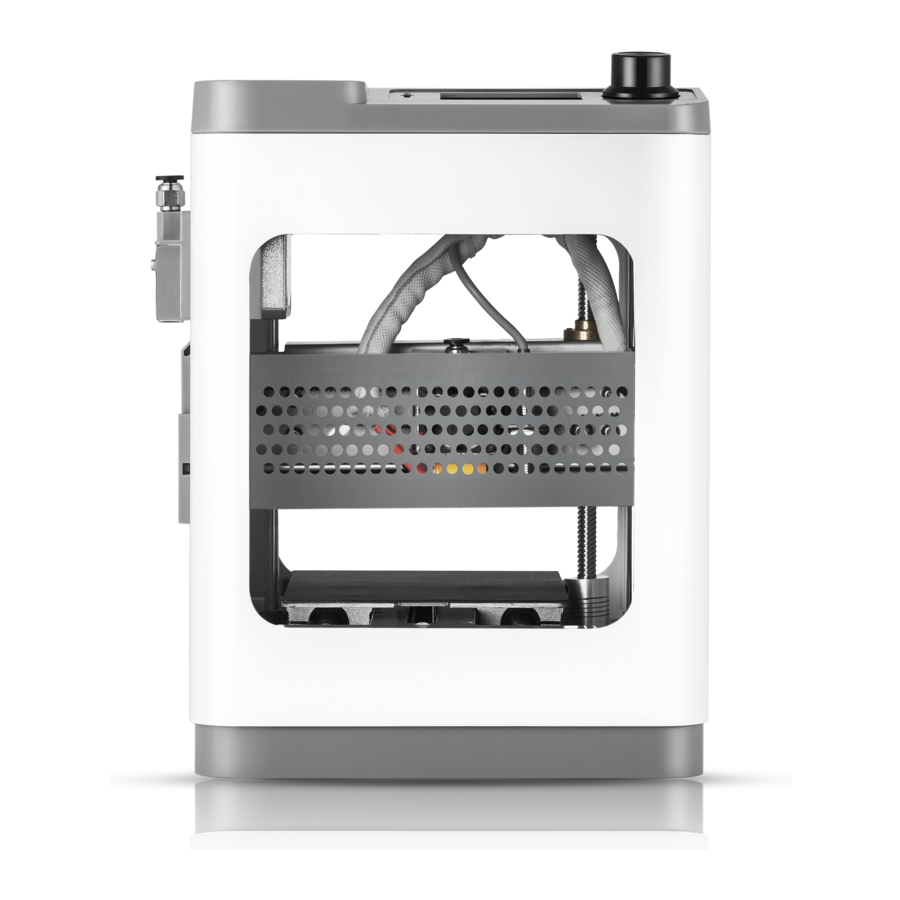
Product Appearance and Introduction Operation Knob 2. LCD Screen 3. Extruder Filament Holder 5. Printing Platform... -
Page 6: Specification
3.Specification Product Size 215*200*270mm Product Weight 3kgs Printing Technology Filament PLA,PLA Pro Filament Diameter 1.75mm Nozzle Diameter 0.4mm Build Volume 100*105*100mm Printing Software Willbuilder/Cura Printing Accuracy 0.1-0.4mm Model File STL/OBJ/G-code Printing Method TF card/Wi-Fi/W Lan Leveling Method Auto-Leveling 4. Unboxing 1) Before using the printer,please remove the fixing clip between the printing extruder and the printing platform.If the fixing material is not removed, turning on the printer may cause damage to the machine. -
Page 7: Accessory List
5. Accessory List USB Cable Power Adaptor Power Cable Glue Platform sticker Hex wrench(1.5mm, 2.0mm, 2.5mm) Phillips Screwdriver Wrench M6 Nozzle TF Card TF Card Reader Filament... -
Page 8: Operation Introduction
6.Operation Introduction 6.1 Connect Power Supply (1) Take out the power cord and transformer from the accessory box. (2) Connect the power supply to the printer as below photo. 6.2 Loading Filament (1) Insert one end of the “guide tube” into the pneumatic connector of the extruder at the right side of the printer. - Page 9 (2)Take out the filament from the box. (3)Cut 5mm and make it straight, then insert it into the guide tube from the bottom side of the extruder.
-
Page 10: Start Printing Test
6.3 Start Printing Test (1) Take out the TF card from accessory box and insert it into the slot on the left side of the display screen. (2) Connect the power and open the power switch. (3)After above 2 steps, the “Info screen”shown in the right figures appears on the screen. -Display the main interface after booting -Click the knob, turn the knob clockwise to select “prepare”... - Page 11 -Turn the knob clockwise and click on “Auto feed filament” -The nozzle starts to heat, when the temperature reaches to 200 ℃,there will be with Beep,it begins to load filaments. When Feed Filament finishes, select Continue to enter into main interface. Note:Before printing,make sure to place a magnetic sticker on the platform.
- Page 12 -After finish the printing, take off the magnetic sticker then pick the model off. Notes: (1)Make sure that the magnetic sticker is placed horizontally on the platform before printing starts. (2)It is recommended that the printer being used at room temperature.When the adhesiveness of the platform is insufficient, apply glue on the printing area of the platform, or replace it with a new magnetic sticker.
-
Page 13: Introduction Of Interface
7.Introduction of Interface There are 4 menus on the 2.4” LCD screen:”Info Screen”,”Prepare”,”Control”,”Print from SD” The menu tree of the operation panel is shown in the following figure. The menu is divided into three layers (menu structure may be adjusted due to firmware upgrade). The left-most menu is the start menu, and the right-hand menu is its sub-menu. Rotate the button clockwise and click the button to enter the sub-menu of a menu item. -
Page 15: Common Operation On Interface
7.1 Common operation on Interface 7.1.1 Print from SD In the Start Menu, select Item 4 "Print from SD" and enter the SD Card File List. This list has the g-code format files in SD card root directory in reverse chronological order. Use the up and down keys to select the file to be printed, and then press OK to start printing. -
Page 16: Printer Function In Prepare
7.1.2 Printer Function in Prepare 7.1.2.1 Change Filament In the Start menu, select item 2, "Prepare". Rotate the button and click on the "Auto Retract Filament" program. The nozzle is heated to a predetermined temperature, and then the motor of the nozzle starts to retreat. Next, select item 2 "Prepare"... - Page 17 7.1.2.2 Move Axis In the Start menu, select item 2, "Prepare". Rotate the button and click on "Move Axis". Enter the printer touch debugging interface. The debugging interface is included X axis, Y axis and Z axis and Extruder respectively. When you want the x\y\z axis go to the position you want, you can use ‘move axis’...
- Page 18 7.1.2.3 Auto home In the start menu, select item 2 "Prepare". Rotate the button and click "Auto home". The printer nozzle and platform will automatically return to the origin. In this mode you can check whether each axis is working correctly.
- Page 19 7.1.2.4 Level Bed Click “Prepare” choose “Level bed”, the 3D printer will level the bed automatically. In this mode you can check whether the ‘level bed’ function work correctly. If this function work incorrectly, you can check whether you put the magnetic sticker on the platform, if there is no magnetic sticker on the platform the level bed function will invalid.
-
Page 20: 3Printer Function In Control
7.1.2.5 Disable Steppers When you are using ‘move axis’ or ’auto home’ all the axis are locked , you can not move each axis by hand immediately. you can click “Disable steppers”, therefore, each axis will be in the free station. To be mentioned, it will be the station of unlocked after a few minutes with no operating. - Page 21 7.1.3.2 Z Offset Setting Z Offset Setting is for users to adjust the distance between Nozzle and Platform. all switch is in correct position. Under the situation of nozzle and h When the distance between nozzle and platform is small, please adjust the figure to bigger; When the distance between nozzle and platform is bigger, please adjust the figure to smaller.
- Page 22 7.1.3.3 Wi-Fi Network Choose “Control” --”Wi-Fi Network” ,there are 4 items: “Show IP” ,”Wi-Fi Device Info”, “Connect to Wi-Fi” and “Wi-Fi OTA Update”. Choose “Show IP”, the IP of the Net will be shown. Choose ”Wi-Fi Device Info” to show the information of the Wi-Fi Device and connecting status. Choose “Connect to Wi-Fi”, open APP, go to Wi-Fi setting,input Wi-Fi password to connect the Wi-Fi.
- Page 23 ”Wi-Fi OTA Update” : When there is update Wi-Fi firmware, users can update it online. Currently, the firmware version is 2.7,when there is a new version you can use ota update function. 7.1.3.4 Language There are 11languages include English/Chinese /French/German/Spanish/Italian/Japanese/Portugal/Dutch/Turkish/Korean in the machine, you can choose the language you need.
- Page 24 7.1.3.5 Machine Info This shows the basic information of the machine. 7.1.3.6 Restore Default There is no need to choose to this function normally. After you update with our new firmware, you need to click ‘Restore Default’, and then restart the printer.
-
Page 25: Parameter Setting During Printing
7.2 Parameter setting during printing 7.2.1 Pause print/Stop print In the state of file printing, you can click the rotary button to enter the Print Screen, and the rotary button can choose "Pause print" or "Stop print". Pause Print After pausing printing, you can click the button to select "Pause print" to resume printing. - Page 26 Click the button, enter into below interface, select “Resume Print”,operating as guide as below pictures: Stop Print During the printing process, click the button, “Stop Print” selection will be appeared.Click it, the printing will be stopped.
-
Page 27: Adjust Temperature Of Nozzle
7.2.2 Adjust temperature of nozzle In the state of document printing, you can click the rotary button to enter the Print Screen, rotate the rotary button and click the button to select "Tune", "Nozzle" and enter the temperature reset interface of the print nozzle. The rotary button can increase or decrease the temperature. -
Page 28: How To Change Filament When Printing
Rotate the rotary knob to adjust the temperature, click the button to confirm, the the nozzle temperature is adjusted. 7.2.4 How to change filament when printing In the state of document printing, you can change filament when you need different color of filament, or in case the material will used up. -
Page 30: Saving Print And Off
7.2.5 Saving print and off The function ”Saving print and off” is means you can click “save printing and off” when you are printing, after this you can turn off the machine. The printing will be saved, therefore next time when you turn on the printer, you can resume the printing. -
Page 31: Software
8.Software Software Instruction Wiibuilder is a host computer software for 3D printers, which can be sliced to Wiibuilder2.0.6.0.exe generate files for offline printing, online printing, 3D model editing, and management of 3D printers. Wiibuilder uses a multi-thread slicing engine, including user interface and professional interface. System requirement for Wiibuilder CPU:Above Pentium 1GHz Memory:Above 1G... - Page 32 (1) Run the software installation package, Wiibuilder in the installation wizard window, click "next"-"next"-"Install"- "finish". In the selection installation path window, use the default path of the program.
- Page 33 (2) Select Printer model Our company 3D printer models are stored in the software configuration file. Users choose the corresponding models according to the products they buy. The direct printing files produced by the software are matched with the specific models. So, choosing the right model is related to whether the printing can be done properly.
- Page 34 Slicing setting...
- Page 35 (1) You can choose different printing profile: very fast, fast , normal, high quality, Ulti quality, if you choose fast profile, the printing precision will worse than normal and high quality profile. We recommend you use normal and high-quality profile. (2) Support: depend on your model, if there are some hanging on your model, make sure use support everywhere.
- Page 36 (5) Infill density: if you have no strength requirement, 10-20% will be ok, however if you are focus on strength, you can make the density higher-40-60% (6) Printing temperature: 200℃ (7) Adhesion: please use Raft model For advanced slicing setting You can set more parameters, however this parameters often do not need to be changed.
- Page 37 If you want know more about the advanced function, please see the instruction of software in TF card. (5) Print via W Lan Tina2 can print via W Lan, it means after you slice the printing file. You can send the printing file to the machine in the software.
-
Page 38: App Printing Introduction
9. APP Printing Introduction Step 1: Copy the APP and install to your Pad or phone(for Step 2:When you first use the APP,you will Step 2:When you first use the APP,you Step 1: Copy the APP and install to your Pad or Android ) see the tutorial,and know how to connect to will see the tutorial,and know how to... - Page 39 Step 5:The main Step 5:The main Step 4: Add your printer Step 4: Add your printer interface of APP interface of APP (5) Setting the printer name (1) Setting the printer name displays cloud displays cloud (6) Enter the device IP address (2) Enter the device IP address model files for model files for...
- Page 40 Filament in and filament out. you have several printers, you can add new one and set one as active printer To know more about our product, you can go to our wiki website: http://weedo.ltd/weedoltd/wiki/doku.php Website: www.weedo.ltd Email: salesservice@wiibooxtech.com...
- Page 41 Facebook Instagram Twitter...
Need help?
Do you have a question about the TINA 2 and is the answer not in the manual?
Questions and answers