Advertisement
Advertisement
Table of Contents

Related Manuals for Huananzhi X79 DUAL-4D


Summary of Contents for Huananzhi X79 DUAL-4D
- Page 2 1 x M.2 PCI-E协议接口 1 x 音频接口...
- Page 3 图1-2 整体后置I/O面板展示 M.2接口...
- Page 4 8.8. 8.8. 8.8. 8.8.
- Page 5 8.8. 从螺丝底座上移除螺丝 拧紧旋入长度M.2模块到M.2 接口距离孔的螺丝底座 30 ° 将您的M.2模块以30度角插 入到M.2接口 将螺丝放在您M.2模块的 后缘缺口上并拧紧到螺丝 底座 图2 -8 M.2接口安装...
- Page 6 8.8.
- Page 7 以便电脑正常工作或执行特定的功能。CMOS SETUP会 将各项数据储存在主板上内见的CMOS SRAM中。当电源关 闭时,由主板上的电池继续为CMOS SRAM供电。电源开启 后,当BIOS开始进行POST(Power On Self Test开机自检)时 ,按下“Delete”键便可--AMI BIOS的CMOS SETUP主画面 中。主板热启动键“F7”。...
-
Page 8: Safety Precautions
If you need any assistance in the process of installation, please contact our after-sales customer service or reach us on ..............BIOS Settings HUANANZHI official WeChat for professional technical support. Prior to installation or disassembly, please switch off the power and unplug the computer. -
Page 9: Brief Introduction
Supporting 7.1 soundtrack HI-FI audio input/output(ALC887) possible. Providing audio input/microphone/front speaker/rear speaker and side speaker output port 1.1*HUANANZHI X79 Dual-8D motherboard Audio output: this is the front speaker output port that stereo speakers or earphones can be plugged into 2.2*SATA data cable Onboard NIC: Motherboard has internal RTL8111E network 3.1*Driver disk... -
Page 10: Rear I/O Panel
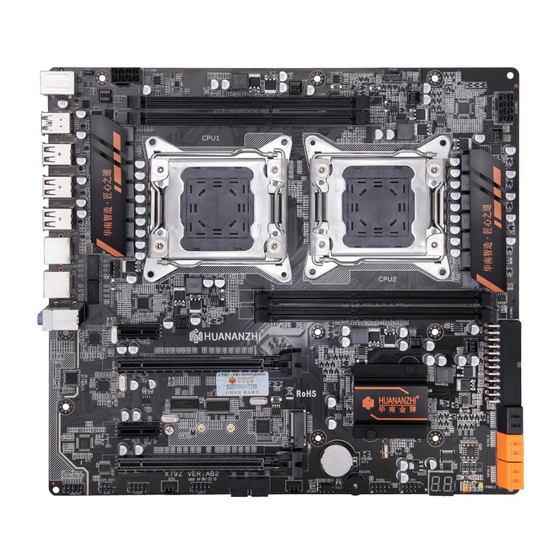
MOTHER BOARD IMAGE Rear I/O Panel Audio Port Notice: This motherboard is HUANANZHI X79 dual-4d Motherboard,which needs to be connected to two 8P CPU independent power supply interfaces CPU Fan Interface CPU-PWRI PS/2 CPU-PWRI USB3.0 1-2 Overall Rear I/O Panel Display USB2.0... -
Page 11: Installation And Settings
Installation And Settings NOTICE please check the motherboard where all pins marked with number “1” or white bold line are position “1”. 2-4 PCI Expansion Slot 2-1 Clear CMOS Jumper CLR-CMOS 8.8. PWR_LED-VCC PWR_LED-VCC HDD_LED-VCC PWR_LED-VCC RESET PWR_SW RESET PWR_SW 8.8. -
Page 12: Memory Installation
1.Pull the clips on both ends of the memory slot outward, and the memory strip corresponds to the protruding posi- tion of the slot to determine the direc- tion of installation. 2.Align the memory module into the slot and press 3.Let the snaps on both ends of the slot 8.8. -
Page 13: Installation Finished
computer. The system will automatically search for devices. Installation finished. 3.Directx11 driver installation Run driver disk: /Tools/Driverx11/DXSETUP, click on "I 8.8. accept"and then "next" to continue. Click on "finished" and restart computer. The system will automatically search for devices. Installation finished. 2 -11 SATA Interface 4.Audio driver installation Drivers installation... -
Page 14: Bios Settings
add/remove"so thatthe driver will be automatically removed.。 Menu: please pay attention to every option in the settings 5.Driver installation of external video card menu. When there is a triangle shaped symbol on the left side of menu, it means that you choose this sub-menu,so a pop-up Run "driver disk", take Setup.exe, sub-menu will be available.
Need help?
Do you have a question about the X79 DUAL-4D and is the answer not in the manual?
Questions and answers