Table of Contents
Advertisement
Quick Links
Advertisement
Table of Contents

Related Manuals for Huananzhi X99-F8 GAMING


Summary of Contents for Huananzhi X99-F8 GAMING
- Page 1 MOTHERBOARD SZ HUANAN SANXIAN TECHNOLOGY CO.,LTD. WWW.HUANANZHI.COM...
-
Page 2: Table Of Contents
If you need any assistance in the process of installation, please contact our after-sales customer service or reach us on ..............BIOS Settings HUANANZHI official E-mail:bussiness@huananzhi.com for professional technical support. Prior to installation or disassembly, please switch off the power and pull the power cable from the socket. -
Page 3: Packing
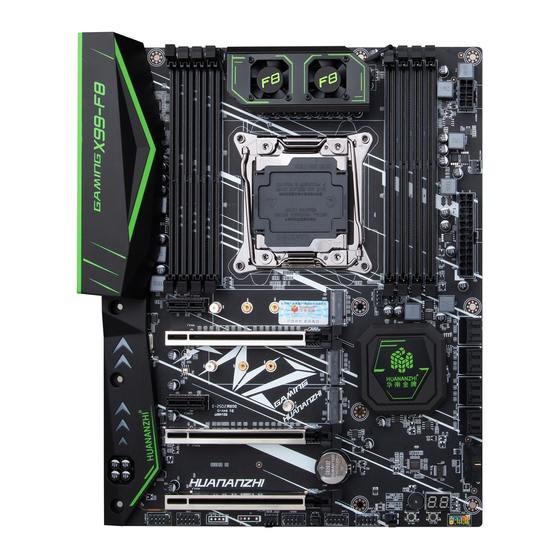
Expansion slot: 2 x PCIe 3.0 x16 possible. 1 x PCIe 3.0x4 2 x PCIe 2.0 x1 1.1*HUANANZHI X99-F8 Motherboard 1 x M.2 NVME PCIe 3.0X4 (key M)2242/2260/2280 2.2*SATA data cable 1 x M.2 NVME PCIe 2.0X4 (key M)2242/2260/2280 3.1*I/O shield back plat 4.1* User manual... -
Page 4: Motherboard Diagram
Rear I/O Panel MOTHER BOARD IMAGE PS/2 USB2.0 DDR4*8Slot USB3.0 Audio Port USB2.0 8Pin CPU Power Supply 3Pin Fan Interface 1-2 Overall Rear I/O Panel Display 24Pin Power Supply M.2 NVME Interface Connection/Work Light Speed Signal 3Pin Fan Interface PCI-E X 1 Interface Status Description Status... -
Page 5: Installation And Settings
PCIEx1 Installation And Settings PCIEx16 NOTICE ! please check the motherboard where all pins marked with PCIEx1 number “1” or white bold line are position “1” . PCIEx16 PCIEx4 2-4 PCI Expansion Slot 2-1 Clear CMOS Jumper CLR-CMOS RESET PWR_SW PWR_SW RESET HDD_LED-... - Page 6 1. Pul l t he c lip s o n bo t h ends of t he memory slot outward, and the memory strip corresponds to the protruding posi - tion of the slot to determine the direction of installation. 2.Align the memory module into the slot and press 3.Let the snaps on both ends of the slot...
-
Page 7: Drivers Installation
Option: Propertyl - Update driverl - Not connect to Internet - Manually installation Find the corresponding directory Select "Next step" 3.Audio driver installation SATA3.0 Before this installation, please check the model of the audio chip on the motherboard first(you may refer to this manual), Select the proper driver accordingly for installa- tion. -
Page 8: Bios Settings
Menu: please pay attention to every option in the settings Click on "next"- "yes” menu. When there is a triangle shaped symbol on the left side -"next" of menu, it means that you choose this sub-menu,so a pop-up -"next"and"finished"h sub-menu will be available. The system will automatically search for devices to complete the installation 1.Main Menu Function...
Need help?
Do you have a question about the X99-F8 GAMING and is the answer not in the manual?
Questions and answers