Table of Contents
Advertisement
Advertisement
Table of Contents

Related Manuals for Synthes Expert Tibial Nail


Summary of Contents for Synthes Expert Tibial Nail
- Page 1 Expert Tibial Nail. Technique Guide Expert Nailing System...
- Page 3 For detailed information please refer to “Reprocessing, This description is not sufficient for immediate application of the instrumentation. Instruction by a surgeon experienced in Care and Maintenance of Synthes Instruments”, Article No. 035.000.090. handling this instrumentation is highly recommended. Synthes...
- Page 4 Expert Tibial Nail Advanced solutions Advanced proximal locking options: – Two state of the art medio-lateral – Three unique and innovative locking (ML) locking options enable primary options, in combination with can cel- compression or secondary controlled lous bone locking screws, increase...
- Page 5 18 mm – 80 mm locking screw pick-up. – 5.0 mm for 10 mm to 13 mm tibial nails, Stardrive ® lengths: 26 mm – 100 mm * Titanium-6% aluminum-7% niobium Synthes...
- Page 6 All of the implants are made of titanium alloy (TAN*). Anatomic Reduction The Expert Tibial Nail is designed to fit anatomically in the medullary canal, allowing indirect reduction of proximal, distal and shaft fractures of the tibia. Stable Fixation...
- Page 7 (not shown in the illustra- tions): – 41-C1/C2 – 43-C1/C2 Note: The use of a cannulated Expert Tibial Nail with a large diameter offering more stability associated with the reamed technique is generally recommended for pseudarthroses, tumours, mal-unions and non-unions.
- Page 8 The use of four distal locking screws is sometimes necessary to achieve stabilization of the distal fragment. In many cases though, three locking screws placed in the most distal locking options are sufficient to stabilize the distal fragment. Synthes Expert Tibial Nail...
- Page 9 (3 weeks after surgery) preoperative postoperative follow-up (1 month after surgery) preoperative postoperative follow-up (4 months after surgery) Synthes...
- Page 10 Use the AO ASIF Preoperative Planner Template for the EXPERT Tibial Nail Expert Tibial Nail to estimate nail diameter and nail length. To for Ø 8, 9, 10, 11, 12, 13 mm nails estimate nail diameter, place the template on the AP or...
- Page 11 Optionally, the procedure can be performed on a fracture table with the leg placed in traction. Note: The knee roller can be placed under the lower part of the thigh if it obstructs the view of the tibia plateau in AP view. Synthes...
- Page 12 Pinless Fixator (186.310) may be appropriate in certain circumstances. Note: The reduction can be temporarily fixed with reduction clamps. In epiphyseal fractures the condyles or the pilon tibiale are fixed first in order to enable the nail insertion. Synthes Expert Tibial Nail...
- Page 13 Note: Compression or dynaminization must be taken into account when determining the nail length. A shorter nail should be chosen when active compression is planned for the procedure. The dynamic locking option allows for 7 mm of travel. Synthes...
- Page 14 Mobilise the infrapatellar corpus adiposum laterally and dor- sally without opening the synovia. A free access of the nail to the insertion point must be guaranteed. Prepare the entry site of the nail on the ventral edge of the tibial plateau. Synthes Expert Tibial Nail...
- Page 15 In AP view the entry point is in line with the axis of the intra- medullary canal and with the lateral tubercle of the inter- condylar eminence. In lateral view the entry point is at the ventral edge of the tibial plateau. Synthes...
- Page 16 Secure the guide wire in the universal chuck. Slightly punch mark the insertion point at a 10° angle to the shaft axis in the lateral view. Hold a sterile Expert Tibial Nail on the side of the lower leg with its distal end parallel to the tibia shaft.
- Page 17 Push the protection sleeve and the cutter over the guide wire and open the medullary canal to a depth of 8–10 cm. The guide wire and the cutter should not touch the posterior cor- tex. Remove guide wire, cutter and protection sleeve. Synthes...
- Page 18 Drill to a depth of approx. 8– 10 cm. The guide wire and the drill bit should not touch the posterior cortex. Remove guide wire, drill bit and protection sleeve. Synthes Expert Tibial Nail...
- Page 19 Place the cannulated awl over the guide wire and open the medullary canal. Use a twisting motion to advance the awl to a depth of approx. 8–10 cm. The awl should not touch the posterior cortex. Remove guide wire and awl. Synthes...
- Page 20 Note: All cannulated Expert Tibial Nails can be inserted over the reaming rod. Reaming rod exchange is not required. In case of solid Expert Tibial Nails, remove the reaming rod before nail insertion. Synthes Expert Tibial Nail...
- Page 21 Option Use the rod pusher to help retain the reaming rod during reamer extraction. Synthes...
- Page 22 Place the connecting screw into the insertion handle and thread it into the proximal nail end using the screwdriver. Verify the nail is oriented properly on the insertion handle, secure the assembly with the screwdriver. Synthes Expert Tibial Nail...
- Page 23 Rod Pusher for Reaming Rod with Hexagonal Screwdriver 8.0 mm Optionally, slide the connecting screw onto the rod pusher. Slide the assembly through the insertion handle and match the notch on the handle to the nail. Tighten using the rod pusher. Synthes...
- Page 24 Insert the nail until it is at or below the tibial opening. Check final nail position in AP and lateral views. Note: For proximal locking mount the aiming arm only when the nail has been completely inserted, otherwise the aiming arm may loosen during nail insertion. Synthes Expert Tibial Nail...
- Page 25 Note: If nail insertion is difficult, choose a smaller diameter nail or ream the intramedullary canal to a larger diameter. Important: Confirm that the nail is securely connected to the insertion handle, especially after hammering. (*) Also adapted for No. 03.010.056 Synthes...
- Page 26 If primary compression or secondary dynaminization are planned, it is recommended to over insert the nail by more than 7 mm, which corresponds to the maximum distance between the positions in static and dynamic modes. Synthes Expert Tibial Nail...
- Page 27 Important: Confirm that the nail is securely connected to the insertion handle, especially after hammering. Note: Insertion depth is critical for distal third fractures where a minimum of two locking screws below the fracture line are required to stabilize the distal segment. Synthes...
- Page 28 Diaphyseal segment fractures For diaphyseal fractures, it is recommended to lock distally first to allow intraoperative compression. Distal segment fractures For distal fractures, it is recommended to lock distally first to facilitate reduction ML view Synthes Expert Tibial Nail...
- Page 29 Locking holes 0 mm 14 mm 20 mm 30 mm 36 mm 43 mm 57 mm 37 mm 22 mm 13 mm 5 mm 0 mm 8 mm 10 mm 11 mm 9 mm 12 mm 13 mm Synthes...
- Page 30 30° from the Sagittal plane. ** For Radiolucent Drive ** Backstroke technique: with the hammer guide attached to the connector and insertion handle (see page 23), light reverse hammer blows may be used to compress the fracture; monitor reduction radiographically. Synthes Expert Tibial Nail...
- Page 31 (distal ML hole shown in illustration). Determine incision point Place a scalpel blade on the skin over the center of the hole to mark the incision point and make a stab incision. Synthes...
- Page 32 Hold the drill bit in this position and drill through both cortices. Tip: For greater drill bit control, discontinue drill power after perforating the near cortex. Manually guide the drill bit through the nail before drilling the far cortex. Synthes Expert Tibial Nail...
- Page 33 3-flute, for Quick Coupling 03.010.104 Drill Bit 4.2 mm, calibrated, length 145 mm 3-flute, for Quick Coupling Standard freehand locking technique can be performed with- out the radiolucent drive. Use the appropriate drill bit shown in the table above. Synthes...
- Page 34 Place the direct measuring device onto the drill bit. Read the graduation of the measuring device at the end of the drill bit. This corresponds to the appropriate locking screw length. Synthes Expert Tibial Nail...
- Page 35 Read the screw length directly from the measuring device at the back of the protection sleeve. Note: Drill bit location with respect to the far cortex is critical for measuring the appropriate locking screw length. Synthes...
- Page 36 Lock the holding sleeve by tightening it counter clockwise. d Release the holding sleeve after insertion of the locking screw by loosening it clockwise and pushing backwards. Synthes Expert Tibial Nail...
- Page 37 1 The dynamic locking option (DYNAM) corresponds to the naminization. upper position of the proximal locking slot. This type of locking allows primary compression or secondary, con- 3 Static 1 (STAT 1) corresponds to most distal of the proximal trolled dynaminization of the bone fragments. locking holes. Synthes...
- Page 38 Proximal locking Mount the aiming arm Instrument 03.010.018 Aiming Arm for Expert Tibial Nail Confirm that the nail is securely connected to the insertion handle (use the blue and green marked guided holes). Mount the aiming arm to the insertion handle.
- Page 39 4.2 mm, for No. 03.010.063 (with green marking) Insert the three-part trocar combination (protection sleeve, corresponding drill sleeve and trocar) through the desired ML hole in the aiming arm, make stab incision and insert the trocar to the bone. Remove the trocar. Synthes...
- Page 40 Ensure that the drill sleeve is pressed firmly to the near cortex and read the measurement from the calibrated drill bit at the back of the drill sleeve. This measurement corresponds to the appropriate length of the locking screw. Remove the drill bit and the drill sleeve. Synthes Expert Tibial Nail...
- Page 41 Make sure that the hook grasps the far cortex and that the protection sleeve is on the bone. Read the measurement from the back of the protection sleeve, which corresponds to the appropriate length of the locking screw. Synthes...
- Page 42 Additional cancellous bone locking screws can be added for proximal fractures and highly unstable fractures. Refer to steps 1 to 7 on pages 44 to 54 for details on proxi- mal locking with the cancellous bone locking screws. Synthes Expert Tibial Nail...
- Page 43 The Expert Tibial Nail allows for a maximum compression of 7 mm. If more compression of the fracture gap is needed, the conventional backstroke technique is recommended.
- Page 44 Advance the compression screw until the fracture gap is re- duced. Monitor reduction under image intensification. Each revolution of the compression screw corresponds to a compression of 1 mm (maximum 7 mm). Important: Do not overtighten the compression screw, it may deform the locking screw. Synthes Expert Tibial Nail...
- Page 45 (Static 1), refer to steps 1 to 5 on pages 35 to 40. Remove the compression screw. Additional oblique cancellous bone locking screws can be in- serted if required, refer to steps 1 to 7 on pages 44 to 54. Synthes...
- Page 46 Inserting an end cap (04.004.004) with this locking screw will create a fixed angle construct (OBLI 1 must be kept empty). 3. The oblique locking option in antero-posterior direction (A/P) corresponds to the third proximal locking position. Synthes Expert Tibial Nail...
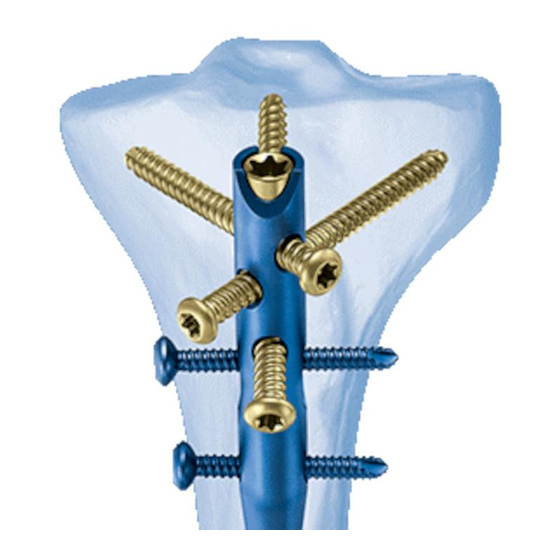
- Page 47 The most recommended procedure is the use of two cannulated screws parallel to and below the tibia plateau surface. common peroneal nerve tibial nerve popliteal artery Synthes...
- Page 48 – Cannulated Screws 6.5 mm, TAN, dark blue (408.401– 408.482) – Cannulated Screws 7.0 mm, TAN, light blue (408.151– 408.223) – Cannulated Screws 7.3 mm, TAN, gold (408.830–409.950) Insert Expert Tibial Nail, please refer to steps 1 to 4 on pages 20 to 25. Synthes Expert Tibial Nail...
- Page 49 Mount the aiming arm Instrument 03.010.018 Aiming Arm for Expert Tibial Nail Confirm that the nail is securely connected to the insertion handle. Mount the aiming arm to the insertion handle as shown in the illustration. Note: Do not exert forces on the aiming arm, protection sleeve, drill sleeves and drill bits.
- Page 50 Proximal locking Check proximal nail position (optional) Instruments 03.010.018 Aiming Arm for Expert Tibial Nail (use the yellow marked guide holes) 03.010.063 Protection Sleeve 12.0/8.0, length 188 mm 03.010.064 Drill Sleeve 8.0/3.2, for No. 03.010.063 (with blue and yellow marking) 03.010.060...
- Page 51 – Depending on the anatomy of the patient’s proximal tibia and on the specific situation, the second proximal oblique locking option can be chosen instead of the first locking option. Synthes...
- Page 52 The position of the second oblique locking option can be checked similarly to the technique described above by using the oblique guide hole (OBLI 2) of the aiming arm and corre- sponding guide hole for the drill bit. Synthes Expert Tibial Nail...
- Page 53 Insert the three part trocar combination (protection sleeve, corresponding drill sleeve and trocar) through the desired hole for oblique locking options in the aiming arm, make a stab incision and insert the trocar to the bone. Remove the trocar. Synthes...
- Page 54 Important: Do not perforate the far cortex with the drill bit. Do not damage the tibial plateau. Confirm drill bit position after drilling. Synthes Expert Tibial Nail...
- Page 55 Insert cancellous bone locking screw Instrument 03.010.107 Screwdriver Stardrive, T25, length 330 mm Insert the appropriate cancellous bone locking screw through the protection sleeve using the screwdriver, do not over tighten. Verify screw length under image intensification. Synthes...
- Page 56 AP direction. The position of the cancellous bone locking screw should be controlled under image intensification to ensure a correct po- sition of the AP cancellous bone locking screw. Synthes Expert Tibial Nail...
- Page 57 The insertion handle can remain to help align the end cap to the top of the nail. The end cap fits through the barrel of the insertion handle. Note: The patient’s leg should be positioned in flexion to facilitate end cap insertion. Synthes...
- Page 58 Turn the end cap clockwise to thread the end cap into the nail. Remove the guide wire and screwdriver. Synthes Expert Tibial Nail...
- Page 59 Complete non-weight- bearing should be avoided. Increase in load is determined according to fracture pattern and location, conditions of soft tissues and quality of bone as well as absence or presence of load induced pain. Synthes...
- Page 60 Remove all locking screws except one of the proximal locking screws using the screwdriver Stardrive T25 and the holding sleeve. Note: Always remove the most proximal cancellous bone locking screw in order to insert the extraction screw into the proximal end of the nail. Synthes Expert Tibial Nail...
- Page 61 Before removing the final locking screw, screw the extraction screw into the nail and tighten it to prevent rotation or displacement of the nail posteriorly below the tibial plateau. Attach the hammer guide to the extraction screw. Remove the remaining locking screw with the screwdriver. Synthes...
- Page 62 Remove the remaining locking screw. Attach Air Pulse to the extraction screw and extract the Expert Tibial Nail. Synthes Expert Tibial Nail...
- Page 63 Implant specifications Expert Tibial Nail 0 mm 0 mm Universal design for the left and right tibia 14 mm 20 mm Material: 30 mm Titanium-6% aluminum-7% niobium alloy (TAN) 36 mm 43 mm Diameters: – 8 mm – 13 mm (1 mm increments) 57 mm –...
- Page 64 04.004.361 04.004.461 04.004.264 04.004.364 04.004.464 04.004.267 04.004.367 04.004.467 04.004.270 04.004.370 04.004.470 04.004.273 04.004.373 04.004.473 8 mm 9 mm 10 mm * Available non-sterile or sterile packed. Add “S” to the catalogue number to order sterile products. Synthes Expert Tibial Nail...
- Page 65 04.004.658 04.004.758 04.004.561 04.004.661 04.004.761 04.004.564 04.004.664 04.004.764 04.004.567 04.004.667 04.004.767 04.004.570 04.004.670 04.004.770 04.004.573 04.004.673 04.004.773 11 mm 12 mm 13 mm * Available non-sterile or sterile packed. Add “S” to the catalogue number to order sterile products. Synthes...
- Page 66 04.024.246 04.024.346 04.024.446 04.024.249 04.024.349 04.024.449 04.024.252 04.024.352 04.024.452 04.024.255 04.024.355 04.024.455 04.024.258 04.024.358 04.024.458 04.024.261 04.024.361 04.024.461 04.024.264 04.024.364 04.024.464 04.024.267 04.024.367 04.024.467 04.024.270 04.024.370 04.024.470 04.024.273 04.024.373 04.024.473 8 mm 9 mm 10 mm Synthes Expert Tibial Nail...
- Page 67 Locking Screws for Expert Tibial Nail Cancellous Bone Locking Screws 5.0 mm (gold)* – Drill 3.2 mm – Titanium-6% aluminium-7% niobium alloy (TAN) – Lengths: 30 mm – 90 mm (5 mm increments) – Used for proximal locking in the metaphysis (through the 3 most proximal holes) –...
- Page 68 04.005.420 04.005.452 04.005.422 04.005.454 04.005.424 04.005.456 04.005.426 04.005.458 04.005.428 04.005.460 04.005.430 04.005.462 04.005.432 04.005.464 04.005.434 04.005.466 04.005.436 04.005.468 04.005.438 04.005.470 * Available non-sterile or sterile packed. Add “S” to the catalogue number to order sterile products. Synthes Expert Tibial Nail...
- Page 69 04.005.556 04.005.526 04.005.558 04.005.528 04.005.560 04.005.530 04.005.562 04.005.532 04.005.564 04.005.534 04.005.566 04.005.536 04.005.568 04.005.538 04.005.570 04.005.540 04.005.575 04.005.542 04.005.580 04.005.544 04.005.585 04.005.546 04.005.590 * Available non-sterile or sterile packed. Add “S” to the catalogue number to order sterile products. Synthes...
- Page 70 04.004.000 04.004.001 04.004.002 04.004.003 Securely locks the second proximal oblique cancellous bone locking screw. Article No. Extension (in mm) 04.004.004 * Available non-sterile or sterile packed. Add “S” to the catalogue number to order sterile products. Synthes Expert Tibial Nail...
- Page 71 Radiographic Ruler for Tibial Nail, length 450 mm 357.399 Guide Wire 3.2 mm 393.100 Universal Chuck with T-Handle 03.010.008 Cutter for Tibial Nails, 12.0 mm, length 350 mm 03.010.035 Protection Sleeve 14.0/12.0 03.010.044 Connecting Screw, for Tibial and Femoral Nails Synthes...
- Page 72 Screwdriver, hexagonal with spherical head 8.0 mm 03.010.047 Connector, length 141 mm, for Aiming Arm 321.160 Combination Wrench 11 mm 321.170 Pin Wrench 4.5 mm 357.220 Hammer Guide, for No. 357.250 (*) (*) Also suitable for No. 03.010.056 Synthes Expert Tibial Nail...
- Page 73 4.2 mm, length 145 mm, 3-flute, with Coupling for RDL 03.010.106 Direct Measuring Device for Drill Bits of length 145 mm, for Nos. 03.010.100–105 03.010.107 Screwdriver Stardrive, T25, length 330 mm 03.010.112 Holding Sleeve, with Locking Device, for No. 03.010.107 Synthes...
- Page 74 Instruments 03.010.018 Aiming Arm for Tibial Nail 03.010.063 Protection Sleeve 12.0/8.0, length 188 mm 03.010.064 Drill Sleeve 8.0/3.2, for No. 03.010.063 03.010.065 Drill Sleeve 8.0/4.2, for No. 03.010.063 03.010.069 Trocar 3.2 mm 03.010.070 Trocar 4.2 mm Synthes Expert Tibial Nail...
- Page 75 Quick Coupling 03.010.072 Depth Gauge for Locking Screws 18 to 110 mm, for No. 03.010.063 03.010.015 Compression Screw for Tibial Nail, for No. 03.010.044 03.010.110 Screwdriver Stardrive, T40, cannulated, length 300 mm 03.010.000 Extraction Screw for Tibial and Femoral Nails Synthes...
- Page 76 Tibial Nail 03.010.004 Compression Screw for Tibial Nail 03.010.011 Insertion Handle for Tibial Nail, radiolucent, long 03.010.014 Connecting Screw for Tibial Nail, long, for No. 03.010.011 03.010.007 Compression Screw for Tibial Nail, for No. 03.010.014 Synthes Expert Tibial Nail...
- Page 77 No. 357.026 (*) 03.010.124 Combined Hammer 500 g, can be mounted Optional Instruments 189.060 SynReam Intramedullary Reaming System 03.010.093 Rod Pusher for Reaming Rod with Hexagonal Screwdriver 8.0 mm (*) Also suitable for Expert Tibial Nail for No. 03.010.124 Synthes...
- Page 78 3-flute, for Quick Coupling 03.010.104 Drill Bit 4.2 mm, length 145 mm, 3-flute, for Quick Coupling 03.010.009 Protection Sleeve 12.0/8.0, length 128 mm 03.010.073 Drill Sleeve 8.0/3.2, for No. 03.010.009 03.010.074 Drill Sleeve 8.0/4.2, for No. 03.010.009 Synthes Expert Tibial Nail...
- Page 79 Depth Gauge for Locking Screws, measuring range up to 110 mm, for No. 03.010.009 03.010.001 Extraction Screw for Tibial and Femoral Nails, for No. 516.100 Note: Do not use standard instruments together with alter- native instruments before contacting your Synthes represen- tative. Synthes...
- Page 80 Instruments VarioCase 68.004.001 Vario Case for Expert Tibial Nails (Titanium Alloy), incl. Locking Screws and End Caps, without Lid, without Contents Synthes Expert Tibial Nail...
- Page 81 68.004.002 Vario Case for Standard Instruments for Expert Tibial Nail, without Lid, without Contents 68.004.003 Vario Case for Radiolucent Instruments for Expert Tibial Nail, without Lid, without Contents (not shown here) Synthes...
- Page 82 Quick Coupling, for drill bits 511.761 Large Quick Coupling 511.785 Reduction Drive Unit 511.790 Quick Coupling, for Kirschner wires 530.010 Power Drive, complete 530.100 Power Drive 530.200 Battery, for Power Drive 530.280 Battery Casing, for Power Drive Synthes Expert Tibial Nail...
- Page 84 Ö036.000.380öAC7ä 0123 Presented by:...
Need help?
Do you have a question about the Expert Tibial Nail and is the answer not in the manual?
Questions and answers