
Related Manuals for Synthes Anspach


Summary of Contents for Synthes Anspach
- Page 1 Anspach Electric Systems. High speed performance and power in a variety of applications. Instructions for Use High Speed Power Tools...
-
Page 2: Table Of Contents
Micro Curved Attachment (MCA) and Curved Burr Support Sleeves (Curved Burr) microSaws and Small Attachments Assembly Sagittal Saw Compact SpeedReducer Care and Maintenance Inspection and Maintenance Manual Cleaning Procedure Sterilization Troubleshooting Ordering Information Anspach Electric Systems Instructions for Use Synthes... -
Page 3: Synthes Anspach
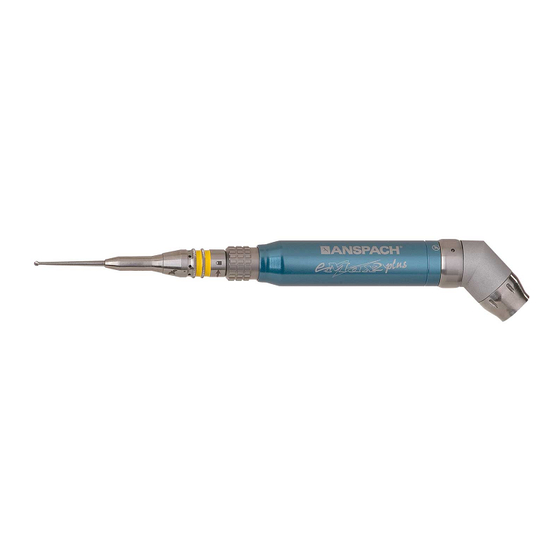
The e12 is designed specifically to meet the demands of sur- gical applications requiring a low speed instrument at a high performance level that is the hallmark of Anspach systems. It Warning: Before using any of the Synthes Anspach High... -
Page 4: Indications
Indications The Synthes Anspach High Speed Electric Systems are intended for cutting and shaping bone including spine and cranium. The Synthes Anspach High Speed Electric System is composed of Hand- piece models eMax2, eMax2 Plus, E12, and E-Saggital; Electric Consoles models SC2000, SC2000U, SC2100, SC2101, and SC2102;... -
Page 5: Warnings And Cautions
Use caution to avoid cutting or tearing gloves while handling Use of accessories or cable other than those provided by dissection tools. Synthes Anspach, and specified for the electric system in use, may result in increased emissions or decreased immunity. Dissection tools must be adequately retained within attachment to prevent distal migration, which may cause injury. -
Page 6: Technical Specifications
6.25 kg (13.77 lbs) Patent Information The device complies with the following standards: Synthes Anspach products are manufactured under one or IEC 60601-1 / IEC 60601-1-2 more of the following U.S. Patent Nos. RE 37,358; 5,405,348; 5,601,560; 5,630,818; 5,741,084; 5,904,687;... - Page 7 The Synthes Anspach High Speed Electric System is intended for use in the electromagnetic environment specified below. The customer or the user of the Synthes Anspach High Speed Electric System should assure that it is used in such an environment.
- Page 8 The Synthes Anspach High Speed Electric System is intended for use in the electromagnetic environment specified below. The customer or the user of Synthes Anspach High Speed Electric System should assure that it is used in such an environment. Immunity test...
- Page 9 TV broadcast cannot be predicted theoretically with accuracy. To assess the electromagnetic environment due to fixed RF transmitters, an electromagnetic site survey should be considered. If the measured field strength in the location in which the Synthes Anspach High Speed Electric System is used exceeds the applicable RF compliance level above, the Synthes Anspach High Speed Electric System, or the device which contains it, should be observed to verify normal operation.
- Page 10 Synthes Anspach High Speed Electric System The Synthes Anspach High Speed Electric System is intended for use in the electromagnetic environment in which radiated RF disturbances are controlled. The customer or the user of the Synthes Anspach High Speed Electric System can help prevent...
-
Page 11: Glossary Of Symbols
Located on the Foot Pedal switch this Irrigation System indicates a change state (on/off) for the Console Irrigation System Located on the Console this indicates a change of irrigation rate for the Console Irrigation System Synthes Anspach Electric Systems Instructions for Use... - Page 12 2 and eMax 2 Plus Manufacturer Authorized European Union Representative Sterilized Using Irradiation Latex-free Certification There is no latex material in Synthes Anspach products or Single Use Only (A.K.A. Do Not Reuse) packaging. CAUTION: Refer to accompanying documentation Anspach Electric Systems...
- Page 13 Hose length is approximately 12 feet. *Power cord provides means to disconnect from the mains. *Position equipment in such a manner that provides access to the rear of the system in order to disconnect from mains. Synthes Anspach Electric Systems Instructions for Use...
- Page 14 Face Panel Light Emitting Diodes (LED) illuminate, and a beep sounds. 5. For operating instructions see Console Face Panel Opera- tion and Foot Control Operation below. Note: Handpiece is fully functional at this time. Anspach Electric Systems Instructions for Use Synthes...
- Page 15 For Example: XY this to be interpreted as Software Version X.Y. On Consoles with no Irrigation (SC2102) the buttons are not marked but are located in the same location which are de- tectable by feel. Synthes Anspach Electric Systems Instructions for Use...
- Page 16 Switch on top right of foot control for a minimum of one second and then step on center of foot control pedal. Directional Upon activation, LED on face panel illuminates; irrigation Control pump and handpiece start. Switch E-FP-DIR Foot Control Anspach Electric Systems Instructions for Use Synthes...
- Page 17 Note: Handpiece is fully functional at this time. 7. To deactivate Hand Control, depress “Foot” button on console face panel. To remove hand control from handpiece, slide towards distal end of handpiece and remove. Synthes Anspach Electric Systems Instructions for Use...
- Page 18 1. Lift top of pump head and insert large diameter tubing. Refer to diagram on irrigation pump housing to ensure tubing is routed properly (smaller diameter tubing flows towards Synthes Anspach handpiece housing). 2. Close lid on pump head. 3. Insert bayonet end of tubing into irrigation bag.
- Page 19 “HOSPITAL GRADE.” Note: If fuse replacement is necessary, use only Time Delay fuse rated 2.5 A, 250 V. Item to be replaced by Synthes Anspach repair facility ONLY. Synthes...
- Page 20 30 seconds after tone is heard and/or code is displayed. Handpiece type None Disconnect connector and reconnect to console. If fault does not not recognized clear, return handpiece and console to Synthes Anspach for service. None Handpiece set 3 beeps to reverse *Note: Consoles with Software Version 3.0 and higher do not generate an Audible Signal for Codes E1–...
-
Page 21: E12 Small Bone System
3. When fully engaged, contours on e12 handpiece body, release ring, and small attachment will align. For specific attachment assembly, refer to “microSaws and Small Bone Attachments Assembly” section in this manual. Synthes Anspach Electric Systems Instructions for Use... -
Page 22: Standard Attachments And Dissection Tool Assembly
An example follows: Dissection Tool Part Number: S-2B Dissection Tool Description: 2 mm Fluted Ball for Short attachment Each attachment is laser-marked with its corresponding part number. Anspach Electric Systems Instructions for Use Synthes... - Page 23 XL-HD 1. Move handpiece knurled knob to “SAFE” position. 2. Remove dissection tool from distal end of attachment. 3. Rotate attachment to left approximately one-quarter turn, and remove from distal end of handpiece. Synthes Anspach Electric Systems Instructions for Use...
- Page 24 1. Lift latch on the distal end of the attachment with your thumb. Remove dissection tool and release latch. 2. Move handpiece knurled knob to “SAFE” position. 3. Rotate attachment counterclockwise and remove from distal end of handpiece. Anspach Electric Systems Instructions for Use Synthes...
- Page 25 Disassembly 1. Move handpiece knurled knob to “SAFE” position. 2. Rotate attachment to left approximately one-quarter turn, and remove from distal end of handpiece. 3. Remove dissection tool from distal end of attachment. Synthes Anspach Electric Systems Instructions for Use...
- Page 26 2. Remove dissection tool from distal end of attachment. 3. Move handpiece knurled knob to “SAFE” position. 4. Rotate attachment to left approximately one-quarter turn, and remove from distal end of handpiece. Anspach Electric Systems Instructions for Use Synthes...
- Page 27 Warning: The Micro Dissection Attachment is to be used only for bone dissection applications. Excessive force or side loads during use can cause rapid temperature increase at the distal end of the attachment. Always use copious irrigation with this attachment. Synthes Anspach Electric Systems Instructions for Use...
-
Page 28: Minimal Access Attachment And Dissection Tool Assembly
Listen for a click as handpiece knurled knob moves up to seat next to driver. 3. Gently twist back and forth to ensure driver is locked into position. Anspach Electric Systems Instructions for Use Synthes... - Page 29 3. Rotate knurled knob on driver to line up arrow with “RUN”. Bearing Sleeve Disassembly 1. Rotate knurled knob on driver to line up arrow with “TUBE”. Remove bearing sleeve distal end of driver. Synthes Anspach Electric Systems Instructions for Use...
-
Page 30: Micro Curved Attachment (Mca) And Curved Burr Support Sleeves (Curved Burr)
Listen for a click as hand- piece knurled knob moves up to seat next to MCA. 3. Gently twist back and forth to ensure MCA is locked into position. Anspach Electric Systems Instructions for Use Synthes... -
Page 31: Microsaws And Small Attachments Assembly
The microSaws were designed for small bone dissection. DRIVER The microSaw Driver provides direct connection to all Anspach electric handpiece systems. The Driver also enables rapid exchange of saw head styles through a unique quick- disconnect system. Keyless Driver Installation... - Page 32 3. If blade has a flat shank, insert blade into slots in chuck until it is fully inserted and tighten chuck knob clockwise until snug. Saw Blade Removal 1. Saw blade removal is reverse of installation. Anspach Electric Systems Instructions for Use Synthes...
- Page 33 Small Attachment, J-Latch SA-JACOBS Small Attachments, Jacobs Chuck SA-JACOBS Note: Anspach does not supply dissection tools for SA-JLATCH or SA-JACOBS small attachments. Keyless driver refers to DRIVER. 1. Insert attachment drive shaft into distal end of keyless driver or distal end of e12 handpiece. Rotate until three...
-
Page 34: Sagittal Saw
4. Rotate the extension handle clockwise to secure the saw blade and lower the handle into its closed position. Note: Saw blades used must be Synthes Anspach blades. Warning: All microSaw blades are for single use only. Note: Electric High Power Sagittal Saw is now fully functional. -
Page 35: Compact Speedreducer
– The red storage cap provided with the Compact SpeedReducer is to prevent damage to the shaft. – The cap is removed for cleaning and washing but replaced for sterilization. – The device may be sterilized without the red storage cap. Synthes Anspach Electric Systems Instructions for Use... -
Page 36: Inspection And Maintenance
Inspection and Maintenance Perform these activities regularly as per institution policy. Warning: Do not use any damaged equipment. Return to Synthes Anspach repair facility. Attachments Straight Attachments Visually inspect for any damage to the tube. – LONG – LONG-S – LONG-01 –... - Page 37 – Visually inspect for damage to electrical cord or – E-FP connector. – E-FP-DIR – Visually inspect for damage or cracks to the housing – E-FP-DIR/IRR or pedal. – EMAX2-FP – EMAX2-FP-NS – EPLUS-FP – EPLUS-FP-NS E-FP Synthes Anspach Electric Systems Instructions for Use...
- Page 38 – Visually inspect for damage to the silicone hose or to the electrical connector. – Connect to console and operate. The handpiece should operate smoothly. – There is no requirement to operate with attachment or dissection tool. Anspach Electric Systems Instructions for Use Synthes...
- Page 39 – Power the system and inspect for illumination of the LEDs. – If there is an irrigation pump present check for proper function. If the irrigation flow LED display is not on, press the Drop button. Synthes Anspach Electric Systems Instructions for Use...
-
Page 40: Manual Cleaning Procedure
Item Number 5. a. DO NOT rinse out instrument milk (lubricant). b. DO NOT apply mineral oil or other lubricants, which 3. Gently insert and remove Synthes Anspach Attachment may cause the attachment to overheat. Cleaning Brush (ACB) wetted with cleaning solution through the distal or proximal opening of the attachment as many times as necessary to remove any foreign debris. - Page 41 Warning: Transmissible Spongiform Encephalopathies (TSE). 2. Wipe with non-abrasive cloth and disinfectant or mild Synthes Anspach will not authorize or accept the return of deter gent and deionized, distilled, or purified water. products that directly contact patients or are contaminated 3.
-
Page 42: Sterilization
Caution: Place attached protective cap over electrical con- nector on Synthes Anspach handpiece prior to sterilization. Before sterilizing: Ensure sterilization equipment is in proper working order as specified by the manufacturer. -
Page 43: Troubleshooting
Problem Possible Cause Solution Excessive handpiece noise Faulty internal component Return to Synthes Anspach for service Lack of power to console Plug is not fully inserted/power switch Verify plugs to wall and back of console not turned on are pushed in completely and power switch is in “I”... - Page 44 Defective attachment Clean attachment or replace attachment. Inoperative Hand Control Defective internal component Return to Synthes Anspach for service. Hand Control Attachment may not be The circumferential groove on handpiece fully installed housing will be exposed when the Hand Control is fully installed.
-
Page 45: Ordering Information
Oscillating microSaw Attachment R-SAW Reciprocating microSaw Attachment S-SAW Sagittal microSaw Attachment SA-JLATCH Small Attachment, J-Latch SA-JACOBS Small Attachment, Jacobs Chuck Warranty and Return Policy is available upon request. Please contact your local Sales Representative. Synthes Anspach Electric Systems Instructions for Use... - Page 46 Aston Court, Kingsmead Business Park Frederick Place, High Wycombe HP11 1LA, United Kingdom Ö036 001 507öACMä Manufacturer Distributor: The Anspach Effort, Inc. 4500 Riverside Drive All technique guides are available as PDF files at Palm Beach Gardens, FL 33410 0086 www.synthes.com/lit...
Need help?
Do you have a question about the Anspach and is the answer not in the manual?
Questions and answers