
Related Manuals for Elite Greenhouses 8'5" Wide Thyme

Summary of Contents for Elite Greenhouses 8'5" Wide Thyme
- Page 4 PARTS LIST - BUILT IN BASE MODEL 10x8 12x8 14x8 16x8 18x8 20x8 Partition Nuts & bolts M6 Band clips Wire clips Casement stay Stay pins Nuts & bolts (M4) Double door lock + cam Short self tapping screws Glazing beading (metre) 10 Door guides 11 Eave plate 12 Ridge plates...
- Page 5 PARTS LIST DWARF WALL MODEL 10x8 12x8 14x8 16x8 18x8 20x8 Partition Nuts & bolts M6 Band clips Wire clips Casement stay Stay pins Nuts & bolts (M4) Double door lock + cam Short self tapping screws Glazing beading (metre) 10 Door guides 11 Eave plates 12 Ridge plates...
- Page 6 HELPFUL HINTS · Please do take your time and be sure to read all instructions carefully before assembling. HELPFUL VIDEOS ARE AVAILABLE ON OUR WEBSITE · www.elite-greenhouses.co.uk · Do not assemble frame in high winds. · The greenhouse frame should be anchored to a permanent foundation. This will not only help secure it against powerful wind but will help prevent breakage of the glass caused by the freezing and thawing process of the earth.
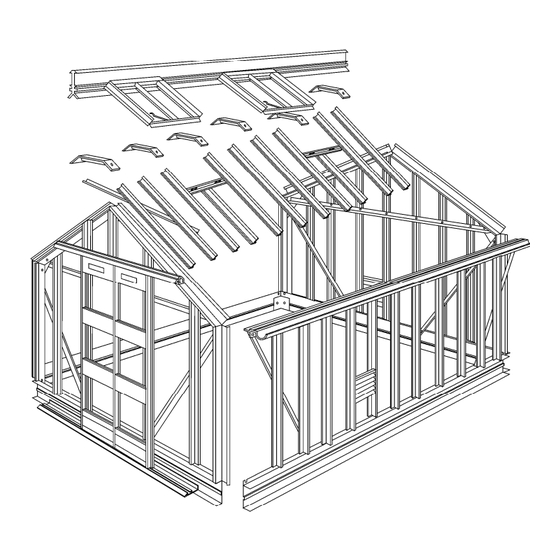
- Page 7 INSTALLATION INSTRUCTIONS FOR THE 8 5 WIDE THYME MODEL RANGE The contents of this carton are divided into the different frame assemblies that collectively make up the completed greenhouse framework. It is recommended that each framework assembly is fully completed before moving onto the next. The contents are as follows: Two side frames Rear end frame (including shelf)
- Page 8 SIDE FRAME ASSEMBLY When you come to the greenhouse itself, start by assembling the side frames first. · Slide the glazing beading into both V grooves of all glazing bars. Lay out the pieces on the ground as though you were standing inside the house, i.e. with the gutter and cill facing downwards, and the bolt channels of the glazing bar(s) upwards.
- Page 9 If you have the built in base model, then the side cill above is replaced by a side built in base section. BUILT IN BASE BUILT IN BASE MODEL ONLY If your greenhouse is over 12 5 in length, you will need to attach the side built in base sections to- gether to form the length of your greenhouse.
- Page 10 REAR END ASSEMBLY Components: 1 rear built in base/cill 7 glazing bars 2 roof corner bars (marked R at the apex) 2 side corner bars (unmarked) 2 diagonal bracing angles 1 horizontal angle brace From the main bag of fittings you will require the nuts and bolts You will also require glazing beading, 2 eave plates and 1 ridge plate These are packed with the casement stay and are separated from the main bag of fittings INSTRUCTIONS...
- Page 11 Starting at the apex (2 corner bars opposite each other marked R), slide 1 bolt into the facing bolt channel i.e. the one that is facing upwards and at 90 degrees to the non facing bolt slot). Place the ridge gusset plate (larger of the 2 types) over the bolt, then slide left or right until the slotted hole in the plate lines up with the locating hole in the flange nearest the end of the corner bar.
- Page 12 Attach the rear built in base/cill (marked rear end) to the bottom of the side corner bars by in- serting a bolt in the facing bolt slot at the bottom of the side corner bar and then into the pre- fabricated slot in the built in base/cill.
- Page 13 SHELF FITTING The diamond shelf is intended to fit on the rear gable end of the greenhouse. Not only is it very functional, but it adds lots of strength to the greenhouse. The parts required for the shelf are: 2 shelf top sections 10 cantilever braces x 4 Angle supports with 45º...
- Page 14 DOOR END ASSEMBLY Components 1 Door end cill 2 Door end built in base/cills 1 Threshold ramp 5 Glazing bars of various lengths 2 Short horizontal braces 2 Medium horizontal braces 2 Diagonal bracing angles 2 Roof corner bars (marked R ) 2 Side corner bars (unmarked) 1 Door track support 1 Top door track...
- Page 15 DWARF WALL MODEL ONLY Attach the door end cills to the corner bars. The door end cills are hand- ed left and right. Each cill has a slot at one end and a tab at the other. The slotted hole fixes to the corner bar. Slide 4 bolts into the top (mitred end) of the 1st, 2nd and 4th and 5th glazing bar.
- Page 16 Dwarf wall only. The bottom door end cill has a section cut out at each end allowing the cill to fit inside the 2 brick pillars. The channel on the cill is outside the brickwork.
- Page 17 Now you can attach the smaller middle (3 ) glazing bar to the ridge gusset plate and the unoccupied hole in the centre of the main door track support. You may need to adjust the position on the door track support to fit to the glazing bar. Attach the small horizontal brace to the 2nd bolt inserted in all vertical glazing bars.
- Page 18 DOOR FRAME ASSEMBLY Each Door consists of: 1 unhanded door post 1 handed door post (handed post for left door is different profile to the handed right hand door post) 3 infill panels (1 with prefabricated lock hole) for lock barrel 1 top and bottom door panels 3 panels of glass which must be fitted during door assembly It is not possible to fit glass after the door is built...
- Page 19 Before fitting the unhanded door post, offer the glass panels to the door (see glazing plan in booklet for glass size guide on door), slide them in from the side. Carefully attach the unhand- ed door post in the same way as before, ensuring the glass is sitting in the correct position (sitting on the beading channels of the door posts) before tightening the screws.
- Page 20 DOOR FRAME ASSEMBLY...
- Page 21 ROOF VENT ASSEMBLY The roof vent pack has 6 pieces of aluminium: and from the main box of fittings you require: 10 of glazing beading 1 casement stay 6 M6 nuts and bolts 6 M4 stainless steel nuts and bolts 2 casement stay pins PROCEDURE: Identify the slam bar and attach the 2 stay pins to the outer side of the angle using the M4 stainless...
- Page 22 ROOF VENT ASSEMBLY...
- Page 23 ASSEMBLY OF GREENHOUSE UNIT If you plan to fit the greenhouse to a soft standing (grass, soil etc) then dig a small hole in each cor- ner (all built in base models), and also at the point where the built in base section joins (models over 12 ).
- Page 24 The extra bolts that were inserted in the bolt slots of the corner bars during the gable end assembly can now be used. Line up the elongated holes in the flanges of the eaves with the bolt slots and slide the bolts into them.
- Page 25 The roof glazing bars can now be attached to the ridge and gutter. Attach them to the ridge first by sliding a bolt into the bolt slot of the glazing bar, inserting it through the hole in the flange of the ridge. Put a nut on and tighten up.
- Page 26 SQUARING UP Before anchoring down you must make sure that the structure is level and square. Put one pane of glass in each corner of roof, each pane must be level with the small glass retaining lip just above the gutter and be running parallel with the roof glazing bars.
- Page 27 FITTING THE DOORS TO THE STRUCTURE The door slides onto the frame from the left hand side. Install the right hand door first. Put the door bottom rail into the bottom door track and slide to the right, feed the first wheel into the upper door track and move further to the right until the black draught excluder butts up to the end glazing bars.
- Page 28 FITTING THE DOOR HANDLES The handles are fitted to the infill panel on each door (choose between 1st or 2nd panel down). Po- sition the handle centrally, and mark the hole position. Drill 7mm diameter holes (2 holes per door), then fit the handles, and secure with a nut and bolt. FITTING THE DOOR LOCK The door lock must be fitted after the doors are in position (Key Point).
- Page 29 FINISHING OFF To prevent the door from sliding past its opening, you must fix 4 angle brackets to the door end assembly. Insert a cropped head bolt into the bolt channel at the top of the right hand glazing bar (viewed from the inside) and fix and angle bracket as shown in the picture below.
- Page 30 5 BLADE LOUVRE 1. Place top cill into position on side jamb of louvre and secure with self tapping screws. 2. Do same on the other top corner. 3. Do same with bottom cill. 4. Please note that the handle is on the right hand side, the above diagrams are viewed from the in- side.
- Page 31 GLAZING THE STRUCTURE Always handle glass with extreme care as failure to do so can result in injury Note: If you have bar capping (optional extra), then see additional fitting in- structions packed with the capping. Capping is fitted with a different clip, so read capping instructions BEFORE you start to glaze.
- Page 32 THYME 8 GLAZING PLAN BUILT IN BASE...
- Page 33 THYME 8 WIDE BUILT IN BASE TOUGHENED GLASS APPLICATION Model 10x8 12x8 14x8 16x8 18x8 20x8 Glass ref Size (mm) 305 x 1197 450 x 457 300 x 610 457 x 1489 450 x 610 300 x 904 300 x 1489 261 x 100 300 x 140 300 x 290...
- Page 34 THYME 8 GLAZING PLAN DWARF WALL...
- Page 35 THYME 8 WIDE DWARF WALL TOUGHENED GLASS APPLICATION Model 10x8 12x8 14x8 16x8 18x8 20x8 Glass ref Size (mm) 450 x 457 300 x 610 305 X 610 450 x 610 300 x 904 300 x 1489 261 x 100 300 x 140 300 x 290 457 X 904...
- Page 36 PARTITION If you have purchased a partition it is at this point that you con- struct the frame in situ. In the box you will find packs marked: Partition corner bars Partition built in base pieces/tab cill Partition door end cill Partition door end Partition door track Partition door panels...
- Page 37 The built in base/cill can now be attached to the facing bolt slot of the partition corner bar (in the same way you did in the original door end assembly). N.B. If you have a brick base you will need to trim off with a hacksaw the first 2 of the overlapping part of the cill to facilitate a snug fit (dwarf wall model only).
- Page 38 PARTITION...
- Page 39 ELITE GREENHOUSES BASE DIMENSIONS For Brick, Block, Concrete or Timber The dimensions given below may be used to locate the position for your Greenhouse or to lay cor- ner footings if they are needed. Your greenhouse comes as standard with a base plinth that allows you to fit your greenhouse onto any level area.
- Page 40 1603...
Need help?
Do you have a question about the 8'5" Wide Thyme and is the answer not in the manual?
Questions and answers