
Related Manuals for DR. Heater DR-966


Summary of Contents for DR. Heater DR-966
- Page 1 WALL/CEILING MOUNT HEATER OWNER’S MANUAL Model No.: DR-966 6000W 240V 60HZ IMPORTANT INSTRUCTIONS READ & SAVE...
-
Page 2: Table Of Contents
TABLE OF CONTENTS Important Instructions .………………………………….… Installation Instructions .……………………….………..… 5-8 Specifications and Wiring Diagram………………………. 9 Parts of the Heater ……………………….……………….. 10 Operating Instructions……………………….………..…. 11-13 Maintenance and Cleaning ………………………………. Troubleshooting ……………………………………………... -
Page 3: Important Instructions
IMPORTANT INSTRUCTIONS PLEASE READ ALL INSTRUCTIONS BEFORE USING THIS HEATER NOTE: There may be a trace of smoke or odor when unit is first operated. Don’t be alarmed. This indicates that a drop of oil fell on the heating coil during the manufacturing process. It will quickly evaporate and should not recur. - Page 4 10. To prevent a possible fire, do not block air intakes or exhaust in any manner. 11. This heater has hot/arcing or sparking parts inside. To reduce the risk of fire, do not use the unit in areas where gasoline, paint, or flammable liquids are used or stored.
-
Page 5: Installationinstructions
INSTALLATIONINSTRUCTIONS WARNING: All wiring must be installed by a certified electrician in accordance with electrical safety standards. The ceiling heater must be grounded in accordance with all national and local building codes. WARNING: To reduce the risk of fire, do not store or use gasoline or other flammable vapors and liquids in the vicinity of the heater. - Page 6 Screw Kit Contents Description M10 Explosion Screw M10x60mm Screw M10 Nut Ф10 Washer Ф10 Spring Washer Ф10 Rubber Pad WARNING: To reduce the risk of fire, do not store or use gasoline, paint or other flammable liquids (with vapors) and in the vicinity of the heater.
- Page 7 8. Hook the unit to the mounting bracket and let the unit hang from the mounting bracket. 9. Insert the screw through the mounting bracket and the heater handle, and tighten the nut. 10. Loosen the screw to remove the wiring compartment/connection cover in the rear of the heater.
- Page 8 13. Replace the wiring compartment/connection cover and lock in place with the screw.
-
Page 9: Specifications And Wiring Diagram
SPECIFICATIONS Wall/Ceiling Mount Heater Model No: DR-966 Voltage: 240V Watts: 6000W Frequency: 60Hz BTU/h: 20472 Recommended Heating Capacity: 1.25 watts / ft (0.03 m... -
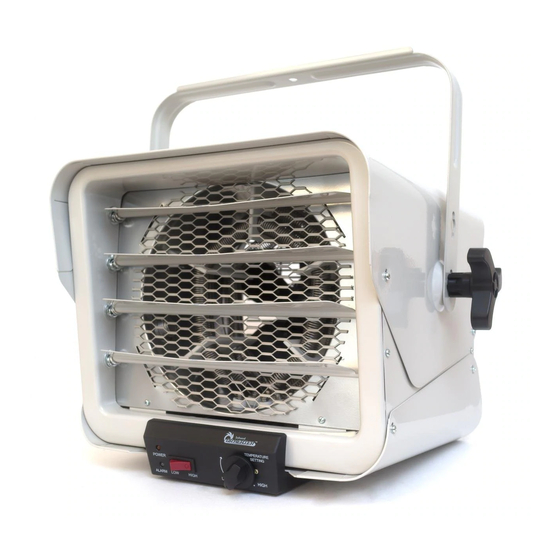
Page 10: Parts Of The Heater
PARTS OF THE HEATER Upper enclosure Tilt adjustable knob C. Front exhaust grille D. Louver for air direction Control panel Power indicator G. Alarm LED H. Setting switch (High/Low) Temperature setting knob... -
Page 11: Operating Instructions
OPERATING INSTRUCTIONS WARNING The heater must be properly installed before use. HAZARD OF ELECTRIC SHOCK, EXPLOSION OR ARC FLASH: Apply appropriate personal protective equipment (PPE) and follow safe electrical work practices. See NFPA 70. A circuit breaker must be installed and serviced only by a certified electrician. - Page 12 Ambient temperature is regulated by adjusting the thermostat to a desired position. Allow the unit to operate and warm up the room. When the desired temperature is reached, turn the control knob counterclockwise until the heater turns off. This is your ideal setting. The heater will start automatically when the room temperature drops below this set point, and will turn off when the set point is reached.
- Page 13 Connect to the Heater Connect to the Power Cord Connect to the Power Cord Connect to the Heater 3. Insert wires into the Thermostat Outlet Box, and screw up the thermostat. 4. Cover the thermostat.
-
Page 14: Maintenance And Cleaning
MAINTENANCE AND CLEANING INSTRUCTIONS CLEANICLEANING (separate page) There are no user-serviceable parts inside this heater except regular cleaning as described below. All other servicing or maintenance should be performed by qualified service personnel. Before any cleaning, make sure that: 1. The power supply is disconnected at the source. Switch off the circuit breaker. -
Page 15: Troubleshooting
TROUBLESHOOTING If your heater fails to operate, please follow the procedures below. This heater is intended to be a ceiling-mounted heater. It has a thermal cut-off protection feature. If the thermal cut-off protection trips, switch OFF the circuit breaker. The unit should reset automatically after 10 minutes. - Page 16 Let us know with a customer review. Please visit: https://www.amazon.com/review/review-your-purchases# Dr. Heater USA, we are committed to bringing top quality alternative & supplemental heating products to our customers. Dr. Heater USA 9293 Beatty Dr, Sacramento, CA 95826 Tel:1- 800-317-1688 EMAIL: SERVICE@DRHEATERUSA.COM...
Need help?
Do you have a question about the DR-966 and is the answer not in the manual?
Questions and answers