Advertisement
Quick Links
thank you for purchasing a sealey product. manufactured to a high standard, this product will, if used according to these
instructions, and properly maintained, give you years of trouble free performance.
IMPORTANT: PLEASE READ THESE INSTRUCTIONS CAREFULLY. NOTE THE SAFE OPERATIONAL REQUIREMENTS, WARNINGS & CAUTIONS. USE
THE PRODUCT CORRECTLY AND WITH CARE FOR THE PURPOSE FOR WHICH IT IS INTENDED. FAILURE TO DO SO MAY CAUSE DAMAGE AND/OR
PERSONAL INJURY AND WILL INVALIDATE THE WARRANTY. KEEP THESE INSTRUCTIONS SAFE FOR FUTURE USE.
Refer to
instructions
1. safety
Familiarise yourself with the application and limitations of the hose reel, as well as the specific hazards.
9
WaRNING! Disconnect the hose reel from the water supply before changing accessories, servicing or performing any maintenance.
‰
Maintain the hose reel in good condition (use an authorised service agent).
9
Replace or repair damaged parts. Use recommended parts only. Unauthorised parts may be dangerous and will invalidate the
9
warranty.
Locate and fix the hose reel in a suitable working area.
9
Do Not position the hose in direct sun light, or in areas of extreme heat or cold.
8
Ensure there is adequate lighting.
9
WaRNING! Ensure maximum water pressure is not exceeded.
‰
Keep extended air hose away from heat, oil and sharp edges. Check hose for wear before each use, and ensure all connections are
9
secure.
Maintain correct balance and footing. Ensure the floor is not slippery and wear non-slip shoes.
9
Remove ill fitting clothing. Remove ties, watches, rings, and other loose jewellery and contain and/or tie back long hair.
9
Keep children and unauthorised persons away from the working area.
9
Do Not operate the hose reel if any parts are damaged or missing as this may cause failure and/or personal injury.
8
Do Not exceed the rated capacity of the hose reel.
8
Do Not use the hose reel for any purpose other than that for which it is designed.
8
Do Not operate the hose reel when you are tired or under the influence of alcohol, drugs or intoxicating medication.
8
When not in use ensure the water supply is turned off and tools disconnected. Disconnect from water supply and retract hose into
9
case.
WaRNING! Do Not dismantle the hose reel casing, or attempt to remove the screws and covers on the sides. To do so may result
‰
in damage to the appliance and/or personal injury and will invalidate the warranty. Internal maintenance, which will require the
opening of the casing, must only be undertaken by an authorised service agent.
2. INtRoDuctIoN
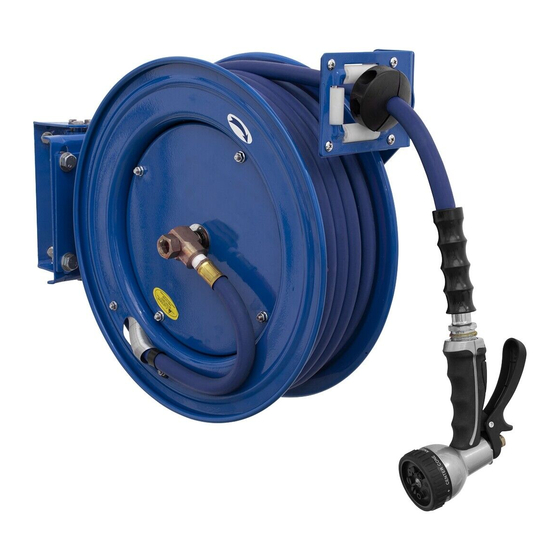
Heavy-duty durable steel case. Fitted with Heavy-duty 15m Ø13mm ultra-light, super-strong rubber hose with 2m leader hose. Features Metal
spray gun with 9 pattern spray/jet nozzle. Finger grip bend restrictors for ease of use. Handles hot water up to 90°C and remains flexible in
cold temperature as low as -40°C. Heavy-duty ratchet mechanism enables safe storage and use. Swivel wall mounting bracket included.
3. specIfIcatIoN
model No: ..............................................................WHR1512
Hose Size (ID): . ......................................................... Ø13mm
length: . ........................................................................... 15m
4. assembly
WaRNING! To avoid a dangerous sudden release of pressure that
‰
can cause severe injury, ensure that the pressure source for the
reel is turned off and the supply hose is not pressurized.
Note:
Before beginning assembly/installation, purchase appropriate
hardware for mounting the reel. The mounting base has four 1/2"
(12.7mm) holes for mounting on a suitable flat surface.
Note:
For overhead ceiling mounting: Install the reel at most 10 feet (3m)
above the floor.
4.1.
assemblING tHe Hose Reel
4.1.1.
Prior to mounting the hose reel, ensure that the supply hose
pressure does not exceed the maximum working pressure of the
hose reel. Also check that the pressure source is turned off and the
supply hose for the reel is not pressurized.
4.1.2.
Unpack the reel then check that all parts are present and inspect
for damage. Check reel function for smooth rotation.
© Jack Sealey Limited
15m Heavy-Duty RetRactable WateR
Hose Reel Ø13mm ID RubbeR Hose
WHR1512
Model no:
Original Language Version
Guide Roller Collar
Drum
Base Plate
Water Inlet Valve
fig.1
WHR1512 Issue 1 30/07/19
Hose Stopper
Water Hose
Advertisement

Related Manuals for Sealey WHR1512


Summary of Contents for Sealey WHR1512
- Page 1 WHR1512 Model no: thank you for purchasing a sealey product. manufactured to a high standard, this product will, if used according to these instructions, and properly maintained, give you years of trouble free performance. IMPORTANT: PLEASE READ THESE INSTRUCTIONS CAREFULLY. NOTE THE SAFE OPERATIONAL REQUIREMENTS, WARNINGS & CAUTIONS. USE THE PRODUCT CORRECTLY AND WITH CARE FOR THE PURPOSE FOR WHICH IT IS INTENDED.
-
Page 2: Connect The Hoses
Apply Teflon tape or pipe sealant to the outlet fitting on the delivery hose then attach it to a desired tool, or nozzle. Pressurize the reel and check all the connections for leakage. Also check the hose reel for correct rotation/latching and that system pressure is adequate to perform the intended function (see the Operating Instructions). 4.2.8. If a final adjustment to the hose stopper (fig.1) is required, pull the hose from the reel and allow it to latch at a desired length. Loosen the hose stopper bolts, and slide it to a position close to the guide roller collar (fig.1). Retighten the hose stopper bolts. 5. INstallatIoN WaRNING! Do Not position the reel in areas of extreme heat or cold. ‰ Note: Prolonged exposure to direct and intense sunlight may affect the integrity of the polymers within the moulded components. Avoid, if possible, positioning the reel in direct sunlight. fig.4 5.1. mouNtING tHe Reel 5.1.1. Due to the way the retractable hose operates, the reel should only be mounted in one of two positions shown below. The brackets supplied will enable you to mount the reel in either position. WaRNING! Ensure the wall, ceiling or other structure, to which the hose reel is to be fixed, is of sound construction and that the ‰ securing points will hold the working strain of the hose when in use. 5.1.2. Using the mounting holes template (cut from box lid), drill appropriate holes for the desired mounting or see diagram below. 5.1.3. When wall mounted the hose exit point should not be more than 2.4m above floor level. Above this height ceiling mounting is recommended. 5.1.4. Fix one bracket to the chosen surface using fixings that are appropriate to the substrate and strong enough to carry the weight of the reel plus the working strain exerted on it when in use. Position the hose reel onto the first bracket, then proceed to fix the second bracket into place and ensure the reel is secure. Original Language Version WHR1512 Issue 1 30/07/19 © Jack Sealey Limited... -
Page 3: Operation
7.2.2. Remove hose stopper from the hose and pull the hose back through guide/rollers. 7.2.3. To increase spring tension, wrap the loose hose one extra turn around the drum or, to decrease tension, un-wrap the hose one turn from drum. 7.2.4. Re-insert the hose through guide/rollers and install the hose stopper at the desired distance from the hose end. 7.2.5. Unlatch the drum and check the tension. Readjust the tension by repeating these steps. 7.3. Hose ReplacemeNt WaRNING! To avoid a dangerous sudden release of pressure that can cause severe injury, ensure that the pressure source for the ‰ reel is turned off and the supply hose is not pressurized before performing any maintenance or adjustment on the reel. WaRNING! Make sure reel drum is securely locked in the next step and cannot accidentally spin. ‰ 7.3.1. Turn off the pressure supply to reel and release pressure from the system in a controlled way. 7.3.2. Pull out all the old hose and lock the reel in position. 7.3.3. Take note of the hose connection, any hose clamps, and the position of the hose stopper. 7.3.4. Remove any hose clamps from the hose. 7.3.5. Carefully disconnect the hose from its connection and remove it. 7.3.6. Route a new equivalent type and size hose through guide/rollers to the old hose connection point. 7.3.7. Use Teflon tape or pipe sealant on the hose fitting threads then screw it into the connection fitting on the reel. Note: To avoid damage to a swivel connection, use a wrench to support the swivel while tightening the hose. 7.3.8. Re-install any hose clamps and the hose stopper as noted in step 7.2.2. Original Language Version WHR1512 Issue 1 30/07/19 © Jack Sealey Limited... -
Page 4: Troubleshooting
The hose has been pulled past the latching Allow reel to retract slowly after hearing 1st, teeth. 2nd or 3rd click. Broken latching pawl or pawl spring. Have new latching pawl or pawl spring fitted by authorised service agent. Reel Leaks damaged hose. Have new hose fitted by authorised service agent. Fluid leaks from Swivel Swivel seals are damaged or worn. Replace swivel seals. See “Swivel Seal Inlet hose is not flexible. Replacement. Caution: Be sure leak is not Hose fitting! Hose locks up when fully extended Hose Clamp is in the incorrect position Relocate hose clamp to optional location. Swivel Assembly is not moving freely of Inlet hose fitting has been over-tightened. Remove and examine swivel assembly for locking up Inlet hose is not flexible causing damage. Replace as necessary. Side force on swivel. Properly tighten inlet hose. Hand lightens fitting, plus1/2 tum with wrench. Original Language Version WHR1512 Issue 1 30/07/19 © Jack Sealey Limited... -
Page 5: Environment Protection
(if applicable) into approved containers and dispose of the product and fluids according to local regulations. Note: It is our policy to continually improve products and as such we reserve the right to alter data, specifications and component parts without prior notice. Important: No Liability is accepted for incorrect use of this product. Warranty: Guarantee is 12 months from purchase date, proof of which is required for any claim. sealey Group, Kempson Way, suffolk business park, bury st edmunds, suffolk. Ip32 7aR 01284 757500 01284 703534 sales@sealey.co.uk www.sealey.co.uk Original Language Version WHR1512 Issue 1 30/07/19 © Jack Sealey Limited...