Table of Contents
Advertisement
Available languages
Available languages
Advertisement
Table of Contents

Related Manuals for Overmax X-bee drone 8.0


Summary of Contents for Overmax X-bee drone 8.0
- Page 1 User Manual Instrukcja obsługi...
- Page 2 www.overmax.pl...
- Page 3 Ważne! Przed rozpoczęciem korzystania z urządzenia należy przeczytać poniższe informacje oraz ostrzeżenia. Niezastosowanie się do zaleceń niniejszej in- strukcji może doprowadzić do obrażeń. Dron nie jest przeznaczony do użytku przez osoby poniżej 14 roku życia bez odpowiedniego nadzoru osób doro- słych.
- Page 4 • Nie należy mieszać ze sobą baterii różnych rodzajów ani baterii starych (zużytych) z nowymi. Wyczerpane baterie należy wyjąć z urządzenia. • Nie należy dopuścić do zwarcia ani dotykania metalowych złącz bate- rii. Nie należy demontować baterii ani wrzucać ich do ognia. •...
- Page 5 Śmigła należy zamontować zgodnie z oznaczonymi stronami (A oraz B). Należy zadbać o to, by były one zamontowane we właściwej pozycji oraz odpowiednią stroną, dokładnie tak, jak pokazano na powyższym rysunku. Niewłaściwy montaż może spowodować uszkodzenie urządzenia lub jego nieprawidłową pracę. Do odkręcenia śmigieł użyj załączonego do zestawu klucza.
- Page 6 Instrukcja ładowania baterii drona Przed rozpoczęciem ładowania należy wyjąć baterię z drona. 1. Wsuń wtyczkę zasilacza do gniazda sieci elektrycznej. Na ładowarce za- pali się zielona dioda LED. 2. Połącz wtyczkę przewodu baterii z gniazdem ładowarki. Proces łado- wania trwa około 300 minut. Podczas ładowania dioda LED świecić bę- dzie światłem czerwonym, po naładowaniu zmieni się...
- Page 7 D. Do ładowania należy używać wyłącznie oryginalnej ładowarki, której para- metry zasilania będą odpowiadać lokalnym standardom. E. Nie należy wrzucać baterii do ognia, umieszczać jej w kuchence mikrofalo- wej ani zbiorniku ciśnieniowym. F. Do czyszczenia drona, pilota i ładowarki nie należy używać rozpuszczalni- ków, alkoholu przemysłowego ani innych substancji łatwopalnych.
- Page 8 1. Odkręć śrubkę zabezpieczającą pokrywę baterii. 2. Zdejmij pokrywę komory baterii pilota. Umieść w komorze 4 baterie typu AA (brak w zestawie). 3. Załóż pokrywę baterii i przytwierdź ją na miejscu za pomocą śrubki. Uwaga: a) Podczas wkładania baterii należy zwrócić uwagę na ich prawidłowe usta- wienie, zgodne z oznaczeniami polaryzacji (+ -) na dnie komory.
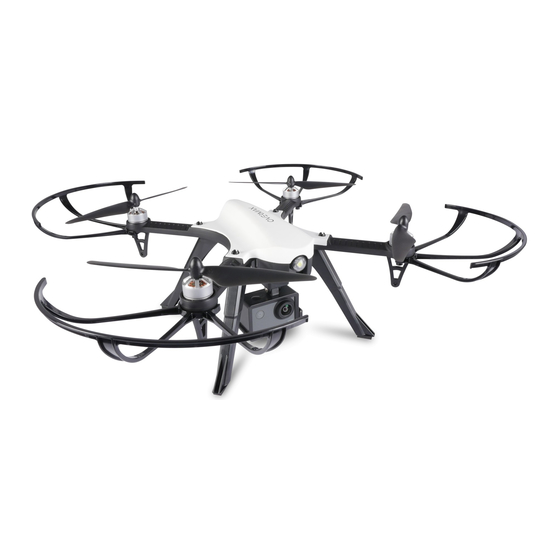
- Page 9 Schemat budowy drona [1] przednia dioda LED [2] silnik bezszczotkowy [3] wysoka płoza podwozia [4] śmigło [5] osłona śmigieł [6] uchwyt kamery [7] komora baterii [8] niska płoza podwozia [9] przednie diody LED [10] antena [11] tylne diody LED UWAGA: Wszystkie piloty zostały skalibrowane podczas produkcji.
- Page 10 Synchronizacja nadajnika (pilota) z od- biornikiem (dronem) 1. Wciśnij i przytrzymaj przycisk odblokowania/blokowania silników następ- nie przesuń włącznik pilota do pozycji ON. Pilot wyemituje jeden sygnał dźwiękowy. Zwolnij przycisk odblokowywania/blokowania silników. 2. Ustaw drona na płaskiej powierzchni tak, by był zwrócony do Ciebie tylną częścią...
- Page 11 START / LĄDOWANIE 1. Naciśnij przycisk „odblokowanie/ blokowanie silników”, aby uruchomić drona. Tuż po włączeniu silniki będą pracowały na wolnych obrotach. Prze- suń w górę drążek obrotów silnika, aby dron wzbił się w powietrze. 2. Po wylądowaniu ustaw lewy analog obrotów do najniższej pozycji, na- stępnie naciśnij i przytrzymaj przycisk „odblokowanie/blokowanie silników”...
- Page 12 Przesuń drążek obrotów silnika w lewo, aby dron skręcił w lewo. Przesuń drążek obrotów silnika w prawo, aby dron skręcił w prawo. Przesuń drążek kierunków w górę, aby dron leciał do przodu. Przesuń drążek kierunków w dół, aby dron leciał do tyłu. Przesuń...
- Page 13 Wskazówka: Przed rozpoczęciem wykonywania akrobacji należy wzbić dro- na na wysokość minimum 5 metrów. Korygowanie lotu drona (przyciski trymerów) Powoli przesuwaj drążek obrotów silnika w górę dopóki dron nie wzbije się na wysokość 1,5 metra. Jeśli podczas lotu zacznie on przechylać się lub obra- cać...
- Page 14 Jeśli dron zbacza w prawo, użyj trymera lotu w lewo, aby skorygować lot. Uchwyt na smartfon Zamocuj uchwyt na antenie pilota, tak ja na poniższym zdjęciu: Kamera Instrukcja obsługi dołączonej do zestawu kamery Activecam 4.1, znajduje się na stronie www.overmax.pl...
- Page 15 Uchwyt kamery Aby umieścić kamerę w uchwycie odblokuj zapięcie uchwytu: Następnie, wyciągnij element zamykający z zaczepu: Rozłóż uchwyt i umieść w nim kamerę: Po zainstalowaniu kamery, uchwyt należy zablokować, aby to zrobić wyko- naj powyższe czynności w odwrotnej kolejności.
- Page 16 Montaż uchwyt kamery Uchwyt posiada znacznik informujący o kierunku montażu: Dron wyposażony jest w prowadnice i zabezpieczenie do montażu uchwy- tu kamery: Umieść uchwyt w prowadnicach drona, zgodnie z ze znacznikiem kierun- kowym umieszczonym na uchwycie:...
- Page 17 Dosuń uchwyt do końca prowadnic: Zabezpiecz uchwyt w dronie przekręcając blokadę do momentu pełnego zamknięcia: Środki ostrożności 1. Niski poziom energii baterii zarówno pilota jak i drona ma negatyw- ny wpływ na zasięg, w jakim urządzenia te mogą się ze sobą sprawnie komunikować.
- Page 18 www.overmax.pl...
- Page 19 Important! Before using the device, please read the following instructions and warnin- gs. Failure to comply with provisions in this manual may result in injuries. The drone is not intended for those under fourteen years of age unless it is operated under adult supervision.
- Page 20 • Do not short-circuit or touch metal battery connectors. Do not disas- semble batteries or dispose of them in fire. • If you plan not to use the product for extended period of time, remove the batteries from the device. •...
- Page 21 The propellers should be installed in accordance with the marked sides (A and B). Ensure that they are mounted in the correct position and side, as shown in the picture above. Improper assembly may cause malfunction or damage to the device. Use the included key to unscrew the propellers. Put the covers into the corresponding holes and tighten the screws.
- Page 22 Battery charging manual Remove the battery from the drone before charging it. 1. Plug the power supply to a power outlet. The power supply LED turns green. 2. Connect the plug of the battery cable to the charger socket. Charging takes up to 300 minutes.
- Page 23 E. Do NOT dispose of batteries in fire or place them in a microwave oven or pressure receptacle. F. Do NOT use solvents, industrial alcohol or other flammable materials to clean the drone, remote control or charger. G. Kit components are made of plastic and electronic parts. In addition, they also contain batteries, so do not dispose of them in an ordinary waste bin.
- Page 24 1. Use a screwdriver to open the battery compartment cover. 2. Remove the battery compartment cover. Place four AA batteries in the compartment (not included). 3. Close the battery cover and tighten it with a screw. Note: a) When installing the batteries, make sure that they are correctly aligned with the polarity marks (+ -) on the bottom of the battery compartment.
- Page 25 Drone diagram [1] Front LED [2] Brushless motor [3] Higher landing skid [4] Propeller [5] Propeller protector [6] Camera mount [7] Battery compartment [8] Lower landing skid [9] Front LEDs [10] Antenna [11] Rear LEDs NOTE: All the remote controls have been calibrated in the factory. The process of calibration should only be performed when the drone does not respond to remote commands.
- Page 26 Transmitter (remote control) and receiver (drone) synchronization 1. Press and hold the engine unlocking / locking button and then slide the remote control Power button to ON. The remote control beeps once. Release the engine unlocking / locking button. 2. Place the drone on a flat surface so that its back faces you. Connect the battery to the drone’s power port.
- Page 27 START / LANDING 1. Press the “engine unlocking / locking” button to turn on the drone. Right after their start, the engines run at slow speed. Move the throttle stick up to take off the drone. 2. After landing, move the left (throt- tle) stick to the lowest position, then press and hold the „unlocking / loc- king”...
- Page 28 Move the throttle stick left so that the drone turns left. Move the throttle stick right so that the drone turns right. Move the direction control stick up to fly the drone forward. Move the direction control stick down to fly the drone backward. Move the direction control stick left to fly the drone in a given direction.
- Page 29 Tip: Before you start aerobatics, it is necessary to fly the drone at least 5 metres high in the air. Flight corrections (trimmer buttons) Move the throttle stick up slowly until the drone takes off 1.5 metres in the air. If, when flying, the drone starts tilting or spinning in an undesirable direction, you can use the trimmer buttons to correct the flight.
- Page 30 When the drone deviates right, use the flying trimmer (left) to correct the flight. FPV holder Attach the handle on the pilot’s antenna, as shown in the picture below: Camera User manual for Activecam 4.1 can be found at www.overmax.pl.
- Page 31 Camera holder To place the camera in the grip, unlock the grip buckle first: Then, pull out the closing element from the hitch: Fold out the handle and place the camera in it: Once the camera is installed, the handle should be locked.
- Page 32 Mounting the camera grip The handle has a direction indicator: Dron is equipped with guides and security for mounting the camera handle: Place the handle in the guide rails in accordance with the directional mark on the handle:...
- Page 33 Slide the handle to the end of the guide: Secure the handle in the side by turning the lock until it is fully closed: Precautions 1. Low battery power of the remote control or the drone negatively affects the range of their effective communication. 2.
- Page 34 www.overmax.pl...
- Page 35 Important! Înainte de a utiliza aparatul, citiți următoarele informații și avertismente. Nerespectarea recomandărilor din acest manual poate duce la un prejudiciu. Dronul nu este destinat utilizării de către persoane sub 14 ani, fără o su- praveghere adecvată a adulților. Avertismente: •...
- Page 36 • Nu permiteți la aparitia unui scurt circuit sau atingerea bornelor me- talice ale bateriei. Nu demontați bateriile și nu le aruncați în foc. • Atunci când nu utilizați produsul pentru o lungă perioadă de timp, scoateți bateriile din dispozitiv. •...
- Page 37 Elicele trebuie să fie montate în conformitate cu părțile desemnate (A și B). Trebuie să se asigure că acestea sunt montate în poziția corectă și partea corectă, exact așa cum se arată mai sus. Instalarea necorespunzatoare poate duce la deteriorarea dispozitivului sau defecțiunea acestuia. Pentru a elimi- na elicei, utilizați cheia furnizată.
- Page 38 Ghid de încărcare a bateriei dronă Înainte de încărcare, scoateți bateria din drona. 1. Introduceți ștecherul în priză. Pe încărcătorul se aprinde LED-ul verde. 2. Conectați fișa încărcătorului din priză. Procesul de încărcare durează aproximativ 300 de minute. În timpul încărcării, LED-ul se va aprinde cu lumina roșie, după...
- Page 39 F. Pentru curățarea dronei si telecomenzii acesteia precum și încărcătoarele nu folosiți solvenți, alcool industrial sau alte substanțe inflamabile. G. Componentele setului sunt fabricate din plastic și componente electroni- ce. În plus, utilizarea bateriei, astfel încât să nu le-a pus în gunoiul menajer. Fiecare dintre elementele trebuie să...
- Page 40 1. Scoateți șurubul care fixează capacul bateriei. 2. Scoateți capacul bateriei telecomenzii. Se pune în baterii AA camera 4 (nu sunt incluse). 3. Puneți la loc capacul bateriei și fixați-l cu șuruburi. Atenție: a) Când introduceți acumulatorul, să acorde o atenție la poziția lor corectă, în conformitate cu polaritățile (+ -) de pe partea inferioară...
- Page 41 Diagrama schematică a dronei [1] LED frontal [2] brushless [3] șasiu antiderapant [4] elice [5] suporturi elice [6] maner camera [7] compartimentul pentru baterii [8] șasiu antiderapant [9] LED-uri partea frontală [10] Antena [11] LED-uri partea posterioară ATENȚIE: Toate dispozitivele de comanda ( telecomanda) au fost calibrate în timpul fabricației.
- Page 42 Sincronizarea emițătorului (telecomandă) al receptorului (drona) 1. Țineți apăsat motoarele / blocare de deblocare, apoi mutați comutatorul de control de la distanță în poziția ON. Telecomanda emite un semnal sonor. Eliberați motoarele de deblocare / blocare. 2. Setați drona pe o suprafață plană, astfel încât să se confruntă cu partea din spate a dispozitivului.
- Page 43 START / ATERIZARE 1. Apăsați „deblocare / blocare motor“ pentru a rula drona. La scurt timp după ce motoarele de comutare acestea vor funcționa la mers în gol. Mutare în sus rotirea axului motorului la drona a zburat în aer. 2.
- Page 44 Mutați butonul de navigare de viteză a motorului la stânga pentru ca drona sa se întoaca la stânga. Mutați butonul de navigare de viteză a motorului spre dreapta , pentru ca drona sa se întoaca la dreapta. Mutați butonul de navigare direcțiile până la o dronă a zburat înainte. Mutați direcțiile butonul de navigare în jos pentru un avion a zburat înapoi.
- Page 45 Recomandare : Înainte de a efectua acrobație dronă ar trebui să se înalțe la o înălțime de cel puțin 5 metri. Corectare de zbor dronă (butoane de trimmer) Mutați încet stick-ul de viteză până cand drona nu urca pana la o inaltime de 1,5 metri.
- Page 46 În cazul în care drona se abate de la dreapta, utilizați zborul de tuns spre stânga pentru a corecta zborul. Mâner pentru Smartphone Atașați mânerul pe antena telecomenzii, a vedea imaginea de mai jos: Cameră Manualul de utilizare livrat împreună cu camera Activecam 4.1, pot fi găsite la accesarea site-ului www.overmax.pl...
- Page 47 Suport cameră Pentru a plasa aparatul în mâner, trebuie sa deblocati clema mânerului: Apoi, trageți elementul de blocare cu autostopul: Depliați mânerul și introduceți camera: După ce instalați camera, trebuie să blocați mânerul, pentru a face acest lu- cru urmați pașii în ordine inversă.
- Page 48 Montarea mânerului camerei Mânerul are un marcaj care indică direcția de montare: Drona este echipata cu ghidaje și asigurarea camera suport de montare: Amplasați ghidajele suport drona, în conformitate cu codul etichetei plasat pe mâner:...
- Page 49 Glisați capătul mânerului ghidului: Securizează mânerul de cotitură de blocare până la închiderea completă: Măsuri de precauție 1. Nivel redus de încărcare, atât al telecomenzii dispozitivului precum și drona are un impact negativ asupra măsurii în care aceste dispozitive pot comunica între ele în mod eficient.
- Page 50 www.overmax.pl...
- Page 51 Fontos! A készülék használatának megkezdése előtt olvassa el az alábbi információ- kat és figyelmeztetéseket. Az alábbi utasítások be nem tartása sérülések- hez vezethet. A drónt 14 évesnél fiatalabb személyek nem használhatják megfelelő felnőtt személy felügyelete nélkül. Figyelmeztetések: • Mindig a terméken, annak csomagolásán elhelyezett valamint a hasz- nálati utasításban levő...
- Page 52 • Ne cserélgesse egymással a különböző típusú elemeket sem a régieket (használtakat) az újakkal. A lemerült elemeket vegye ki a berendezésből. • Ne zárja rövidre és ne is érints az elemek fém érintkezőit. Ne szedje szét az elemeket és ne dobja tűzbe sem. •...
- Page 53 A propellereket a megjelölt oldalaknak (A és B) megfelelően szerelje össze. Gondoskodjon arról, hogy legyenek megfelelő pozícióba összeszerelve vala- mint a megfelelő oldalon pontosan úgy, ahogy a fenti rajz mutatja. A hely- telen összeszerelés a készülék sérülését vagy nem megfelelő működését okozhatja.
- Page 54 Útmutató a drón elemeinek töltéséhez A töltés megkezdése előtt vegye ki az elemeket a drónból. 1. Dugja be az adapter csatlakozóját a hálózati konnektorba. A töltőn fel- gyullad egy zöld LED. 2. Csatlakoztassa az elem csatlakozóját a töltő aljzatához. A töltés folyamata körülbelül 300 percen át tart.
- Page 55 D. A töltéshez kizárólag az eredeti töltőt használja, melynek a tápparaméte- rei megfelelőek a helyi szabványoknak. E. Ne dobja tűzbe az elemeket, ne tegye mikrohullámú sütőbe, sem nyomás alatti tartályba. F. A drón, a távirányító és a töltő tisztításához ne használjon oldószereket, ipari alkoholt sem más gyúlékony anyagokat.
- Page 56 1. Csavarja ki az elemtartó fedelét biztosító csavart. 2. Vegye le az elemtartó fedelét. Helyezzen a kamrába 4 AA típusú elemet (nincs a készletben). 3. Helyezze vissza az elemtartó fedelét és rögzítse azt a helyére a csavar segítségével. Figyelem: a) Az elemek betételénél ügyeljen a megfelelő elhelyezésre, a kamra alján jelölt (+ -) polarizációnak megfelelően.
- Page 57 A drón felépítésének sémája [1] előlapi LED [2] kefe nélküli motor [3] magas alváz csúszótalp [4] propeller [5] propeller burkolat [6] kameratartó [7] elemkamra [8] alacsony alváz csúszótalp [9] előlapi LED-ek [10] antenna [11] hátsó LED-ek FIGYELEM: Minden távirányító kalibrálva lett a gyártás során. A kalibrálást csak akkor kell végrehajtani, ha a drón nem reagál az analógok parancsaira.
- Page 58 Az adó (távirányító) szinkronizálása a vevővel (drónnal) 1. Nyomja meg és tartsa nyomva a motorok engedélyezése/tiltása gombot, majd tolja a távirányító kapcsolóját ON pozícióba. A távirányító egy hangjel- zést bocsájt ki. Engedje el a motorok engedélyezése/tiltása gombot. 2. Állítsa a drónt sima felületre úgy, hogy Ön felé nézzen a hátsó része (farok rész).
- Page 59 START / LESZÁLLÁS 1. Nyomja meg a „motorok en- gedélyezése/tiltása” gombot a drón elindításához. A bekapcsolás után a motorok a máris működni kezdenek, alacsony fordulaton. Tolja fel a motor fordulatának rúdját, hogy a drón fele- melkedjen a levegőbe. 2. A leszállás után állítsa a bal fordu- latszám analógot a legalacsonyabb pozícióba, majd nyomja meg és tartsa nyomva „motorok engedélyezése/...
- Page 60 Tolja a motor fordulatának rúdját balra, hogy a drón balra forduljon. Tolja a motor fordulatának rúdját jobbra, hogy a drón jobbra forduljon. Tolja az irányok rúdját fel, hogy a drón előre repüljön. Tolja az irányok rúdját le, hogy a drón hátrafelé repüljön. Nyomja az irányok rúdját balra, a drón a kiválasztott irányba repüljön.
- Page 61 Tanács: Mutatványok végrehajtásának megkezdése előtt emelje a drónt mi- nimum 5 méter magasságba. A drón repülésének korrekciója (trymer nyomógombok) Lassan tolja a motor fordulatának rúdját fel addig, míg a drón fel nem emel- kedik 1,5 méter magasságra. Ha repülés közben elkezd billegni vagy elfordul- ni nem kívánt irányba, használhatja a trymer - nyomógombokat a repülés korrekciójára.
- Page 62 Ha a drón eltér jobbra, használja a repülés trymerét balra, hogy korrigálja a repülést. Okostelefon tartó Rögzítse a tartót az távirányító antennájára, úgy ahogy lenti képen: Kamera A készlethez csatolt Activecam4.1 kamera használati utasítása az alábbi ol- dalon található www.overmax.pl...
- Page 63 Kameratartó A kamera elhelyezéséhez oldja ki a tartó csattját: Majd húzza ki a záróelemet az akasztóból: Nyissa szét a tartót és helyezze el benne a kamerát: A kamera beszerelése után a tartót biztosítani kell úgy, hogy csinálja végig a fenti műveleteket fordított sorrendben...
- Page 64 A kameratartó felszerelése A tartón van egy tájékoztató jelzés a felszerelés irányáról: A drón el van látva vezetősínekkel és biztosítással a kameratartó felsze- reléséhez: Helyezze a tartót a drón vezetősínjeibe, egyezően a tartón található irányjelzéssel:...
- Page 65 Nyomja a tartót a vezetősínek végéig: Biztosítsa a tartót a drónon elfordítva a reteszelést a teljes zárásig: Óvintézkedések 1. Az elemek alacsony energia szintje úgy a távirányítóban, mint a drónban negatív hatással vannak a hatótávolságra, melyben ezek a készülékek megfe- lelően tudnak egymással kommunikálni.
-
Page 66: Declaration Of Conformity
Declaration of Conformity Product details For the following Product : Drone Model(s) : OV-X-BeeDrone 8,0 Declaration & Applicable standards We, BrandLine Group Sp. z o.o., hereby declare under our sole responsibility that the of the above referenced product complies the following directives: R&TTE Directive 1999/5/EC EMC Directive... - Page 68 www.overmax.eu...
Need help?
Do you have a question about the X-bee drone 8.0 and is the answer not in the manual?
Questions and answers