Advertisement
Advertisement
Table of Contents

Related Manuals for Covidien Nellcor PM10N


Summary of Contents for Covidien Nellcor PM10N
- Page 1 Nellcor Portable SpO Patient Monitoring System PM10N Home Use Guide...
- Page 2 © 2013 Covidien. All rights reserved. COVIDIEN, COVIDIEN with logo, and Covidien logo and Positive Results for Life are U.S. and internationally registered trademarks of Covidien AG. ™* brands are trademarks of their respective owners. Other brands are trademarks of a Covidien company.
-
Page 3: Table Of Contents
Write your clinician’s contact Contents information here. Welcome ..............5 Safety Information ...........7 Set Up the Monitoring System ......11 Monitor the Patient ..........17 Change the Sensor ..........35 Clean the Monitoring System and Sensor ..37 Accessories ............. 41 Symbols .............. - Page 4 Notes: Support 1.800.635.5267 PM10N Home Use Guide...
-
Page 5: Welcome
Welcome his manual is for the home caregiver—the person The monitoring system can be used for patients of who provides care in the home for a patient all ages—infants, children, and adults. Your clinician monitored by the Nellcor™ portable SpO patient will assist you with the selection and use of the monitoring system (PM10N). - Page 6 What Is the Clinician’s Role? The clinician is a trained health care professional who: • Orders a monitoring system and sensors for use in your home • Sets up the monitoring system for you • Assists you with monitoring the patient and answers any questions you have •...
-
Page 7: Safety Information
Safety Information ead this chapter thoroughly. If you have questions, contact your clinician. WARNINGS Safety Symbols • Explosion hazard—Do not use the monitoring system in the presence of flammable substances. WARNING • Shock hazard—Use only AA size batteries. Do not use Alerts you to potential serious outcomes different types or models of batteries, such as lithium- (death, injury, or adverse events) to the... - Page 8 For best product performance and measurement excessive pressure. Do not wrap the sensor, apply accuracy, use only accessories supplied or supplemental tape, or leave the sensor too long on recommended by Covidien. Use accessories one place. according to their respective instructions for use. •...
- Page 9 • The only user-serviceable parts inside the monitoring system are the four AA batteries. While Cautions you can open the battery cover to change the batteries, only qualified service personnel should • The monitoring system may not work if it is remove the cover or access internal components for operated or stored at conditions outside the any other reason.
- Page 10 • The use of accessories, sensors, and cables other than those specified may result in inaccurate readings of the monitoring system and increased emission and/or decreased electromagnetic immunity of the monitoring system. • To avoid short-circuiting the batteries, do not let the batteries come in contact with metal objects at any time, especially during transport.
-
Page 11: Set Up The Monitoring System
Set Up the Monitoring System Parts of the Monitoring System erform the following steps to prepare the monitoring system for use with your patient: • Identify the parts of the monitoring system Display Up button • Insert the batteries Return button •... - Page 12 Insert the Batteries 1. Use 4 Lithium AA batteries. 2. Make sure to orient each battery correctly. Turn On the Monitoring System 1. Press the power button for about 1 second. 2. Make sure you hear a beep (this is a test for the alarm sound) and that the monitoring system’s main screen appears.
- Page 13 Turn Off the Monitoring System 1. Press and hold the power button for about 1 second. 2. Make sure the screen and green light turn off. Identify Connectors 1. Sensor Connector 2. Service Connector (Do not use unless instructed by your clinician.) Support 1.800.635.5267 PM10N Home Use Guide...
- Page 14 Attach the Sensor to the Patient 1. Attach the sensor to the appropriate location on the patient (for example, finger, forehead, nose, or foot). If the sensor is not attached to the patient, you will see this picture on the screen. Support 1.800.635.5267 PM10N Home Use Guide...
- Page 15 Connect the Sensor to the Monitoring System 1. Insert the sensor connector firmly. 2. If you use an extension cable, make sure it is firmly connected to the sensor’s connector. If the sensor or extension cable are missing or not connected firmly, you will see this picture on the screen.
- Page 16 Verify Operation 1. Look at the display to see if it is showing oxygen saturation (SpO %) and pulse rate values in the expected range. 2. If you are not sure, contact your clinician. Support 1.800.635.5267 PM10N Home Use Guide...
-
Page 17: Monitor The Patient
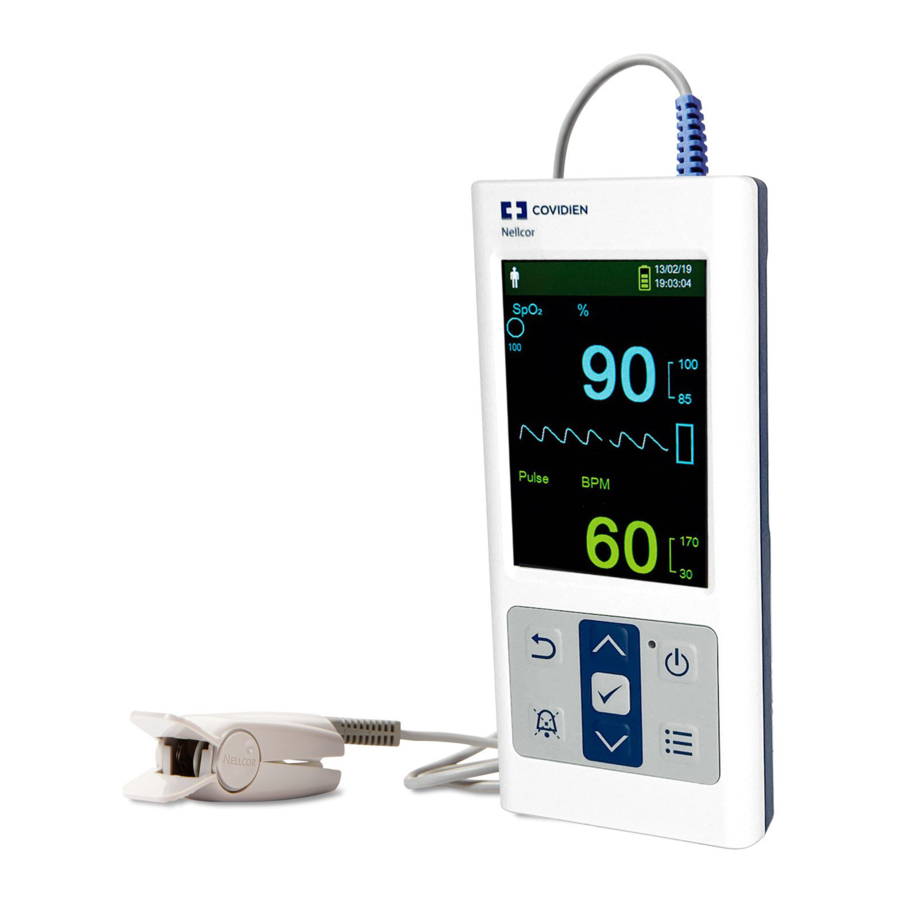
Monitor the Patient nce you have completed the setup tasks, you are ready to monitor the patient. As you monitor the patient , you will perform the following tasks: • Recognize what the main screen looks like under normal conditions •... - Page 18 Identify Main Screen Components Homecare Mode indicator SatSeconds™ indicator (your clinician will explain this feature if necessary) Battery power level Date and time Current SpO % (oxygen) reading % upper and lower alarm limits Pulse indicator (blip bar) Current pulse rate (beats per minute, BPM) Pulse rate (BPM) upper and lower alarm limits...
- Page 19 Identify Sensor Detached from Patient Place sensor back on patient (finger, forehead, or nose). If you have trouble, contact your clinician. Identify Sensor Disconnected from Monitoring System Firmly insert the sensor connector into the plug at the top of the monitoring system. If you have trouble, contact your clinician.
- Page 20 Identify Pulse Rate Alarm High or Low pulse rate Contact your clinician. Identify SpO Alarm High or Low SpO Contact your clinician. Support 1.800.635.5267 PM10N Home Use Guide...
- Page 21 Identify Alarm Silence Temporarily silence an alarm by pressing the Silence Alarm button. The Alarm Silenced symbol appears on the screen with the time remaining for the alarm to be silenced. Identify Signal Interference Turn off other nearby electronics. Encourage patient to be still. If the interference symbol continues to appear on the screen, contact your clinician.
- Page 22 Identify Low Battery Battery OK Fewer bars indicates less power. Low Battery symbol If monitoring continuously, replace the batteries within 15 minutes. If monitoring for spot checks, replace the batteries before the next use. Critically Low Battery symbol Replace the batteries as soon as possible. Support 1.800.635.5267 PM10N Home Use Guide...
- Page 23 Operate Buttons Power: Press and hold to turn Silence Alarm: Press once to monitoring system on or off. temporarily silence the alarm sound. Menu: Press once to view the list of Return: Press once to go back to available settings. the previous screen.
- Page 24 Identify Menu Items Save Spot Reading allows you to capture the reading that is currently displayed. Sound Settings allows you to adjust the volume for alarms, pulse beep, and key beep. Brightness Setting allows you to adjust the screen’s brightness. Screen Saver allows you to set the time interval when the screen will go dark after the monitoring system keys have not been pressed.
- Page 25 Save Spot Reading Press the Menu button. Save Spot Reading (top item) is highlighted. Press OK to select Save Spot Reading. Message “Spot Reading Saved” appears. Support 1.800.635.5267 PM10N Home Use Guide...
- Page 26 Adjust Volume Press the Menu button. Press Down Arrow until Sound Settings is highlighted. Press OK to select Sound Settings. Select the sounds setting you want to change. Alarm Volume is shown as an example on the next page. Support 1.800.635.5267 PM10N Home Use Guide...
- Page 27 Alarm Volume Example For example, to change the alarm volume: Press OK when Alarm Volume is highlighted. Press the Up Arrow or Down Arrow to select a volume. Press OK to select the volume. Note: You can also adjust the Pulse Volume by pressing Up Arrow or Down Arrow when the main monitoring screen is displayed.
- Page 28 Adjust Brightness Press the Menu button. Press Down Arrow until Brightness Setting is highlighted. Press OK to select Brightness Setting. Press Up or Down Arrow to adjust to the brightness you want. Press OK to select the brightness setting. Support 1.800.635.5267 PM10N Home Use Guide...
- Page 29 Set Screen Saver Press the Menu button. Press Down Arrow until Screen Saver is highlighted. Press OK to select Screen Saver. Choose from two options: • Press Up Arrow to highlight Never and press OK. Support 1.800.635.5267 PM10N Home Use Guide...
- Page 30 • Or, press OK to change the number of minutes of idle time before Screen Saver activates. - To change the number of minutes, press Up or Down Arrow. - Press OK to select the number of minutes indicated on the display. Support 1.800.635.5267 PM10N Home Use Guide...
- Page 31 View Monitoring History Press the Menu button. Press Down Arrow until Monitoring History is highlighted. Press OK to select Monitoring History. Select View Spot Data or View Continuous Data. Press OK. Support 1.800.635.5267 PM10N Home Use Guide...
- Page 32 When viewing Continuous Data, press OK again to adjust the interval of the displayed readings to every 1, 5, 100, or 500 data points. Support 1.800.635.5267 PM10N Home Use Guide...
- Page 33 Interpret Status Codes Status Description Loss of pulse, patient motion Loss of pulse Critically low battery Low battery Sensor off patient Sensor disconnected from monitoring system Alarm audio off Alarm audio silenced Signal interference, patient motion Pulse search Support 1.800.635.5267 PM10N Home Use Guide...
- Page 34 Notes: Support 1.800.635.5267 PM10N Home Use Guide...
-
Page 35: Change The Sensor
Change the Sensor Examples of Sensor Placement our clinician can help you determine when the sensor needs changing or moving to another location on the patient. Look for the following characteristics in sensors that have been applied to the patient for a period of time: •... - Page 36 Sensor Information Some of the sensors are provided in sterile packaging, and some are not. If you have questions about the sensors you are using on the patient, contact your clinician. Support 1.800.635.5267 PM10N Home Use Guide...
-
Page 37: Clean The Monitoring System And Sensor
Clean the Monitoring System and Sensor ou can clean the monitoring system periodically to keep it looking fresh and so that you can readily see the display. In addition, if there is any type of fluid spill on the monitoring system, you should clean it immediately. - Page 38 Clean the Sensor 2. Dampen a soft cloth with tap water or isopropyl alcohol. If the cloth becomes soaked with liquid, start again with a dry cloth. Or, use a pre-moistened wipe recommended by your clinician. 3. Gently wipe all surfaces of the monitoring system. 4.
- Page 39 Restart the Monitoring System 1. Turn the monitoring system on. Ensure it powers on correctly. 2. Listen for the audible beep that indicates the sound is working. 3. Look at the display and ensure that it turns on and that you see the SpO and pulse rate areas.
- Page 40 Notes: Support 1.800.635.5267 PM10N Home Use Guide...
-
Page 41: Accessories
Accessories Protective Cover he monitoring system has a few accessories. Ask your clinician if they are available for your use. Extension Cable (DEC-4) Support 1.800.635.5267 PM10N Home Use Guide... - Page 42 Carrying Case Support 1.800.635.5267 PM10N Home Use Guide...
-
Page 43: Symbols
Symbols he symbols that appear on the labels attached Symbol Description to the monitoring system are described in this Ingress protection (IP) rating: Protected chapter. against access to hazardous parts by a finger or solid object greater than 12.5mm in size. Symbol Description Protected against falling drops of water... - Page 44 Symbol Description European Union representative Reference code (part number) Manufacturer Serial number Date of manufacture Support 1.800.635.5267 PM10N Home Use Guide...
-
Page 45: Glossary
Glossary ambient light caregiver The light in the area of the patient The person who attends to the sensor. High ambient light sources, patient and check the monitoring such as bilirubin lamps, fluorescent system readings and sensor lights, infrared heating lamps, and placement. - Page 46 heart rate pulse BPM The number of times the heart Pulse rate. A measurement of the beats, usually as a per-minute number of times the heart beats value. per minute. Pulse rate is also called heart rate, beats per minute, or BPM.
- Page 47 sensor sensor site An accessory used to collect and The place on the patient’s body send patient information to the where the sensor is applied, such as monitoring system. One end of a finger, the forehead, or the nose. the sensor attaches to the patient’s finger, toe, ear lobe, or forehead (%SpO ) An estimation of the oxygen...
-
Page 48: Index
Index silence alarm button 11, 23 (oxygen) reading 18 accessories 41 date and time 18 OK button 11, 23 alarm silenced symbol 21 description of monitoring oxygen (SpO %) reading 18 alarms 20-21 system 5 temperature, operating 11 altitude, operating 11 display, monitoring system turn on or off the parts of the monitoring... - Page 49 Notes:...
- Page 50 Part No. PT00093013 Rev A (A7359-4) 2018-08 COVIDIEN, COVIDIEN with logo, and Covidien logo and Positive Results for Life are U.S. and internationally registered trademarks of Covidien ™* brands are trademarks of their respective owners. Other brands are trademarks of a Covidien company.
Need help?
Do you have a question about the Nellcor PM10N and is the answer not in the manual?
Questions and answers