Advertisement
Advertisement
Table of Contents

Related Manuals for Alarm.Com ADC-T3000


Summary of Contents for Alarm.Com ADC-T3000
- Page 1 Smart Thermostat User Guide ADC-T3000...
-
Page 3: Installation Precautions
120 or 240 volts or has wire nuts, the system is high voltage. Do not install the thermostat to a high voltage system. Contact a local HVAC professional for help. Questions? Visit: www.alarm.com/supportcenter or contact your service provider. -
Page 4: Recommended Tools
In the box Thermostat Back plate Trim plate Power resistor Drywall screws (2) Drywall anchors (2) AAA batteries (2) Recommended tools Phillips screwdriver Power drill (1/4” drill bit) Pencil Needle-nose pliers... -
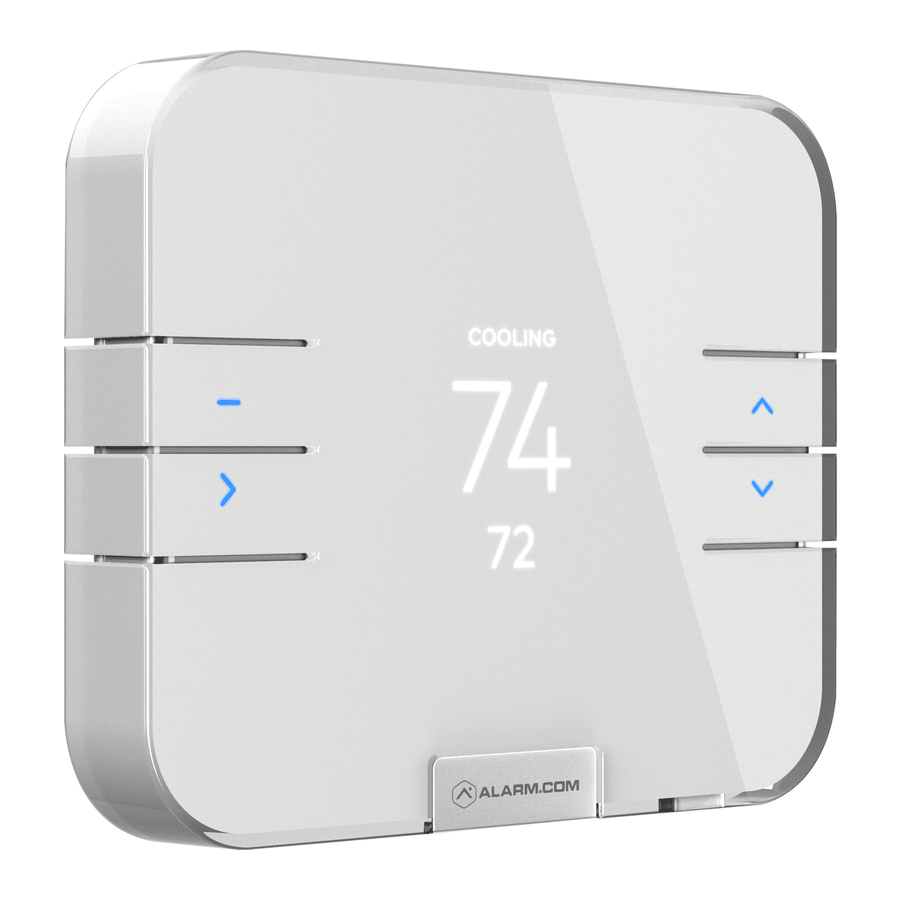
Page 5: Thermostat Overview
COOLING: Illuminated in COOL or AUTO mode the MENU. when the thermostat is calling for cool. DOWN: Adjust setpoint down or Illuminated when the thermostat is using one navigate the MENU. or more Alarm.com Temperature Sensors. SELECT: Select options in the MENU. ❶ Display ❺ Select ❷... - Page 6 Location If replacing an old thermostat, the new thermostat • Be aware of what is on the other side of the can be mounted in its place. If a new location is wall where the thermostat is being installed. desired it will be necessary to move the wiring. Do not install on walls adjacent to unheated rooms, stoves, or housing hot water pipes.
- Page 7 Preparation Test the system ! CAUTION: Wiring can vary for each manufacturer. Identify all wiring before removing it from the existing Verify that the heating and/or cooling system thermostat. Take a picture of the wires before you is operating properly before you try to install detach them from the existing thermostat for the new thermostat.
-
Page 8: Installation
Installation Prepare the wires Wire your new thermostat Follow these guidelines for safe and secure Connect the wires to the new thermostat. wire connections: If you have extra wires, do not connect them • Ensure the wires are a proper to the new thermostat. - Page 9 Terminal designations Conventional system Heat pump Terminal Description Terminal Description Cooling power Cooling power Heating power Heating power Configurable W3, H (humidifier control), Configurable W3, H (humidifier control), DH (dehumidifier control), DH (dehumidifier control), EX (ventilation) EX (ventilation) Configurable W3, H (humidifier control), Configurable W3, H (humidifier control), DH (dehumidifier control), DH (dehumidifier control),...
- Page 10 Install the batteries • If the home is unoccupied for a month or more, such as with vacation homes, you should The thermostat can be powered by battery or replace the batteries as a preventive measure 24 VAC. If a wall transformer is used to power against battery failure while you are away.
- Page 11 Attach the body and back plate Turn the power on Verify that any excess wire is tucked back into Restore power to all the heating and cooling the wall to allow room for the thermostat systems. This can be done at the circuit breaker. to sit flush against the back plate.
- Page 12 Setup The thermostat will automatically Backup heat type detect connected wires. Tells the thermostat what type of auxiliary/ Follow the on-screen instructions to backup heating the heat pump uses. complete the thermostat configuration. • Electric: This is the most common NOTE: If the thermostat screen does not show type of backup heating.
-
Page 13: Configure The Thermostat
Configure the thermostat Add to the Z-Wave network While the default settings online will be sufficient in most cases, you also have the option to change 1. Put the Z-Wave controller into ADD mode. Refer to advanced configuration settings, such as: Swing, the controller documentation for more information. -
Page 14: Humidity Control
Humidity control Enabling motion-detected wake The thermostat can adjust the humidity level in your home by directly controlling an external humidifier, This setting will enable the thermostat screen dehumidifier, or by using the cooling system to dehumidify. to wake when motion is detected nearby. For an external humidifier or dehumidifier, the 1. - Page 15 Changing the dehumidifier setpoint Changing the humidifier setpoint Ensure that the humidity mode selected Ensure that the humidity mode selected is either DEHUMID or AUTO. is either HUMID or AUTO. 1. Press the MENU button. 1. Press the MENU button. 2.
-
Page 16: Check The System
Ventilation The thermostat can control a ventilation system Reconfiguring the thermostat (HRV, VRV, or air baffle) using the Z1 or Z2 terminal. By default, the thermostat will operate 1. Press the MENU button. the ventilation system for 15 minutes every hour. To change the ventilation settings, refer to the 2. -
Page 17: Operation
Check cooling Changing the mode and setpoint 1. Press the MENU button. 1. Press the MENU button to access the menu screen. 2. Select MODE. 2. Select the MODE option. 3. Select COOL. • The modes are HEAT, COOL, 4. Press the DOWN button to lower AUTO, EMER, and OFF. - Page 18 Changing the fan mode Changing the batteries 1. Press the MENU button. If the thermostat batteries are low, replace the batteries with two new AAA batteries. 2. Select the FAN MODE option. 1. Remove the thermostat from the The fan modes are AUTO, ON, and CIRCULATE. back plate by pulling the thermostat The thermostat will only show the fan modes if it straight out and off the wall.
-
Page 19: Troubleshooting
Troubleshooting Heating or cooling doesn’t turn on when the Bypassing wire detection setpoint is above or below the room temperature If the automatic wire detection feature is not To prevent damaging the compressor, the thermostat correctly identifying your wires, please proceed inserts a delay when cycling the compressor. - Page 20 Remove the thermostat from the Z-Wave network Can I keep the thermostat screen lit up at all times? If for some reason the thermostat must be removed No. The thermostat display cannot be lit up from the network, follow the steps below: indefinitely.
- Page 21 Is my thermostat a repeater in the Z-Wave network? unaware that this procedure was performed, so it is recommended that you follow the process The thermostat is only a repeater when it has been in the “Remove the thermostat from the Z-Wave added into the network while it has a common network”...
- Page 22 Connect the equipment into an outlet on a circuit different void the user’s authority to operate the equipment. from that to which the receiver is connected. • Consult the dealer or an experienced radio/TV technician for help. Questions? Visit: www.alarm.com/supportcenter or contact your service provider.
- Page 24 8281 Greensboro Drive 190508 Suite 100 © 2019 Alarm.com. All rights reserved. Tysons, VA 22102 Designed in the USA by Building 36, an Alarm.com company. Made in China.
Need help?
Do you have a question about the ADC-T3000 and is the answer not in the manual?
Questions and answers