
Related Manuals for Mira Flight Shower Tray


Summary of Contents for Mira Flight Shower Tray
- Page 1 Mira Flight Shower Tray Riser and Non-Riser These instructions must be left with the user Installation and User Guide...
- Page 2 Important! The shower trays featured in this manual are available for use as riser and non-riser products. Mira Flight Shower Trays - are available in various shapes and sizes with or without upstands and are all supplied with an 85 mm top access waste and trap.
- Page 3 The Construction Products Directive (89/106/ EEC). Warning! The Mira Flight 760 and 800 variants weigh less than 25 kg and are a ‘one‑person‑lift’. All other Mira Flight tray variants weigh in excess of 25 kg and will require a ‘two‑person‑lift’.
-
Page 4: Pack Contents
PACK CONTENTS Tick the appropriate boxes to familiarise yourself with the part names and to confirm that the parts are included. Square or Rectangular Shower Tray 1 x 85 mm Waste 1 x Square or Rectangular Shower Tray Square/Rectangular Riser Conversion Kit (if purchased) Quantity Quantity Description... - Page 5 Pentangle Shower Tray 1 x 85 mm Waste 1 x Pentangle Shower Tray Pentangle Riser Conversion Kit (if purchased) Description Quantity Adjustable Legs Clips Locators Sticky Pads 135° Corner Panels...
- Page 6 Quadrant Shower Tray 1 x 85 mm Waste 1 x Quadrant Shower Tray Description Quantity Adjustable Legs Clips Locators Sticky Pads 90° Corner Used Panels...
- Page 7 DIMENSIONS Square or Rectangular Shower Tray All Dimensions in mm...
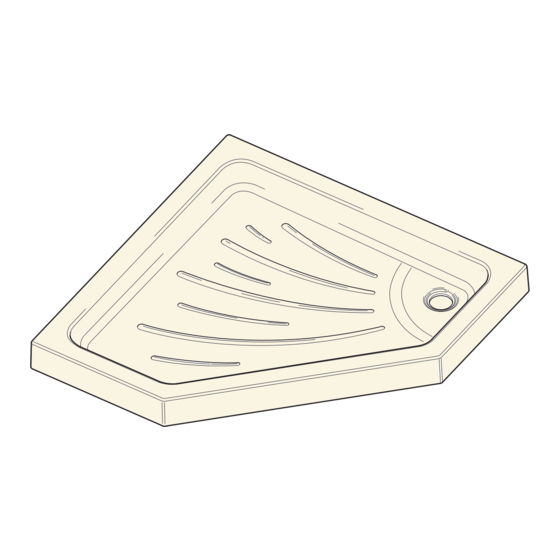
- Page 8 Pentangle Shower Tray Quadrant Shower Tray Radius 550 All Dimensions in mm...
-
Page 9: Installation
INSTALLATION Please read these instructions carefully before starting the installation procedure. Important Notes It is recommended that the shower tray is installed before tiling. This will make sure that the tray is rebated into the plaster behind where the tile face will be, thus helping to achieve a watertight joint. - Page 10 Non‑Riser Installation Carefully remove all of the blue protective film from the tray for inspection. Caution! Additional protective coverings such as a dust sheet should then be used to protect the tray from damage from falling objects. Fit the 85 mm top access waste (supplied) to the tray before setting down being careful not to overtighten.
- Page 11 Make sure that the tray is level. Note! The bottom of the shower tray has a built in fall to allow for correct drainage. Therefore check the edges of the tray with a spirit level (refer to Figure 2). Make sure that the shower tray is level Figure 2 Level the Shower Tray...
- Page 12 Riser Installation Carefully remove all of the blue protective film from the tray for inspection. Attention should then be paid to effectively cover the tray to protect from damage. Spots on the adjustable leg mouldings are provided to help set equal heights. Set the adjustable legs to the third spot from the bottom, this will give the initial clearance for the waste supplied.
- Page 13 Rebating the Shower Tray The figures below provide an indication of the type of typical recommended installation methods. It does not provide a fully detailed description for ALL installation methods / procedures. To aid installation, optional accessories are available, refer to section ‘Accessories’.
- Page 14 BASIC PANEL INSTALLATION Square/Rectangle Cut the panel to length. Note! When cutting to length, make sure that you take into account the amount of panel that goes into the corner connector. Note! The panel can be cut or shaped to suit the wall profile e.g. skirting board.
- Page 15 Offer up the panel to the tray with the horizontal grooves nearest the floor and make sure that the panel is the correct length. Note! If extra panel stability is required, secure wooden blocks or batons to the floor along the rear edge of the panel as shown. Remove the backing paper from the sticky pads and remove the protective film from the panel.
- Page 16 Pentangle Cut the panel to length. Note! When cutting to length, make sure that you take into account the amount of panel that goes into the corner connector. Note! The panel can be cut or shaped to suit the wall profile e.g. skirting board.
- Page 17 Offer up the panel to the tray with the horizontal grooves nearest the floor and make sure that the panel is the correct length. Note! If extra panel stability is required, secure wooden blocks or batons to the floor along the rear edge of the panel as shown. Remove the backing paper from the sticky pads and remove the protective film from the panel.
- Page 18 Quadrant Cut the panel to length. Note! Cut each end equally to maintain the correct fit of the curved panel. The panel can be cut or shaped to suit the wall profile e.g. skirting board. Remove the backing from one side of each of the pads and stick the pads to back of locators.
- Page 19 Offer up the panel to the tray and make sure that the panel is the correct length. Note! If extra panel stability is required, secure wooden blocks or batons to the floor along the rear edge of the panel as shown. Remove the backing paper from the sticky pads and remove the protective film from the panel.
-
Page 20: Maintenance
MAINTENANCE General Providing the shower tray has been correctly installed in accordance with the instructions contained in this guide, difficulties should not arise. If any maintenance is required then it must be carried out by a competent tradesperson for whom the maintenance instructions are provided. - Page 21 ACCESSORIES Genuine Mira accessories can be purchased direct from Customers Services (our contact details can be found on the back cover of this guide) or from approved stockists or merchants. Apply Silicone Sealant Shower Tray Offset Leg adaptor Adjustable Leg...
-
Page 22: Spare Parts
1570.005 PG (pergamon) 1570.589 WH (white) End Piece 1570.589 SC (soft cream) 1570.589 PG (pergamon) (for use with Square, Rectangle and Pentangle Trays) 1570.280 Mira Flight Riser Fittings Pack Comprising of: 1 Leg 1 Clip 1 Locator 2 Sticky Pads 1570.296... - Page 23 NOTES...
-
Page 24: Customer Service
Spares and Accessories - We hold the largest The guarantee applies solely to the original installation stocks of genuine Mira spares and accessories. under normal use and to the original purchaser only. Contact us for a price or visit our website to... - Page 25 Pdf Supplied By http://www.plumbworld.co.uk/...
Need help?
Do you have a question about the Flight Shower Tray and is the answer not in the manual?
Questions and answers