
Related Manuals for Dentsply Sirona SiroLaser Blue


Summary of Contents for Dentsply Sirona SiroLaser Blue
- Page 1 10.2018 New as of: SiroLaser Blue Operating Instructions (valid for USA) English Rx only. Federal law restricts this device to sale by or under the order of a dentist, physician, or licensed healthcare practitioner.
-
Page 2: Table Of Contents
Table of contents Dentsply Sirona Operating Instructions SiroLaser Blue Table of contents General information ....................Dear Customer..................... Contact data....................General information on the Operating Instructions ........Intended use ....................Formats and symbols used................Safety information ....................Identification of danger levels .............. - Page 3 Dentsply Sirona Table of contents Operating Instructions SiroLaser Blue Initial start-up – procedure for proper assembly........... 4.4.1 Install power supply ............... 4.4.2 Handpiece and assembly of single-use fiber tips and therapy rods ....................4.4.2.1 Handpiece ..............4.4.2.2 Assembly of sterile single-use optical fiber tips ....
- Page 4 Table of contents Dentsply Sirona Operating Instructions SiroLaser Blue Maintenance and service ..................Safety checks....................Cleaning the handpiece optics..............Maintenance ....................Troubleshooting of simple defects ............... Technical support, repair and testing............Replacing the rechargeable battery of the control unit ........
-
Page 5: General Information
Please perform maintenance and cleaning based on the corresponding instructions. We wish you much success and pleasure with the SiroLaser Blue. Your SiroLaser Blue Team Contact data Customer service center... -
Page 6: General Information On The Operating Instructions
Operating Instructions, please contact your dental dealer. Intended use The SiroLaser Blue is developed as a table top laser device intended for: ● (970nm and 445nm): intra- and extra-oral surgery including incision, excision, hemostasis, coagulation and vaporization of soft tissue including marginal and inter-dental and epithelial lining of free gingiva and is indicated for: frenectomy;... -
Page 7: Formats And Symbols Used
Dentsply Sirona 1 General information Operating Instructions SiroLaser Blue 1.5 Formats and symbols used Formats and symbols used The symbols and character formats used in the present manual have the following definitions: Instructions for action ü Prerequisite Prompts you to do something. -
Page 8: Safety Information
Information to make work easier For application information and other useful information. Standards and regulations For the installation and operation of the SiroLaser Blue, Dentsply Sirona requires: ● compliance with IEC 60825-1 and its amendments, ● observance of any supplemental national laws and regulations. -
Page 9: Operating Personnel
Unauthorized access In order to prevent false or improper use, the SiroLaser Blue must not be used by unauthorized persons. Therefore the SiroLaser Blue equipment must be protected against unauthorized access when not in use. -
Page 10: Laser Radiation Hazards
(wall outlet) the unit may only be used with internal electric power supply (battery). Do not use the SiroLaser Blue if a visual inspection shows that it has been damaged in any way. -
Page 11: Laser Protective Goggles
● are suitable for the correct wavelengths (labeled on the goggles) These instructions apply particularly when using goggles supplied from an outside source that are not included with the SiroLaser Blue. Optical instruments Never use optical instruments such as microscopes, eye loupes or magnifiers together with the original protective goggles. -
Page 12: Contamination
Location The SiroLaser Blue is to be protected against the intrusion of liquids. The SiroLaser Blue must not be used in areas in which the presence of liquids is probable. Verify that the line voltage corresponds to the voltage indicated on the rating plate of the power supply or in the technical specifications. -
Page 13: Modifications
Never disconnect the USB stick during data transfer while you perform a software update. The connection of the SiroLaser Blue to other USB devices could result in previously unidentified risks for your patients, yourself or others. 66 56 842 D3648... -
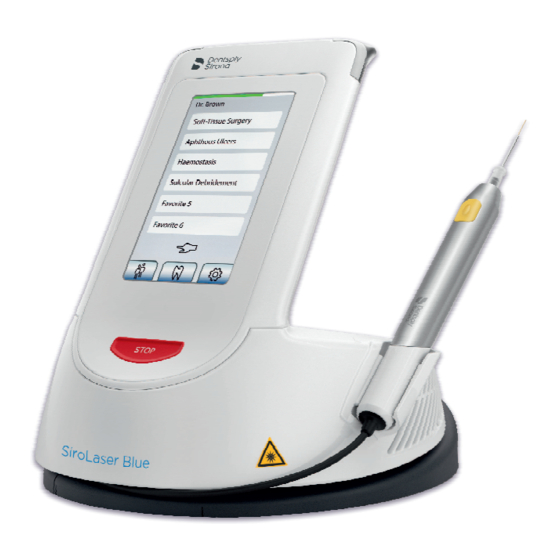
Page 14: System Description
3 System description Dentsply Sirona 3.1 System overview Operating Instructions SiroLaser Blue System description System overview SiroLaser Blue (Control unit) LED lights Touch screen Laser Stop key Carry handle Single-use fiber tips (EasyTip) Finger switch with exchangeable keypad Metal handpiece sleeve... -
Page 15: Dentsply Sirona
Dentsply Sirona 3 System description Operating Instructions SiroLaser Blue 3.1 System overview ON/OFF switch Power supply socket Interlock connector including interlock connector USB port Wireless foot control – optional Foot switch Registration key Safety and positioning bar 66 56 842 D3648... -
Page 16: Laser Operation Modes
3 System description Dentsply Sirona 3.2 Laser operation modes Operating Instructions SiroLaser Blue Laser operation modes Continuous wave mode (CW) CW implies a continuous, uninterrupted laser beam as long as the laser is activated (and determined by a time set). This mode presents a stable output power control since the maximum power equals the average power. -
Page 17: Symbols And Abbreviations
Dentsply Sirona 3 System description Operating Instructions SiroLaser Blue 3.3 Symbols and abbreviations Symbols and abbreviations 3.3.1 Symbols Type B applied part according to IEC 60601-1 CE mark in accordance with Council Directive 93/42/EEC, stating the manufacturer's Notified Body. Verifies the compliance of the SiroLaser... - Page 18 3 System description Dentsply Sirona 3.3 Symbols and abbreviations Operating Instructions SiroLaser Blue Temperature limitations, transport and storage Protect against moisture, keep dry Fragile, Handle with care Please refer to manual first (IEC 60601-1 3rd ed.) Power switch (on the backside of the control unit)
-
Page 19: Dentsply Sirona
Dentsply Sirona 3 System description Operating Instructions SiroLaser Blue 3.3 Symbols and abbreviations Warns of laser radiation emission at the distal tip of the handpiece. It also indicates the socket for the handpiece cable. Warns of laser radiation hazards when the fiber connector is unscrewed. -
Page 20: Abbreviations
3 System description Dentsply Sirona 3.3 Symbols and abbreviations Operating Instructions SiroLaser Blue 3.3.2 Abbreviations NOHD Nominal ocular Volt-ampere hazard distance Continuous Wave Effective voltage Pulsed Frequency or Threshold voltage Chopped Mode cont. continuous Volt per meter approximately Milliampere prox. -
Page 21: Technical Data
Dentsply Sirona 3 System description Operating Instructions SiroLaser Blue 3.4 Technical Data Technical Data General Beam guide: Flexible quartz glass fiber Display: Full color, graphical LCD touch screen Cooling: Internal air cooling controlled by output Temperature switch: Software temperature switch at 48° C Door contact connec- Potential-free contact 5 VDC/20 mA (TTL) -
Page 22: Dentsply Sirona
Type of protection SiroLaser handpiece applied part type B against electric shock: Power supply: The SiroLaser Blue may only be operated with the Sinpro MPU101-106 power sup- ply. Input voltage: 100 - 240 VAC Input current: 1.25 - 0.5 A... -
Page 23: Dentsply Sirona
The SiroLaser Blue comes in a cardboard box that ensures proper and easy transport. CAUTION Do not leave the SiroLaser Blue in a vehicle parked in the sun. The inside temperature of the car could thus heat up to a point where individual components may be damaged. -
Page 24: Dentsply Sirona
3 System description Dentsply Sirona 3.4 Technical Data Operating Instructions SiroLaser Blue Sterile delivered single-use fiber tips Labeling Each tip is sterilized with gas (ethylene oxide). A label on the outer packing of each set of 25 single-use fiber tips indicates the sterilization procedure (see 3.3.1 symbols). -
Page 25: Installation
Operating Instructions SiroLaser Blue 4.1 Scope of supply Installation Any national or local regulations stipulating that the SiroLaser Blue may be installed only by trained personnel must be strictly observed. Scope of supply The following components are included in the scope of supply of the... -
Page 26: Spare Parts
4 Installation Dentsply Sirona 4.2 Spare parts Operating Instructions SiroLaser Blue Spare parts Order-No Handpiece sleeve with keypad 62 56 767 Keypad finger switch 64 87 800 EasyTip 320 (25 pieces) 64 98 062 EasyTip 200 (25 pieces) 64 98 484... -
Page 27: Initial Start-Up - Procedure For Proper Assembly
There will be a warning if the rechargeable battery reaches a low level of capacity. This is indicated by the red LED bar on the top of the control unit. The SiroLaser Blue is fully functional and can be run while charging the battery. ➢ Charge the battery completely. -
Page 28: Handpiece And Assembly Of Single-Use Fiber Tips And Therapy Rods
EasyTips are delivered sterile in a special packaging tube, which also assists the mounting of the fiber tips.The optical single-use fiber tips can be used only with the SiroLaser Blue in the spectral range of 445 nm ± 5 nm and 970 nm -10/+15 nm. -
Page 29: Dentsply Sirona
Dentsply Sirona 4 Installation Operating Instructions SiroLaser Blue 4.4 Initial start-up – procedure for proper assembly WARNING Do not sterilize the single-use fiber tips (EasyTips) again after usage. Re-sterilization would severely affect the characteristics of the single- use fiber tips (laser power output, form, accuracy,…). - Page 30 Always wear protective goggles. 8. As soon as the SiroLaser Blue is ready you can check to make sure that the aiming beam illuminates evenly, i.e. projects a circular light pattern (see adjacent picture).To do this, aim the EasyTip vertically...
-
Page 31: Dentsply Sirona
Dentsply Sirona 4 Installation Operating Instructions SiroLaser Blue 4.4 Initial start-up – procedure for proper assembly Bending of the EasyTip WARNING For surgical applications, please bend the fiber tip not more than 60°. 1. Please sterilize the bending tool prior to each use in order to keep the sterile conditions of the EasyTip, see chapter "Cleaning,... -
Page 32: Dentsply Sirona
4 Installation Dentsply Sirona 4.4 Initial start-up – procedure for proper assembly Operating Instructions SiroLaser Blue 1. Place the optical fiber of the EasyTip in the fiber cutter at the notched mark. 2. Press the fiber cutter together and release it again. -
Page 33: Assembly Of Therapy Light Guide
= week year e.g. 0215 for calendar week 2, 2015). Please replace the light guide accordingly. The optical output can be reduced. The MultiTips can be used only with the SiroLaser Blue in the spectral range of 445 nm ± 5 nm, 660 nm ± 5 nm and 970 nm -10/+15 nm. -
Page 34: Install Wireless Foot Control - Optional
For technical data of the wireless foot control, see chapter Technical Data, "Wireless foot control". The wireless foot control must be assigned to the SiroLaser Blue via a registration. This prevents malfunctions caused by neighboring wireless controls. -
Page 35: Install Remote Interlock - Optional
NOTE The installation must be performed by a qualified electrician who is also responsible for the installation and maintenance of the electrical system to which the SiroLaser Blue is connected. NOTE Additional or different safety precautions required by the applicable national or local regulations for the protection of dentists, assistant personnel, or patients must also be observed. -
Page 36: Operation
5 Operation Dentsply Sirona 5.1 Start the device for the first time Operating Instructions SiroLaser Blue Operation Start the device for the first time NOTE Touch screen functionality: When the touch screen is touched by the finger, the touch field is highlighted. As soon as the finger leaves the touch screen the action will be started. -
Page 37: Dentsply Sirona
Dentsply Sirona 5 Operation Operating Instructions SiroLaser Blue 5.1 Start the device for the first time Settings User is able to do all the necessary settings, e.g. language settings All applications User is able to select an application from all applications or to define a... -
Page 38: Switch On/Off Power
Switch on/off power Switch on the laser device The LEDs will blink after starting the SiroLaser Blue by switching on the on/off button on the backside of the control unit. While the SiroLaser Blue is booting, information about the software version and the set language as well as the note to read the user manual will be displayed. -
Page 39: Dentsply Sirona
Dentsply Sirona 5 Operation Operating Instructions SiroLaser Blue 5.2 Switch on/off power Switch off the laser device To switch off the laser device press the on/off button on the backside of the control unit. The unit will ask you then to confirm switching off by pressing the “OK“... -
Page 40: Enter Pin Code
Favorite 5 structured the same way. Favorite 6 ● Settings Within this submenu you will be able to configure the SiroLaser Blue to your needs as well as you will find all necessary settings and service programs. ● User Change By pressing the 'user change button' you will jump back to the screen 'enter pin code'. -
Page 41: Self Test
Operating Instructions SiroLaser Blue 5.5 Main home screen 5.5.1 Self Test After booting, the SiroLaser Blue will automatically perform a self test including a status check of the following functions: ● Wireless foot control vs. finger switch ● USB port In addition, you will be informed when the next calibration check or when the next servicing is due. -
Page 42: Dentsply Sirona
NOTE Legal regulations require a regular safety test of the performance of a laser device. The SiroLaser Blue needs to be tested once every two years. Please contact your local dental dealer or an authorized Customer Service Department for technical support. -
Page 43: Favorites
Dentsply Sirona 5 Operation Operating Instructions SiroLaser Blue 5.5 Main home screen 5.5.2 Favorites Six applications from pre-sets within the submenus: Surgery, Periodontology, Endodontics, Miscellaneous and / or self-defined applications from My Applications can be defined as favorite Gingivectomy applications directly accessible from the home screen. Four favorites Perio. -
Page 44: Submenu: All Applications
5 Operation Dentsply Sirona 5.5 Main home screen Operating Instructions SiroLaser Blue 5.5.3 Submenu: All applications The submenus of the surgery, periodontology, endodontics, soft laser therapy and miscellaneous areas as well as the area of own applications are arranged in the same way. After opening the submenus, you can select among different indications with preset treatment parameters. -
Page 45: Dentsply Sirona
At the same time, two yellow LEDs at the upper right and left end of the SiroLaser Blue control unit light up, as does the ’laser active’ bar on the touch screen and the audible alarm sounds. When you release the finger or wireless foot control to interrupt treatment, the laser output is deactivated, but the laser remains ready for operation. -
Page 46: Dentsply Sirona
5 Operation Dentsply Sirona 5.5 Main home screen Operating Instructions SiroLaser Blue 1. Selected program In this example: Soft-tissue surgery Soft-tissue surgery Wavelengt 455 nm Power 2.0 W Time 00 s Duty cycle Frequency Ø -Power 2.0 W 2. Laser power In this example, the power output setting is 2.0 W. -
Page 47: Dentsply Sirona
Dentsply Sirona 5 Operation Operating Instructions SiroLaser Blue 5.5 Main home screen 5. Frequency In our example, the frequency is set to CW (continuous wave) mode. This is the modulation frequency of the laser unit. By pushing ‘frequency‘ touch screen you will be transferred to another screen where you will be able to enter the laser operation mode. -
Page 48: My Applications
5.5.3.2.1 Activation device If you have purchased the SiroLaser Blue with the optional wireless foot control, you have the choice to use either the finger switch or the wireless foot control. Select one and confirm by pressing 'OK'. -
Page 49: Dentsply Sirona
(e.g. SMITH instead key user) and to change the default PIN code 2 9 7 4. The key user is the administrator of the SiroLaser Blue and has all rights to create and configure up to five adittional users as well as to remove users. -
Page 50: Dentsply Sirona
5 Operation Dentsply Sirona 5.5 Main home screen Operating Instructions SiroLaser Blue NOTE If 'no' is entered, there will be no My Applications screen for this user. The key user decides if this user will have a power limit for treatments. If 'yes' is entered, the key user also enters the power limit in watts. -
Page 51: Dentsply Sirona
Operating Instructions SiroLaser Blue 5.5 Main home screen 5.5.3.2.5 Software update If a software update of the SiroLaser Blue is needed, please proceed as follows: CAUTION Use a USB class 2.0 (or above) memory stick. To perform the software download, use a USB stick with a minimum capacity of 512 MB. -
Page 52: Dentsply Sirona
● 1 W (445 nm) ● 1 W (970 nm) ● 100 mW (660 nm) The SiroLaser Blue performs a self-calibration. During this procedure, the system checks that the laser emission parameters are correct. We recommend that you check these values using a suitable external measuring instrument at least every twelve months. If the measurement readings indicate the following values, the calibration is correct: ●... -
Page 53: Dentsply Sirona
Dentsply Sirona 5 Operation Operating Instructions SiroLaser Blue 5.5 Main home screen 5.5.3.2.8.1 Calibration check without an external power meter ➢ Select "w/o power meter". Please read the operating instructions and wear protective goggles before proceeding to the calibration check. -
Page 54: Dentsply Sirona
5 Operation Dentsply Sirona 5.5 Main home screen Operating Instructions SiroLaser Blue 2. Press the finger switch for at least 3 seconds while directing the laser to the head of the power meter. 3. Read the measured power from the display of your power meter. -
Page 55: Error Messages, Warnings And Instructions
Dentsply Sirona 5 Operation Operating Instructions SiroLaser Blue 5.5 Main home screen 5.5.4 Error messages, warnings and instructions 5.5.4.1 Error messages and warnings Before battery calibration, The screen is displayed in Pin not correct Warns the user that USB this screen is displayed. -
Page 56: Dentsply Sirona
5 Operation Dentsply Sirona 5.5 Main home screen Operating Instructions SiroLaser Blue Displayed when the diode Displayed when an error Displayed when there is a Displayed when the inter- current differs by more of the fan occurs (for ex- finger switch error. -
Page 57: Instructions
Dentsply Sirona 5 Operation Operating Instructions SiroLaser Blue 5.5 Main home screen 5.5.4.2 Instructions Prior to starting battery This screen describes how The device asks to insert The device asks to use the calibration, remove the to perform the pairing the USB device to down- protective goggles. -
Page 58: Information Messages
5 Operation Dentsply Sirona 5.5 Main home screen Operating Instructions SiroLaser Blue The unit asks to direct the The unit asks that the fin- laser beam to the power ger switch is pressed for meter and to press the fin- three seconds. -
Page 59: Indications, Contraindications And Medical Precautions
Indications, contraindications and medical precautions Indications The SiroLaser Blue is intended for: Intra- and extra-oral surgery including incision, excision, hemostasis, coagulation and vaporization of soft tissue including marginal and interdental and epithelial lining of free gingiva and is indicated for: frenectomy;... -
Page 60: List Of Preset Indications
6 Indications, contraindications and medical precautions Dentsply Sirona 6.2 List of preset indications Operating Instructions SiroLaser Blue List of preset indications Application Used Power Modus Time Duty Fre- Fiber Help Menu wave- [sec] Cycle quency [µm] length [Hz] [nm] Endodontics... -
Page 61: Additional Indications
Dentsply Sirona 6 Indications, contraindications and medical precautions Operating Instructions SiroLaser Blue 6.3 Additional indications Additional indications Application Used Power Modus Time Duty Fre- Fiber Help Menu wave- [sec] Cycle quenz [µm] length [nm] [Hz] Treatment of cont. Anesthetics not needed! Apply canker sores laser 1-3 mm away from lesion for... -
Page 62: Contraindications
6.6 Contraindications Operating Instructions SiroLaser Blue Contraindications All clinical procedures performed with the SiroLaser Blue must be subjected to the same clinical judgment and care as with traditional techniques. Patient risk must always be considered and fully understood before clinical treatment. The clinician must completely understand the patient’s medical history prior to treatment. -
Page 63: Cleaning, Disinfection And Sterilization
7 Cleaning, disinfection and sterilization Operating Instructions SiroLaser Blue 7.1 Cleaning Cleaning, disinfection and sterilization Following treatment, switch off the SiroLaser Blue and disconnect the power cable from the power supply. NOTE Wear gloves during these procedures. Control unit, handpiece body, handpiece tube and foot control must be cleaned and wipe-disinfected. -
Page 64: Disinfection
Use only disinfectants that comply with the requirements of your national authorities and whose bactericidal, fungicidal and virucidal properties have been tested and properly certified. Dentsply Sirona recommends the use of MinuteWipes from Alpro. ™ In the USA: Caviwipes are recommended. -
Page 65: Cleaning The Control Unit
Sterilize again once the storage period has elapsed. This is not valid for sterile delivered single-use EasyTips. Cleaning the control unit Use a dry, soft cloth to remove dust from the SiroLaser Blue. More stubborn spots can be removed with a damp cloth. NOTE Please proceed carefully not to scratch and damage the foil on the touch screen. -
Page 66: Maintenance And Service
8 Maintenance and service Dentsply Sirona 8.1 Safety checks Operating Instructions SiroLaser Blue Maintenance and service Safety checks The following safety checks must be performed every 24 months by a qualified service engineer: ● Visual inspection of the unit and its accessories for mechanical damage that might impair operation ●... -
Page 67: Maintenance
● Modifications of the laser unit or repair work may be performed only by authorized personnel. ● The electrical installations in the rooms where the SiroLaser Blue is used must fulfill the applicable legal requirements. ● The unit must be used in compliance with the instructions provided in this instruction manual. -
Page 68: Troubleshooting Of Simple Defects
● Check the functioning of the finger switch and/or wireless foot control by pressing several times. If the touch screen of the SiroLaser Blue remains dark after switching it ● Check the connection of the power cable and/or check the rechargeable battery. -
Page 69: Technical Support, Repair And Testing
Please contact your local dental dealer or an authorized Customer Service Department for technical support. The SiroLaser Blue may be sent in for repair or for safety inspection only in its original packaging, including all accessories. Disinfect the SiroLaser Blue and sterilize the accessories according to the relevant instructions for use before shipping them. -
Page 70: Replacing The Rechargeable Battery Of The Control Unit
Make sure that the small metal cylinder of the cable is properly placed in the anti-pull clamp. Fiber in the cable may break if not correctly mounted, resulting in high repair costs. Only use the Dentsply Sirona battery pack, see "Spare parts [→ 26]". 66 56 842 D3648 D3648.201.03.02.02 10.2018... -
Page 71: Replacing The Batteries Of The Wireless Foot Control
Touch a grounded metal part before opening the housing to prevent damage to the PC board due to electrostatic discharge. CAUTION Prior to changing the batteries, switch the SiroLaser Blue off at the main switch. This prevents accidental triggering. Removing and replacing the batteries 1. -
Page 72: Replacement Of Parts Subject To Wear And Tear
● Rechargeable battery (change after 1000 charging cycles or every two years) ● Batteries in wireless foot control (change after 1 year) For further information, see chapter "Cleaning, disinfection and sterilization [→ 63]". CAUTION Only use parts from Dentsply Sirona, see "Spare parts [→ 26]". 66 56 842 D3648 D3648.201.03.02.02 10.2018... -
Page 73: Electromagnetic Compatibility
Dentsply Sirona 9 Electromagnetic compatibility Operating Instructions SiroLaser Blue 9.1 Electromagnetic emission Electromagnetic compatibility NOTE The SiroLaser Blue complies with all requirements for electromagnetic compatibility according to IEC 60601-1-2: 2007 Definitions: Emission (electromagnetic) When electromagnetic energy is emitted by a source. Interference immunity The ability of a device or system to work without errors even if there is electromagnetic interference. -
Page 74: Interference Immunity
9 Electromagnetic compatibility Dentsply Sirona 9.2 Interference immunity Operating Instructions SiroLaser Blue Interference immunity The UNIT is intended for operation in the electromagnetic environment specified below. The customer or user of the UNIT should make sure that it is used in such an environment. - Page 75 Dentsply Sirona 9 Electromagnetic compatibility Operating Instructions SiroLaser Blue 9.2 Interference immunity Interference IEC 60601-1-2 test level Compliance level Electromagnetic environment – immunity tests guidance Conducted RF d= [1.2] √P interference 150 kHz to 80 MHz IEC 61000-4-6 Radiated RF 3 V/m d= [1.2] √P...
-
Page 76: Working Clearances
9 Electromagnetic compatibility Dentsply Sirona 9.3 Working clearances Operating Instructions SiroLaser Blue Working clearances The UNIT is intended for operation in an electromagnetic environment, where radiated RF interference is checked. The customer or the user of the UNIT can help prevent electromagnetic interference by maintaining... -
Page 77: Disposal
Dentsply Sirona 10 Disposal Operating Instructions SiroLaser Blue 9.3 Working clearances Disposal In accordance with Directive 2012/19/EU and national disposal regulations regarding old electrical and electronic devices, please be advised that such items must be disposed of in a special way within the European Union (EU). -
Page 78: Batteries
Please dispose the batteries according to the disposal regulations and legal requirements applicable in your country. Prior to disposal, remove the following batteries: ● Batteries in the wireless foot control ● Lithium battery in the SiroLaser Blue Accessories 10.2 MultiTips, handpiece sleeve incl. keypad for finger switch, bending tool for EasyTips and fiber cutter may be disposed in the domestic refuse. -
Page 79: Appendix
Directive 93/42/EEC concerning medical devices. Appendix B -Label positions 11.2 11.2.1 Control unit The following figures show the positions of the labels on the SiroLaser Blue: Front side Rear side CAUTION VISIBLE AND INVISIBLE LASER RADIATION. AVOID EYE OR SKIN EXPOSURE TO... -
Page 80: Wireless Foot Control - Optional
11 Appendix Dentsply Sirona 11.2 Appendix B -Label positions Operating Instructions SiroLaser Blue Bottom side Use only with power supply Sinpro MPU 101-106 USA ONLY CAUTION Complies with FDA performance standards for laser products CLASS 4 VISIBLE AND INVISIBLE LASER except for deviations pursuant to RADIATION WHEN OPEN. -
Page 81: Appendix C - Safety Circuit (Interlock)
11.3 Appendix C – Safety circuit (interlock) Appendix C – Safety circuit (interlock) 11.3 Interlock connection supplied with the SiroLaser Blue (Insulate the jumper between pins 1 and 2; connect both of these pins to relay K1 with a two-core cable). -
Page 82: D3648
We reserve the right to make any alterations which may be required due to technical improvements. © Sirona Dental Systems GmbH Sprache: englisch Printed in Germany D3648.201.03.02.02 10.2018 Ä.-Nr.: 126 299 Sirona Dental Systems GmbH 66 56 842 D3648 Fabrikstr. 31 Order No ...
Need help?
Do you have a question about the SiroLaser Blue and is the answer not in the manual?
Questions and answers