Table of Contents
Advertisement
Advertisement
Table of Contents

Related Manuals for GRAVOGRAPH IS200


Summary of Contents for GRAVOGRAPH IS200
- Page 1 OPERATING AND MAINTENANCE MANUAL IS200 Electronic engraving machine...
-
Page 2: Table Of Contents
Table of contents A. Foreword ..............................4 1. Appreciation ............................4 2. Information ............................. 4 B. Legal notices ............................5 C. Regulation observance ..........................6 D. Introduction ..............................7 1. Presentation ............................7 2. Identification of the marking equipment ....................7 E. Unpacking ..............................8 1. Unpacking .............................. 8 2. Package contents ........................... - Page 3 2. Installation ............................21 „ Switching on the machine ........................21 „ Resolution of the problems ........................ 21 „ Power down ............................21 „ Restarting ............................22 3. Program installation ..........................22 J. Using the machine ..........................23 1. Using the program ..........................23 2.
-
Page 4: Foreword
Gravotech is pleased to count you among the users of its engraving and traceability solutions. For help, contact Gravotech. For more information on products, visit www.gravograph.com website. 2. Information To ensure security and productivity, read this manual before starting-up the equipment. -
Page 5: Legal Notices
To the widest extent permitted by law, Gravotech shall only be held liable for direct damage arising from personal injury caused by a fault proven in its Product (including this manual). Gravotech® - Type3® - Propen™ - Technifor™ - Gravograph® is (are) a used, pending or registered trademark(s) of Gravotech group or one of its subsidiaries. The products and names of third party companies which appear in this manual are used solely for the necessary purposes of reference, and in particular for issues of compatibility. All the trademarks mentioned in this manual remain the property of their respective owners. -
Page 6: Regulation Observance
IM3, TXL M20, M20 Jewel, M20 ABC, M20 Pen, M20 Energy, M20 Beauty Cube M40, M40 Deep vice, M40 Gift, M40 ABC IS200, IS200 TX, IS400, IS400 Volume, IS900 IS6, 7, 8000 - XP - XP Milling Hot foil stamping: Machine... -
Page 7: Introduction
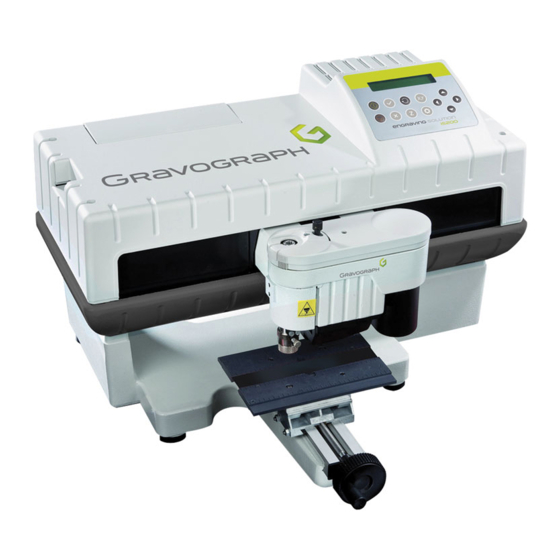
D. Introduction 1. Presentation The IS200 machines are electronic engraving machines. • They are provided with a keypad and a screen for controlling the machine. • The files to be engraved are transferred from the software to the engraving machine. • Engraving is performed by the tool holder assembly. The IQ+ (Intelligence Quotient +) concept increases movement and machine/PC communication speeds. Function Engraving area Firmware... -
Page 8: Unpacking
Keep the packaging in order to move the machine safely. This packaging is designed to protect the machine during shipping (return for repair...). The packaging complies with European recycling standards. 1. Remove the accessories package, protective wrappers and cardboard box. 2. Remove the machine from the packaging. 3. Check that nothing is missing from the parcel. If anything is missing, contact Gravotech. Wedge Machine IS200 Toolbox M_IS200_EN_B... -
Page 9: Package Contents
Unpacking 2. Package contents Machine IS200 - DVD containing the instruction manual - Program Gravostyle Toolbox Starter kit Twincut Power cable USB cord M_IS200_EN_B... -
Page 10: Toolbox: Content
Unpacking 3. Toolbox: content Driver Ball-tip hex key Screwdriver (3.5) Allen key Jig(s) Cutter button(s) Depth regulating nose Spindle belt Fuse T 2 A H - 250 V (x2) Brush M_IS200_EN_B... -
Page 11: Safety
For safety reasons, never operate the machine without constant surveillance. Turn off the machine before beginning any cleaning, maintenance or repair procedure. Never hold the materials for engraving by the hands. Do not start engraving without first ensuring that the object to be engraved is securely clamped. Use only Gravograph clamping systems designed for the machine. Never take hold of the material for engraving when engraving is in progress. Keep away from the area above the machine. Ensure that people are kept clear of the area of travel of the moving parts of the machine and that no objects risk obstructing their movement. -
Page 12: X84; Handling The Machine
This machine is designed for a single user only. Do not allow its operation by multiple users at the same time. During engraving operations, use this machine with a (regulating or suction) nose in order to prevent flying swarf. Interrupt engraving by means of the function provided for this purpose on the machine control panel. Use the machine with Gravograph tools only. „ Wearing safety glasses The use of safety glasses is recommended for protection against flying swarf. M_IS200_EN_B... -
Page 13: Required Safety Labels
Safety 2. Required safety labels Warning: Electricity Warning: Rotation of the spindle Refer to instructions manual/booklet. M_IS200_EN_B... -
Page 14: Description Of The Machine
G. Description of the machine 1. Front view of the machine Tool holder assembly Vice + jig(s) Control panel Frame „ Vice Jig(s) Dowel Jaws Handle for opening/closing the vice jaws 1. Separate the jaws by turning the handle (counter-clockwise). The jaws must be spaced far enough apart so as not to obstruct the mounting of the 2 jigs. 2. -
Page 15: X84; Tool Holder
Description of the machine „ Tool holder Spindle pressure thumbwheel Cutter(s) Cutter button(s) Spindle belt Index pin Scaled knob Nose nut Belt housing M_IS200_EN_B... -
Page 16: X84; Control Panel
Rotation of the spindle Spindle rotation activation/deactivation (machine paused) Movement: engraving area Z Ref. Adjustment: Z Ref. • Adjustment: number of passes Pass(es) • Adjusting the machine • Head movement (X, Y, Z) Joystick • Move the cursor to different data entry areas Detail on the human-machine interface: refer to the user manual for the IS200 program. M_IS200_EN_B... -
Page 17: Rear View Of The Machine
Description of the machine 2. Rear view of the machine Each connection meets one of the following safety levels: - dangerous voltage - SELV (safety extra-low voltage) On / Off switch Port: USB - SELV SCREEN (do not use) „ On / Off switch (general stop button) Fuse carrier (Fuse T 2 A H - 250 V) On / Off switch Power inlet / outlet - Dangerous voltage M_IS200_EN_B... -
Page 18: Recommendations For Installation
The power cable must always be easily accessible (power shut-off device). • Protect the equipment against: damp (rain, snow, condensation etc.) heat (exposure to full sun, heating etc.) sudden changes in temperature dust (extraction duct) spillages of liquids onto the electrical unit, cables and connections, and all other parts of the machine (except in situations recommended by Gravotech (lubrication)) vibrations electrical/electronic radiation 2. IT requirements • Firmware: refer to the user manual for the IS200 program. • Refer to the user manual for the Gravostyle program. M_IS200_EN_B... -
Page 19: Electrical Installation
Avoid the installation of manual or automatic switching systems on the same mains power line as the machine (relays, timers, programmers, automatic circuit-breakers, automatic switches, etc.). • Check that devices in the vicinity of the machine meet the standards for electromagnetic interference (Read the technical data sheet for each device.). If they are non-compliant, move them as far away from the machine as possible. • Use the Gravograph accessories. Always switch the machine off before connecting or disconnecting a cable or optional accessory. M_IS200_EN_B... -
Page 20: Connections - Installation
I. Connections - Installation 1. Connections „ Power supply connection Power inlet / outlet Connect the machine to the power supply. To cut off the power to the machine if there is a serious problem, unplug the power cable or operate the On/Off switch (general stop button). „ Machine / PC connection The machine installation and usage procedure is based on a PC-type computer running Windows®. For help, contact Gravotech. -
Page 21: Installation
Connections - Installation 2. Installation „ Switching on the machine Place the switch in the "I" position (On). The machine emits an audible signal. Leave the machine powered on, even if it is only going to be used at intervals. „ Resolution of the problems If the machine does not switch on: • Check that the power cord is correctly plugged in to both the machine and the power supply. -
Page 22: X84; Restarting
Connections - Installation „ Restarting If the machine or the operating program locks, the machine may need to be restarted. 1. Switch off the machine. 2. Wait approximately 30 s. This waiting time must be respected. It prevents an electric surge likely to damage the machine's power supply. 3. Switch on the machine. 3. Program installation • Refer to the user manual for the Gravostyle program. -
Page 23: Using The Machine
J. Using the machine 1. Using the program The machine is an output peripheral, like a printer. • Firmware: refer to the user manual for the IS200 program. • Refer to the user manual for the Gravostyle program. 2. Transfer of the composition to the machine 1. Switch on the machine. -
Page 24: Positioning The Object To Be Engraved (Vice)
Using the machine 3. Positioning the object to be engraved (vice) 1. Choose the jigs according to the length of the object to be engraved. Consult a Gravotech retailer to find out about the various jigs available. The length of the object to be engraved must never exceed that of the jigs: Jig(s) 2. -
Page 25: Adjustment On The Tool Holder
Using the machine 4. Adjustment on the tool holder „ Spindle pressure adjustment 1. Press on the arrow keys in succession: Start - Pause. The tool holder stops above the material to be engraved at the point at which engraving is to start. 2. Adjust the spindle pressure with the pressure thumbwheel. Spindle pressure thumbwheel Slot To engrave without a nose, the pressure knob must be completely tightened so that the spindle is rigid. -
Page 26: X84; Engraving With A Regulating Nose
Using the machine „ Engraving with a regulating nose For engraving with a nose, adjustment is carried out according to the hardness of the material, the width of the cutter and the state of the surface of the plate. If there is any risk that the nose might scratch the surface of the object, reduce the spindle pressure. Depth regulating nose Index pin Scaled knob 1. -
Page 27: X84; Mounting The Cutter On The Tool Holder
Carbide cutters are fragile. It is advisable to have as many cutter buttons as you have cutters, so that they can be left assembled and the settings saved if necessary (materials of the same thickness). Save the configuration and the ZRef. (refer to the user manual for the IS200 program). 1. Press the following key on the machine: 2. Press the following key on the machine: The tool holder is lowered until the depth regulating nose touches the plate to be engraved. - Page 28 Using the machine 4. Screw cutter button onto the spindle (counter-clockwise). Cutter button(s) 5. Insert the cutter into the spindle until it comes into contact with the material to be engraved. In order to facilitate the passage of the cutter, slightly loosen the screw on the upper part of the cutter button.
-
Page 29: X84; Setting The Origin Of The Tool Carrier
Using the machine „ Setting the origin of the tool carrier Store the position of the tool carrier by pressing the "Check" key. The tool holder is raised. „ Adjusting the engraving depth 1. Turn the scaled knob a few notches to the right to obtain the desired engraving depth. 1 division(s) = 0.025 mm (0.001 in) The number of notches depends on the engraving depth and the material: Material to be engraved... -
Page 30: Start-Up Engraving
Using the machine 5. Start-up engraving Engraving is launched from the control panel on the machine. 1. Check that the object is correctly positioned in the engraving area. 2. Press the key: The tool holder moves at a safe movement speed to the first engraving point and starts the engraving. • In the event of a problem, press the Pause button. The machine pauses momentarily. -
Page 31: Adaptable Accessories
K. Adaptable accessories List of accessories available upon request 1. Pen attachment This accessory is placed on the vice. Installation - Use: refer to the manual. A circular device enables cylindrical parts to be marked/engraved. 2. Gravogrip table This accessory is placed on the vice. Gravogrip table + ruler (units (mm or inches)) M_IS200_EN_B... -
Page 32: Preventive Maintenance
L. Preventive maintenance 1. General maintenance • Unplug the power supply plug before beginning any cleaning or maintenance operation. • The mains power cable must be replaced immediately if it is cut or crushed, cracked or a conductor is stripped bare. The machine's maintenance needs depend on the type of material used, the quantity of material removed, frequency of operation, environment and the effectiveness of the air extraction system. It is the user's responsibility to define them. -
Page 33: Changing The Spindle Belt
Preventive maintenance 2. Changing the spindle belt 1. Slide the belt housing (right). Unscrew the 2 screws at the top of the housing. Screw 3. Remove the belt housing. 4. Pull the belt upwards. Rotate the motor pulley. Spindle pulley Motor pulley Belt 5. -
Page 34: Changing The Fuse
Preventive maintenance 3. Changing the fuse A damaged fuse is the result of a problem on the machine or its environment. If the new fuse blows, contact an approved Gravotech technician. 1. Unplug the power supply cord. 2. Extract the fuse holder with 1 screwdriver(s). 3. -
Page 35: Adjusting The Machine
4. Adjusting the machine The center of the engraving area of the machine must be aligned with the clamping system. The IS200 machines have a machine reference point adjustment system which can be deployed by the user. 1. Switch on the machine. -
Page 36: Technical Specifications
M. Technical specifications 1. Physical characteristics Dimensions (L x w x h) 500 mm (19.685 in) x 455 mm (17.913 in) x 295 mm (11.614 in) Net weight 20 kg (44.092 lb) Engraving area Maximum: 225 mm (8.858 in) x 80 mm (3.150 in) Dimensions (L x D x H): with packaging 650 mm (25.591 in) x 600 mm (23.622 in) x 400 mm (15.748 in) Weight: with packaging 23 kg (50.706 lb) Dimensions (L x w x h): permissible object Unlimited x 140 mm (5.512 in) x 30 mm (1.181 in) Jaws opening Maximum: 140 mm (5.512 in) Height of jaws 16 mm (0.630 in) Passage under spindle: with jigs 14 mm (0.551 in) Travel distance Z 15 mm (0.591 in) 2. Engraving characteristics Type of spindle(s) Rotating / through spindle with cutter button Diameter (tool) -
Page 37: Electrical Characteristics
Technical specifications 4. Electrical characteristics Nominal voltage / Type of current 100 - 240 V Absorbed current Maximum: 1.3 A Frequency 50-60 Hz Power 90 W Protection(s) Fuse 5x 20 mm (0.787 in) 2 A F1T Degree of protection IP40 „ Spindle motor Type Direct current Power 20 W Absorbed current 1.1 A Speed...
Need help?
Do you have a question about the IS200 and is the answer not in the manual?
Questions and answers
Machine problem for bower line tin thick line not came