
Related Manuals for Schweitzer Engineering Laboratories SEL-700G Series


Summary of Contents for Schweitzer Engineering Laboratories SEL-700G Series
- Page 1 SEL-700G Generator and Intertie Protection Relays SEL-700G0 SEL-700G1 SEL-700GT SEL-700GW Instruction Manual 20170814 *PM700G-01-NB*...
- Page 2 SEL products appearing in this document may be covered by U.S. and Foreign patents. Schweitzer Engineering Laboratories, Inc. reserves all rights and benefits afforded under federal and international copyright and patent laws in its products, including without limitation software, firmware, and documentation.
-
Page 3: Table Of Contents
Table of Contents Instruction Manual List of Tables ............................... v List of Figures ..............................xiii Preface ................................xxi Manual Overview ............................xxi Safety Information............................xxii Conventions ..............................xxvi Section 1: Introduction and Specifications Overview ................................. 1.1 Features................................1.1 Models, Options, and Accessories........................1.5 Applications.............................. - Page 4 Table of Contents Report Settings (SET R Command) ......................4.234 DNP Map Settings (SET DNP n Command, n = 1, 2, or 3)..................4.237 Modbus Map Settings (SET M Command)....................4.238 Section 5: Metering and Monitoring Overview ................................. 5.1 Power Measurement Conventions ........................5.2 Delta-Connected CTs ............................
- Page 5 Table of Contents Appendix C: SEL Communications Processors SEL Communications Protocols........................C.1 SEL Communications Processor ........................C.3 SEL Communications Processor and Relay Architecture ................C.5 SEL Communications Processor Example......................C.7 Appendix D: DNP3 Communications Overview ................................ D.1 Introduction to DNP3 ............................. D.1 DNP3 in the SEL-700G..........................D.6 DNP3 Documentation ..........................
- Page 6 Table of Contents Appendix K: Analog Quantities Glossary Index SEL-700G Relay Command Summary SEL-700G Relay Instruction Manual Date Code 20170814...
-
Page 7: List Of Tables
List of Tables Instruction Manual Table 1.1 Current (ACI) and Voltage (AVI) Card Selection for SEL-700G Models ......1.2 Table 1.2 Protection Elements in SEL-700G Models ................1.2 Table 1.3 Recommended Protection Elements by Generator Grounding Method......... 1.4 Table 1.4 SEL-700G Serial Port Settings.................... - Page 8 List of Tables Table 4.26 Equations Associated With IEC Curves................4.98 Table 4.27 Available Ground Directional Elements................4.103 Table 4.28 Best Choice Ground Directional Element Logic..............4.104 Table 4.29 Ground Directional Element Availability by Voltage Transformer Connections On X Side ........................4.104 Table 4.30 Ground Directional Element Availability by Voltage Transformer Connections On Y Side ........................
- Page 9 List of Tables Table 4.80 Rear-Panel DeviceNet Port Settings................... 4.223 Table 4.81 Display Point and Local Bit Default Settings ..............4.223 Table 4.82 LCD Display Settings......................4.223 Table 4.83 Settings That Always, Never, or Conditionally Hide a Display Point ....... 4.225 Table 4.84 Entries for the Four Strings ....................
- Page 10 viii List of Tables Table 7.19 GEN Command Variants...................... 7.28 Table 7.20 GSH Command Variants ...................... 7.29 Table 7.21 GOOSE Command Variants....................7.30 Table 7.22 GOOSE IED Description ..................... 7.30 Table 7.23 GROUP Command....................... 7.32 Table 7.24 HELP Command ........................7.32 Table 7.25 HISTORY Command ......................
- Page 11 List of Tables Table 10.5 CTRY Phase Current Measuring Accuracy................ 10.10 Table 10.6 Power Quantity Accuracy—Wye Voltages................. 10.11 Table 10.7 Power Quantity Accuracy—Delta Voltages ............... 10.12 Table 10.8 Periodic Relay Checks ....................... 10.12 Table 10.9 Relay Self-Tests........................10.13 Table 10.10 Troubleshooting........................
- Page 12 List of Tables Table E.17 Responses to 06h Preset Single Register Query Errors............E.13 Table E.18 08h Loopback Diagnostic Command...................E.14 Table E.19 Responses to 08h Loopback Diagnostic Query Errors............E.14 Table E.20 10h Preset Multiple Registers Command................E.14 Table E.21 10h Preset Multiple Registers Query Error Messages ............E.15 Table E.22 60h Read Parameter Information Command................E.15 Table E.23...
- Page 13 List of Tables Table H.5 SEL-700G Serial Port Settings for Synchrophasors ............. H.9 Table H.6 SEL-700G Ethernet Port Settings for Synchrophasors ............H.10 Table H.7 Synchrophasor Trigger Relay Word Bits ................H.12 Table H.8 Time-Synchronization Relay Word Bits ................H.13 Table H.9 TQUAL Bits Translation to Time Quality................
- Page 14 This page intentionally left blank...
-
Page 15: List Of Figures
List of Figures Instruction Manual Figure 1.1 Typical Current Connections....................1.8 Figure 1.2 Response Header ........................1.9 Figure 1.3 STA Command Response—No Communications Card or EIA-232/EIA-485 Communications Card ................ 1.10 Figure 1.4 STA Command Response—Communications Card/DeviceNet Protocol......1.10 Figure 2.1 Relay Panel-Mount Dimensions..................... - Page 16 List of Figures Figure 3.4 Communications Menu ......................3.3 Figure 3.5 Device Response to the ID Command ................... 3.4 Figure 3.6 Selection of Drivers........................ 3.7 Figure 3.7 Update Part Number....................... 3.7 Figure 3.8 New Setting Screen ........................ 3.8 Figure 3.9 Expressions Created With Expression Builder ..............
- Page 17 List of Figures Figure 4.44 Example Turbine Operating Limitations During Abnormal Frequency ......4.75 Figure 4.45 Abnormal Frequency Protection Logic Diagram ..............4.76 Figure 4.46 Single-Blinder Scheme Operating Characteristics ............... 4.78 Figure 4.47 Single-Blinder Scheme Logic Diagram ................4.79 Figure 4.48 Single-Blinder Typical Settings....................
- Page 18 List of Figures Figure 4.87 Positive-Sequence Voltage-Polarized Directional Element for Phase Overcurrent Elements ......................... 4.119 Figure 4.88 Routing of Directional Elements to Negative-Sequence and Phase Overcurrent Elements ......................... 4.120 Figure 4.89 Direction Forward/Reverse Logic for Negative-Sequence Overcurrent Elements .... 4.120 Figure 4.90 Direction Forward/Reverse Logic for Phase Overcurrent Elements ........
- Page 19 List of Figures xvii Figure 4.139 Example of the Effects of the Input Precedence ..............4.204 Figure 4.140 Breaker Failure Logic......................4.211 Figure 4.141 Analog Input Card Adaptive Name..................4.212 Figure 4.142 Settings to Configure Input 1 as a 4–20 mA Transducer Measuring Temperatures Between –50°C and 150°C .....................
- Page 20 xviii List of Figures Figure 7.5 IRIG-B Input Via EIA-232 Port 3 (SEL Communications Processor as Source) ....7.6 Figure 7.6 IRIG-B Input VIA EIA-232 Port 3 (SEL-2401/2404/2407 Time Source)......7.6 Figure 7.7 IRIG-B Input VIA Fiber-Optic EIA-232 Port 2 (SEL-2030/2032 Time Source) ....7.7 Figure 7.8 IRIG-B Input VIA Fiber-Optic EIA-232 Port 2 (SEL-2401/2404/2407 Time Source) ..
- Page 21 List of Figures Figure 9.5 Derivation of Phasor RMS Current Values From Event Report Current Values....9.15 Figure 9.6 Sample CEV Report Viewed With Analytic Assistant or QuickSet Via SEL-5601 .... 9.16 Figure 9.7 Options for Converting CEV Reports to COMTRADE in Analytic Assistant ....9.16 Figure 9.8 Example Standard 15-cycle Digital Event Report (EVE D X Command) 1/4 Cycle Resolution ......................
- Page 22 This page intentionally left blank...
-
Page 23: Preface
Preface R.Instruction Manual Manual Overview The SEL-700G Relay Instruction Manual describes common aspects of generator and intertie relay application and use. It includes the necessary information to install, set, test, and operate the relay. An overview of each manual section and topics follows: Preface. -
Page 24: Safety Information
xxii Preface Safety Information Appendix D: DNP3 Communications. Describes the DNP3 protocol support provided by the SEL-700G. Appendix E: Modbus RTU Communications. Describes the Modbus protocol support provided by the SEL-700G. Appendix F: IEC 61850 Communications. Describes IEC 61850 implementation in the SEL-700G. Appendix G: DeviceNet Communications. - Page 25 Preface xxiii Safety Information Safety Symbols The following symbols are often marked on SEL products. CAUTION ATTENTION Refer to accompanying documents. Se reporter à la documentation. Earth (ground) Terre Protective earth (ground) Terre de protection Direct current Courant continu Alternating current Courant alternatif Both direct and alternating current Courant continu et alternatif...
- Page 26 xxiv Preface Safety Information Hazardous Locations Approvals The SEL-700G is UL certified for hazardous locations to U.S. and Canadian standards. In North America, the relay is approved for Hazardous Locations Class I, Division 2, Groups A, B, C, and D, and temperature class T4A in the maximum surrounding air temperature of 50°C.
- Page 27 Preface Safety Information Other Safety Marks (Sheet 2 of 2) WARNING AVERTISSEMENT This device is shipped with default passwords. Default passwords Cet appareil est expédié avec des mots de passe par défaut. A should be changed to private passwords at installation. Failure to l’installation, les mots de passe par défaut devront être changés pour change each default password to a private password may allow des mots de passe confidentiels.
-
Page 28: Conventions
xxvi Preface Conventions Conventions Typographic There are many ways to communicate with the SEL-700G. The three primary methods are: Conventions ➤ Using a command line interface on a PC terminal emulation window. ➤ Using the front-panel menus and pushbuttons. ➤ Using QuickSet. - Page 29 Preface xxvii Conventions Product Labels You can find the serial number, model number, and rating of the product on the labels located on the left side panel of the relay. The example below shows product labels for high-voltage and low-voltage power supply options. (for high-voltage supply) (for low-voltage supply) Date Code 20170814...
- Page 30 xxviii Preface Conventions LED Emitter The following table shows LED information specific to the SEL-700G (see Figure 2.10 for the location of the ports using these LEDs on the relay). CAUTION Item Fiber-Optic Ethernet Port 1 (1A, 1B) Port 2 Looking into optical connections, fiber ends, or bulkhead connections Mode...
- Page 31 (such as xylene or acetone) on any Decontamination surface of the relay. Technical Assistance Obtain technical assistance from the following address: Schweitzer Engineering Laboratories, Inc. WARNING 2350 NE Hopkins Court Use of this equipment in a manner Pullman, WA 99163-5603 U.S.A.
- Page 32 This page intentionally left blank...
-
Page 33: Section 1: Introduction And Specifications
Section 1 Introduction and Specifications Instruction Manual Overview The SEL-700G Relay is designed to provide comprehensive protection, integration and control features in a flexible, compact, and cost-effective package. The SEL-700G0 and SEL-700G1 relays provide basic to full generator protection for small to large machines. The SEL-700GT Relay provides complete intertie and generator protection. -
Page 34: Table 1.1 Current (Aci) And Voltage (Avi) Card Selection For Sel-700G Models
Introduction and Specifications Features connect an external zero-sequence voltage input. In such an application, the setting EXT3V0_X must also be set accordingly. Refer to Section 4: Protection and Logic Functions for more details. Table 1.1 Current (ACI) and Voltage (AVI) Card Selection for SEL-700G Models Slot Z Card Slot E Card Model... - Page 35 Introduction and Specifications Features Table 1.2 Protection Elements in SEL-700G Models (Sheet 2 of 2) Basic With Basic Intertie and Wind Generator 21C, 25, 21C, 78, 21C, 25, Intertie Generator Generator Protection 64G, 78 64G, 78, 87 Protection Protection Protection PROTECTION ELEMENTS 700G0 700G0+...
-
Page 36: Table 1.3 Recommended Protection Elements By Generator Grounding Method
Introduction and Specifications Features Generator Protection The SEL-700G provides protection elements suitable for applications protecting many different generators. Use Table 1.3 to select the protection Element Selection elements to enable for specific applications. Table 1.3 Recommended Protection Elements by Generator Grounding Method High-Impedance Resistance Solidly... -
Page 37: Models, Options, And Accessories
Introduction and Specifications Models, Options, and Accessories ➤ Modbus RTU slave, Modbus TCP/IP, DNP3 serial, DNP3 LAN/ WAN, Ethernet FTP, Telnet, SNTP, M , IEC 61850, IRRORED DeviceNet, File Transfer Protocols, and Synchrophasors with C37.118 Protocol ➤ SEL ASCII, Compressed ASCII, Fast Meter, Fast Operate, Fast SER, and Fast Message Protocols ➤... - Page 38 Introduction and Specifications Models, Options, and Accessories ➤ Options SEL-700G0, SEL-700G1 for Generator Protection ➤ SEL-700GT for Intertie and Generator Protection ➤ SEL-700GW for Wind Generator Protection ➤ Current/Voltage Input Options (see Table 1.1) ➤ Input/Output (I/O) Options ➢ Additional Digital I/O ➢...
-
Page 39: Applications
Introduction and Specifications Applications ➤ SEL-700G Configurable Labels ➤ Rack-Mounting Kits ➢ For one relay ➢ For two relays ➢ For one relay and a test switch ➤ Wall-Mounting Kits ➤ Bezels for Retrofit ➤ Replacement Rear Connector Kit ➤ Dust Protection Kit ➤... -
Page 40: Getting Started
Introduction and Specifications Getting Started Z Slot: 4 ACI/3 AVI Generator E Slot: 3 ACI/2 AVI 87-Input CTs Phase-Input CTs Neutral Grounding PT The current transformers and the SEL-700G chassis must be grounded in the relay cabinet. Figure 1.1 Typical Current Connections Getting Started Understanding basic relay operation principles and methods will help you use the SEL-700G effectively. -
Page 41: Table 1.4 Sel-700G Serial Port Settings
Introduction and Specifications Getting Started Establishing The SEL-700G has two EIA-232 serial communications ports. The following steps require PC terminal emulation software and an SEL Cable C234A (or Communication equivalent) to connect the SEL-700G to the PC. See Section 7: Communications for further information on serial communications connections and the necessary cable pinout. -
Page 42: Figure 1.3 Sta Command Response-No Communications Card Or Eia-232/Eia-485 Communications Card
1.10 Introduction and Specifications Getting Started =>>STA <Enter> SEL-700GT Date: 02/23/2010 Time: 13:21:15.339 INTERTIE RELAY Time Source: Internal Serial Num = 000000000000000 FID = SEL-700G-X133-V0-Z001001-D20100219 CID = 7170 PART NUM = 0700GT1B0X0X7181063X Self Tests (W=Warn) FPGA GPSB CR_RAM NON_VOL CLOCK CID_FILE +0.9V +1.2V... - Page 43 Introduction and Specifications 1.11 Getting Started Table 7.51 provides the definition of each status report designator. The beginning of the status report printout (see Figure 1.3) contains the relay serial number, relay part number, firmware identification string (FID) and checksum string (CID).
-
Page 44: Specifications
1.12 Introduction and Specifications Specifications Specifications Instruction Manual Power Consumption: <40 VA (ac) Compliance <20 W (dc) Interruptions: 50 ms @ 125 Vac/Vdc Designed and manufactured under an ISO 9001 certified quality 100 ms @ 250 Vac/Vdc management system 47 CFR 15B, Class A 24/48 Vdc NOTE: This equipment has been tested and found to comply with Rated Supply Voltage:... - Page 45 Introduction and Specifications 1.13 Specifications 110 V: ON for 88–137.5 Vdc AC Output Ratings OFF below 66 Vdc Maximum Operational 48 V: ON for 38.4–60 Vdc Voltage (U ) Rating: 240 Vac OFF below 28.8 Vdc Insulation Voltage (U 24 V: ON for 15–30 Vdc Rating (excluding OFF for <5 Vdc...
- Page 46 1.14 Introduction and Specifications Specifications Simple Network Time Operating Environment Protocol (SNTP) Accuracy: ±5 ms Pollution Degree: Unsynchronized Clock Drift Overvoltage Category: Relay Powered: 2 minutes per year, typically Atmospheric Pressure: 80–110 kPa Communications Ports Relative Humidity: 5–95%, noncondensing Standard EIA-232 (2 ports) Maximum Altitude: 2000 m Location:...
- Page 47 Introduction and Specifications 1.15 Specifications Dielectric Strength and Impulse Tests Oscillography Dielectric (HiPot): IEC 60255-5:2000 Length: 15, 64, 180 cycles IEEE C37.90-2005 Sampling Rate: 32 samples per cycle unfiltered 2.5 kVac on current inputs, voltage 4 samples per cycle filtered inputs, contact I/O Trigger: Programmable with Boolean...
- Page 48 1.16 Introduction and Specifications Specifications Composite-Time Element Harmonics Combination of Definite-Time and Inverse-Time specifications Pickup Range (% of fundamental): 5–100% User-Definable Curve Element Pickup Accuracy (A secondary): Pickup Range: 100–200% 5 A Model: ±5% plus ±0.10 A of harmonic current Steady-State Pickup Accuracy: ±1% of setpoint...
- Page 49 Introduction and Specifications 1.17 Specifications Definite-Time Delay: 0.00–400.00 s Pickup Time: 3 cycles (Max) Accuracy: ±0.1% plus ±0.25 cycle Definite-Time Delay: 0.00–400.00 s Minimum Phase Current: 5 A model: 0.5 A Accuracy: ±0.1% plus ±0.25 cycle 1 A model: 0.1 A Field Ground Protection (64F) Maximum Torque Angle (Requires SEL-2664 Field Ground Module)
- Page 50 1.18 Introduction and Specifications Specifications Close Failure Angle: 3–120° Negative-Sequence Overcurrent Elements (46) Steady-State Angle Definite-Time and Inverse- 2%–100% of generator rated Accuracy: ±2° Time Neg.-Seq. I Pickup: secondary current Generator Thermal Model (49T) Generator Rated Secondary 5 A Model: 1.0–10.0 A secondary Current: 1 A Model: 0.2–2.0 A secondary Thermal Overload Trip...
- Page 51 Introduction and Specifications 1.19 Specifications System Frequency: ±0.01 Hz of reading for frequencies within 20–70 Hz (V1 > 60 V) Line-to-Line Voltages: ±1% of reading, ±1° for voltages within 24–264 V 3-Phase Average Line-to- ±1% of reading for voltages Line Voltage: within 24–264 V Line-to-Ground Voltages: ±1% of reading, ±1°...
- Page 52 This page intentionally left blank...
-
Page 53: Section 2: Installation
Section 2 Installation Instruction Manual Overview The first steps in applying the SEL-700G Relay are installing and connecting the relay. This section describes common installation features and requirements. To install and connect the relay safely and effectively, you must be familiar with relay configuration features and options. -
Page 54: I/O Configuration
Installation I/O Configuration dusty environments, use the optional IP54-rated terminal dust-protection assembly (SEL Part #915900170). The 10°C temperature derating applies to the temperature specifications of the relay. 7.56 7.36 (192.0) (187.0) 5.67 1.12 5.80 5.47 (144.0) (28.5) (147.4) (139.0) i9089b Figure 2.1 Relay Panel-Mount Dimensions Refer to Models, Options, and Accessories for information on mounting accessories. -
Page 55: Figure 2.2 Slot Allocations For Different Cards
Installation I/O Configuration Power Supply With I/O (Slot A) Processor and Communications Card (Slot B) I/O Expansion Card (Slot C) I/O Expansion Card (Slot D) I/O Expansion Card (Slot E) ACI/AVI Card (Slot Z) Rear-Panel Slot Slot Number Software Reference (e.g., OUT101) (e.g., IN301) (e.g., OUT401) -
Page 56: Table 2.1 Power Supply Inputs (Psio/2 Di/3 Do) Card Terminal Designations
Installation I/O Configuration Power Supply Card Select appropriate power supply option for the application: ➤ PSIO/2DI/3DO (Slot A) High Voltage: 110–250 Vdc, 110–240 Vac, 50/60 Hz ➤ Low Voltage: 24–48 Vdc Select appropriate digital input voltage option: 125 Vdc/Vac, 24 Vdc/Vac, 48 Vdc/Vac, 110 Vdc/Vac, 220 Vdc/Vac, or 250 Vdc/Vac. -
Page 57: Table 2.3 Communications Card Interfaces And Connectors
Installation I/O Configuration ➤ Event Messenger ➤ C37.118 (Synchrophasor Data) Port 1 (Ethernet) supports the following protocols: ➤ Modbus TCP/IP ➤ DNP3 LAN/WAN ➤ IEC 61850 ➤ ➤ Telnet ➤ C37.118 (Synchrophasor Data) ➤ Simple Network Time Protocol (SNTP) Port 2 and Port 3 support the following protocols: ➤... -
Page 58: Table 2.4 Current/Voltage Inputs (3 Aci/4 Avi) Card Terminal Designations
Installation I/O Configuration The communications card supports the following protocols: ➤ ➤ Modbus RTU Slave SEL Settings File Transfer ➤ ➤ SEL ASCII and SEL M (MBA, IRRORED Compressed ASCII MBB, MB8A, MB8B, MBTB, MBTA) ➤ SEL Fast Meter ➤ Event Messenger ➤... -
Page 59: Table 2.5 Current/Voltage Inputs (3 Aci/2 Avi) Card Terminal Designations
Installation I/O Configuration Current/Voltage Card MOT…x72x… (1 A phase CTs) or …x76x…(5 A phase CTs). This card is only supported in Slot E of the SEL-700G1+ model (refer to Table 1.1 and Option (3 ACI/2 AVI) Figure 2.2). It supports Y-side current inputs for three-phase CTs. It also supports a synchronism-check voltage input VS and neutral voltage input VN. -
Page 60: Table 2.7 Voltage Inputs (2 Avi) Card Terminal Designations
Installation I/O Configuration Voltage Card Option MOT…x74x…. This card is only supported in Slot E of the SEL-700G0+ model (refer to Table 1.1 and Figure 2.2). It supports a synchronism-check (2 AVI) voltage input VS and neutral voltage input VN. Table 2.7 Voltage Inputs (2 AVI) Card Terminal Designations Side-Panel Terminal... -
Page 61: Table 2.9 Current Inputs (3 Aciz) Card Terminal Designations
Installation I/O Configuration Current Card Option MOT…x83x… (1 A phase CTs), or …x87x…(5 A phase CTs). This card is supported in Slot Z of the SEL-700GW model only. It supports X-side (3 ACIZ) current inputs for three-phase CTs. WARNING Table 2.9 Current Inputs (3 ACIZ) Card Terminal Designations Before working on a CT circuit, first apply a short to the secondary Side-Panel... -
Page 62: Table 2.11 Four Analog Inputs/Four Analog Outputs (4 Ai/4 Ao) Card Terminal Designations
2.10 Installation I/O Configuration Analog Input Card Supported in only one of the nonbase unit slots (Slot C through Slot E), this card has four analog inputs and four analog outputs (AO). Table 2.11 shows the (4 AI/4 AO) terminal allocation Table 2.11 Four Analog Inputs/Four Analog Outputs (4 AI/4 AO) Card Terminal Designations NOTE:... -
Page 63: Table 2.13 Rtd (10 Rtd) Card Terminal Designations
Installation 2.11 I/O Configuration RTD Card (10 RTD) Supported in Slot D only, this card has 10 three-wire RTD inputs. Table 2.13 shows the terminal allocation. Table 2.13 RTD (10 RTD) Card Terminal Designations NOTE: All Comp/Shield terminals are internally connected to relay Side-Panel Terminal Description... -
Page 64: Table 2.15 Eight Digital Inputs (8 Di) Card Terminal Designations
2.12 Installation I/O Configuration I/O Card (8 DI) Supported in any nonbase unit slot (Slot C through Slot E), this card has eight digital inputs. Table 2.15 shows the terminal allocation. Table 2.15 Eight Digital Inputs (8 DI) Card Terminal Designations Side-Panel Terminal Description... -
Page 65: Table 2.17 Four Digital Inputs, One Form B Digital Output, Two Form C Digital Outputs (4 Di/3 Do) Card Terminal Designations
Installation 2.13 I/O Configuration I/O Card (4 DI/3 DO) Supported in any nonbase unit slot (Slot C through Slot E), this card has four digital inputs, one Form-B digital output (normally closed contact output) and two form-C digital output contacts. Table 2.17 shows the terminal allocation. Table 2.17 Four Digital Inputs, One Form B Digital Output, Two Form C Digital Outputs (4 DI/3 DO) Card Terminal Designations Side-Panel... - Page 66 2.14 Installation I/O Configuration Card Installation for Slots C, D, E, and Z Perform the following steps to install cards into Slots C, D, E, or Z of the base unit. Step 1. Remove the power supply voltage from terminals A01+ and DANGER A02–...
- Page 67 Installation 2.15 I/O Configuration Step 16. Press the ENT pushbutton. The front panel displays the following: Accept New Config? No Yes Step 17. Select Yes and press the ENT pushbutton. The front panel displays the following: Config Accepted Enter to Reboot Step 18.
-
Page 68: Figure 2.3 Circuit Board Of Analog I/O Board, Showing Jumper Selection
2.16 Installation I/O Configuration Perform the following steps to replace the existing CPU board with a new board: Step 1. Turn off the power to the relay. Step 2. Use a ground strap between yourself and the relay. Step 3. Disconnect the terminal blocks and CT/PT wires. Step 4. -
Page 69: Figure 2.4 Jmp1 Through Jmp4 Locations On 4 Ai/4 Ao Board
Installation 2.17 I/O Configuration JMP1–JMP4 Pin Numbering 9 7 5 3 1 JMP2 JMP1 JMP3 JMP4 10 8 6 4 2 Figure 2.4 JMP1 Through JMP4 Locations on 4 AI/4 AO Board You need to insert three jumpers for a current analog output selection and two NOTE: There is no jumper between jumpers for a voltage analog output selection. -
Page 70: Table 2.18 Jumper Functions And Default Positions
2.18 Installation I/O Configuration Password, Breaker Figure 2.7 shows the major components of the B-slot card in the base unit. Notice the three sets of pins labeled A, B, and C. Control, and SEL BOOT Jumper Selection JMP1 Default Positions A B C JMP1 JMP1... -
Page 71: Rear-Panel Connections
Installation 2.19 Rear-Panel Connections Rear-Panel Connections Rear-Panel and The physical layout of the connectors on the rear-panel and side-panel diagrams of three sample configurations of the SEL-700G are shown in Side-Panel Diagrams Figure 2.8, Figure 2.9, and Figure 2.10. (a) Rear-Panel View (b) Side-Panel View i4491a i4488a... -
Page 72: Figure 2.10 Sel-700Gw With Copper Ethernet, 4 Di/4 Do, 4 Ai/4 Ao, 3 Acie, 3 Aciz
2.20 Installation Rear-Panel Connections (a) Rear-Panel View (b) Side-Panel View i4493b i4490b Figure 2.10 SEL-700GW With Copper Ethernet, 4 DI/4 DO, 4 AI/4 AO, 3 ACIE, 3 ACIZ (MOT 0700GW1A1A6X77870310) Power Connections The POWER terminals on the rear panel, A01 (+/H) and A02 (—/N), must connect to 110–240 Vac, 110–250 Vdc, or 24–48 Vdc (see Power Supply on page 1.12 for complete power input specifications). -
Page 73: Figure 2.11 Control I/O Connections-4 Ai/4 Ao Option In Slot D
Installation 2.21 Rear-Panel Connections For connecting devices at distances over 100 feet, where metallic cable is not appropriate, SEL offers fiber-optic transceivers or the fiber-optic port. The SEL-2800 family of transceivers provides fiber-optic links between devices for electrical isolation and long-distance signal transmission. Contact SEL for further information on these products. -
Page 74: Table 2.19 Typical Maximum Rtd Lead Length
2.22 Installation Rear-Panel Connections As Many as Ten RTD Inputs RTD01 RTD10 NOTE: All RTD Comp/ Shield terminals are External connected internally to Contacts the relay chassis. — COMP/ — COMP/ SHLD SHLD SEL-700G Relay –/N IRIG-B +IRIG-B –IRIG-B Figure 2.12 Control I/O Connections—Internal RTD Option Notes: ➤... -
Page 75: Ac/Dc Control Connection Diagrams
Installation 2.23 AC/DC Control Connection Diagrams Analog Output Meter AO_0 1 Relay Chassis Ground Figure 2.13 Analog Output Wiring Example AC/DC Control Connection Diagrams This section describes fail-safe versus nonfail-safe tripping, describes voltage connections, and provides the ac and dc wiring diagrams. Fail-Safe/Nonfail-Safe Figure 2.14 shows the output OUT103 relay coil and Form C contact. -
Page 76: Figure 2.15 Out103 Contact Fail-Safe And Nonfail-Safe Options
2.24 Installation AC/DC Control Connection Diagrams Circuit Breaker Fail-Safe Nonfail-safe (Electrically Held Open) OUT103FS = N OUT103FS= Y Breaker Trip Coil Breaker Trip Coil Figure 2.15 OUT103 Contact Fail-Safe and Nonfail-Safe Options Voltage Connections With the voltage inputs option, the three-phase voltages can be connected either 3-wire (delta) or 4-wire (wye). -
Page 77: Figure 2.16 Voltage Connections
Installation 2.25 AC/DC Control Connection Diagrams (e) Open-Delta VT 3-Wire Connection (DELTAY_X := DELTA) (f) Open-Delta VT 3-Wire Connection (DELTAY_X := DELTA) External Zero-Sequence Voltage Connected to VS (EXT3V0_X := VS) External Zero-Sequence Voltage Connected to VN (EXT3V0_X := VN) Generator Bus Generator Bus SEL-700G... -
Page 78: Ac/Dc Connections And Applications
2.26 Installation AC/DC Connections and Applications AC/DC Connections and Applications Figure 2.17 through Figure 2.22 show ac and dc connection diagrams and NOTE: When the VS-NS or VN-NN voltage inputs are unused in the applications for the SEL-700G0, SEL-700G1, SEL-700GT, and SEL-700GW SEL-700G1+ model and the setting relays. -
Page 79: Figure 2.19 Sel-700G0+ Relay High-Impedance Grounded Generator With Synchronism Check And Without Current Differential Protection
Installation 2.27 AC/DC Connections and Applications Generator Phase-Input CTs SYNCP := VAB Z Slot: 4AC1/3 AVI card E Slot: 2AV1 card Figure 2.19 SEL-700G0+ Relay High-Impedance Grounded Generator With Synchronism Check and Without Current Differential Protection Generator Phase-Input CTs 2000/5 A 200/5 A to A, 13.8 / 138 Kv... -
Page 80: Figure 2.21 Sel-700G1+ Relay Ac Connection Example-High-Impedance Grounded Generator With Split-Phase Current Differential Protection
2.28 Installation AC/DC Connections and Applications Generator Slot Z: 4AC1/3 AVI card Slot E: 3AC1/2AV1 card Figure 2.21 SEL-700G1+ Relay AC Connection Example—High-Impedance Grounded Generator With Split- Phase Current Differential Protection Generator Window CT Z Slot: 4AC1/3 AVI card E Slot: 3AC1/2AV1 card Figure 2.22 SEL-700G1+ Relay High-Impedance Grounded Generator With Split-Phase, Self-Balancing Differential Protection SEL-700G Relay... -
Page 81: Sel-700G1+ Generator Relay Application Example
Installation 2.29 SEL-700G1+ Generator Relay Application Example 1 SEL-700G1+ Generator Relay Application Example 1 Example 1 shows an SEL-700G1+ Relay application with full generator protection including: ➤ Phase differential element (87) ➤ Field ground element (64F) requires SEL-2664 Field Ground Module ➤... -
Page 82: Figure 2.24 Sel-700G1+ Typical Dc External Connections
2.30 Installation SEL-700G1+ Generator Relay Application Example 1 —DC BKR X (GEN) 52ax Notes: Field BKR (41) • IN101–102 and OUT 101–103 are in the 52ax “base”relay—Slot A Power Supply TRIP card. OUT103 BKR X (GEN) • Slot C—Select 8DO card Trip Coil OUT301–OUT308. -
Page 83: Sel-700G1+ Generator Relay Application Example 2
Installation 2.31 SEL-700G1+ Generator Relay Application Example 2 SEL-700G1+ Generator Relay Application Example 2 Illustrating the 67N This example shows an SEL-700G1+ Relay application with full generator protection. The application involves several high-impedance grounded Element generators connected to the same bus. This application calls for a sensitive neutral directional overcurrent element (67N) looking into the generator. -
Page 84: Figure 2.25 Sel-700G1+ Relay Ac Connection Example, Multiple High-Impedance Grounded Generators Connected To A Common Bus, With 67N And Other Protection
2.32 Installation SEL-700G1+ Generator Relay Application Example 2 directional control setting. Refer to Section 4: Protection and Logic Functions, Overcurrent Elements on page 4.87 and Directional Elements on page 4.101 for more information. SEL recommends that the external 3V0 connected to VS-NS or VN-NN inputs for use with the previous elements should be an equivalent of that calculated by the relay at the generator terminals, given wye-connected PTs (i.e., when a DELTAY_X := WYE relay calculated 3V0 = VAX + VBX + VCX). -
Page 85: Sel-700Gt+ Intertie Relay Application
Installation 2.33 SEL-700GT+ Intertie Relay Application SEL-700GT+ Intertie Relay Application UTILITY Figure 2.26 SEL-700GT+ Relay Typical AC Current and Four-Wire Wye Voltage Connection Date Code 20170814 Instruction Manual SEL-700G Relay... -
Page 86: Figure 2.27 Sel-700Gt+ Typical Dc External Connections
2.34 Installation SEL-700GT+ Intertie Relay Application —DC BKR X 52ax BKR Y 52ay Notes: • OUTxxx requires an additional I/O 52ax card in Slot C or D. OUT103 TRIP X • IN101-102 and OUT 101-103 are in the X Breaker “base”... -
Page 87: Sel-700Gw Wind Generator Relay Application
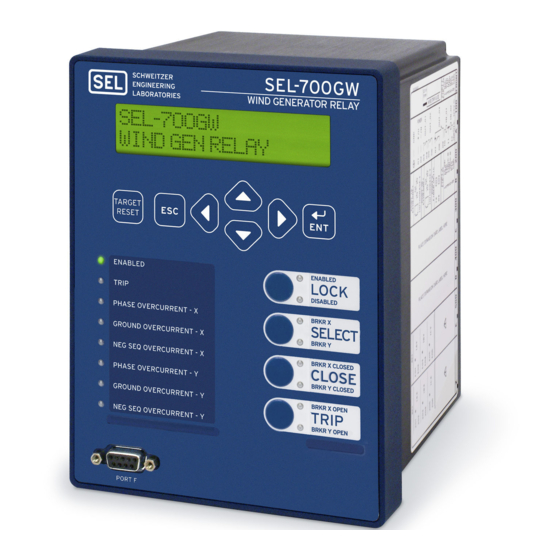
Installation 2.35 SEL-700GW Wind Generator Relay Application SEL-700GW Wind Generator Relay Application X Side Y Side Slot Z: 3 ACIZ Slot E: 3 ACIE Figure 2.28 SEL-700GW Dual Feeder AC Current Connections —DC BKR X 52ax BKR Y 52ay Notes: •... -
Page 88: Thermal Protection Of Generator And Prime Mover
2.36 Installation Thermal Protection of Generator and Prime Mover Thermal Protection of Generator and Prime Mover Figure 2.30 shows an application example of an SEL-700G Relay and an SEL-2600 RTD Module connected to the multimode fiber-optic serial Port 2 of the relay providing thermal protection for the generator and prime mover. The SEL-700G also supports an SEL-2600 RTD Module on the EIA-232 port using an SEL-2812M or SEL-2814M for ST connectors and an SEL-2800M Fiber-Optic Transceiver for V-pin connectors. -
Page 89: Field Serviceability
Installation 2.37 Field Serviceability Field Field Rotor Breakers Winding Iron FIELD SEL-2664 Field Ground SEL-700G Module Generator Relay Exciter (Vdc) Fiber-Optic cable FIELD with ST connectors EIA-232 Fiber-Optic Port Port (ST) SEL-2812MR or MT FIELD (GND) Fiber-Optic Transceiver (not required if Port 2 is available) Brushes Figure 2.31 Field Ground Protection With an SEL-700G Relay Field Serviceability... - Page 90 2.38 Installation Field Serviceability Real-Time Clock To replace the real-time clock battery, perform the following steps: Battery Replacement Step 1. De-energize the relay. Step 2. Remove the four rear-panel screws and the relay rear panel. CAUTION There is danger of explosion if the Step 3.
-
Page 91: Section 3: Pc Software
Section 3 PC Software Instruction Manual Overview This section describes how to get started with the SEL-700G and QuickSet SEL-5030 Software. SEL provides many PC ERATOR software solutions (applications) to support the SEL-700G and other SEL devices. Table 3.1 lists SEL-700G software solutions. Table 3.1 SEL Software Solutions Part Number Product Name Description... -
Page 92: Setup
PC Software Setup Table 3.2 QuickSet SEL-5030 Software (Sheet 2 of 2) ERATOR Application Description Terminal Provides a direct connection to the SEL device. Use this feature to ensure proper communications and directly interface with the device. Help Provides general QuickSet and device-specific QuickSet context. Available only in licensed versions of QuickSet. -
Page 93: Terminal
PC Software Terminal Step 6. Exit the menus by clicking OK when finished. Figure 3.2 Serial Port Communication Figure 3.3 Network Communication Parameters Dialog Box Parameters Dialog Box Terminal Terminal Window Select Communications > Terminal on the QuickSet main menu bar to open the terminal window (shown in Figure 3.4). -
Page 94: Figure 3.5 Device Response To The Id Command
PC Software Terminal Verify proper communications with the relay by opening a terminal window, pressing <Enter> a few times, and verifying that a prompt is received. If a prompt is not received, verify proper setup. Terminal Logging To create a file that contains all terminal communications with the relay, select Terminal Logging in the Communications >... -
Page 95: Settings Database Management And Drivers
PC Software Settings Database Management and Drivers Settings Database Management and Drivers QuickSet uses a database to save relay settings. QuickSet contains sets of all settings files for each relay specified in the Database Manager. Choose appropriate storage backup methods and a secure location for storing database files. -
Page 96: Settings
PC Software Settings Create a New Database, Copy an Existing Database To create and copy an existing database of devices to a new database: Step 1. Click File > Database Manager, and select the New button. QuickSet prompts you for a file name. Step 2. -
Page 97: Table 3.3 File/Tools Menus
PC Software Settings Table 3.3 File/Tools Menus Menus Description <<, >> Use these navigation menu buttons to move from one category to the next Open a new record Open Open an existing record Read Read device settings and then create and open a new record Convert Convert and open an existing record File >... -
Page 98: Figure 3.8 New Setting Screen
PC Software Settings (select Tools > HMI > HMI > Status). These numbers must match. QuickSet uses this first portion of the Z-number to determine the correct Settings Editor to display. Z-Number Figure 3.8 New Setting Screen File > Open The Open menu item opens an existing device from the active database folder. -
Page 99: Figure 3.9 Expressions Created With Expression Builder
PC Software Settings Expression Builder NOTE: Be sure to enable the control equations are a powerful means for customizing device OGIC functions you need (Logic performance. QuickSet simplifies this process with the Expression Builder, a Settings > SEL Enable) before OGIC using Expression Builder. -
Page 100: Event Analysis
3.10 PC Software Event Analysis File > Save Select the Save menu item from the File menu item of the Settings Editor once settings are entered into QuickSet. This ensures that the settings are not lost. File > Send To transfer the edits made in the QuickSet edit session, you must send the settings to the relay. -
Page 101: Figure 3.11 Generator Synchronism Report
PC Software 3.11 Event Analysis Event Waveforms The relay provides two types of event data captures: event reports that use 4 samples/cycle filtered data or 32 samples/cycle unfiltered (raw) data. See Section 9: Analyzing Events for information on recording events. Use the Options function in Figure 3.10 to select the 32 samples/cycle unfiltered (raw) data event (default is 4 samples/cycle filtered data). -
Page 102: Meter And Control
3.12 PC Software Meter and Control Get Event Highlight the event you want to view (for example, Event 3 in Figure 3.10), select the event type with the Options Event Type function (4 samples, 32 samples, or Generator Synchronism Report), and click the Get Selected Event button. -
Page 103: Figure 3.13 Device Overview Screen
PC Software 3.13 Meter and Control Relay Word bit, and click the Update button to assign the Relay Word bit to the LED. To change the color of the LED, click in the square and make your selection from the color palette. The front-panel LEDs display the status of the 16 front-panel LEDs. -
Page 104: Figure 3.14 Control Screen
3.14 PC Software Meter and Control Figure 3.14 shows the control screen. From here, you can reset metering data and clear the event history, SER, M report, LDP, trigger events, IRRORED or generator operating statistics. You can also reset the targets, synchronize with IRIG, and set the time and date. -
Page 105: Ac Sel Erator Quickset Help
PC Software 3.15 QuickSet Help ERATOR The synchroscope also shows the breaker status (Relay Word bit 52AX) as well as the status of the Relay Word bits FRAISE, FLOWER, VRAISE, and VLOWER. These indicators correspond to the output of the SEL-700G to the generator's governor and exciter controllers. - Page 106 This page intentionally left blank...
- Page 107 Section 4 Protection and Logic Functions Instruction Manual Overview This section describes the SEL-700G Relay settings, including the protection NOTE: Each SEL-700G is shipped elements and basic functions, control I/O logic, as well as the settings that with default factory settings. Calculate control the communications ports and front-panel displays.
-
Page 108: Section 4: Protection And Logic Functions Overview
Protection and Logic Functions Overview Intertie and Feeder Protection. Describes elements primarily associated with intertie protection but which are also applicable to generator and feeder protection. ➤ Overcurrent Elements ➤ Directional Elements ➤ Load-Encroachment Logic ➤ Power Elements ➤ Over- and Underfrequency Protection ➤... -
Page 109: Application Data
Protection and Logic Functions Application Data Report Settings (SET R Command). Lists the settings for the sequential event reports, event, generator autosynchronism, and load profile reports. DNP Map Settings (SET DNP n Command, n = 1, 2, or 3). Shows the DNP user map register settings. -
Page 110: Table 4.2 Configuration Settings
Protection and Logic Functions Group Settings (SET Command) The SEL-700G prints the relay and terminal identifier strings at the top of the responses to serial port commands to identify messages from individual relays. Enter as many as 16 characters, including letters A–Z (not case sensitive), numbers 0–9, periods (.), dashes (-), and spaces. -
Page 111: Figure 4.1 Phase Rotation Setting
Protection and Logic Functions Group Settings (SET Command) PHROT = ABC PHROT = ACB Figure 4.1 Phase Rotation Setting The X_CUR_IN setting is available only in SEL-700G1 relays. For most applications where the X-side CTs are located on the neutral side of the generator (see Figure 2.23), set X_CUR_IN := NEUT. - Page 112 Protection and Logic Functions Group Settings (SET Command) EXAMPLE 4.2 Phase VT Ratio Setting Calculations Consider a 13.8 kV Generator application where 14400:120 V rated voltage transformers (connected in open delta) are used. Set PTRX := 14400/120 := 120, VNOM_X := 13.8, and DELTAY_X := DELTA.
-
Page 113: Figure 4.2 Percentage Restraint Differential Characteristic
Protection and Logic Functions Group Settings (SET Command) The four settings that define the characteristic are: O87P = minimum IOP level required for operation SLP1 = initial slope, beginning at the origin and intersecting O87P at IRT = O87P • 100/SLP1 IRS1 = limit of IRT for SLP1 operation;... -
Page 114: Figure 4.3 Winding X Compensated Currents
Protection and Logic Functions Group Settings (SET Command) I1XC1, I2XC1, and I3XC1 are the fundamental frequency A-phase, B-phase, and C-phase compensated currents for Winding X. Similarly, I1XC2, I2XC2, and I3XC2 are the second-harmonic compensated currents for Winding X. The fourth-harmonic and fifth-harmonic compensated currents use similar names. - Page 115 Protection and Logic Functions Group Settings (SET Command) For each restraint element (87R-1, 87R-2, 87R-3), the quantities are summed as phasors and the magnitude becomes the operate quantity (IOPn). For a through-current condition, IOPn should calculate to about 1 + (–1) = 0, at rated load.
-
Page 116: Figure 4.5 Differential Element Logic
4.10 Protection and Logic Functions Group Settings (SET Command) Relay Word Bits IOPn 87Un U87P (setting) 2 CYC 0.05 INRn 10 CYC HSM=0 87SNn IRTn f1(IRTn) Sensitive Differential INRn Logic Σ Relay HSM=0 87HSNn Word Bits 5HB1 I1H24 87Rn O87P 87OSNn (setting) 87HRn... - Page 117 Protection and Logic Functions 4.11 Group Settings (SET Command) Relay Relay Word Relay Word Bits Word Bits Bits Relay 87U1 87HR1 87HR Word 87U2 87HR2 Bits 87U3 HRSTR = Y 87HR3 (setting) 87HB Figure 4.7 Differential Element Output Logic Harmonic Restraint. Consider the harmonic restraint feature (HRSTR = Y) if your practices require independent harmonic restraint.
-
Page 118: Table 4.3 Differential Element Settings
4.12 Protection and Logic Functions Group Settings (SET Command) Differential Element Output Logic. Relay Word bits 87R and 87U, shown in Figure 4.7, are high-speed elements that must trip all breakers. The assigns 87R and 87U (along with other protection elements) to assert four Relay Word bits (TRIPX, TRIP1, TRIP2, and TRIP3) to shut down the generator. -
Page 119: Figure 4.8 Differential Current Alarm Logic Diagram
Protection and Logic Functions 4.13 Group Settings (SET Command) the MVA setting (that is, MVA is not set to OFF), the relay uses the MVA, winding voltage, CT ratio, and CT connection settings (see Table 4.2) you have entered and calculates the TAPX and TAPT values automatically. You can also directly enter tap values when MVA := OFF. - Page 120 4.14 Protection and Logic Functions Group Settings (SET Command) element only responds to the fundamental frequency component of the differential operating current. It is unaffected by the SLP1, SLP2, IRS1, PCT2, or PCT5 settings. Thus, you must set the element pickup level high enough so as not to react to large inrush currents.
-
Page 121: Figure 4.9 Delta Irtn And Delta Iopn External Event Detector Logic
Protection and Logic Functions 4.15 Group Settings (SET Command) programmed to force the element into high security mode during these external events. The HSM SEL control equation can be programmed to OGIC assert based on the external event detector Relay Word bits as follows: HSM = (DRDOPT OR HRT) AND NOT RHSM When HSM = 1, the element switches to the high security characteristic (O87P2 pickup, slopes SLP12 and SLP22) shown in Figure 4.2. -
Page 122: Figure 4.10 Second-Harmonic External Event Detector Logic
4.16 Protection and Logic Functions Group Settings (SET Command) |I1XC2| Relay Word Bits IA12H |I1XC1| Multiply by 0.15 |I1YC2| IA22H Relay Word Multiply by |I1YC1| Bits 0.15 IB12H 5 cyc IB22H IC12H IC22H Figure 4.10 Second-Harmonic External Event Detector Logic I1XC1 Phase Comparator Relay... -
Page 123: Figure 4.12 Ao87P2 Logic
Protection and Logic Functions 4.17 Group Settings (SET Command) I1XC1 I2XC1 I3XC1 Σ |KCLI| I1YC1 I2YC1 I3YC1 O87P2 = AUTO Σ O87P (setting) AO87P2 q O87P2 O87P2 ≠ AUTO (setting) q To Figure 4.5. Figure 4.12 AO87P2 Logic Differential Element Settings in SEL-700G1, SEL-300G, SEL-387, and SEL-587. - Page 124 4.18 Protection and Logic Functions Group Settings (SET Command) phase sequence will be rotated in a counterclockwise direction when multiplied by [CTC(m)]. If a balanced set of currents with ACB phase rotation undergoes the same exercise, the rotations by the [CTC(m)] matrices are in the clockwise direction.
- Page 125 Protection and Logic Functions 4.19 Group Settings (SET Command) forming the delta. Thus, for CTCn = 11, the relay uses the following [CTC(m)] matrix: 1 0 –1 CTC 11 ------ - –1 1 0 0 –1 1 that is, ...
- Page 126 4.20 Protection and Logic Functions Group Settings (SET Command) The Complete List of Compensation Matrices (m = 1 to 12). –1 0 –2 1 CTC 1 CTC 2 ------ - -- - 1 –1 1 –2...
-
Page 127: Figure 4.13 Winding Connections, Phase Shifts, And Compensation Direction
Protection and Logic Functions 4.21 Group Settings (SET Command) Winding Connection Review. Figure 4.13 shows the three basic winding connections, consisting of a wye connection and the two possible delta connections. Connection Line Outputs Connection Phase Shift (Xfmr. or CT) ABC Rotation ACB Rotation 0°... - Page 128 4.22 Protection and Logic Functions Group Settings (SET Command) currents. The phase shift produced by each physical type of delta depends on the system phase sequence. NOTE: The terms “lead” and “lag” In the ABC phase sequence B lags A by 120 degrees and C leads A by 120 refer to the assumed degrees.
-
Page 129: Figure 4.14 Example 1 For Wnctc Selection
Protection and Logic Functions 4.23 Group Settings (SET Command) reference is “noon” and a wye secondary winding whose direction is at “one o’clock” with respect to the direction of the delta. The CT currents go to relay winding inputs 1 and 2 from left to right as Figure 4.14 illustrates. (DAB) 115 kV 24.9 kV... - Page 130 4.24 Protection and Logic Functions Group Settings (SET Command) Step 4. Choose the CTCn settings for the windings. Because Winding X is the reference, we need no adjustment; the setting is CTCX = 0. Note that the adjusted Winding Y inputs coincide exactly with the reference direction;...
- Page 131 Protection and Logic Functions 4.25 Group Settings (SET Command) Restraint Slope Percentage. The purpose of the percentage restraint characteristic is to allow the relay to differentiate between differential current from an internal fault versus differential current during normal or external fault conditions.
- Page 132 4.26 Protection and Logic Functions Group Settings (SET Command) The variable restraint characteristic provided by SLP2 at high multiples of TAP for a through fault accommodates transient CT error. SLP2 can be set fairly high without jeopardizing sensitivity for low-grade partial winding faults.
- Page 133 Protection and Logic Functions 4.27 Group Settings (SET Command) There are two criteria for setting TH5P: TH5P minimum (0.05 • INOMn/TAPn) where: n = X, Y INOMn = nominal current of the corresponding CT Example of Setting the SEL-700G Relay (Unit Differential). example represents a typical unit differential application and demonstrates the use of CT compensation settings and tap calculations.
- Page 134 4.28 Protection and Logic Functions Group Settings (SET Command) The relay now calculates each tap current, using the formula stated previously: MVA 1000 TAPn -------------------------------------------------------- - C 3 VWDGn CTRn where 1 for wye CTs Thus, we have the following: ...
- Page 135 Protection and Logic Functions 4.29 Group Settings (SET Command) U87P = 10 (unrestrained differential Operate current level, multiple of tap) PCT4 = 15 (block operation if fourth harmonic is above 15 percent) PCT5 = 35 (block operation if fifth harmonic is above 35 percent) TH5P = OFF (no fifth-harmonic alarm) HRSTR = Y (harmonic restraint enabled)
- Page 136 4.30 Protection and Logic Functions Group Settings (SET Command) saturation conditions. You can set and edit the remaining settings according to the suggestions in the previous setting descriptions. O87P = 0.3 (Operate current pickup in multiple of tap) SLP1 = 25 (25 percent initial slope) SLP2 = 70 (70 percent second slope, fixed) IRS1 = 6.0 (limit of slope 1 restraint current in multiple of tap, fixed)
- Page 137 Protection and Logic Functions 4.31 Group Settings (SET Command) burden in ohms is less than half of the C voltage rating of the CT. The following CT selection procedure uses this second guideline. CT Ratio Selection Step 1. Determine the secondary side burdens in ohms for all current transformers connected to the relay.
-
Page 138: Figure 4.15 Effect Of X_Cur_In Setting On Residual Current (Ig)
4.32 Protection and Logic Functions Group Settings (SET Command) Ground Differential Element Basic generator protection in SEL-700G relays includes the ground differential element (87N) that operates based on the difference between the measured neutral current and the sum of the three-phase current inputs. The 87N element provides sensitive ground fault detection on resistance-grounded and solidly grounded generators, particularly where multiple generators are connected directly to a load bus. -
Page 139: Table 4.4 Ground Differential Settings
Protection and Logic Functions 4.33 Group Settings (SET Command) Notes: SEL-700G0/GT+: S1 set to Pos. 1. OGIC SEL-700G1: S1 set as follows: Setting Pos . 1 - if X_CUR_IN := TERM Pos. 2 - if X_CUR_IN := NEUT 87NTC Relay Word CTRX Bits... - Page 140 4.34 Protection and Logic Functions Group Settings (SET Command) equal to the Idiff calculated in the previous equation. The higher pickup setting allows a shorter or zero time delay. The ground differential elements are enabled when the result of 87NTC equals logical 1.
-
Page 141: Figure 4.17 Ref Enable Logic
Protection and Logic Functions 4.35 Group Settings (SET Command) Relay Word Group Setting Relay REF52BYP = YES Word Relay Word Bits 50NREF1 50GREF1 Group 1 / I Setting NNOM CTRX/CTRN • I NNOM CTRY/CTRN • I NNOM OGIC Setting • I is the nominal CT rating of the neutral CT. -
Page 142: Table 4.5 Restricted Earth Fault Settings
4.36 Protection and Logic Functions Group Settings (SET Command) The operating current, IOP, is simply the neutral CT current divided by nominal rating of the neutral CT, I . The REF1 element calculates the NNOM real part of IPOL times IOP* (IOP complex conjugate). This equates to |IPOL| times |IOP| times the cosine of the angle between them. -
Page 143: Figure 4.20 Effect Of X_Cur_In Setting On Polarizing Current
Protection and Logic Functions 4.37 Group Settings (SET Command) current). However, the minimum acceptable value of 50REF1P must meet the following two criteria. 1. 50REF1P must be greater than any natural residual current imbalance caused by load conditions. 2. 50REF1P must be greater than a minimum value determined by the relationship of the CTRn (where n is N, X, or Y) values used in the REF function. - Page 144 4.38 Protection and Logic Functions Group Settings (SET Command) REF Current Pickup Level The minimum acceptable REF element pickup value, 50REF1P, must meet the following criteria and be set at the greater of the two criteria values. 1. 50REF1P must be greater than any natural residual current imbalance caused by load conditions.
-
Page 145: Figure 4.21 64G Element Operating Characteristic
Protection and Logic Functions 4.39 Group Settings (SET Command) NOTE: Most generators produce When a ground fault occurs high in the winding of a resistance or high- enough third-harmonic voltage for impedance grounded generator, a voltage appears at the generator neutral. The proper application of the 64G2 neutral voltage magnitude during the fault is proportional to the fault location element;... -
Page 146: Table 4.6 Stator Ground Protection Settings
4.40 Protection and Logic Functions Group Settings (SET Command) and neutral third-harmonic voltage may not be equal, and their rates of increase with increasing load may be different as well. Note also that the third- harmonic characteristics of generators have been observed to change over time, perhaps because of modifications to auxiliary equipment connected to the generator bus. - Page 147 Protection and Logic Functions 4.41 Group Settings (SET Command) Table 4.6 Stator Ground Protection Settings (Sheet 2 of 2) Setting Name := Setting Prompt Setting Range Factory Default ZONE 1 TIMER 0.00–400.00 s 64G1D := 0.75 64G1 TRQCTRL 64G1TC := 1 OGIC DIFF VOLT LVL OFF, 0.1–20.0 V...
- Page 148 4.42 Protection and Logic Functions Group Settings (SET Command) The following procedure assumes WYE connected PTs (DELTAY_X := WYE) at the terminals. If DELTAY_X := DELTA and EXT3V0_X := VS, then replace PTRX by PTRS in the following procedure. NOTE: Perform the procedure when To simplify the following calculations, you can use the Microsoft Excel the relay is first installed, but after the...
- Page 149 Protection and Logic Functions 4.43 Group Settings (SET Command) 64RAT 64G2P 64G2 ----------------------------------------- - – ------------------------------------------------------------------------------------------------------------------------------------ - PTRX PTRX PTRN 64RAT --------------- - 64RAT --------------- - VP3_NL VN3_NL --------------- - ...
- Page 150 4.44 Protection and Logic Functions Group Settings (SET Command) measuring the neutral third-harmonic voltage at various real and reactive load conditions to find the minimum voltage. Step 1. Operate the generator at various loads. Use the SEL-700G METER command and record the values of neutral third- harmonic voltage.
-
Page 151: Figure 4.22 64G Logic Diagram
Protection and Logic Functions 4.45 Group Settings (SET Command) |VN1| Fundamental Frequency Positive- Filter |V1X| Sequence Voltage Calculation PHROT Voltage Inputs Third- Harmonic Voltage Cosine Filter Magnitude |VN3| Calculation DELTAY_X := WYE VPX3 |VPX3| DELTAY_X := DELTA VABX VBCX VCAX EXT3V0_X := VS Relay Word... -
Page 152: Figure 4.23 Field Ground Protection (64F) Elements Logic
4.46 Protection and Logic Functions Group Settings (SET Command) Field Ground Protection Elements The SEL-700G works with the SEL-2664 Field Ground Module to protect the generator field winding. Connect the SEL-2664 directly to two ends of the generator field winding and the rotor ground brush. When the SEL-2664 calculates the insulation resistance value between the field winding and ground, it uses a fiber-optic cable with ST connectors and a transceiver (SEL-2812MR or MT) to transmit the insulation resistance value to the... -
Page 153: Table 4.7 Field Ground Protection Settings
Protection and Logic Functions 4.47 Group Settings (SET Command) If 64FFLT := 1, indicating a non-functional SEL-2664 or fiber-optic connection, then the 64F elements are not calculated, the 64F1, 64F1T, 64F2, and 64F2T Relay Word bits are set to zero (0), and all accumulated timer values are reset to zero (0). -
Page 154: Table 4.8 Compensator Distance Protection Settings
4.48 Protection and Logic Functions Group Settings (SET Command) The relay includes a user-settable SEL control equation to disable the OGIC distance elements, as well as the supervision by the LOPX loss-of-potential logic and the load-encroachment function, to provide three-phase element security under maximum generator loading conditions. - Page 155 Protection and Logic Functions 4.49 Group Settings (SET Command) The Z2CO setting defines the element offset for the three-phase faults. You can apply an offset, typically equal to the generator impedance, to provide generator phase backup protection. The Z2CD setting defines the Zone 2 element definite-time delay. Set 50PP2 to its minimum value, unless a special condition requires a higher value.
-
Page 156: Figure 4.24 Three-Phase Distance Element Operating Characteristics
4.50 Protection and Logic Functions Group Settings (SET Command) details. You must change the setting if a different action is necessary for your application. PLAFX ZLFX NLAFX Figure 4.24 Three-Phase Distance Element Operating Characteristics Figure 4.25 Phase-to-Phase Distance Element Operating Characteristics SEL-700G Relay Instruction Manual Date Code 20170814... -
Page 157: Figure 4.26 Zone 1 Compensator Element Logic
Protection and Logic Functions 4.51 Group Settings (SET Command) is CT rating, 1 A or 5 A (X-CTs). ABC1F and PP1F are values calculated by compensator distance element. Zone 2 logic is similar to Zone 1. Figure 4.26 Zone 1 Compensator Element Logic Relay Word Bits... -
Page 158: Table 4.9 Voltage Controlled/Restraint Time Oc Protection Settings
4.52 Protection and Logic Functions Group Settings (SET Command) The voltage-controlled phase time-overcurrent element, 51C, operates when its torque-control setting, 51CTC, is equal to logical 1. Typically, the torque- control setting should include the Relay Word bit for an undervoltage element, such as 27PPX1. - Page 159 Protection and Logic Functions 4.53 Group Settings (SET Command) Use the 51VCA setting to compensate the voltage-restrained overcurrent element for the presence of a delta-wye generator step-up transformer between the generator and system. When the element is not set to reach through the step-up transformer, set 51VCA := 0.
- Page 160 4.54 Protection and Logic Functions Group Settings (SET Command) by the phase current transformer ratio, CTRX, to find the element pickup current in secondary amps. 51CP ---------------- - CTRX Select a curve shape and time-dial that allow this element to coordinate with the system primary protection.
-
Page 161: Figure 4.28 Voltage-Controlled Phase Time-Overcurrent Element 51Ct
Protection and Logic Functions 4.55 Group Settings (SET Command) potential transformer fuse blows, the element is torque controlled by the NOT LOPX Relay Word bit. 51VTC NOT LOPX With the previous settings, the 51V element is enabled as long as there is no loss-of-potential condition. -
Page 162: Figure 4.30 51V Element Voltage Restraint Characteristic
4.56 Protection and Logic Functions Group Settings (SET Command) 1.00 0.50 0.25 0.125 0.125 0.25 0.50 1.00 Selected Phase-to-Phase Voltage (per unit of VNOM_X) Figure 4.30 51V Element Voltage Restraint Characteristic Loss-of-Field Element Loss-of-field current causes the synchronous generator to act as an induction generator. -
Page 163: Table 4.10 Loss-Of-Field Protection Settings
Protection and Logic Functions 4.57 Group Settings (SET Command) Relay Word OGIC Bits Setting Impedance Calculation 40Z1 Z1Ω 40Z1D 40Z1T Setting Zone 1 Calculation 40XD1 40Z1P 40Z2 40Z2D 40Z2T 40XD2 Zone 2 Calculation 40Z2P 40DIR Figure 4.31 Loss-of-Field Logic Diagram Table 4.10 Loss-of-Field Protection Settings Setting Name := Setting Prompt... - Page 164 4.58 Protection and Logic Functions Group Settings (SET Command) Zone 2 loss-of-field tripping typically is performed with a time delay of 0.5 to 0.6 seconds. Set 40Z2D equal to the necessary delay. The 40DIR setting is hidden when 40XD2 < 0. The 40Z2 Relay Word bit asserts without time delay when the measured positive-sequence impedance falls within the Zone 2 mho circle defined by the offset and diameter settings, and below the directional supervision line (if...
- Page 165 Protection and Logic Functions 4.59 Group Settings (SET Command) Set the Zone 2 offset equal to the Zone 1 offset. – X ----------- - 40XD2 Set the Zone 2 time delay long enough to avoid an incorrect operation during a worst-case stable power system swing condition, typically 0.5 to 0.6 seconds or according to the recommendations of the generator manufacturer.
-
Page 166: Figure 4.32 Loss-Of-Field Element Operating Characteristic, Negative Zone 2 Offset
4.60 Protection and Logic Functions Group Settings (SET Command) The traditional application of this scheme provides accelerated (0.25 second) Zone 2 tripping in the event of an undervoltage condition occurring during the loss-of-field. To achieve this accelerated tripping, it is necessary to use a SEL OGIC control equation variable and a positive-sequence undervoltage element, 27V1X1. -
Page 167: Table 4.11 Current Unbalance Settings
Protection and Logic Functions 4.61 Group Settings (SET Command) Figure 4.33 Loss-of-Field Element Operating Characteristic, Positive Zone 2 Offset Current Unbalance Elements Generator unbalance current causes high rotor heating. IEEE Standard C50.13-1977 defined the ability of generators to withstand unbalance current in terms of negative-sequence current. - Page 168 4.62 Protection and Logic Functions Group Settings (SET Command) The negative-sequence time-overcurrent element operates with an I t time characteristic. Set the pickup value equal to the minimum percent of nominal current to which the element must respond. Set the 46Q2K setting equal to the generator-rated I t short time-current capability rating defined by the generator manufacturer.
-
Page 169: Figure 4.34 Negative-Sequence Overcurrent Element Logic Diagram
Protection and Logic Functions 4.63 Group Settings (SET Command) Settings for details). You must change the setting if your application requires a different action. Negative- Negative- Torque Control Switch Closed | I2 | A Sequence Sequence When 46QTC = Logical 1 Percent Current Current... -
Page 170: Figure 4.35 Negative-Sequence Time-Overcurrent Operating Characteristic
4.64 Protection and Logic Functions Group Settings (SET Command) 10000 1000 46Q2K = 46Q2P minimum = 2.0% 0.01 100% 1000% 10000% I2 (percent of INOM) 46Q2K ------------------------ - seconds ---------------- - INOM Figure 4.35 Negative-Sequence Time-Overcurrent Operating Characteristic Thermal Overload Elements The SEL-700G thermal element provides generator overload protection based on the thermal model described in IEC standard 60255-8. -
Page 171: Table 4.12 Thermal Overload Settings
Protection and Logic Functions 4.65 Group Settings (SET Command) Relay Word = 49TTP I1 = Positive-sequence generator current, amps I2 = Negative-sequence generator current, amps GTC = 60 • GTC1 if Relay Word bit ALTCOOL = 0 GTC = 60 • GTC2 if Relay Word bit ALTCOOL = 1 49TTP, INOM, GTC1, GTC2 = Relay settings / TV ) •... -
Page 172: Figure 4.37 Generator Overload Curve
4.66 Protection and Logic Functions Group Settings (SET Command) – TripTime • ------------------------------ - seconds – 49TTP where GTC = Generator Time Constant in seconds I = Generator current in per unit, assuming no negative-sequence current Io = Generator preload current in per unit, assuming no negative-sequence current 49TTP = Overload level setting in per unit 10000... -
Page 173: Figure 4.38 Volts/Hertz Element Logic
Protection and Logic Functions 4.67 Group Settings (SET Command) Relay OGIC Word Setting Bits 24TC 24TC 24D1 24D1D (V/Hz) 24D1T Switch closed when 24TC=1 24D1P Volts/Hertz Element Curve Timing and 24C2 Reset Timing 24CCS Settings 24C2T 24D2P1 24ITD 24D2D1 24D2P2 24CR 24IP 24D2D2... -
Page 174: Figure 4.39 Dual-Level Volts/Hertz Time-Delay Characteristic 24Ccs = Dd
4.68 Protection and Logic Functions Group Settings (SET Command) 24D2P2 = 118% 24D2D2 = 6 s Mfg-Generator Limit Curve 24D2P1 = 110% 24D2D1 = 60 s Transformer Limit Curve on Gen. Voltage Base 1000 Time (Minutes) Figure 4.39 Dual-Level Volts/Hertz Time-Delay Characteristic 24CCS = DD Transformer Limit Curve on Generator Voltage Base Generator Manufacturer's... -
Page 175: Table 4.13 Volts-Per-Hertz Settings
Protection and Logic Functions 4.69 Group Settings (SET Command) Table 4.13 Volts-Per-Hertz Settings Setting Name := Setting Prompt Setting Range Factory Default ENABLE V/HZ PROT Y, N E24 := Y LVL1 V/HZ PICKUP 100–200 % 24D1P := 105 LVL1 TIME DLY 0.04–400.00 s 24D1D := 1.00 LVL2 CURVE SHAPE... - Page 176 4.70 Protection and Logic Functions Group Settings (SET Command) ➤ When 24CCS := I, the element operates with a simple inverse- time characteristic, defined by the 24IP, 24IC and 24ITD settings described previously. ➤ When 24CCS := U, the element operates with a user-defined NOTE: If 24CCS := U and no user inverse-time characteristic with a pickup of 24IP.
-
Page 177: Figure 4.42 Volts/Hertz Inverse-Time Characteristic, 24Ic
Protection and Logic Functions 4.71 Group Settings (SET Command) 24ITD ----------------------------------------------------------------------------------------------------------- - seconds VPP PTRX FNOM --------------------------------- ---------------------------------------- - freq if V/Hz 1.5 24IP ... -
Page 178: Figure 4.43 Volts/Hertz Inverse-Time Characteristic, 24Ic
4.72 Protection and Logic Functions Group Settings (SET Command) 24ITD ----------------------------------------------------------------------------------------------------------- - seconds VPP PTRX FNOM --------------------------------- ---------------------------------------- - freq if V/Hz 1.5 24IP ... - Page 179 Protection and Logic Functions 4.73 Group Settings (SET Command) if V/Hz 1.5 24IP 24ITD ----------------------------------------------------------------------------------------------------------- - seconds VPP PTRX FNOM --------------------------------- ---------------------------------------- - freq ...
-
Page 180: Table 4.14 Frequency Accumulation Settings
4.74 Protection and Logic Functions Group Settings (SET Command) Off-Frequency Accumulators When steam turbine prime movers operate at other than design speed, vibration can cause cumulative metal fatigue in the turbine blades. Eventually, this fatigue can lead to premature and catastrophic turbine blade failure. For steam turbine prime mover applications, the SEL-700G records the total time of operation of the generator at off-nominal frequencies in as many as six frequency bands. -
Page 181: Figure 4.44 Example Turbine Operating Limitations During Abnormal Frequency
Protection and Logic Functions 4.75 Group Settings (SET Command) 81ACCTC := NOT 3POX blocks the element until the generator is synchronized and on-line. Relay Word bit FREQTRKX inherently blocks the element if the relay cannot accurately measure the frequency (see Figure 4.45). -
Page 182: Figure 4.45 Abnormal Frequency Protection Logic Diagram
4.76 Protection and Logic Functions Group Settings (SET Command) E81AC = Y FREQTRKX OGIC Setting 81ACCTC Relay Word FREQX Bits 62ACC TBND1 62ACC TBND2 62ACC TBND3 62ACC TBND4 62ACC TBND5 62ACC TBND6 Figure 4.45 Abnormal Frequency Protection Logic Diagram SEL-700G Relay Instruction Manual Date Code 20170814... -
Page 183: Table 4.15 Out-Of-Step Protection Settings
Protection and Logic Functions 4.77 Group Settings (SET Command) Out-of-Step Element The SEL-700G contains an out-of-step element to detect out-of-step conditions between two electrical sources. Two interconnected systems can experience an out-of-step condition for several reasons. For example, loss of excitation can cause a generator to lose synchronism with the rest of the system. -
Page 184: Figure 4.46 Single-Blinder Scheme Operating Characteristics
4.78 Protection and Logic Functions Group Settings (SET Command) Single-Blinder Scheme The single-blinder scheme, shown in Figure 4.46, consists of mho element 78Z1, right blinder 78R1, and left blinder 78R2. 78R2 78R1 Left Blinder Right Blinder Diameter of 78Z1 = (78REV + 78FWD) 78R2 78R1 Pickup... -
Page 185: Figure 4.47 Single-Blinder Scheme Logic Diagram
Protection and Logic Functions 4.79 Group Settings (SET Command) 78R2 are retained until the next time SWING asserts, which is the next time a power system swing occurs. Figure 4.47 Single-Blinder Scheme Logic Diagram The sum of the forward and reverse reaches (the diameter of the mho circle) has to be 100 ohms or less for a 5 A relay and 500 ohms or less for a 1 A relay. - Page 186 4.80 Protection and Logic Functions Group Settings (SET Command) The 78 element torque control SEL control equation OOSTC has a OGIC default setting of one. If this value is left at one, the out-of-step element is not controlled by any other conditions external to the element. However, users can block the operation of the 78 element for certain conditions, such as the presence of excessive negative-sequence currents, by setting OOSTC to NOT 46Q1.
-
Page 187: Figure 4.48 Single-Blinder Typical Settings
Protection and Logic Functions 4.81 Group Settings (SET Command) X’ Figure 4.48 Single-Blinder Typical Settings Double-Blinder Scheme The double-blinder scheme, shown in Figure 4.49, consists of mho element 78Z1 and two blinder pairs: outer resistance blinder 78R1 and inner resistance blinder 78R2. - Page 188 4.82 Protection and Logic Functions Group Settings (SET Command) If the relay detects an out-of-step condition, it asserts the following Relay Word bits: ➤ Relay Word bit SWING picks up when the positive-sequence impedance stays between the outer and inner blinders for more than 78D seconds (78R1 asserts, mho element 78Z1 may or may not assert).
-
Page 189: Figure 4.50 Double-Blinder Scheme Logic Diagram
Protection and Logic Functions 4.83 Group Settings (SET Command) Figure 4.50 Double-Blinder Scheme Logic Diagram Date Code 20170814 Instruction Manual SEL-700G Relay... - Page 190 4.84 Protection and Logic Functions Group Settings (SET Command) The inner resistance blinder must be inside the mho circle while the outer resistance blinder should be outside the mho circle for the logic to operate correctly. Settings Calculation. Collect the following information to calculate the out-of-step protection settings.
-
Page 191: Figure 4.51 Double-Blinder Typical Settings
Protection and Logic Functions 4.85 Group Settings (SET Command) 78FWD: Forward Reach Perpendicular Bisector of M-N α: 78REV: Reverse Reach Angle of Separation Between Generator and System Measured at 78R2 γ: X’ Generator Transient Reactance Angle of Separation Between Generator and System Measured at 78R1 Transformer Reactance System Impedance M-N:... -
Page 192: Table 4.16 Inadvertent Energization Protection Settings
4.86 Protection and Logic Functions Group Settings (SET Command) Table 4.16 Inadvertent Energization Protection Settings Setting Name := Setting Prompt Setting Range Factory Default INADV ENRG EN Y, N EINAD := N GEN DE-ENRG PU 0.00-100.00 s GENDEPU := 2 GEN DE-ENRG DO 0.00-100.00 s GENDEDO := 1... -
Page 193: Table 4.17 Phase Overcurrent Settings
Protection and Logic Functions 4.87 Group Settings (SET Command) ➤ The GENDEDO setting ensures that inadvertent energization protection remain armed for 1 second after the 27V1X1 element deasserts to allow for reapplication of the generator field. If you can parallel the generator within 1 second of reenergizing the field, shorten the GENDEDO setting. -
Page 194: Table 4.18 Neutral Overcurrent Settings
4.88 Protection and Logic Functions Group Settings (SET Command) current waveform is highly distorted. This ensures fast operation of the 50Pmn phase overcurrent elements even with severe CT saturation. When the harmonic distortion index exceeds the fixed threshold, which indicates severe CT saturation, the phase overcurrent elements operate on the output of the peak detector. -
Page 195: Figure 4.53 Sel-700G0, Sel-700G1, Sel-700Gt+ Instantaneous Overcurrent Element Logic (Generator Protection)
Protection and Logic Functions 4.89 Group Settings (SET Command) (Phase A Current Magnitude) |IAm| (Phase B Current Magnitude) |IBm| (Phase C Current Magnitude) |ICm| Current (Maximum Phase Current Magnitude) Magnitude |IPm| Calculations Negative-Sequence (Core-Balance Current Magnitude) |IN| Current Calculation (Residual Current Magnitude 3I0m) |IGm| (Negative-Sequence Current Magnitude) |3I2m|... -
Page 196: Figure 4.54 Sel-700Gt Instantaneous Overcurrent Element Logic (Intertie Protection)
4.90 Protection and Logic Functions Group Settings (SET Command) (Phase A Current Magnitude) |IAY| (Phase B Current Magnitude) |IBY| (Phase C Current Magnitude) |ICY| Current (Maximum Phase Current Magnitude) Magnitude |IPY| Calculations Negative-Sequence (Core-Balance Current Magnitude) Current Calculation |IN| (Residual Current Magnitude 3I0Y) |IGY| (Negative-Sequence Current Magnitude) |3I2Y|... -
Page 197: Figure 4.55 Instantaneous Overcurrent Element Logic (Feeder Protection, Sel-700Gw)
Protection and Logic Functions 4.91 Group Settings (SET Command) (Phase A Current Magnitude) |IAm| (Phase B Current Magnitude) |IBm| (Phase C Current Magnitude) |ICm| Current (Maximum Phase Current Magnitude) Magnitude |IPm| Calculations Negative-Sequence (Residual Current Magnitude 3I0m) |IGm| Current Calculation (Negative-Sequence Current Magnitude) |3I2m| Settings... -
Page 198: Figure 4.56 Sel-700G0, Sel-700G1, Sel-700Ggt Instantaneous Neutral-Ground Overcurrent Element Logic (Generator Protection)
4.92 Protection and Logic Functions Group Settings (SET Command) Relay Word Bits 67NnP 50NnD 50NnP 67NnT |IN| 50NnTC NXnDIR 50NnP 50NnD 50NnP 50NnT |IN| 50NnTC From Figure 4.53 From Figure 4.84 Only applicable to SEL-700GT Applicable to SEL-700G0, SEL-700G0+, SEL-700G1, SEL-700G1+, SEL-700GT+ n = 1 or 2. -
Page 199: Table 4.19 Residual Overcurrent Settings
Protection and Logic Functions 4.93 Group Settings (SET Command) Table 4.19 Residual Overcurrent Settings Setting Name := Setting Prompt Setting Range Factory Default RES IOC LEVEL OFF, 0.50–96.00 A 50Gm1P := OFF RES IOC DELAY 0.00–400.00 s 50Pm1D := 0.50 RES IOC TRQCTRL 50Pm1TC := 1 OGIC... -
Page 200: Table 4.21 Maximum Phase Time-Overcurrent Settings
4.94 Protection and Logic Functions Group Settings (SET Command) Table 4.21 Maximum Phase Time-Overcurrent Settings Setting Name := Setting Prompt Setting Range Factory Default PHASE TOC LEVEL OFF, 0.50–16.00 A 51PmP := OFF PHASE TOC CURVE U1–U5, C1–C5 51PmC := U3 PHASE TOC TDIAL 0.50–15.00 51PmTD := 3.00... -
Page 201: Table 4.22 Negative-Sequence Time-Overcurrent Settings
Protection and Logic Functions 4.95 Group Settings (SET Command) Table 4.22 Negative-Sequence Time-Overcurrent Settings Setting Name := Setting Prompt Setting Range Factory Default NSEQ TOC LEVEL OFF, 0.50–16.00 A 51QmP :=OFF NSEQ TOC CURVE U1–U5, C1–C5 51QmC := U3 NSEQ TOC TDIAL 0.50–15.00 51QmTD := 3.00 0.05–1.00... -
Page 202: Table 4.23 Neutral Time-Overcurrent Settings
4.96 Protection and Logic Functions Group Settings (SET Command) this transient condition, do not use a time-dial setting that results in curve times below three cycles. Table 4.23 Neutral Time-Overcurrent Settings Setting Name := Setting Prompt Setting Range Factory Default NEUT TOC LEVEL OFF, 0.50–16.00 A 51NP := OFF... -
Page 203: Figure 4.61 Residual Time-Overcurrent Elements
Protection and Logic Functions 4.97 Group Settings (SET Command) The residual time-overcurrent elements, 51GXT and 51GYT, respond to residual current IGm, as shown in Figure 4.61. Relay (a) Generator Protection (SEL-700G0, SEL-700G1, and SEL-700GT) Word Bits 51GXP (Pickup) 51GXT Phase Setting Time-Overcurrent Element Curve Timing and Reset Timing... -
Page 204: Table 4.25 Equations Associated With U.s. Curves
4.98 Protection and Logic Functions Group Settings (SET Command) conform to IEEE C37.112-1996, IEEE Standard Inverse-Time Characteristic Equations for Overcurrent Relays. Relay Word Bit ORED51T Relay Word bit ORED51T is asserted if any of the Relay Word bits 51PXT, 51QXT, 51GXT, 51PYT, 51QYT, 51GYT, OR 51NT are asserted. Table 4.25 Equations Associated With U.S. -
Page 205: Figure 4.62 U.s. Moderately Inverse Curve: U1
Protection and Logic Functions 4.99 Group Settings (SET Command) 6000 (5000) 6000 (5000) 3000 (2500) 3000 (2500) 1500 (1250) 1500 (1250) 600 (500) 600 (500) 300 (250) 300 (250) 15.00 150 (125) 15.00 150 (125) 12.00 12.00 10.00 10.00 8.00 8.00 6.00 60 (50) -
Page 206: Figure 4.66 U.s. Short-Time Inverse Curve: U5
4.100 Protection and Logic Functions Group Settings (SET Command) 6000 (5000) 6000 (5000) 3000 (2500) 3000 (2500) 1500 (1250) 1500 (1250) 600 (500) 600 (500) 300 (250) 300 (250) 150 (125) 150 (125) 1.00 0.90 0.80 0.70 0.60 60 (50) 60 (50) 0.50 15.00... -
Page 207: Figure 4.70 Iec Long-Time Inverse Curve: C4
Protection and Logic Functions 4.101 Group Settings (SET Command) 1000 60000 (50000) 6000 (5000) 30000 (25000) 3000 (2500) 15000 (12500) 1500 (1250) 6000 (5000) 600 (500) 3000 (2500) 300 (250) 1500 (1250) 150 (125) 600 (500) 60 (50) 300 (250) 30 (25) 1.00 0.90... -
Page 208: Figure 4.72 General Logic Flow Of Directional Control For Residual Ground Overcurrent Elements
4.102 Protection and Logic Functions Group Settings (SET Command) elements. ORDER can be set with the elements listed and defined in Table 4.27. The order in which these directional elements are listed in setting ORDER determines the priority in which they operate to provide Best Choice Ground Directional Element logic control. -
Page 209: Table 4.27 Available Ground Directional Elements
Protection and Logic Functions 4.103 Group Settings (SET Command) Table 4.27 Available Ground Directional Elements Corresponding Ground Corresponding ORDER Directional Internal Enables Corresponding Setting Availability Element (and (and System Figures Choices System Grounding) Grounding) DIRQGE Negative-sequence Figure 4.74, All models, voltage-polarized Figure 4.77 except... -
Page 210: Table 4.28 Best Choice Ground Directional Element Logic
4.104 Protection and Logic Functions Group Settings (SET Command) Table 4.28 Best Choice Ground Directional Element Logic Resultant Ground Directional Element Preference ORDER (indicated below with corresponding internal enables; run ORDER Setting element that corresponds to highest choice internal enable Setting Combination that is asserted;... -
Page 211: Table 4.30 Ground Directional Element Availability By Voltage Transformer Connections On Y Side
Protection and Logic Functions 4.105 Group Settings (SET Command) Table 4.30 Ground Directional Element Availability by Voltage Transformer Connections On Y Side Element Designation in DELTAY_Y := WYE DELTAY_Y := DELTA ORDER Setting for Y Side Zero-Sequence Voltage Sources. The directional elements that rely on zero-sequence voltage 3V0 (ORDER setting choices V and U, shown in Figure 4.78 and Figure 4.80) may use either a calculated 3V0 from the wye- connected voltages VA, VB, and VC, or a measured 3V0 from the VS or VN... - Page 212 4.106 Protection and Logic Functions Group Settings (SET Command) The settings involved with the internal enables (for example, settings a2, k2, a0, and a0N) are explained in Directional Control Settings on page 4.121. Best Choice Ground Directional Element Logic. The Best Choice Ground Directional Element logic determines which directional element should be enabled to operate.
- Page 213 Protection and Logic Functions 4.107 Group Settings (SET Command) ➤ If DELTAY_ := WYE, EFWDLOP := Y, internal enable DIRIE is not asserted, and an LOP condition occurs, then the forward logic point (Relay Word bit DIRGF) asserts to logical 1, thus enabling the residual-ground (Figure 4.83) overcurrent elements that are set direction forward (with settings DIR1 = F, DIR2 = F, etc.).
-
Page 214: Figure 4.74 Internal Enables (Dirqe And Dirqge) Logic For Negative-Sequence Voltage-Polarized Directional Elements
4.108 Protection and Logic Functions Group Settings (SET Command) logic points are routed to the different levels of overcurrent protection by the level direction settings DIR1 and DIR2. Table 4.33 shows the overcurrent elements that are controlled by each level direction setting. -
Page 215: Figure 4.75 Internal Enables (Dirve And Dirie) Logic For Zero-Sequence Voltage-Polarized Directional Element With Ig As Operate Quantity And Channel In Current-Polarized Directional Element
Protection and Logic Functions 4.109 Group Settings (SET Command) Relay (Residual) Word Bits Settings 50GF 50GFP 50GR 50GRP a0 • |I Setting Relay Word Bits Loss-of-Potential EXT3V0_ = VS OR VN DIRVE Setting Enable "V" listed in (Internal Enable) setting ORDER Setting Enable "I"... -
Page 216: Figure 4.77 Negative-Sequence Voltage-Polarized Directional Element For Residual-Ground Overcurrent Elements
4.110 Protection and Logic Functions Group Settings (SET Command) Relay Word Relay 50QF Word Bits Forward Threshold FDIRQG (Forward) Relay Word DIRQGE Best Choice DIRQGE is highest Ground Directional choice that is asserted Enable Logic Re[V •(I •1∠Z1ANG)*] Z2 = RDIRQG Reverse (Reverse) -
Page 217: Figure 4.78 Zero-Sequence Voltage-Polarized Directional Element For Residual-Ground Overcurrent Elements
Protection and Logic Functions 4.111 Group Settings (SET Command) Relay Word Relay 50GF Word Bits Forward Threshold FDIRV (Forward) Relay Word DIRVE Best Choice DIRVE is highest Ground Directional choice that is asserted Enable Logic Re[3V •(I •1∠Z0MTA)*] Z0 = (Residual) = 3I RDIRV... -
Page 218: Figure 4.79 Channel In Current-Polarized Directional Element
4.112 Protection and Logic Functions Group Settings (SET Command) Relay Word Relay 50GF Word Bits Forward Threshold FDIRI (Forward Relay Word DIRIE Best Choice DIRIE is highest Ground Directional choice that is asserted Enable Logic Re[I • (I • 1∠INMTA)*] (Residual) = 3I RDIRI... -
Page 219: Figure 4.80 Zero-Sequence Voltage-Polarized Directional Element For Neutral-Ground Overcurrent Elements
Protection and Logic Functions 4.113 Group Settings (SET Command) Relay Word Relay 50NF Word Bits Forward Threshold FDIRN (Forward) Relay Word DIRNE Settings ORDER = U Enable Re[3V •(IN•1/Z0MTA)*] Z0 = |IN| (Neutral) RDIRN Reverse (Reverse) Threshold Relay Word 50NR Z0 PLANE Reverse Threshold Forward Threshold... -
Page 220: Figure 4.81 Routing Of Directional Elements To Residual-Ground Overcurrent Elements
4.114 Protection and Logic Functions Group Settings (SET Command) Relay Word Bits Logic enclosed in this box applies only to X side. DIRVE EXT3V0_ = VS or VN DIRIE Loss-of-Potential Setting Relay Word EFWDLOP = Y Bits FDIRQG DIRGF RDIRQG (Forward) FDIRV RDIRV... -
Page 221: Figure 4.83 Direction Forward/Reverse Logic For Residual-Ground Overcurrent Elements
Protection and Logic Functions 4.115 Group Settings (SET Command) Level Direction Settings Relay Word DIR1 = F Bits Forward Directional Forward Control DIRGF Setting Level 1 DIR1 = N to Residual Ground ORDER = OFF Time-0vercurrent Elements DIR1 = R Reverse GX1DIR GY1DIR... -
Page 222: Figure 4.85 General Logic Flow Of Directional Control For Negative-Sequence And Phase Overcurrent Elements
4.116 Protection and Logic Functions Group Settings (SET Command) negative-sequence voltage-polarized and positive-sequence voltage-polarized directional elements are enabled and routed to control the negative-sequence and phase overcurrent elements. Directional Direction Directional Internal Relay Word Directional Relay Word Element Relay Word Forward/ Enables Bit Outputs... - Page 223 Protection and Logic Functions 4.117 Group Settings (SET Command) Note in Figure 4.85 and Figure 4.87 that the assertion of internal enable DIRQE (for the negative-sequence voltage-polarized directional element) disables the positive-sequence voltage-polarized directional element. The negative-sequence voltage-polarized directional element has priority over the positive-sequence voltage-polarized directional element in controlling the phase overcurrent elements.
-
Page 224: Figure 4.86 Negative-Sequence Voltage-Polarized Directional Element For Negative-Sequence And Phase Overcurrent Elements
4.118 Protection and Logic Functions Group Settings (SET Command) Directional Control Provided by Torque Control Settings on page 4.133 describes how to avoid this limitation for special cases. Relay Word Relay 50QF Word Bits Forward Threshold FDIRQ (Forward) Relay Word Bits DIRQE Enable... -
Page 225: Figure 4.87 Positive-Sequence Voltage-Polarized Directional Element For Phase Overcurrent Elements
Protection and Logic Functions 4.119 Group Settings (SET Command) (90°) Forward Z1ANG (0°) (180°) Reverse (270°) Relay Word Bits FDIRP (Forward) [90° + Z1ANG] > ∠Z > [—90° + Z1ANG] Relay Word RDIRP Bits (Reverse) Pos.-Seq. Polarizing Voltage Present VPOLV Load Condition ZLOAD Neg.-Seq. -
Page 226: Figure 4.88 Routing Of Directional Elements To Negative-Sequence And Phase Overcurrent Elements
4.120 Protection and Logic Functions Group Settings (SET Command) Setting EFWDLOP = Y Relay Word Loss-of- Bits Potential DIRQF FDIRQ (Forward) DIRQR RDIRQ (Reverse) DIRPF FDIRP (Forward DIRPR RDIRP (Reverse) From Figure 4.120 From Figure 4.86 From Figure 4.87 To Figure 4.89 to Figure 4.90 Figure 4.88 Routing of Directional Elements to Negative-Sequence and Phase Overcurrent Elements... -
Page 227: Table 4.31 Directional Element Settings For X Side And Y Side
Protection and Logic Functions 4.121 Group Settings (SET Command) Level Direction Relay Settings Word DIR1 = F Forward Directional Forward DIRPF Control Level 1 to Phase DIR1 = N Time-0vercurrent Elements DIR1 = R Reverse PY1DIR DIR2 = F Forward Level 2 DIR2 = N DIR2 = R... - Page 228 4.122 Protection and Logic Functions Group Settings (SET Command) Table 4.31 Directional Element Settings for X Side and Y Side (Sheet 2 of 3) Setting Name := Setting Prompt Setting Range Factory Default ZERO SQ LN Z MAG 0.10–510.00 ohm Z0MAGX := 6.38 ZERO SQ LN Z ANG 50.00–90.00 deg...
- Page 229 Protection and Logic Functions 4.123 Group Settings (SET Command) Table 4.31 Directional Element Settings for X Side and Y Side (Sheet 3 of 3) Setting Name := Setting Prompt Setting Range Factory Default I1 RST FAC I2/I1 0.02–0.50 a2Y := 0.10 I0 RST FAC I2/I0 0.10–1.20 k2Y := 0.20...
-
Page 230: Table 4.32 Directional Control Settings Not Made For Particular Conditions
4.124 Protection and Logic Functions Group Settings (SET Command) Table 4.32 Directional Control Settings Not Made for Particular Conditions Settings hidden/not made: for condition: 50PDIRP Always hidden (X side), ELOADY := Y (Y side). 50GFP, 50GRP, a0 setting ORDER does not contain V or I Z0F, Z0R, Z0MTA setting ORDER does not contain V or I ORDERX := U... - Page 231 Protection and Logic Functions 4.125 Group Settings (SET Command) Table 4.34 Relay Word Bits Associated With X-Side and Y-Side Overcurrent Elements With and Without Directional Control Across Different SEL-700G Models (Sheet 2 of 2) Models Elements 700G0 700G0+ 700G1 700G1+ 700GT 700GT+ 700GW...
- Page 232 4.126 Protection and Logic Functions Group Settings (SET Command) ORDER—Ground Directional Element Priority Setting. Setting ORDER can be set with the elements listed and defined in Table 4.27, subject to the setting combination constraints in Table 4.28 and Table 4.29. Table 4.29 lists the ground directional element availability resulting from the voltage transformer connections.
-
Page 233: Table 4.35 Z Constant For Z2R Setting
Protection and Logic Functions 4.127 Group Settings (SET Command) If setting: ORDERm := OFF then all of the ground directional elements are inoperable. Note in Figure 4.83 and Figure 4.84 that setting ORDER := OFF effectively makes the residual- ground and neutral-ground overcurrent elements nondirectional (the directional control outputs of Figure 4.83 and Figure 4.84, respectively, are continuously asserted to logical 1). - Page 234 4.128 Protection and Logic Functions Group Settings (SET Command) The 50QRP setting (3I current value) is the pickup for the reverse fault detector 50QR of the negative-sequence voltage-polarized directional elements (see Figure 4.74). Ideally, the setting is above normal load unbalance and below the lowest expected negative-sequence current magnitude for unbalanced reverse faults.
- Page 235 Protection and Logic Functions 4.129 Group Settings (SET Command) If both of the internal enables: DIRVE internal enable for the zero-sequence voltage-polarized directional element that controls the neutral-ground and residual-ground overcurrent elements internal enable for the channel IN current-polarized DIRIE directional element that controls the neutral-ground and residual-ground overcurrent elements are deasserted, then factor k2 is ignored as a logic enable for the DIRQGE...
-
Page 236: Table 4.36 Z Constant For Z0R Setting
4.130 Protection and Logic Functions Group Settings (SET Command) unbalance), which circulates as a result of line asymmetries, CT saturation during three-phase faults, etc. The zero-sequence current (I ), referred to in the application of the a0 factor, is from the residual current (I ), which is derived from phase currents I and I If enable setting EDIR = AUTO, setting a0 is set automatically at:... -
Page 237: Figure 4.91 Zero-Sequence Impedance Network And Relay Polarity
Protection and Logic Functions 4.131 Group Settings (SET Command) If the system in Figure 4.91 is a solidly-grounded system (mostly inductive; presume uniform system angle) with load-connected line to neutral, the impedance plot (in the R + jX plane) would appear as in Figure 4.92a, with resultant Z0F and Z0R settings as in Figure 4.92b. -
Page 238: Figure 4.93 Hybrid Power System With Neutral-Ground Resistor
4.132 Protection and Logic Functions Group Settings (SET Command) selected to allow a ground fault current through the resistor equal to or somewhat more than the capacitive charging current of the system. To detect a ground fault internal to the generator, which is forward looking from the core- balance CT into the generator, a Z0MTAX value of -45 degrees should suffice. - Page 239 Protection and Logic Functions 4.133 Group Settings (SET Command) Adjust the final setting value of a0N from the above derived value of a0N, depending on your security philosophy, etc. The a0N factor increases the security of the zero-sequence voltage-polarized directional element. It keeps the elements from operating for zero-sequence current as a result of any system unbalance.
-
Page 240: Table 4.37 Load-Encroachment Settings
4.134 Protection and Logic Functions Group Settings (SET Command) (controlled by level direction setting DIR1). The same setting principles apply to the other levels as well. Many variations are possible. Load-Encroachment Logic The load-encroachment feature allows certain elements (system backup, phase directional, etc.) to be set without regard for load levels. -
Page 241: Figure 4.94 Load-Encroachment Logic For X Side
Protection and Logic Functions 4.135 Group Settings (SET Command) PLAFX > ∠ Z > NLAFX Relay Word Settings Bits ZLFX Load Out ZLOADX | (Magnitude) ∠Z (Angle) Pos.-Seq. Threshold Positive-Sequence Threshold = (Phase Channels Nominal Rating) • (0.1) ZLOADX = ZLOUTX (90°) ZLOUTX (Load Out... -
Page 242: Figure 4.95 Load-Encroachment Logic For Y Side
4.136 Protection and Logic Functions Group Settings (SET Command) PLAFY > ∠ Z > NLAFY Relay Word Settings Bits ZLFY Load Out ZLOUTY | (Magnitude) ZLOADY ∠Z (Angle) Load In ZLRY ZLINY NLARY > ∠ Z > PLARY Pos.-Seq. Threshold Positive-Sequence Threshold = (Phase Channels Nominal Rating) •... - Page 243 Protection and Logic Functions 4.137 Group Settings (SET Command) Convert Maximum Loads to Equivalent Secondary Impedances. Start with maximum forward load: 800 MVA • (1/3) 267 MVA per phase 230 kV • (1/ 3) = 132.8 kV line-to-neutral 267 MVA • (1/132.8 kV) • (1000kV/MV) = 2010 A primary 2010 A primary •...
-
Page 244: Table 4.38 Power Element Settings
4.138 Protection and Logic Functions Group Settings (SET Command) Use the SEL-321 Relay Application Guide for the SEL-700G Relay The load-encroachment logic and the settings in the SEL-700G are the same as those in the SEL-321. Refer to SEL Application Guide AG93-10, SEL-321 Relay Load-Encroachment Function Setting Guidelines, for applying the load- encroachment logic in the SEL-700G. -
Page 245: Figure 4.96 Three-Phase Power Elements Logic
Protection and Logic Functions 4.139 Group Settings (SET Command) Table 4.38 Power Element Settings (Sheet 2 of 2) Setting Name := Setting Prompt Setting Range Factory Default PWR ELEM DELAY 0.00–240.00 s PWRm3D := 0.00 3PH PWR ELEM PU OFF, 1.0–6500.0 VA 3PWRm4P := OFF (secondary VA) PWR ELEM TYPE... -
Page 246: Figure 4.97 Power Elements Operation In The Real/Reactive Power Plane
4.140 Protection and Logic Functions Group Settings (SET Command) Y-Side Set as Reactive Power Elements X-Side Set as Real Power Elements Reactive Reactive Power Power PWRY1T = +VARS (type) 3PWRY1P (pickup) Real Power Real Power PWRX2T = PWRX1T = —WATTS +WATTS (type) (type) -
Page 247: Table 4.39 Signals Used For Frequency Measurement And Tracking
Protection and Logic Functions 4.141 Group Settings (SET Command) power, set the element pickup lower than this level to account for measuring errors in the relay, voltage transformers, and current transformers. For sequential tripping of the generator, you might want low-forward power. The default settings of the Level 2 power element and associated trip logic is set up for such an application. -
Page 248: Table 4.40 Frequency Settings
4.142 Protection and Logic Functions Group Settings (SET Command) Table 4.40 Frequency Settings Setting Name := Setting Prompt Setting Range Factory Default ENABLE 81m N, 1–6 E81m := N FREQm TRIP1 LVL OFF, 15.00–70.00 Hz 81m1TP := OFF FREQm TRIP1 DLY 0.00–240.00 s 81m1TD := 1.00 FREQm TRIP2 LVL... -
Page 249: Table 4.41 Rate-Of-Change-Of-Frequency Settings
Protection and Logic Functions 4.143 Group Settings (SET Command) FREQY 81YnTP 81YnTP ≥ FNOM 81YnTD 81YnTP < FNOM 81YnT 81YTC FREQTRKY FREQYOK ZCFREQY Frequency Elements 1–6 FREQY = Measured Frequency 81YnTP = Frequency Pickup Setting FNOM = Nominal Frequency Setting 81YnTD = Over- and Underfrequency Element Pickup Time Delay 81YnT =... -
Page 250: Table 4.42 Time Window Versus 81Rmntp Setting
4.144 Protection and Logic Functions Group Settings (SET Command) Table 4.41 Rate-of-Change-of-Frequency Settings (Sheet 2 of 2) Setting Name := Setting Prompt Setting Range Factory Default FREQm ROC PU DLY 0.10–60.00 s 81Rm4TD := 1.00 FREQm ROC DO DLY 0.00–60.00 s 81Rm4DO := 0.00 FREQm ROC VSUPER OFF, 12.5–300.0 V... - Page 251 Protection and Logic Functions 4.145 Group Settings (SET Command) Table 4.42 Time Window Versus 81RmnTP Setting (Sheet 2 of 2) 81RmnTP Setting (Hz/s) Time-Window (Cycles) 0.28–0.26 < 0.25 (m = X or Y; n = 1–4). Set 81RmnTRN Trend to INC or DEC to limit the operation of the element to increasing or decreasing frequency, respectively.
-
Page 252: Table 4.43 Undervoltage Settings
4.146 Protection and Logic Functions Group Settings (SET Command) Table 4.43 Undervoltage Settings Setting Name := Setting Prompt Setting Range Factory Default PHASE UV LEVEL OFF, 2.0–300.0 V 27Pm1P := OFF PHASE UV DELAY 00.00–120.00 s 27Pm1D := 0.50 PHASE UV LEVEL OFF, 2.0–300.0 V 27Pm2P := OFF PHASE UV DELAY... -
Page 253: Table 4.44 Overvoltage Settings
Protection and Logic Functions 4.147 Group Settings (SET Command) Table 4.44 Overvoltage Settings Setting Name := Setting Prompt Setting Range Factory Default PHASE OV LEVEL OFF, 2.0–300.0 V 59Pm1P := OFF PHASE OV DELAY 00.00–120.00 s 59Pm1D := 0.50 PHASE OV LEVEL OFF, 2.0–300.0 V 59Pm2P := OFF PHASE OV DELAY... -
Page 254: Figure 4.101 Undervoltage Element Logic
4.148 Protection and Logic Functions Group Settings (SET Command) (a) Voltage Magnitude Calculation (Minimum Phase Voltage Magnitude in secondary) |VPminm| (Maximum Phase Voltage Magnitude in secondary) |VPmaxm| VABm or VAm Voltage (Minimum Phase-to-Phase Voltage Magnitude secondary) Magnitude VBCm or VBm |VPPminm| Calculation VCAm or VCm... -
Page 255: Figure 4.102 Overvoltage Element Logic
Protection and Logic Functions 4.149 Group Settings (SET Command) (a) Voltage Magnitude Calculation (Minimum Phase Voltage Magnitude in secondary) |VPminm| (Maximum Phase Voltage Magnitude in secondary) |VPmaxm| Voltage (Minimum Phase-to-Phase Voltage Magnitude secondary) VABm or VAm |VPPminm| Magnitude (Maximum Phase-to-Phase Voltage Magnitude secondary) VBCm or VBm |VPPmaxm| Calculation... -
Page 256: Table 4.45 Rtd Settings
4.150 Protection and Logic Functions Group Settings (SET Command) (a) Logic Below is Applicable When DELTAY_m := WYE Relay Word Bits |3V0m| 59Gm1 59Gm1D 59Gm1P 59Gm1T 59Gm2 59Gm2D 59Gm2P 59Gm2T (b) Logic Below is Applicable to X Side Only When DELTAY_X := DELTA and EXT3V0_X = VS or VN Relay Word Bits |3V0X|... - Page 257 Protection and Logic Functions 4.151 Group Settings (SET Command) Table 4.45 RTD Settings (Sheet 2 of 2) Setting Name := Setting Prompt Setting Range Factory Default RTD1 TRIP LEVEL OFF, 1–250 degC TRTMP1 := OFF RTD1 WARN LEVEL OFF, 1–250 degC ALTMP1 := OFF •...
-
Page 258: Table 4.46 Rtd Resistance Versus Temperature
4.152 Protection and Logic Functions Group Settings (SET Command) temperature trip if one or two of the healthy winding RTDs indicate a temperature greater than their RTD trip temperature settings. Two winding RTDs must indicate excessive temperature when the winding trip voting setting equals Y. -
Page 259: Table 4.47 X-Side Synchronism-Check Settings
Protection and Logic Functions 4.153 Group Settings (SET Command) Table 4.46 RTD Resistance Versus Temperature (Sheet 2 of 2) Temp Temp (°F) (°C) Platinum Nickel Nickel Copper 230.00 186.82 340.14 268.90 17.95 240.00 190.45 353.14 278.90 18.34 250.00 194.08 366.53 289.10 18.73 Synchronism Elements... - Page 260 4.154 Protection and Logic Functions Group Settings (SET Command) Table 4.47 X-Side Synchronism-Check Settings (Sheet 2 of 2) Setting Prompt Setting Range Setting Name := Factory Default MAX SLIP FREQ –0.99 to 1.00 Hz 25SHI := 0.10 MAX ANGLE 1 0–80 deg 25ANG1X := 5 MAX ANGLE 2...
-
Page 261: Figure 4.105 Synchronism-Check Function Voltage Elements
Protection and Logic Functions 4.155 Group Settings (SET Command) Setting E25X = Y Setting Relay 25VHIX Word Bits 59VPX |Vpxc| |VS| 59VSX Settings 25VLOX BSYNCHX GENVHI GENVLO Setting 25VDIFX ||VS| – |Vpxc|| / |VS| • 100% VDIFX GENV+ = Y Vpxc = 25RCFX * VP (where 25RCFX is the setting and VP is determined by the SYNCPX setting). -
Page 262: Figure 4.107 Synchronism-Check Function 25Rcfx And Syncpx/Syncpy Setting Examples
4.156 Protection and Logic Functions Group Settings (SET Command) applications require 25RCFX := 1.000, but some applications may need a different setting. Figure 4.107 shows four out of several possible configurations and their associated settings and calculations. (a) SEL-700G Without GSU Transformer (b) SEL-700G With GSU Transformer 13.8 kV 115 kV... -
Page 263: Figure 4.108 Synchronism-Check Function Slip Elements
Protection and Logic Functions 4.157 Group Settings (SET Command) The 25ANG1X setting defines an acceptable generator breaker closing angle. The relay asserts the 25AX1 Relay Word bit when the generator voltage is within 25ANG1X degrees of the system voltage if the other supervisory conditions also are met. -
Page 264: Figure 4.109 Synchronism-Check Function Angle Elements
4.158 Protection and Logic Functions Group Settings (SET Command) Compensated Angle Difference = Ang (VPX) - Ang (VS) + SLIP * TCLOSDX * 360/1000 25ANG2X CFANGLE Enable Angle Calculation Uncompensated Angle Difference = | Ang (VPX) - Ang (VS) | Figure 4.108 Figure 4.109 Synchronism-Check Function Angle Elements Relay... -
Page 265: Figure 4.111 Synchronism-Check Function Angle Characteristics
Protection and Logic Functions 4.159 Group Settings (SET Command) VP Rotation When VP Rotation When 0° Generator Freq. < System Freq. Generator Freq. > System Freq. (slip < 0.0 Hz) (slip > 0.0 Hz) -90° 90° 180° Figure 4.111 Synchronism-Check Function Angle Characteristics The TCLOSDX setting predicts the time that it will take for the generator main breaker to close, from the instant the SEL-700G Relay Word bit CLOSEX asserts, to the instant the breaker main contacts close. - Page 266 4.160 Protection and Logic Functions Group Settings (SET Command) Sometimes the VS voltage cannot be in phase with any one of the voltage inputs. This happens in applications where voltage input VS is connected ➤ Phase-to-phase when DELTAY_X := WYE ➤...
- Page 267 Protection and Logic Functions 4.161 Group Settings (SET Command) The 25RCFX setting compensates magnitude differences between the synchronism-check voltage and the generator voltage. Unmatched voltage transformer or step-up transformer ratios can introduce magnitude differences. Use the following equation to set 25RCFX: VSNOM 25RCFX -------------------------- -...
- Page 268 4.162 Protection and Logic Functions Group Settings (SET Command) The settings for 25ANG1X, 25ANG2X, and CANGLE depend on the requirements of the application. Set TCLOSDX equal to the circuit breaker closing time in milliseconds. The relay uses this value to calculate the slip-compensated phase-angle difference between the generator and system voltages, as described previously.
- Page 269 Protection and Logic Functions 4.163 Group Settings (SET Command) The BSYNCHX SEL control equation should be set to block the OGIC synchronism-check function whenever the generator circuit breaker is closed and during other conditions that you select. Manually Refine the 25RCFX Setting While the Generator Is in Service.
- Page 270 4.164 Protection and Logic Functions Group Settings (SET Command) Step 7. Calculate a refined 25RCFX setting by dividing VSs by VP: 25RCFX = VSs/VP = __________ Step 8. If the 25RCFX value calculated in Step 7 varies from the 25RCFX setting noted in Step 1, enter the value as a new 25RCFX setting to improve the accuracy of the synchronism- check voltage acceptance logic.
-
Page 271: Figure 4.112 Synchronism-Check Voltage Window And Slip Frequency Elements
Protection and Logic Functions 4.165 Group Settings (SET Command) Settings Relay 25VHIY High Threshold Word VP Within Bits "Healthy Voltage" Window VPY = 25RCFY *VPH 59VPY where VPH = VAY, VBY, VCY, VABY, VBCY, or VCAY depending on Low Threshold the SYNCPY setting. -
Page 272: Figure 4.113 Synchronism-Check Elements
4.166 Protection and Logic Functions Group Settings (SET Command) Relay Word Bits Slip Frequency Element Angle Angle Difference Difference Calculator (absolute value) Relay Word Bits Settings Synchronism-Check Element 1 25AY1 Maximum Angle 1 25ANG1Y Synchronism-Check Element 2 25AY2 Maximum Angle 2 25ANG2Y Operation of Synchronism-Check Elements if voltages VP and VS are static (not slipping):... -
Page 273: Table 4.48 Synchronism-Check Settings
Protection and Logic Functions 4.167 Group Settings (SET Command) Voltage Input VS Connected Phase-to-Phase or Beyond Delta-Wye Transformer Sometimes synchronism-check voltage VS cannot be in phase with voltage VA, VB, or VC (wye-connected PTs); or VAB, VBC, or VCA (delta- connected PTs). - Page 274 4.168 Protection and Logic Functions Group Settings (SET Command) how many degrees VS constantly lags VABY. In this application, voltage input NOTE: Settings SYNCPY := 0 and VAY-VBY has to be connected and has to meet the “healthy voltage” criteria SYNCPY := VABY are effectively the (settings 25VHIY and 25VLOY—see Figure 4.112).
- Page 275 Protection and Logic Functions 4.169 Group Settings (SET Command) Block Synchronism-Check Conditions. Refer to Figure 4.112. The synchronism-check element slip frequency calculator runs if both voltages VPY and VS are healthy (59VPY and 59VSY asserted to logical 1) and the control equation setting BSYNCHY (Block Synchronism Check) is OGIC deasserted (= logical 0).
-
Page 276: Figure 4.114 Angle Difference Between Vpy And Vs Compensated By Breaker Close Time (Fpy < Fs And Vpy Shown As Reference In This Example)
4.170 Protection and Logic Functions Group Settings (SET Command) For example, if SYNCPY := 90 (indicating VS constantly lags VPY = VAY by 90 degrees), but VS actually lags VAY by 100 angular degrees on the power system at a given instant, the angle difference calculator automatically accounts for the 90 degrees and: Angle Difference = |(... - Page 277 Protection and Logic Functions 4.171 Group Settings (SET Command) Angle Difference Example (Voltages VPY and VS Are “Slipping”). Refer to the bottom of Figure 4.113. For example, if the breaker close time is 100 ms, set TCLOSDY := 100. Presume that the slip frequency is the example slip frequency calculated previously.
- Page 278 4.172 Protection and Logic Functions Group Settings (SET Command) through time. Synchronism-check element 25AY1 or 25AY2 asserts to logical 1 for either one of the following scenarios. 1. The top of Figure 4.114 shows the angle difference decreasing—VS* is approaching VPY. When VS* is in phase with VPY (Angle Difference = 0 degrees), synchronism-check elements 25AY1 and 25AY2 assert to logical 1.
-
Page 279: Figure 4.115 Overall Functional Block Diagram
Protection and Logic Functions 4.173 Group Settings (SET Command) Autosynchronism The autosynchronizer is used to match the frequency, phase, and voltage of an incoming generator to the frequency, phase, and voltage of the bus before allowing the generator breaker to be closed. The SEL-700G Relay offers built- in autosynchronism. -
Page 280: Table 4.49 Autosynchronism Settings
4.174 Protection and Logic Functions Group Settings (SET Command) Table 4.49 Autosynchronism Settings Setting Name := Setting Prompt Setting Range Description Factory Default AUTO SYNC EN NONE, DIG EAUTO := NONE Autosynchronism enable FREQ SYNC TIMER 5–3600 sec FSYNCT := 100 Frequency matching Timer FREQ ADJ RATE 0.01–10.00 Hz/s... -
Page 281: Figure 4.116 Simplified Block Diagram, Frequency And Phase Matching Elements
Protection and Logic Functions 4.175 Group Settings (SET Command) Relay Word Logic Activation Relay Word Bits Activate Setting FSYNCACT FSYNCST De-activate FSYNCT See Note (Higher Priority) FSYNCTO Pulse Definition Processing Pulse (Pulse width = 0 except as computed below) Generator SLIP = FREQX —... -
Page 282: Figure 4.117 Simplified Block Diagram, Voltage Matching Elements
4.176 Protection and Logic Functions Group Settings (SET Command) Phase Matching In some cases (that is, either 25SLO or 25SHI is set within +/- 0.02 Hz), the correction pulses described previously in Frequency Matching are likely to stop when the slip is very close to zero. This prevents the synchronism-check function from asserting the bit 25C if the phase angle difference between Vpxc and VS is not acceptable and is nearly static. -
Page 283: Figure 4.118 Synchroscope
Protection and Logic Functions 4.177 Group Settings (SET Command) Set VPULSEI to define an interval for the VRAISE and VLOWER pulses. Make sure that the interval setting is greater than the time necessary for the generator voltage to stabilize after a control pulse is applied. This prevents the relay from overshooting the target magnitude by prematurely applying the next control pulse. -
Page 284: Figure 4.119 Graphical Display Of Generator Autosynchronism Report
4.178 Protection and Logic Functions Group Settings (SET Command) information on the CGSR report, refer to Section 9: Analyzing Events, Generator Autosynchronism Report (CGSR Command). The SEL-700G Relay also triggers and saves synchronism-check reports on the X-side each time the relay initiates a synchronism-check supervised generator breaker close. -
Page 285: Table 4.50 Loss Of Potential (Lop) Settings
Protection and Logic Functions 4.179 Group Settings (SET Command) Settings The LOPX and LOPY functions, when available in a given SEL-700G model, are always active unless blocked by the corresponding SEL control OGIC equations LOPBLKX and LOPBLKY, respectively (see Table 4.50 for the settings and Figure 4.120 for the logic). -
Page 286: Other Settings
4.180 Protection and Logic Functions Other Settings Relay Word | V1 | > 10.5 V Δ| V1 | > 25% LOPX/LOPY LOPBLKX or LOPBLKY OOS (X or Y Side) Δ I1 > 10° Δ | I1 |> 0.1 • I (RESET has priority) Δ... -
Page 287: Figure 4.121 Demand Current Logic Outputs
Protection and Logic Functions 4.181 Other Settings Table 4.51 Demand Meter Settings (Sheet 2 of 2) Setting Name := Setting Prompt Setting Range Factory Default RES CURR DEM LVL OFF, 0.50-16.00 A GNDEMP := OFF OFF, 0.10-3.20 A GNDEMP := OFF 3I2 CURR DEM LVL OFF, 0.50-16.00 A 3I2DEMP... -
Page 288: Figure 4.122 Response Of Thermal And Rolling Demand Meters To A Step Input (Setting Dmtc = 15 Minutes)
4.182 Protection and Logic Functions Other Settings Step Current Input Time (Minutes) Thermal Demand Meter Response (EDEM = THM) Time (Minutes) DMTC = 15 minutes Rolling Demand Meter Response (EDEM = ROL) Time (Minutes) Figure 4.122 Response of Thermal and Rolling Demand Meters to a Step Input (Setting DMTC = 15 minutes) SEL-700G Relay Instruction Manual... -
Page 289: Figure 4.123 Voltage
Protection and Logic Functions 4.183 Other Settings Thermal Demand Meter Response The response of the thermal demand meter in Figure 4.122 (middle) to the step current input (top) is analogous to the series RC circuit in Figure 4.123. — — Figure 4.123 Voltage V Applied to Series RC Circuit In the analogy:... - Page 290 4.184 Protection and Logic Functions Other Settings (15/5 = 3). The rolling demand meter response is updated every five minutes, after a new five-minute total is calculated. The following is a step-by-step calculation of the rolling demand response example in Figure 4.122 (bottom). Time = 0 Minutes Presume that the instantaneous current has been at zero for quite some time before “Time = 0 minutes”...
-
Page 291: Table 4.52 Pole Open Logic Settings
Protection and Logic Functions 4.185 Other Settings Time = 15 Minutes The three five-minute intervals in the sliding time-window at “Time = 15 minutes” each integrate into the following 5-minute totals. Five-Minute Totals Corresponding Five-Minute Interval 1.0 per unit 0 to 5 minutes 1.0 per unit 5 to 10 minutes 1.0 per unit... -
Page 292: Table 4.53 Trip/Close Logic Settings
4.186 Protection and Logic Functions Other Settings Relay Relay Word Word Bits Bits 52AY 3POY 3POYD | IAY | | IBY | 50LY | ICY | Setting 50LYP Figure 4.125 Pole Open Logic Diagram, Breaker 52Y Set 50LmP (m = X or Y) to its minimum value. When the breaker current is extremely low, the relay relies on the 52Am input status to indicate breaker position. - Page 293 Protection and Logic Functions 4.187 Other Settings Table 4.53 Trip/Close Logic Settings (Sheet 2 of 2) Setting Prompt Setting Range Setting Name := Factory Default UNLATCH TRIP 3 ULTR3 := NOT TR3 BREAKER STATUS := 0 CLOSE X EQUATION CLX := SV03T OR CCX OR SV11T AND 25C CLOSE X EQUATION CLX := SV03T AND NOT LT02...
-
Page 294: Figure 4.126 Trip Logic
4.188 Protection and Logic Functions Other Settings Pushbutton TARGET RESET Relay Communications Word Command Target Reset TRGTR Serial Port Reset TRIP LED Command TAR R OGIC Setting RSTTRGT R_TRIG 52AX OR R_TRIG 52AY RSTLED = Y Relay Word OGIC Setting TRIPX TDURD ULTRX... -
Page 295: Figure 4.127 Typical Generator Trip Tr Logic (Sel-700G0, Sel-700G1, Sel-700Gt)
Protection and Logic Functions 4.189 Other Settings LT06 LB01 RB01 (Prime Mover Trip) 3POX (General Lockout Trip) 87N1T 87N2T (SV06 OR SV07) 64G1T (Field BKR Trip) 64G2T REF1P SV06 50GX1T 50GX2T 67GX1T 67GX2T INADT 64F2T 21C1T (BKR 52X Trip 21C2T 51CT 51VT 51GXT... -
Page 296: Figure 4.129 Typical Feeder Trip Tr Logic (Sel-700Gw)
4.190 Protection and Logic Functions Other Settings 50PX1T 50PX2T 50PX3AT 50PX3BT 50PX3CT SV06 50GX1T 50GX2T 50QX1T 50QX2T 51PXT 51GXT SV07 51QXT (BKR 52X Trip SV04T LT02 50PY1T 50PY2T 50PY3AT 50PY3BT 50PY3CT SV09 50GY1T 50GY2T 50QY1T 50QY2T 51PYT 51GYT SV10 51QYT (BKR 52Y Trip SV04T LT02... -
Page 297: Figure 4.130 Close Logic
Protection and Logic Functions 4.191 Other Settings Unlatch Trip Logic Each of the five trip logic equations has an associated unlatch trip SEL OGIC control equation. Following a fault, the trip signal is maintained until all of the following conditions are true: ➤... -
Page 298: Figure 4.131 Typical Generator Or Intertie Close Cl Logic (Sel-700G Or Gt)
4.192 Protection and Logic Functions Other Settings Set the CL SEL control equation to include an ORcombination of all OGIC Relay Word bits for which you want to cause the relay to close the breaker. The factory-default setting already includes all commonly used Relay Word bits. -
Page 299: Logic Settings (Set L Command)
Protection and Logic Functions 4.193 Logic Settings (SET L Command) (a) CLX Logic SV03T LT02 INxxx (b) CLY Logic SV03T LT02 INyyy Figure 4.132 Typical Feeder Close CL Logic (SEL-700GW) Unlatch Close Logic Each of the two close logic equations has an associated unlatch close control equation. -
Page 300: Figure 4.133 Schematic Diagram Of A Traditional Latching Device
4.194 Protection and Logic Functions Logic Settings (SET L Command) Latch Bits Latch control switches (latch bits are the outputs of these switches) replace traditional latching devices. Traditional latching devices maintain output contact state. The SEL-700G latch control switch also retains state even when power to the device is lost. -
Page 301: Table 4.55 Latch Bits Equation Settings
Protection and Logic Functions 4.195 Logic Settings (SET L Command) Table 4.55 Latch Bits Equation Settings Settings Prompt Setting Range Setting Name := Factory Default Description SET01 SET01 := R_TRIG SV01T AND NOT LT01 Disables front-panel control LOCK. OGIC RST01 RST01 := R_TRIG SV01T AND LT01 Enables front-panel control LOCK. -
Page 302: Figure 4.135 Sel Ogic Control Equation Variable/Timers Sv01/Sv01T-Sv32T
4.196 Protection and Logic Functions Logic Settings (SET L Command) Settings Change If individual settings are changed, the states of the latch bits (Relay Word bits LT01 through LT32) are retained, as in the preceding Power Loss on page 4.195 explanation. If the individual settings change causes a change in the SEL control equation settings SETn or RSTn (n = 1 through 32), the OGIC... -
Page 303: Table 4.56 Sel Ogic Control Equation Operators (Listed In Operator Precedence)
Protection and Logic Functions 4.197 Logic Settings (SET L Command) The relay converts variables from decimal to integer before performing math operations (through multiplication by 128 followed by rounding). After the math operations, the relay converts the result back from integer to decimal by scaling the value down by 128 before reporting the results. - Page 304 4.198 Protection and Logic Functions Logic Settings (SET L Command) Table 4.56 SEL Control Equation Operators (Listed in Operator OGIC Precedence) (Sheet 2 of 2) Function Type (Boolean Operator Function and/or Mathematical) Mathematical subtract <, >, <=, >= comparison Boolean equality Boolean <>...
-
Page 305: Figure 4.136 Result Of Falling-Edge Operator On A Deasserting Input
Protection and Logic Functions 4.199 Logic Settings (SET L Command) MV01 := 12 * IN101 + (MV01 + 1) * NOT IN101 The previous equation sets MV01 to 12 whenever IN101 asserts. Otherwise, it increments MV01 by 1 each time the equation is executed. - Page 306 4.200 Protection and Logic Functions Logic Settings (SET L Command) Boolean Comparison Operators (<, >, <=, and >=) Comparisons are mathematical operations that compare two numerical values, with the result being a logical 0 (if the comparison is not true) or logical 1 (if the comparison is true).
- Page 307 Protection and Logic Functions 4.201 Logic Settings (SET L Command) SV/Timers Settings The SEL-700G includes 32 SEL variables. Table 4.58 shows the pickup, OGIC dropout, equation settings, and brief descriptions for SV01–SV12. The factory-default settings for these variables should address most applications. Review the default settings and make any changes necessary to suit your application.
- Page 308 4.202 Protection and Logic Functions Logic Settings (SET L Command) Table 4.58 SEL Variable Settings (Sheet 2 of 3) OGIC Setting Setting Prompt Default Settings Description Range SV INPUT SV07 := 51CT OR 51VT OR 51GXT OR 51NT Assigned to prolonged system faults, OGIC OR 67N1T OR 67N2T OR 49T OR LT06 AND overload, and neutral overcurrent...
-
Page 309: Table 4.59 Counter Input/Output Description
Protection and Logic Functions 4.203 Logic Settings (SET L Command) Table 4.58 SEL Variable Settings (Sheet 3 of 3) OGIC Setting Setting Prompt Default Settings Description Range SV INPUT SV12 := 0 OGIC • • • • • • Counter Variables counters are up- or down-counting elements, updated every OGIC processing interval. -
Page 310: Table 4.60 Order Of Precedence Of The Control Inputs
4.204 Protection and Logic Functions Logic Settings (SET L Command) Table 4.60 Order of Precedence of the Control Inputs Order Input SCnnR SCnnLD SCnnCU SCnnCD SC01CU first being seen as a rising edge and the resultant outputs. This indicates that there is no intentional lag between the control input asserting and the count value changing. -
Page 311: Table 4.61 Control Output Equations And Contact Behavior Settings
Protection and Logic Functions 4.205 Logic Settings (SET L Command) Word bit SCnnQD to assert (SCnnQD := logical 1), and the Relay Word bit SCnnQU to deassert (SCnnQU := logical 0). Output Contacts The SEL-700G provides the ability to use SEL control equations to map OGIC protection (trip and warning) and general-purpose control elements to the... -
Page 312: Global Settings (Set G Command)
4.206 Protection and Logic Functions Global Settings (SET G Command) Global Settings (SET G Command) General Settings Set the FNOM setting equal to your system nominal frequency. The DATE_F setting allows you to change the relay date presentation format to the North American standard (Month/Day/Year), the engineering standard (Year/ Month/Day), or the European standard (Day/Month/Year). - Page 313 Protection and Logic Functions 4.207 Global Settings (SET G Command) Table 4.63 Event Messenger Settings (Sheet 2 of 2) Setting Name := Setting Prompt Setting Range Factory Default MESSENGER POINT Off, 1 Relay Word bit MPTR32 := OFF MP32 TRIGGER MESSENGER POINT None, 1 analog quantity MPAQ32 := NONE...
-
Page 314: Table 4.64 Setting Group Selection
4.208 Protection and Logic Functions Global Settings (SET G Command) Table 4.64 Setting Group Selection Setting Name := Setting Prompt Setting Range Factory Default GRP CHG DELAY 0–400 sec TGR := 3 SELECT GROUP1 SS1 := 1 OGIC SELECT GROUP2 SS2 := 0 OGIC SELECT GROUP3... - Page 315 Protection and Logic Functions 4.209 Global Settings (SET G Command) IRIGC IRIGC defines whether IEEE C37.118 control bit extensions are in use. Control bit extensions contain information such as Leap Second, UTC time, Daylight Saving Time, and Time Quality. When your satellite-synchronized clock provides these extensions, your relay adjusts the synchrophasor time stamp accordingly.
- Page 316 4.210 Protection and Logic Functions Global Settings (SET G Command) With these example settings, the relay will enter daylight-saving time on the last Sunday in March at 0200 h, and leave daylight-saving time on the third Wednesday in October at 0300 h. The relay asserts Relay Word bit DST when DST is active.
-
Page 317: Table 4.66 Breaker Failure Setting
Protection and Logic Functions 4.211 Global Settings (SET G Command) Breaker Failure The SEL-700G provides flexible breaker failure logic for as many as two breakers (see Figure 4.140). In the default breaker failure logic, the assertion Setting of the Relay Word bit TRIPm (m = X, Y) starts the associated BFD timer if the sum of positive-sequence and negative-sequence currents is above 0.02 •... -
Page 318: Figure 4.141 Analog Input Card Adaptive Name
4.212 Protection and Logic Functions Global Settings (SET G Command) Analog Inputs The SEL-700G tracks the power system frequency and samples the analog inputs four times per power system cycle. For analog inputs, set the following parameters for each input: ➤... -
Page 319: Table 4.67 Summary Of Steps
Protection and Logic Functions 4.213 Global Settings (SET G Command) Table 4.67 Summary of Steps Step Activity Terse Description General SET G Access settings for INPUT 1 AI301NAM TX_TEMP Enter a Tag name Select type of analog input; “I” for current Transducer Enter transducer low output (LOW IN VAL) High/Low... -
Page 320: Figure 4.142 Settings To Configure Input 1 As A 4-20 Ma Transducer Measuring Temperatures Between -50°C And 150°C
4.214 Protection and Logic Functions Global Settings (SET G Command) With the levels defined, the next six settings provide two warning settings and one alarm setting for low temperature values, as well as two warning settings and one alarm setting for high temperature values. State the values in engineering units, not the setting range of the transducer. -
Page 321: Table 4.68 Analog Input Card In Slot 3
Protection and Logic Functions 4.215 Global Settings (SET G Command) Table 4.68 Analog Input Card in Slot 3 Setting Name := Setting Prompt Setting Range Factory Default AI301 TAG NAME 8 characters 0–9, A–Z, _ AI301NAM := AI301 AI301 TYPE I, V AI301TYP := I AI301 LOW IN VAL... -
Page 322: Table 4.69 Output Setting For A Card In Slot 3
4.216 Protection and Logic Functions Global Settings (SET G Command) Table 4.69 shows the setting prompt, setting range, and factory-default settings for an analog card in Slot 3. Table 4.69 Output Setting for a Card in Slot 3 NOTE: Setting Name := The SEL-700G hides the Setting Prompt Setting Range... -
Page 323: Figure 4.145 Dc Mode Processing
Protection and Logic Functions 4.217 Global Settings (SET G Command) Digital Input To comply with different control voltages, the SEL-700G offers dc and ac debounce modes. Therefore, if the control voltage is dc, select the dc mode of Debounce operation, and if the control voltage is ac, select the ac mode of operation. In general, debounce refers to a qualifying time delay before processing the change of state of a digital input. -
Page 324: Table 4.70 Slot C Input Debounce Settings
4.218 Protection and Logic Functions Global Settings (SET G Command) IN101R Asserted; DPUT counts IN101R IN101R Asserted; DPUT Counts IN101R Deasserted; IN101R Deasserted; DDOT Counts DDOT Counts Relay Word Dropout Time 2 ms Bit IN101 (16 ms) Debounce Pickup Debounce Dropout DPUT = Debounce Pickup Timer Timer Expires;... -
Page 325: Port Settings (Set P Command)
Protection and Logic Functions 4.219 Port Settings (SET P Command) Table 4.71 Data Reset Settings (Sheet 2 of 2) Setting Name := Setting Prompt Setting Range Factory Default RESET DEMAND RSTDEM := 0 OGIC RESET PK DEMAND RSTPKDEM := 0 OGIC Access Control The DSABLSET setting defines conditions for disabling all setting changes... -
Page 326: Table 4.74 Front-Panel Serial Port Settings
4.220 Protection and Logic Functions Port Settings (SET P Command) PORT F Table 4.74 Front-Panel Serial Port Settings Setting Name := Setting Prompt Setting Range Factory Default PROTOCOL SEL, MOD, PROTO := SEL EVMSG, PMU SPEED 300–38400 bps SPEED := 9600 DATA BITS 7, 8 bits BITS := 8... -
Page 327: Table 4.76 Port Number Settings That Must Be Unique
Protection and Logic Functions 4.221 Port Settings (SET P Command) Port Number Settings Must be Unique When making the SEL-700G Port 1 settings, port number settings cannot be used for more than one protocol. The relay checks all of the settings shown in Table 4.76 before saving changes. -
Page 328: Table 4.79 Rear-Panel Serial Port (Eia-232/Eia-485) Settings
4.222 Protection and Logic Functions Port Settings (SET P Command) Table 4.78 Rear-Panel Serial Port (EIA-232) Settings (Sheet 2 of 2) Setting Name := Setting Prompt Setting Range Factory Default FAST OP MESSAGES Y, N FASTOP := N MODBUS SLAVE ID 1–247 SLAVEID := 1 PORT 4... -
Page 329: Front-Panel Settings (Set F Command)
Protection and Logic Functions 4.223 Front-Panel Settings (SET F Command) Appendix C: SEL Communications Processors for the description of the SEL-700G Fast Operate commands. Set PROTO := DNET to establish communications when the DeviceNet card is used. Table 4.80 shows the additional settings, which can be set only at the rear on the DeviceNet card. - Page 330 4.224 Protection and Logic Functions Front-Panel Settings (SET F Command) Table 4.82 LCD Display Settings Setting Setting Prompt Range Default FP_AUTO FP AUTOMESSAGES OVERRIDE, OVERRIDE ROTATING RSTLED CLOSE RESET LEDS Y, N Display Points Use display points to view either the state of internal relay elements (Boolean information) or analog information on the LCD display.
-
Page 331: Table 4.83 Settings That Always, Never, Or Conditionally Hide A Display Point
Protection and Logic Functions 4.225 Front-Panel Settings (SET F Command) Table 4.83 Settings That Always, Never, or Conditionally Hide a Display Point Programmable Automation Controller Clear Name Alias Comment Setting String String DP01 := IN101,TRFR1,CLOSED,OPEN IN101 TRFR1 CLOSED OPEN Never hidden DP01 := IN101,TRFR1 IN101 TRFR1... -
Page 332: Figure 4.148 Display Point Settings
4.226 Protection and Logic Functions Front-Panel Settings (SET F Command) =>>SET F TERSE <Enter> Front Panel General Settings DISPLY PTS ENABL (N,1-32) := 4 ? > <Enter> Target LED Set TRIP LATCH T_LED (Y,N) T01LEDL := Y ? > <Enter> Display Point Settings (maximum 60 characters): (Boolean): Relay Word Bit Name, "Alias", "Set String", "Clear String"... -
Page 333: Table 4.85 Binary Entry In The Name String Only
Protection and Logic Functions 4.227 Front-Panel Settings (SET F Command) TRFR 1 LV BRKR:= CLOSED Figure 4.152 Front-Panel Display—LV Breaker Closed If you want the relay to display a blank state when IN101 deasserts instead of removing the line altogether, use the curly brackets {} for the Clear String, as follows: DP01 := RID, “{16}”... -
Page 334: Table 4.86 Analog Entry In The Name String Only
4.228 Protection and Logic Functions Front-Panel Settings (SET F Command) Analog Display Point Entry Composition In general, the legal syntax for analog display points consists of the following two fields or strings: Name, “User Text and Formatting.” where: Name = Analog quantity name (AI301 for example). All analog quantities occupy two lines on the front-panel display (all binary quantities occupy one line on the display). -
Page 335: Table 4.87 Entry In The Name String And The Alias Strings
Protection and Logic Functions 4.229 Front-Panel Settings (SET F Command) Table 4.87 Entry in the Name String and the Alias Strings Name Alias Set String Clear String IN101 INPUT IN101 — — AI301 TEMPERATURE — — Figure 4.156 shows the front-panel display for the entry in Table 4.87. Input IN101 is deasserted in this display (0), and the display changes to INPUT when Input IN101 asserts. -
Page 336: Figure 4.158 Adding Temperature Measurement Display Points
4.230 Protection and Logic Functions Front-Panel Settings (SET F Command) temperatures, we install an analog card in relay Slot C, and we connect 4–20 mA transducers inputs to analog inputs AI301 (hot-spot temperature), AI302 (oil temperature), and AI303 (winding temperature). First, enable enough display points for the analog measurements (for example, EDP = 5). -
Page 337: Figure 4.160 Adding Two Local Bits
Protection and Logic Functions 4.231 Front-Panel Settings (SET F Command) following four settings, using a maximum of 14 valid characters for the NLBnn setting and a maximum of seven valid characters (0–9, A–Z, -, /, ., space) for the remainder: ➤... -
Page 338: Table 4.89 Target Led Settings
4.232 Protection and Logic Functions Front-Panel Settings (SET F Command) Target LED Settings The SEL-700G offers the following two types of LEDs. See Figure 8.1 and Figure 8.26 for the programmable LED locations: ➤ Six Target LEDs ➤ Eight Pushbutton LEDs You can use SEL control equations to program all 14 LEDs. -
Page 339: Table 4.90 Pushbutton Led Settings
Protection and Logic Functions 4.233 Front-Panel Settings (SET F Command) Table 4.89 Target LED Settings (Sheet 2 of 2) Setting Prompt Setting Range Setting Name := LED5 EQUATION T05_LED := 40Z1T OR 40Z2T OGIC T05_LED := 50GY1T OR 50GY2T OR 51GYT TRIP LATCH T_LED Y, N... -
Page 340: Report Settings (Set R Command)
4.234 Protection and Logic Functions Report Settings (SET R Command) Table 4.90 Pushbutton LED Settings (Sheet 2 of 2) Setting Prompt Setting Range Setting Name := PB4A_LED EQUATION PB4A_LED := NOT 52AX OR (SV04 OGIC AND SV05T AND NOT SV04T) PB4A_LED := NOT 52AX OR (SV04 AND SV05T AND NOT SV04T AND NOT LT02) -
Page 341: Table 4.92 Ser Trigger Settings
Protection and Logic Functions 4.235 Report Settings (SET R Command) You can enable or disable the auto-deletion function via the SER settings. Any auto-deletion notice entry is lost during changes of the settings. The deleted items can be viewed in the SER Delete Report (command SER D—refer to Section 7: Communications for additional information). -
Page 342: Table 4.94 Set R Ser Alias Settings
4.236 Protection and Logic Functions Report Settings (SET R Command) Table 4.94 SET R SER Alias Settings Setting Relay Asserted Deasserted Alias Prompt Word Bit Text Text ALIAS1 := PB01 FP_LOCK PICKUP DROPOUT ALIAS2 := PB02 FP_BRKR_SELECT PICKUP DROPOUT ALIAS3 := PB03 FP_CLOSE PICKUP... -
Page 343: Dnp Map Settings (Set Dnp N Command
Protection and Logic Functions 4.237 DNP Map Settings (SET DNP n Command, n = 1, 2, or 3) Table 4.97 Generator Autosynchronism Report Data Data Description Remarks Analog Data: (From Figure 4.105) See Appendix K: Analog Quantities for additional descriptions (FREQS DELTA_VOLT Vpxc_Mag–Vs_Mag is the frequency of synchronism-... -
Page 344: Modbus Map Settings (Set M Command)
4.238 Protection and Logic Functions Modbus Map Settings (SET M Command) Table 4.99 DNP Map Settings (Sheet 2 of 2) Setting Name := Setting Prompt Setting Range Factory Default · · · DNP Binary Output Label Name 10 characters BO_31 := RB32 DNP Analog Input Label Name 24 characters AI_00 := IAX_MAG... -
Page 345: Section 5: Metering And Monitoring
Section 5 Metering and Monitoring Instruction Manual Overview The SEL-700G Relay includes metering functions to display the present values of current, voltage (if included), analog inputs (if included), field insulation resistance (with external SEL-2664 Field Ground Module), and RTD measurements (with the external SEL-2600 RTD Module or an internal RTD card). -
Page 346: Power Measurement Conventions
Metering and Monitoring Power Measurement Conventions Power Measurement Conventions The SEL-700G uses the IEEE convention for power measurement. The implications of this convention are depicted in Figure 5.1. Source I lags V I lags V Direction of Q+ (VAR) W = — W = + Positive Real Power VAR = +... -
Page 347: Table 5.1 Measured Fundamental Meter Values
Metering and Monitoring Metering ➤ Demand and peak demand metering ➤ Synchrophasor metering ➤ Differential metering ➤ Harmonic metering (differential) Fundamental Table 5.1 details each of the fundamental meter data types in the SEL-700G. Section 8: Front-Panel Operations and Section 7: Communications describe Metering how to access the various types of meter data by using the relay front panel and communications ports. -
Page 348: Figure 5.2 Meter Command Report For Sel-700G1 With Synchronism Check And Neutral Voltage Inputs
Metering and Monitoring Metering Table 5.1 Measured Fundamental Meter Values (Sheet 2 of 2) Relay Option Fundamental Meter Values ➤ Power and Power Factor (single phase quantities for WYE connected PTs only): ➢ Single-phase (PAY, PBY, PCY) and three-phase (P3Y) real power (kW) ➢... -
Page 349: Table 5.2 Thermal Meter Values
Metering and Monitoring Metering Thermal Metering The thermal metering function reports the RTD meter values (see Table 5.2 for details) and also reports the state of connected RTDs, if any have failed (see Table 5.3 for details). The report also displays % generator thermal capacity used and % RTD-based thermal capacity used quantities for selected models with thermal model element. -
Page 350: Figure 5.4 Device Response To The Meter E Command
Metering and Monitoring Metering Energy Metering The SEL-700G with the voltage option includes energy metering. Table 5.4 lists the energy quantities that are available in the Energy Meter report generated by the MET E command. Figure 5.4 shows the device response to the METER E command. =>>MET E <Enter>... -
Page 351: Table 5.4 Maximum/Minimum Meter Values
Metering and Monitoring Metering Maximum and Maximum and minimum metering allows you to determine maximum and minimum operating quantities such as currents, voltages, power, analog input Minimum Metering quantities, RTD quantities, and frequency. Table 5.4 lists the max/min metering quantities. Table 5.4 Maximum/Minimum Meter Values Relay Option Maximum/Minimum Meter Values... -
Page 352: Figure 5.7 Device Response To The Meter M Command
Metering and Monitoring Metering ➤ Voltage values (phase, phase-to-phase, synchronism check, neutral): 7.5 V • PTRn, 13 V • PTRn, 7.5 V • PTRS, and 7.5 V • PTRN, respectively. ➤ Power values (real, reactive, and apparent): All three currents n, I n, I n) and all three voltages (V... -
Page 353: Table 5.5 Rms Meter Values
Metering and Monitoring Metering Math Variable The SEL-700G includes 32 math variables. When you receive your SEL-700G, no math variables are enabled. To use math variables, enable the Metering number of math variables (between 1 and 32) you require, using the EMV setting in the Logic setting category. -
Page 354: Figure 5.10 Device Response To The Meter Rms Command
5.10 Metering and Monitoring Metering =>>MET RMS <Enter> SEL-700G Date: 02/24/2010 Time: 15:28:59.635 GENERATOR RELAY Time Source: Internal RMS (A pri.) 505.1 501.7 498.6 RMS (A pri.) 500.6 502.7 499.8 RMS (V pri.) 9977 9980 9984 RMS (A pri.) RMS (V pri.) 9972 =>>... -
Page 355: Table 5.6 Demand Values
Metering and Monitoring 5.11 Metering Table 5.6 Demand Values Relay Option Demand/Peak Demand Values ➤ X-Side Demand/Peak Demand/peak demand values of input currents IAX, IBX, Demand Quantities and ICX magnitudes (A primary) (model dependent) ➤ Demand/peak demand value of calculated current IGX (IGX = 3I0 = IAX + IBX + ICX) magnitude (A primary) ➤... -
Page 356: Table 5.7 Synchrophasor Measured Values
5.12 Metering and Monitoring Metering Synchrophasor The METER PM serial port ASCII command is used to view SEL-700G synchrophasor measurements. There are multiple ways to use the METER Metering PM command: ➤ As a test tool, to verify connections, phase rotation, and scaling ➤... -
Page 357: Table 5.8 Measured Differential Meter
Metering and Monitoring 5.13 Metering Differential Metering The differential metering function in the SEL-700G1 model reports the fundamental frequency operate and restraint currents for each differential element (87) in multiples of TAP. Table 5.8 shows the value reported. Figure 5.14 shows an example of the METER DIF (differential) command report. -
Page 358: Load Profiling
5.14 Metering and Monitoring Load Profiling =>>MET H <Enter> SEL-700G Date: 02/24/2010 Time: 15:53:02.780 GENERATOR RELAY Time Source: Internal Fund (A sec.) 5.05 5.01 5.00 5.01 5.02 5.00 2nd (A sec.) 0.01 0.00 0.00 0.00 0.00 0.00 3rd (A sec.) 0.00 0.01 0.01... -
Page 359: Breaker Monitor
Metering and Monitoring 5.15 Breaker Monitor Breaker Monitor The breaker monitor in the SEL-700G helps in scheduling circuit breaker maintenance. The breaker monitor is enabled with the enable setting: EBMONn = Y, where n = X or Y The breaker monitor settings in Table 5.11 are available via the SET G commands (see Table 6.3). -
Page 360: Table 5.11 Breaker Monitor Settings
5.16 Metering and Monitoring Breaker Monitor These three points are entered with the settings in Table 5.11. Table 5.11 Breaker Monitor Settings Setting Name := Setting Prompt Setting Range Breakern Monitor (Y, N) EBMONn := Y nCL/OPN OPS SETPT 1 (0–65000) COSP1n := 10000 nCL/OPN OPS SETPT 2... -
Page 361: Figure 5.17 Plotted Breaker Maintenance Points For A 25 Kv Circuit Breaker
Metering and Monitoring 5.17 Breaker Monitor 10,000 1000 6 7 8 9 kA Interrupted per Operation Figure 5.17 Plotted Breaker Maintenance Points for a 25 kV Circuit Breaker The following settings are made from the breaker maintenance information in Table 5.10 and Figure 5.17: COSP1n = 10000 COSP2n = 150 COSP3n = 12... -
Page 362: Figure 5.18 Sel-700G Breaker Maintenance Curve For A 25 Kv Circuit Breaker
5.18 Metering and Monitoring Breaker Monitor Breaker Maintenance Curve Details In Figure 5.18, note that set points KASP1n, COSP1n and KASP3n, COSP3n are set with breaker maintenance information from the two extremes in Table 5.10 and Figure 5.17. 100% 10,000 KASP1n = 1.2 COSP1n = 1000... -
Page 363: Figure 5.19 Operation Of Sel Ogic Control Equation Breaker Monitor Initiation Setting
Metering and Monitoring 5.19 Breaker Monitor In Figure 5.19, note that the breaker maintenance curve levels off horizontally above set point KASP1n, COSP1n. This is the close/open operation limit of the circuit breaker (COSP1n = 10000), regardless of interrupted current value. Also, note that the breaker maintenance curve falls vertically below set point KASP3n, COSP3n. -
Page 364: Figure 5.20 Breaker Monitor Accumulates 10 Percent Wear
5.20 Metering and Monitoring Breaker Monitor Note in Figure 5.20 through Figure 5.23 that the interrupted current in a given figure is the same magnitude for all interruptions (for example, in Figure 5.21, 2.5 kA is interrupted 290 times). This is not realistic, but it demonstrates the operation of the breaker maintenance curve and how it integrates for varying current levels. -
Page 365: Figure 5.21 Breaker Monitor Accumulates 25 Percent Wear
Metering and Monitoring 5.21 Breaker Monitor 10 Percent to 25 Percent Breaker Wear Refer to Figure 5.21. The current value changes from 7.0 kA to 2.5 kA. 2.5 kA is interrupted 290 times (290 close/open operations = 480 – 190), pushing the breaker maintenance curve from the 10 percent wear level to the 25 percent wear level. -
Page 366: Figure 5.22 Breaker Monitor Accumulates 50 Percent Wear
5.22 Metering and Monitoring Breaker Monitor 25 Percent to 50 Percent Breaker Wear Refer to Figure 5.22. The current value changes from 2.5 kA to 12.0 kA. 12.0 kA is interrupted 11 times (11 close/open operations = 24 – 13), pushing the breaker maintenance curve from the 25 percent wear level to the 50 percent wear level. -
Page 367: Figure 5.23 Breaker Monitor Accumulates 100 Percent Wear
Metering and Monitoring 5.23 Breaker Monitor 50 Percent to 100 Percent Breaker Wear Refer to Figure 5.23. The current value changes from 12.0 kA to 1.5 kA. 1.5 kA is interrupted 3000 times (3000 close/open operations = 6000 – 3000), pushing the breaker maintenance curve from the 50 percent wear level to the 100 percent wear level. -
Page 368: Table 5.12 Breaker Monitor Output
5.24 Metering and Monitoring Breaker Monitor Breaker Monitor When the breaker maintenance curve for a particular phase (A, B, or C) reaches the 100 percent wear level (see Table 5.12), a corresponding Relay Output Word bit (BCWAn, BCWBn, or BCWCn) asserts. Table 5.12 Breaker Monitor Output Relay Word Definition... - Page 369 Metering and Monitoring 5.25 Breaker Monitor Determination of See Section 7: Communications. Note in the BRE n command response that the accumulated number of trips and accumulated interrupted current are Relay-Initiated Trips separated into two groups of data: those generated by relay-initiated trips (Rly and Externally Trips), and those generated by externally initiated trips (Ext Trips).
-
Page 370: Figure 5.24 Input Inxxx Connected To Trip Bus For Breaker Monitor Initiation
5.26 Metering and Monitoring Breaker Monitor SEL-700G CS/T OUTxxx INxxx (Control = TRIPn Switch Trip) Other External Trip Bus Trips TRIP COIL (—) Figure 5.24 Input INxxx Connected to Trip Bus for Breaker Monitor Initiation If the SEL control equation breaker monitor initiation setting is set: OGIC BKMONn = INxxx then the SEL-700G breaker monitor sees all trips. -
Page 371: Section 6: Settings
Section 6 Settings Instruction Manual Overview SEL-700G Relay stores the settings you enter in nonvolatile memory. Settings are divided into the following eight setting classes: 1. Relay Group n (where n = 1, 2, or 3) 2. Logic Group n (where n = 1, 2, or 3) 3. -
Page 372: View/Change Settings With Front Panel
Settings View/Change Settings With Front Panel View/Change Settings With Front Panel You can use the pushbuttons on the front panel to view/change settings. Section 8: Front-Panel Operations presents the operating details of the front panel. Enter the front-panel menu by pushing the ESC pushbutton. It will display the following message: MAIN Meter... -
Page 373: Figure 6.1 Front-Panel Setting Entry Example For The Sel-700Gt Relay
Settings View/Change Settings With Front Panel Main Menu Meter Press to move within the list. Events Targets Control Press to select an Set/Show underlined menu item. Status Breaker Quit Set/Show Menu Press to Global return to the Group previous list. Port Active Group Date... -
Page 374: View/Change Settings Over Communications Port
Settings View/Change Settings Over Communications Port View/Change Settings Over Communications Port Refer to Section 7: Communications for information on how to set up and access the relay serial or Ethernet port with a personal computer and how to use ASCII commands to communicate with the relay. View Settings Use the SHOW command to view relay settings. -
Page 375: Table 6.4 Set Command Editing Keystrokes
Settings View/Change Settings Over Communications Port When you issue the SET command, the relay presents a list of settings one at a time. Enter a new setting, or press <Enter> to accept the existing setting. Editing keystrokes are listed in Table 6.4. Table 6.4 SET Command Editing Keystrokes Press Key(s) Results... -
Page 376: Setting Entry Error Messages
Settings Setting Entry Error Messages Setting Entry Error Messages As you enter relay settings, the relay checks the setting entered against the range for the setting as published on the relay setting sheet. If any setting entered falls outside the corresponding range for that setting, the relay immediately responds and prompts you to reenter the setting. -
Page 377: Sel-700G Settings Sheets
SEL-700G Settings Sheets Instruction Manual These settings sheets include the definition and input range for each setting in the relay. You can access the settings from the relay front panel and the communications ports. See Section 4: Protection and Logic Functions in the instruction manual for detailed descriptions of the settings. - Page 378 SET.2 SEL-700G Settings Sheets of 68 Group Settings (SET Command) Other SYNCV PT RATIO (1.00–10000.00) (Hidden if Slot E = Empty/73/77) PTRS := NEUT CT RATIO (1–10000 [5 A I ], 1–50000 [1 A I CTRN := NNOM NNOM (Hidden if Slot Z = 83/87) NEUT PT RATIO (1.00–10000.00) (Shown if Slot E = 74/72/76) PTRN := Generator Differential...
- Page 379 SEL-700G Settings Sheets SET.3 Group Settings (SET Command) of 68 Ground Differential GND DIFF EN (Y, N) (Hidden and auto-set to N if CTCONY := DELTA) E87N := LVL1 GND DIFF PU (0.1 • CTRm/CTRN – 15.0 A [5 A I 87N1P := NNOM 0.02 •...
- Page 380 SET.4 SEL-700G Settings Sheets of 68 Group Settings (SET Command) System Backup (Hidden if Slot Z = 83/84/87/88) BACKUP PROT EN (N, V, C) (Hidden if Slot E = 74/73/77/72/76) EBUP := BACKUP PROT EN (N, V, C, DC, DC_V, or DC_C) EBUP := (Shown if Slot E = 74/73/77/72/76) Compensator Distance...
- Page 381 SEL-700G Settings Sheets SET.5 Group Settings (SET Command) of 68 Loss of Field (Hidden if Slot Z = 83/84/87/88) LOSS OF FIELD EN (Y, N) E40 := (All Loss of Field settings are hidden if E40 := N) Z1 MHO DIAMETER (OFF, 0.1–100.0 ohm [5 A I ], 0.5–500.0 ohm 40Z1P := XNOM...
- Page 382 SET.6 SEL-700G Settings Sheets of 68 Group Settings (SET Command) LVL2 INV-TM CURV (0.5, 1, 1.0, 2, 2.0) (Hidden if 24CCS := OFF, DD, or U) 24IC := LVL2 INV-TM FCTR (0.1–10.0 ) (Hidden if 24CCS := OFF, DD, or U) 24ITD := LVL2 PICKUP 1 (100–200 %) (Hidden if 24CCS := OFF, ID, I, or U) 24D2P1 :=...
- Page 383 SEL-700G Settings Sheets SET.7 Group Settings (SET Command) of 68 X-Side Phase Overcurrent (Hidden if Slot Z = 84/88) PHASE IOC LEVEL (OFF, 0.50–96.00 A [5 A I ], 0.10–19.20 A [1 A I 50PX1P := XNOM XNOM PHASE IOC DELAY (0.00–400.00 s) (Hidden if 50PX1P := OFF) 50PX1D := PH IOC TRQCTRL (SEL ) (Hidden if 50PX1P := OFF)
- Page 384 SET.8 SEL-700G Settings Sheets of 68 Group Settings (SET Command) PH IOC TRQCTRL (SEL ) (Hidden if 50PY2P := OFF) 50PY2TC := OGIC PHASE IOC LEVEL (OFF, 0.50–96.00 A [5 A I ], 0.10–19.20 A [1 A I 50PY3P := YNOM YNOM PHASE IOC DELAY (0.00–400.00 s) (Hidden if 50PY3P := OFF)
- Page 385 SEL-700G Settings Sheets SET.9 Group Settings (SET Command) of 68 EM RESET DELAY (Y, N) (Hidden if 51PXP := OFF) 51PXRS := CONST TIME ADDER (0.00–1.00 s) (Hidden if 51PXP := OFF) 51PXCT := MIN RESPONSE TIM (0.00–1.00 s) (Hidden if 51PXP := OFF) 51PXMR := PH TOC TRQCTRL (SEL ) (Hidden if 51PXP := OFF)
- Page 386 SET.10 SEL-700G Settings Sheets of 68 Group Settings (SET Command) Y-Side Residual Time-Overcurrent (Shown if Slot E = 71/ 75 or Slot Z = 83/87 [700GT, 700GW]) (Hidden if CTCONY := Delta) RES TOC LEVEL (OFF, 0.50–16.00 A [5 A I ], 0.10–3.20 A [1 A I 51GYP := YNOM...
- Page 387 SEL-700G Settings Sheets SET.11 Group Settings (SET Command) of 68 ZERO SQ LN Z MAG (0.10–510.00 ohm [5 A I Z0MAGX := XNOM 0.50–2550.00 ohm [1 A I XNOM ZERO SQ LN Z ANG (50.00–90.00°) Z0ANGX := DIR CONTROL LVL1 (F, R, N) DIR1X := DIR CONTROL LVL2 (F, R, N) DIR2X :=...
- Page 388 SET.12 SEL-700G Settings Sheets of 68 Group Settings (SET Command) GND DIR PRIORITY (I, V, Q, IV, VI, QV, VQ, IQ, QI, IVQ, IQV, VQI, VIQ, QIV, ORDERY := QVI, OFF) (V is hidden if DELTAY_Y := DELTA) PH DIR 3PH LVL (0.50–10.00 A [5 A I ], 0.10–2.00 A [1 A I 50PDIRPY := YNOM...
- Page 389 SEL-700G Settings Sheets SET.13 Group Settings (SET Command) of 68 X-Side Power Elements (Hidden if Slot Z = 83/84/87/88) ENABLE PWR ELEM (N, 1–4) EPWRX := (All X-Side Power element settings are hidden if EPWRX := N) 3PH PWR ELEM PU (OFF, 0.2–1300.0 VA [5 A 1 A I ], 1.0–6500.0 3PWRX1P := XNOM...
- Page 390 SET.14 SEL-700G Settings Sheets of 68 Group Settings (SET Command) FREQX TRIP2 LVL (OFF, 15.00–70.00 Hz) (Hidden if E81X < 2) 81X2TP := FREQX TRIP2 DLY (0.00–240.00 s) (Hidden if 81X2TP := OFF) 81X2TD := FREQX TRIP3 LVL (OFF, 15.00–70.00 Hz) (Hidden if E81X < 3) 81X3TP := FREQX TRIP3 DLY (0.00–240.00 s) (Hidden if 81X3TP := OFF) 81X3TD :=...
- Page 391 SEL-700G Settings Sheets SET.15 Group Settings (SET Command) of 68 FREQX ROC DO DLY (0.00–60.00 s) (Hidden if 81RX2TP := OFF) 81RX2DO := FREQX ROC LEVEL (OFF, 0.10–15.00 Hz/s) (Hidden if E81RX < 3) 81RX3TP := FREQX ROC TREND (INC, DEC, ABS) (Hidden if 81RX3TP := OFF) 81RX3TRN := FREQX ROC PU DLY (0.10–60.00 s) (Hidden if 81RX3TP := OFF) 81RX3TD :=...
- Page 392 SET.16 SEL-700G Settings Sheets of 68 Group Settings (SET Command) BAND1 LOWER LIMIT (15.00–70.00 Hz) (UBND1 must be greater than LBND1) LBND1 := BAND1 ACC TIME (0.01–6000.00 s) TBND1 := BAND2 LOWER LIMIT (15.00–70.00 Hz) (LBND1 must be greater than LBND2) LBND2 := (Hidden if E81ACC <...
- Page 393 SEL-700G Settings Sheets SET.17 Group Settings (SET Command) of 68 PH_PH OV LEVEL (OFF, 2.0–300.0 V [DELTAY_X = DELTA]; 2.0–520.0 V 59PPX1P := [DELTAY_X = WYE]) PH_PH OV DELAY (0.00–120.00 s) (Hidden if 59PPX1P := OFF) 59PPX1D := PH_PH OV LEVEL (OFF, 2.0–300.0 V [DELTAY_X = DELTA]; 59PPX2P := 2.0–520.0 V [DELTAY_X = WYE]) PH_PH OV DELAY (0.00–120.00 s) (Hidden if 59PPX2P := OFF)
- Page 394 SET.18 SEL-700G Settings Sheets of 68 Group Settings (SET Command) POS SEQ OV LEVEL (OFF, 2.0–300.0 V [DELTAY_X = WYE]; 59V1X5P := 2.0–170.0 V [DELTAY_X = DELTA]) (Hidden if E59V1X <5) POS SEQ OV DELAY (0.00–120.00 s) (Hidden if 59V1X5P := OFF) 59V1X5D := (Hidden if E59V1X <5) POS SEQ OV LEVEL (OFF, 2.0–300.0 V [DELTAY_X = WYE];...
- Page 395 SEL-700G Settings Sheets SET.19 Group Settings (SET Command) of 68 Y-Side Negative-Sequence Overvoltage Elements (Shown only when Slot E = 71/75) NSEQ OV LEVEL (OFF, 2.0–200.0 V) 59QY1P := NSEQ OV DELAY (0.00–120.00 s) (Hidden if 59QY1P := OFF) 59QY1D := NSEQ OV LEVEL (OFF, 2.0–200.0 V) 59QY2P := NSEQ OV DELAY (0.00–120.00 s) (Hidden if 59QY2P := OFF)
- Page 396 SET.20 SEL-700G Settings Sheets of 68 Group Settings (SET Command) RTD3 WARN LEVEL (OFF, 1–250°C) (Hidden if RTD3LOC := OFF) ALTMP3 := RTD4 LOCATION (OFF, WDG, BRG, AMB, OTH) RTD4LOC := RTD4 IDENTIFIER (10 Characters) (Hidden unless RTD4LOC:= OTH) RTD4NAM := RTD4 TYPE (PT100, NI100, NI120, CU10) (Hidden if RTD4LOC := OFF) RTD4TY := RTD4 TRIP LEVEL (OFF, 1–250°C) (Hidden if RTD4LOC := OFF)
- Page 397 SEL-700G Settings Sheets SET.21 Group Settings (SET Command) of 68 RTD11 TRIP LEVE (OFF, 1–250°C) (Hidden if RTD11LOC := OFF or TRTMP11 := E49RTD := INT) RTD11 WARN LEVEL (OFF, 1–250°C) (Hidden if RTD11LOC := OFF or ALTMP11 := E49RTD := INT) RTD12 LOCATION (OFF, WDG, BRG, AMB, OTH) (Hidden if E49RTD := INT) RTD12LOC := RTD12 IDENTIFIER (10 Characters) (Hidden unless RTD12LOC:= OTH)
- Page 398 SET.22 SEL-700G Settings Sheets of 68 Group Settings (SET Command) MAX SLIP FREQ (0.05–0.5 Hz) 25SF := MAX ANGLE 1 (0–80°) 25ANG1Y := MAX ANGLE 2 (0–80°) 25ANG2Y := SYNCP PHASE (VAY, VBY, VCY, 0, 30, 60, 90, 120, 150, 180, 210, 240, 270, 300, SYNCPY := 330°...
- Page 399 SEL-700G Settings Sheets SET.23 Group Settings (SET Command) of 68 Y-Side Demand Metering (Shown if Slot E = 71/75 or Slot Z = 83/87) PH CURR DEM LVL (OFF, 0.50–16.00 A [5 A I ], 0.10–3.20 A [1 A I PHDEMPY := YNOM YNOM...
- Page 400 SET.24 SEL-700G Settings Sheets of 68 Logic Settings (SET L Command) ) (Hidden if Slot Z = 84/88) BREAKER X STATUS (SEL 52AX := OGIC CLOSE X EQUATION (SEL CLX := OGIC ) (Hidden if Slot Z = 84/88) UNLATCH CLOSE X (SEL ULCLX := OGIC ) (Shown if Slot Z = 83/87 or Slot E = 71/75)
- Page 401 SEL-700G Settings Sheets SET.25 Logic Settings (SET L Command) of 68 RST10 := SET11 := RST11 := SET12 := RST12 := SET13 := RST13 := SET14 := RST14 := SET15 := RST15 := SET16 := RST16 := SET17 := RST17 := SET18 := RST18 := SET19 :=...
- Page 402 SET.26 SEL-700G Settings Sheets of 68 Logic Settings (SET L Command) RST30 := SET31 := RST31 := SET32 := RST32 := SV/Timers SV TIMER PICKUP (0.00–3000.00 s) SV01PU := SV TIMER DROPOUT (0.00–3000.00 s) SV01DO := SV INPUT (SEL SV01 := OGIC SV TIMER PICKUP (0.00–3000.00 s) SV02PU :=...
- Page 403 SEL-700G Settings Sheets SET.27 Logic Settings (SET L Command) of 68 SV TIMER PICKUP (0.00–3000.00 s) SV09PU := SV TIMER DROPOUT (0.00–3000.00 s) SV09DO := SV INPUT (SEL SV09 := OGIC SV TIMER PICKUP (0.00–3000.00 s) SV10PU := SV TIMER DROPOUT (0.00–3000.00 s) SV10DO := SV INPUT (SEL SV10 :=...
- Page 404 SET.28 SEL-700G Settings Sheets of 68 Logic Settings (SET L Command) SV TIMER PICKUP (0.00–3000.00 s) SV19PU := SV TIMER DROPOUT (0.00–3000.00 s) SV19DO := SV INPUT (SEL SV19 := OGIC SV TIMER PICKUP (0.00–3000.00 s) SV20PU := SV TIMER DROPOUT (0.00–3000.00 s) SV20DO := SV INPUT (SEL SV20 :=...
- Page 405 SEL-700G Settings Sheets SET.29 Logic Settings (SET L Command) of 68 SV TIMER PICKUP (0.00–3000.00 s) SV29PU := SV TIMER DROPOUT (0.00–3000.00 s) SV29DO := SV INPUT (SEL SV29 := OGIC SV TIMER PICKUP (0.00–3000.00 s) SV30PU := SV TIMER DROPOUT (0.00–3000.00 s) SV30DO := SV INPUT (SEL SV30 :=...
- Page 406 SET.30 SEL-700G Settings Sheets of 68 Logic Settings (SET L Command) SC LOAD PV INPUT (SEL SC05LD := OGIC SC CNT UP INPUT (SEL SC05CU := OGIC SC CNT DN INPUT (SEL SC05CD := OGIC SC PRESET VALUE (1–65000) SC06PV := SC RESET INPUT (SEL SC06R := OGIC...
- Page 407 SEL-700G Settings Sheets SET.31 Logic Settings (SET L Command) of 68 SC LOAD PV INPUT (SEL SC13LD := OGIC SC CNT UP INPUT (SEL SC13CU := OGIC SC CNT DN INPUT (SEL SC13CD := OGIC SC PRESET VALUE (1–65000) SC14PV := SC RESET INPUT (SEL SC14R := OGIC...
- Page 408 SET.32 SEL-700G Settings Sheets of 68 Logic Settings (SET L Command) SC LOAD PV INPUT (SEL SC21LD := OGIC SC CNT UP INPUT (SEL SC21CU := OGIC SC CNT DN INPUT (SEL SC21CD := OGIC SC PRESET VALUE (1–65000) SC22PV := SC RESET INPUT (SEL SC22R := OGIC...
- Page 409 SEL-700G Settings Sheets SET.33 Logic Settings (SET L Command) of 68 SC LOAD PV INPUT (SEL SC29LD := OGIC SC CNT UP INPUT (SEL SC29CU := OGIC SC CNT DN INPUT (SEL SC29CD := OGIC SC PRESET VALUE (1–65000) SC30PV := SC RESET INPUT (SEL SC30R := OGIC...
- Page 410 SET.34 SEL-700G Settings Sheets of 68 Logic Settings (SET L Command) MV21 := MV22 := MV23 := MV24 := MV25 := MV26 := MV27 := MV28 := MV29 := MV30 := MV31 := MV32 := Base Output OUT101 FAIL-SAFE (Y, N) OUT101FS := OUT101 := OUT102 FAIL-SAFE (Y, N)
- Page 411 SEL-700G Settings Sheets SET.35 Logic Settings (SET L Command) of 68 Slot D Output (Hidden if output option not included; OUT405–OUT408 only available with 8 DO card) OUT401 FAIL-SAFE (Y, N) OUT401FS := OUT401 := OUT402 FAIL-SAFE (Y, N) OUT402FS := OUT402 := OUT403 FAIL-SAFE (Y, N) OUT403FS :=...
- Page 412 SET.36 SEL-700G Settings Sheets of 68 Logic Settings (SET L Command) Transmit SEL Control Equations IRRORED OGIC (Hidden if PROTO is not MBxx on any of the communications ports) TMB1A := TMB2A := TMB3A := TMB4A := TMB5A := TMB6A := TMB7A := TMB8A := TMB1B :=...
- Page 413 SEL-700G Settings Sheets SET.37 Global Settings (SET G Command) of 68 Global Settings (SET G Command) General RATED FREQ. (50, 60 Hz) FNOM := DATE FORMAT (MDY, YMD, DMY) DATE_F := FAULT CONDITION (SEL FAULT := OGIC EVE MSG PTS ENABL (N, 1–32) EMP := Event Messenger Points (Only the points enabled by EMP are visible)
- Page 414 SET.38 SEL-700G Settings Sheets of 68 Global Settings (SET G Command) MESSENGER POINT MP08 TEXT (148 characters) MPTX08 := MESSENGER POINT MP09 TRIGGER (Off, 1 Relay Word bit) MPTR09 := MESSENGER POINT MP09 AQ (None, 1 analog quantity) MPAQ09 := MESSENGER POINT MP09 TEXT (148 characters) MPTX09 := MESSENGER POINT MP10 TRIGGER (Off, 1 Relay Word bit)
- Page 415 SEL-700G Settings Sheets SET.39 Global Settings (SET G Command) of 68 MESSENGER POINT MP18 TRIGGER (Off, 1 Relay Word bit) MPTR18 := MESSENGER POINT MP18 AQ (None, 1 analog quantity) MPAQ18 := MESSENGER POINT MP18 TEXT (148 characters) MPTX18 := MESSENGER POINT MP19 TRIGGER (Off, 1 Relay Word bit) MPTR19 := MESSENGER POINT MP19 AQ (None, 1 analog quantity)
- Page 416 SET.40 SEL-700G Settings Sheets of 68 Global Settings (SET G Command) MESSENGER POINT MP28 TRIGGER (Off, 1 Relay Word bit) MPTR28 := MESSENGER POINT MP28 AQ (None, 1 analog quantity) MPAQ28 := MESSENGER POINT MP28 TEXT (148 characters) MPTX28 := MESSENGER POINT MP29 TRIGGER (Off, 1 Relay Word bit) MPTR29 := MESSENGER POINT MP29 AQ (None, 1 analog quantity)
- Page 417 SEL-700G Settings Sheets SET.41 Global Settings (SET G Command) of 68 VY COMP ANGLE (–179.99 to 180.00°) (Shown for Slot E = 71/75) VYCOMP := VS COMP ANGLE (–179.99 to 180.00°) (Shown for Slot E = 71/75/72/76/74) VSCOMP := CURRENT DATA SET (I1, ALL, NA) PHDATAI := CURRENT SOURCE (IX, IY, BOTH) PHCURR :=...
- Page 418 SET.42 SEL-700G Settings Sheets of 68 Global Settings (SET G Command) Analog Inputs/Outputs For the Analog Inputs/Outputs settings, x is the card position (3, 4, or 5 in Slot C, D, and E, respectively) (Settings are hidden if Analog I/O are not included.) AIx01 AIx01 TAG NAME (8 characters 0–9, A–Z, _) AIx01NAM :=...
- Page 419 SEL-700G Settings Sheets SET.43 Global Settings (SET G Command) of 68 AIx02 HI WARN L2 (OFF, –99999.000 to +99999.000) AIx02HW2 := AIx02 HI ALARM (OFF, –99999.000 to +99999.000) AIx02HAL := AIx03 AIx03 TAG NAME (8 characters 0–9, A–Z, _) AIx03NAM := AIx03 TYPE (I, V) AIx03TYP := If AIx03TYP = I...
- Page 420 SET.44 SEL-700G Settings Sheets of 68 Global Settings (SET G Command) AOx01 AOx01 ANALOG QTY (Off, 1 analog quantity) AOx01AQ := AOx01 TYPE (I, V) AOx01TYP := AOx01 AQTY LOW (–2147483647 to +2147483647) AOx01AQL := AOx01 AQTY HI (–2147483647 to +2147483647) AOx01AQH := If AOx01TYP = I AOx01 LO OUT VAL (–20.480 to +20.480 mA)
- Page 421 SEL-700G Settings Sheets SET.45 Global Settings (SET G Command) of 68 If AOx04TYP = I AOx04 LO OUT VAL (–20.480 to +20.480 mA) AOx04L := AOx04 HI OUT VAL (–20.480 to +20.480 mA) AOx04H := If AOx04TYP = V AOx04 LO OUT VAL (–10.240 to +10.240 V) AOx04L := AOx04 HI OUT VAL (–10.240 to +10.240 V) AOx04H :=...
- Page 422 SET.46 SEL-700G Settings Sheets of 68 Global Settings (SET G Command) Breaker Monitor Settings (Hidden if not available) BRK X MONITOR (Y, N) EBMONX := (All X Breaker Monitor settings are hidden if EBMONX := N) X CL/OPN OP SET1 (0–65000) COSP1X := X CL/OPN OP SET2 (0–65000) COSP2X :=...
- Page 423 SEL-700G Settings Sheets SET.47 SET PORT p (p = F, 1, 2, 3, or 4) Command of 68 SET PORT p (p = F, 1, 2, 3, or 4) Command PORT F PROTOCOL (SEL, MOD, EVMSG, PMU) PROTO := Communications SPEED (300, 1200, 2400, 4800, 9600, 19200, 38400 bps) SPEED := DATA BITS (7, 8 bits) (Hidden if PROTO := MOD, EVMSG, or PMU)
- Page 424 SET.48 SEL-700G Settings Sheets of 68 SET PORT p (p = F, 1, 2, 3, or 4) Command Enable Modbus Sessions (0–2) EMOD := Modbus TCP Port1 (1–65534) (Hidden if EMOD := 0) MODNUM1 := Note: See Table SET.1 and the note at the end of Port 1 settings. Modbus TCP Port2 (1–65534) (Hidden if EMOD := 0 or 1) MODNUM2 := Note: See Table SET.1 and the note at the end of Port 1 settings.
- Page 425 SEL-700G Settings Sheets SET.49 SET PORT p (p = F, 1, 2, 3, or 4) Command of 68 Class for Binary Event Data (0–3) ECLASSB1 := Class for Counter Event Data (0–3) ECLASSC1 := Class for Analog Event Data (0–3) ECLASSA1 := Currents Scaling Decimal Places (0–3) DECPLA1 :=...
- Page 426 SET.50 SEL-700G Settings Sheets of 68 SET PORT p (p = F, 1, 2, 3, or 4) Command Event Message Confirm Time-Out (1–50 s) ETIMEO2 := Enable Unsolicited Reporting (Y, N) (Hidden if ECLASSA2 := 0, ECLASSB2 := 0, UNSOL2 := ECLASSC2 := 0, and ECLASSV2 := 0) Enable Unsolicited Reporting at Power-Up (Y, N) (Hidden if UNSOL2 := N) PUNSOL2 :=...
-
Page 427: Table Set.1 Port Number Settings That Must Be Unique
SEL-700G Settings Sheets SET.51 SET PORT p (p = F, 1, 2, 3, or 4) Command of 68 Make the following setting when ESNTP = UNICAST. Backup Server IP Address (zzz.yyy.xxx.www) SNTPBSIP := SNTP IP (Local) Port Number (1–65534) SNTPPORT := Note: See Table SET.1 and the note at the end of Port 1 settings. - Page 428 SET.52 SEL-700G Settings Sheets of 68 SET PORT p (p = F, 1, 2, 3, or 4) Command MODBUS SLAVE ID (1–247) (Hidden if PROTO := SEL, EVMSG, or MB_) SLAVEID := DNP3 Protocol (Hidden if PROTO := SEL, EVMSG, MB, PMU, or MOD) DNP Address (0–65519) DNPADR := DNP Address to Report to (0–65519)
- Page 429 SEL-700G Settings Sheets SET.53 SET PORT p (p = F, 1, 2, 3, or 4) Command of 68 RMB4 Dropout Debounce Messages (1–8) RMB4DO := RMB5 Pickup Debounce Messages (1–8) RMB5PU := RMB5 Dropout Debounce Messages (1–8) RMB5DO := RMB6 Pickup Debounce Messages (1–8) RMB6PU := RMB6 Dropout Debounce Messages (1–8) RMB6DO :=...
- Page 430 SET.54 SEL-700G Settings Sheets of 68 SET PORT p (p = F, 1, 2, 3, or 4) Command Amps Reporting Dead-Band Counts (0–32767) (Hidden if ECLASSA1 := 0) ANADBA1 := Volts Reporting Dead-Band Counts (0–32767) (Hidden if ECLASSA1 := 0) ANADBV1 := Misc Data Reporting Dead-Band Counts (0–32767) (Hidden if ECLASSA1 := 0 and ANADBM1 :=...
- Page 431 SEL-700G Settings Sheets SET.55 Front-Panel Settings (SET F Command) of 68 RMB4 Pickup Debounce Messages (1–8) RMB4PU := RMB4 Dropout Debounce Messages (1–8) RMB4DO := RMB5 Pickup Debounce Messages (1–8) RMB5PU := RMB5 Dropout Debounce Messages (1–8) RMB5DO := RMB6 Pickup Debounce Messages (1–8) RMB6PU := RMB6 Dropout Debounce Messages (1–8) RMB6DO :=...
- Page 432 SET.56 SEL-700G Settings Sheets of 68 Front-Panel Settings (SET F Command) PB1B_LED EQUATION (SEL PB1B_LED := OGIC PB2A_LED EQUATION (SEL PB2A_LED := OGIC PB2B_LED EQUATION (SEL PB2B_LED := OGIC PB3A_LED EQUATION (SEL PB3A_LED := OGIC PB3B_LED EQUATION (SEL PB3B_LED := OGIC PB4A_LED EQUATION (SEL PB4A_LED :=...
- Page 433 SEL-700G Settings Sheets SET.57 Front-Panel Settings (SET F Command) of 68 DISPLAY POINT DP12 (60 characters) DP12 := DISPLAY POINT DP13 (60 characters) DP13 := DISPLAY POINT DP14 (60 characters) DP14 := DISPLAY POINT DP15 (60 characters) DP15 := DISPLAY POINT DP16 (60 characters) DP16 := DISPLAY POINT DP17 (60 characters) DP17 :=...
- Page 434 SET.58 SEL-700G Settings Sheets of 68 Front-Panel Settings (SET F Command) DISPLAY POINT DP31 (60 characters) DP31 := DISPLAY POINT DP32 (60 characters) DP32 := Local Bits Labels LB_NAME (14 characters) NLB01 := CLEAR LB_ LABEL (7 characters) CLB01 := SET LB_ LABEL (7 characters) SLB01 := PULSE LB_ LABEL (7 characters)
- Page 435 SEL-700G Settings Sheets SET.59 Front-Panel Settings (SET F Command) of 68 SET LB_ LABEL (7 characters) SLB09 := PULSE LB_ LABEL (7 characters) PLB09 := LB_NAME (14 characters) NLB10 := CLEAR LB_ LABEL (7 characters) CLB10 := SET LB_ LABEL (7 characters) SLB10 := PULSE LB_ LABEL (7 characters) PLB10 :=...
- Page 436 SET.60 SEL-700G Settings Sheets of 68 Front-Panel Settings (SET F Command) SET LB_ LABEL (7 characters) SLB19 := PULSE LB_ LABEL (7 characters) PLB19 := LB_NAME (14 characters) NLB20 := CLEAR LB_ LABEL (7 characters) CLB20 := SET LB_ LABEL (7 characters) SLB20 := PULSE LB_ LABEL (7 characters) PLB20 :=...
- Page 437 SEL-700G Settings Sheets SET.61 Report Settings (SET R Command) of 68 PULSE LB_ LABEL (7 characters) PLB29 := LB_NAME (14 characters) NLB30 := CLEAR LB_ LABEL (7 characters) CLB30 := SET LB_ LABEL (7 characters) SLB30 := PULSE LB_ LABEL (7 characters) PLB30 := LB_NAME (14 characters) NLB31 :=...
- Page 438 SET.62 SEL-700G Settings Sheets of 68 Modbus Map Settings (SET M Command) Event Report EVENT TRIGGER (SEL ER := OGIC EVENT LENGTH (15, 64, 180 cyc) LER := PREFAULT LENGTH (1–10 cyc [if LER := 15], 1–59 cyc [if LER := 64], PRE := 1-175 cyc [if LER := 180]) Generator Autosynchronism Report...
- Page 439 SEL-700G Settings Sheets SET.63 Modbus Map Settings (SET M Command) of 68 MOD_039 := MOD_079 := MOD_040 := MOD_080 := MOD_041 := MOD_081 := MOD_042 := MOD_082 := MOD_043 := MOD_083 := MOD_044 := MOD_084 := MOD_045 := MOD_085 := MOD_046 := MOD_086 := MOD_047 :=...
- Page 440 SET.64 SEL-700G Settings Sheets of 68 DNP3 Map Settings (SET DNP n Command) MOD_119 := MOD_123 := MOD_120 := MOD_124 := MOD_121 := MOD_125 := MOD_122 := DNP3 Map Settings (SET DNP n Command) (Hidden if DNP Option Not Included) Use SET DNP n command with n = 1, 2, or 3 to create as many as three DNP User Maps.
- Page 441 SEL-700G Settings Sheets SET.65 DNP3 Map Settings (SET DNP n Command) of 68 BI_56 := BI_78 := BI_57 := BI_79 := BI_58 := BI_80 := BI_59 := BI_81 := BI_60 := BI_82 := BI_61 := BI_83 := BI_62 := BI_84 := BI_63 := BI_85 := BI_64 :=...
- Page 442 SET.66 SEL-700G Settings Sheets of 68 DNP3 Map Settings (SET DNP n Command) BO_ 24 := BO_ 28 := BO_ 25 := BO_ 29 := BO_ 26 := BO_ 30 := BO_ 27 := BO_ 31 := Analog Input Map DNP Analog Input Label Name (24 characters) AI_32 := AI_00 :=...
- Page 443 SEL-700G Settings Sheets SET.67 DNP3 Map Settings (SET DNP n Command) of 68 AI_64 := AI_82 := AI_65 := AI_83 := AI_66 := AI_84 := AI_67 := AI_85 := AI_68 := AI_86 := AI_69 := AI_87 := AI_70 := AI_88 := AI_71 := AI_89 := AI_72 :=...
- Page 444 SET.68 SEL-700G Settings Sheets of 68 DNP3 Map Settings (SET DNP n Command) Counter Map DNP Counter Label Name (11 characters) CO_00 := CO_16 := CO_01 := CO_17 := CO_02 := CO_18 := CO_03 := CO_19 := CO_04 := CO_20 := CO_05 := CO_21 := CO_06 :=...
-
Page 445: Section 7: Communications
Section 7 Communications Instruction Manual Overview A communications interface and protocol are necessary for communicating with an SEL-700G Relay. A communications interface is the physical connection on a device. Once you have established a physical connection, you must use a communications protocol to interact with the relay. The first part of this section describes communications interfaces and protocols available with the relay, including communications interface connections. - Page 446 Communications Communications Interfaces Be sure to evaluate the installation and communications necessary to integrate with existing devices before ordering your SEL-700G. For example, consider the fiber-optic interface in noisy installations or for large communications distances. Following is general information on possible applications of the different interfaces.
-
Page 447: Figure 7.1 Simple Ethernet Network Configuration
Communications Communications Interfaces Hardware Flow Control All EIA-232 serial ports support RTS/CTS hardware handshaking (hardware flow control). To enable hardware handshaking, use the SET P command or front-panel submenu to set RTSCTS = Y. Disable hardware handshaking PORT by setting RTSCTS := N. ➤... -
Page 448: Figure 7.2 Ethernet Network Configuration With Dual Redundant Connections (Failover Mode)
Communications Communications Interfaces NETWORK CAT 5 shielded twisted pair (STP) cables with RJ45 connectors (SEL-C627/C628) for copper Ethernet ports Fiber-optic Ethernet cables with LC connectors (SEL-C808) for fiber-optic Ethernet ports Set Port 1 (Ethernet) settings in each relay. Figure 7.2 Ethernet Network Configuration With Dual Redundant Connections (Failover Mode) NETWORK CAT 5 shielded twisted pair (STP) cables with... - Page 449 Communications Communications Interfaces primary link returns to normal before the failover time expires, the failover timer resets and uninterrupted operation continues on the primary network port. Setting FTIME = OFF allows fast port switching (with no intentional delay). Fast port switching can occur within one processing interval (typically 4 ms to 5 ms) and can help with IEC 61850 GOOSE performance.
-
Page 450: Figure 7.4 Irig-B Input (Relay Terminals B01-B02)
Communications Communications Interfaces SEL-700G SEL-2401 + IRIG SEL-2407 SEL Cable – IRIG SEL-2404 C962 B01–B02 IRIG-B input is available on all models except those with fiber-optic Ethernet or dual- copper Ethernet. If you use a B01–B02 input, you cannot bring IRIG-B via Port 2 or 3. Set Global setting IRIG TIME SOURCE to TIME_SRC := IRIG1. -
Page 451: Figure 7.7 Irig-B Input Via Fiber-Optic Eia-232 Port 2 (Sel-2030/2032 Time Source)
Communications Communications Interfaces Option 3: Port 2 (Fiber-Optic Serial Port) You can use Fiber-Optic Serial Port 2 to bring IRIG-B Input to the relay as shown in Figure 7.7 and Figure 7.8. Set switch to 232 for IRIG-B from SEL-2030 or SEL-2032 ST Connectors SEL-2030 SEL-700G... -
Page 452: Table 7.2 Eia-232/Eia-485 Serial Port Pin Functions
Communications Communications Interfaces Port Connector and Figure 7.9 shows the EIA-232 serial port DB-9 connector pinout for the SEL-700G. Communications Cables Figure 7.9 EIA-232 DB-9 Connector Pin Numbers Table 7.2 shows the pin functions for the EIA-232 and EIA-485 serial ports. Table 7.2 EIA-232/EIA-485 Serial Port Pin Functions PORT 3 PORT 3... -
Page 453: Figure 7.11 Sel Cable C227A-Sel-700G To Dte Device
Communications Communications Interfaces SEL-700G Relay *DTE Device 9-Pin Male 25-Pin Female D Subconnector D Subconnector Pin # Pin # Func. Func. *DTE = Data Terminal Equipment (Computer, Terminal, etc.) Figure 7.11 SEL Cable C227A—SEL-700G to DTE Device SEL-700G Relay **DCE Device 9-Pin Male 25-Pin Female D Subconnector... -
Page 454: Communications Protocols
7.10 Communications Communications Protocols SEL-700G Relay SEL-3010 Event Messenger DTE* DCE** 9-Pin Male 9-Pin Male D Subconnector D Subconnector Func. Pin # Pin # Func. DCD*** +5 Vdc (IN) RXD (OUT) TXD (IN) Not Used Not Used RTS (IN) CTS (OUT) *DTE = Data Terminal Equipment **DCE = Data Communications Equipment (Modem, etc.) ***DC Voltage (+5 V) not available on front-panel EIA-232 port... - Page 455 Communications 7.11 Communications Protocols SEL Fast Meter. This protocol supports binary messages to transfer metering and digital element messages. Compressed ASCII commands that support Fast Meter are described in SEL ASCII Protocol and Commands, and the protocol is described in Appendix C: SEL Communications Processors.
- Page 456 7.12 Communications Communications Protocols FTP Server Use the single FTP (File Transfer Protocol) session to access the following files: CFG.XML Configuration read-only file in XML format CFG.TXT Configuration read-only file in TXT format ERR.TXT Error read-only file in text format SET_61850.CID IEC 61850 CID read-write file SET_xx.TXT...
-
Page 457: Table 7.4 Settings Associated With Sntp
Communications 7.13 Communications Protocols SNTP as Primary or Backup Time Source If an IRIG-B time source is connected and either Relay Word bit TSOK or Relay Word bit IRIGOK asserts, then the relay synchronizes the internal time- of-day clock to the incoming IRIB-G time code signal, even if SNTP is configured in the relay and an NTP server is available. -
Page 458: Sel Ascii Protocol And Commands
7.14 Communications SEL ASCII Protocol and Commands SNTPRATE. If the NTP server does not respond with the period defined by setting SNTPTO, then the relay tries the other SNTP server. When the relay successfully synchronizes to the primary NTP time server, Relay Word bit TSNTPP asserts. -
Page 459: Table 7.5 Serial Port Automatic Messages
Communications 7.15 SEL ASCII Protocol and Commands A command transmitted to the relay consists of the command followed by either a CR (carriage return) or a CRLF (carriage return and line feed). You can truncate commands to the first three characters. For example, EVENT 1 <Enter>... - Page 460 7.16 Communications SEL ASCII Protocol and Commands Access Levels Commands can be issued to the SEL-700G via the serial port or Telnet session to view metering values, change relay settings, etc. The available serial port commands are listed in the SEL-700G Relay Command Summary at the end of this manual.
- Page 461 Communications 7.17 SEL ASCII Protocol and Commands Access Level 2 When the relay is in Access Level 2, the SEL-700G sends the prompt: =>> See the SEL-700G Relay Command Summary at the end of this manual for the commands available from Access Level 2. Any of the Access Level 1 commands are also available in Access Level 2.
-
Page 462: Table 7.6 Command Response Header Definitions
7.18 Communications SEL ASCII Protocol and Commands Table 7.6 Command Response Header Definitions Item Definition [RID Setting] This is the RID (Relay Identifier) setting. The relay ships with the default setting RID = 700G ; see ID Settings on page 4.3. [TID Setting] This is the TID (Terminal Identifier) setting. - Page 463 Communications 7.19 SEL ASCII Protocol and Commands Password Requirements Passwords are necessary unless they are disabled. See PASSWORD Command (Change Passwords) on page 7.37 for the list of default passwords and for more information on changing and disabling passwords. Access Level Attempt (Password Required). Assume the following conditions: ➤...
-
Page 464: Table 7.8 Analog Command
7.20 Communications SEL ASCII Protocol and Commands [RID Setting] Date: mm/dd/yyyy Time: hh:mm:ss.sss [TID Setting] Time Source: external Level 1 => prompt indicates that the relay is now in Access Level 1. => The two previous examples demonstrate going from Access Level 0 to Access Level 1. - Page 465 Communications 7.21 SEL ASCII Protocol and Commands When parameter p is a ramp function, the device displays the following message during the test: Ramping Analog Output at xx.xx [units]/min; full scale in y.y minutes. Press any key to end test where: xx.xx is the calculation based upon range/time t...
-
Page 466: Figure 7.16 Bre X Command Response
7.22 Communications SEL ASCII Protocol and Commands ASP Command (Stop Autosynchronizer) The ASP command (Access Level 2) allows ASCII serial port control of the ASP Relay Word bit, which when asserted stops the autosynchronizer function. See Autosynchronism on page 4.173 for further details. BRE n Command (Breaker Monitor Data) Use the BRE n command to view the breaker monitor report. -
Page 467: Figure 7.17 Bre X W Command Response
Communications 7.23 SEL ASCII Protocol and Commands =>>BRE X W <Enter> Breaker X Wear Preload Relay (or Internal) Trip Counter (0-65000) ? 11 Internal Current (0.0-999999 kA) ? 34 ? 43 ? 51 External Trip Counter (0-65000) External Current (0.0-999999 kA) ? 31 ? 37 ? 41... - Page 468 7.24 Communications SEL ASCII Protocol and Commands CLOSE n Command (Close Breaker n) The CLO n (CLOSE n) command asserts Relay Word bit CC n for 1/4 cycle when it is executed. Relay Word bit CCn can then be programmed into the CL n SEL control equation to assert the CLOSE n Relay Word bit, which OGIC...
-
Page 469: Table 7.10 Com Command
Communications 7.25 SEL ASCII Protocol and Commands Table 7.10 COM Command Command Description Access Level COM S A or Return a summary report of the last 255 records in COM S B the communications buffer for either M IRRORED communications Channel A or Channel B when only one channel is enabled. -
Page 470: Table 7.13 Copy Command
7.26 Communications SEL ASCII Protocol and Commands COPY Command Use the COPY j k command (see Table 7.13) to copy the settings of settings Group j to the settings of settings Group k. The settings of settings Group j effectively overwrite the settings of settings Group k. Parameters j and k can be any available settings group number 1 through 3. -
Page 471: Table 7.16 Event Command (Event Reports)
Communications 7.27 SEL ASCII Protocol and Commands =>>ETH <Enter> SEL-700G Date: 02/28/2010 Time: 10:41:37 GENERATOR RELAY Time Source: Internal MAC: 00-30-A7-00-75-6A IP ADDRESS: 192.168.1.2 SUBNET MASK: 255.255.255.0 DEFAULT GATEWAY: 192.168.1.1 PRIMARY PORT: PORT 1A ACTIVE PORT: PORT 1B LINK SPEED DUPLEX MEDIA PORT 1A... -
Page 472: Table 7.17 Event Command Format
7.28 Communications SEL ASCII Protocol and Commands Table 7.16 EVENT Command (Event Reports) (Sheet 2 of 2) Command Description Access Level EVE DIF3 n Return the n differential element 3 event report, with 4- samples/cycle data. EVE GND n Return the n ground event report (64G element) with 4-samples/cycle data. -
Page 473: Table 7.20 Gsh Command Variants
Communications 7.29 SEL ASCII Protocol and Commands ➤ Accumulated I ➤ Three-phase power output averages To view the generator operation profile, enter the command: =>GEN <Enter> The output from an SEL-700G is shown: =>GEN <Enter> SEL-700GT Date: 02/26/2010 Time: 17:33:20.453 INTERTIE RELAY Time Source: Internal 81AC Off-Frequency Time Accumulators... -
Page 474: Table 7.21 Goose Command Variants
7.30 Communications SEL ASCII Protocol and Commands GST Command (Trigger GSR) The GST (level 1) command triggers the generator autosynchronism report data acquisition. GOOSE Command Use the GOOSE command to display transmit and receive GOOSE messaging information, which you can use for troubleshooting. The GOOSE command variants and options are shown in Table 7.21. -
Page 475: Figure 7.23 Goose Command Response
Communications 7.31 SEL ASCII Protocol and Commands Table 7.22 GOOSE IED Description (Sheet 2 of 2) Description Code This text field contains warning or error condition text when appropriate that is abbreviated as follows: Code Abbreviation Explanation OUT OF SEQUENC Out of sequence error CONF REV MISMA Configuration Revision mismatch... -
Page 476: Table 7.23 Group Command
7.32 Communications SEL ASCII Protocol and Commands SEL_387E_1CFG/LLN0$GO$NewGOOSEMessage2 01-0C-CD-01-00-02 115848 Data Set: SEL_387E_1CFG/LLN0$DSet04 SEL_387E_1CFG/LLN0$GO$NewGOOSEMessage1 01-0C-CD-01-00-01 115798 Data Set: SEL_387E_1CFG/LLN0$DSet03 => Figure 7.23 GOOSE Command Response (Continued) GROUP Command Use the GROUP command (see Table 7.23) to display the active settings group or try to force an active settings group change. -
Page 477: Table 7.25 History Command
Communications 7.33 SEL ASCII Protocol and Commands Table 7.25 HISTORY Command Command Description Access Level Return event histories with the oldest at the bottom of the list and the most recent at the top of the list. HIS n Return event histories with the oldest at the bottom of the list and the most recent at the top of the list, beginning at event n. -
Page 478: Table 7.28 Ldp Commands
7.34 Communications SEL ASCII Protocol and Commands Table 7.28 LDP Commands Command Description Access Level LDP row1 row2 Use the LDP command to display a numeric progression of all load profile report rows. Use the LDP date1 date2 LDP command with parameters to display a numeric or reverse numeric subset of the load profile rows. -
Page 479: Table 7.32 Meter Command
Communications 7.35 SEL ASCII Protocol and Commands Table 7.31 LOO Command Command Description Access Level Enable loopback testing of M IRRORED channels. LOO A Enable loopback on M Channel A for IRRORED the next 5 minutes. LOO B Enable loopback on M Channel B for IRRORED the next 5 minutes. -
Page 480: Table 7.33 Meter Command Parameters
7.36 Communications SEL ASCII Protocol and Commands Table 7.33 Meter Command Parameters Parameter Description Parameter for identifying meter class. Parameter used to specify number of times (1–32767) to repeat the meter response. Table 7.34 Meter Class Meter Class Fundamental Metering Energy Metering Maximum/Minimum Metering RMS Metering... -
Page 481: Table 7.35 Password Command
Communications 7.37 SEL ASCII Protocol and Commands =>>OPE X <Enter> Command Aborted: No BRKR Jumper =>> PASSWORD Command (Change Passwords) Use the PAS command (see Table 7.35 and Table 7.36) to change existing passwords. Table 7.35 PASSWORD Command Command Description Access Level PAS level Change password for Access Level level. -
Page 482: Figure 7.25 Ping Command Response
7.38 Communications SEL ASCII Protocol and Commands Examples of valid, distinct, and strong passwords are as follows: ➤ #0t3579!ijd7 ➤ (Ih2dcs)36dn ➤ A24.68&,mvj ➤ *4u-Iwg+?lf- PING Command When you are setting up or testing substation networks, it is helpful to determine if the network is connected properly and if the other devices are powered up and configured properly. -
Page 483: Table 7.39 Pul Outnnn Command
Communications 7.39 SEL ASCII Protocol and Commands Table 7.39 PUL OUTnnn Command Command Description Access Level PUL OUTnnn Pulse output OUTnnn for 1 second. PUL OUTnnn s Pulse output OUTnnn for s seconds. Parameter nnn is a control output number. Parameter s is time in seconds, with a range of 1–30. -
Page 484: Table 7.44 Ser D Command
7.40 Communications SEL ASCII Protocol and Commands Table 7.43 SER Command Format (Sheet 2 of 2) Parameter Description date1 Append date1 to return all rows with this date. For example, use SER 1/1/2003 to return all records for January 1, 2003. date1 date2 Append date1 and date2 to return all rows between date1 and date beginning with date1 and ending with date2. -
Page 485: Table 7.46 Set Command Format
Communications 7.41 SEL ASCII Protocol and Commands Table 7.46 SET Command Format Parameter Description Append s, the name of the specific setting you want to view and jumps to this setting. If s is not entered, the relay starts at the first setting. TERSE Append TERSE to skip the settings display after the last setting. -
Page 486: Table 7.49 Show Command Format
7.42 Communications SEL ASCII Protocol and Commands Table 7.49 SHOW Command Format Parameter Description Appends, s, the name of the specific setting you want to view, and jumps to this setting. If s is not entered, the relay starts at the first setting. =>>SHO <Enter>... - Page 487 Communications 7.43 SEL ASCII Protocol and Commands YSide Max Ph TOC 51PYP := OFF Y Side Res TOC 51GYP := OFF YSide NegSeq TOC 51QYP := OFF Neutral IOC 50N1P := OFF 50N2P := OFF Neutral TOC 51NP := OFF X Side Dir Elem EDIRX := N...
-
Page 488: Table 7.50 Status Command (Relay Self-Test Status)
7.44 Communications SEL ASCII Protocol and Commands RTD Settings E49RTD := NONE X Side SyncCheck E25X := N Y Side SyncCheck E25Y := N Demand Mtr Set EDEM := ROL DMTC := 15 PHDEMPX := 5.00 GNDEMPX := 1.00 3I2DEMPX := 1.00 PHDEMPY := 5.00 GNDEMPY... -
Page 489: Figure 7.27 Typical Relay Output For Status S Command
Communications 7.45 SEL ASCII Protocol and Commands Table 7.51 STATUS Command Report and Definitions (Sheet 2 of 2) STATUS Report Designator Definition Message Format FPGA FPGA programming unsuccessful, or FPGA failed OK/FAIL GPSB General Purpose Serial Bus OK/FAIL Front-Panel FGPA programming unsuccessful, or Front-Panel OK/WARN FPGA failed Volatile memory integrity... -
Page 490: Table 7.53 Syn Command
7.46 Communications SEL ASCII Protocol and Commands SUMMARY Command The SUM command (see Table 7.52) displays an event summary in human- readable format. Table 7.52 SUMMARY Command Command Description Access Level SUM n The command without arguments displays the latest event summary. -
Page 491: Table 7.56 Front-Panel Leds And The Tar 0 Command
Communications 7.47 SEL ASCII Protocol and Commands The elements are represented as Relay Word bits and are listed in rows of eight, called Relay Word rows. The first four rows, representing the front- panel operation and target LEDs, correspond to Table 7.56. All Relay Word rows are described in Table J.1 and Table J.3. -
Page 492: Table 7.59 Vec Command
7.48 Communications SEL ASCII Protocol and Commands VEC Command (Show Diagnostic Information) Issue the VEC command under the direction of SEL. The information contained in a vector report is formatted for SEL in-house use only. Your SEL application engineer or the factory may request a VEC command capture to help diagnose a relay or system problem. -
Page 493: Section 8: Front-Panel Operations
Section 8 Front-Panel Operations Instruction Manual Overview The SEL-700G Relay front panel makes generator and intertie data collection and control quick and efficient. Use the front panel to analyze operating information, view and change relay settings, and perform control functions. The SEL-700G features a straightforward menu-driven control structure presented on the front-panel liquid crystal display (LCD). -
Page 494: Human-Machine Interface
Front-Panel Operations Human-Machine Interface SEL–700G SEL–700GT SEL–700GW GENERATOR PROTECTION RELAY INTERTIE PROTECTION RELAY WIND GENERATOR RELAY ENABLED ENABLED ENABLED ENABLED ENABLED ENABLED LOCK LOCK LOCK TRIP DISABLED TRIP TRIP DISABLED DISABLED DIFFERENTIAL DIFFERENTIAL PHASE OVERCURRENT - X BRKR X GEN BRKR SELECT SELECT OVERCURRENT... -
Page 495: Table 8.1 Front-Panel Automatic Messages (Fp_Auto := Override)
Front-Panel Operations Human-Machine Interface Table 8.1 Front-Panel Automatic Messages (FP_AUTO := OVERRIDE) Condition Front-Panel Message Relay detecting any failure Displays the type of latest failure (see Section 10: Testing and Troubleshooting). Relay trip has occurred Displays the type or cause of the trip. Refer to Table 9.1 for a list of trip display messages. -
Page 496: Table 8.2 Front-Panel Pushbutton Functions
Front-Panel Operations Human-Machine Interface Front-Panel Timeout To help prevent unauthorized access to password-protected functions, the SEL-700G has a front-panel timeout, setting FP_TO. A timer resets every time you press a front-panel pushbutton. Once the timeout period expires, the access level resets to Access Level 1. Manually reset the access level by selecting from the menu. -
Page 497: Figure 8.5 Main Menu
Front-Panel Operations Human-Machine Interface The SEL-700G automatically scrolls information that requires more space than provided by a 16-character LCD line. Use the Left Arrow and Right Arrow pushbuttons to suspend automatic scrolling and enable manual scrolling of this information. MAIN Menu Figure 8.5 shows the menu screen. -
Page 498: Figure 8.7 Meter Menu And Energy Submenu
Front-Panel Operations Human-Machine Interface For viewing ) metering data, select the Energy Max/Min Energy ) menu item from the menu and select the menu Max/Min METER Display item as shown in Figure 8.7. METER Fundamental Thermal Differential Demand (Energy Selected) Peak Demand Energy ENERGY... -
Page 499: Figure 8.11 Main Menu And Events Submenu
Front-Panel Operations Human-Machine Interface Events Menu Select the menu item from the menu as shown in Figure 8.11. Events MAIN menu has as menu items. Select to view EVENTS Display Clear Display events and to delete all events data. Clear MAIN (Events Selected) Meter... -
Page 500: Figure 8.15 Main Menu And Targets Submenu
Front-Panel Operations Human-Machine Interface MAIN Meter Events (Targets Selected) Targets TARGETS Control Row 0=10000000 Set/Show Row 1=00000000 Status Row 2=00000000 Breaker Quit Figure 8.15 MAIN Menu and TARGETS Submenu Select the target row to display two consecutive Relay Word bits with name and binary state as shown in Figure 8.16. -
Page 501: Figure 8.18 Control Menu And Outputs Submenu
Front-Panel Operations Human-Machine Interface Select the menu item, and then select breaker X or Y to assert Close Breaker Relay Word bit CCX or CCY, which closes breaker X or Y via the CLX or CLY SEL control equation (see Table 4.52 and Figure 4.126). Note that OGIC this requires Level 2 access. -
Page 502: Figure 8.20 Main Menu And Set/Show Submenu
8.10 Front-Panel Operations Human-Machine Interface Set/Show Menu Select the menu item on the menu. The menu is used Set/Show MAIN Set/Show to view or modify the settings ( , and Global Group Port Active Group , and . Note that modifying the settings requires Level 2 access. Date Time MAIN... -
Page 503: Figure 8.21 Set/Show Menu
Front-Panel Operations 8.11 Human-Machine Interface (Global Selected) SET/SHOW Global GLOBAL Group General Settings Port Event Messenger Active Group ••• Date Time Synchronization Source Time (Group Selected) Password (1 Selected) GROUP ID Settings Config Settings . . . Trip/Close Logic (Port Selected) (F Selected) PORT Protocol Select... -
Page 504: Operation And Target Leds
8.12 Front-Panel Operations Operation and Target LEDs Breaker Monitor Menu Select the menu item on the menu as shown in Figure 8.23 to Breaker MAIN access breaker data or reset the data. See Breaker Monitor on page 5.15, in Section 5: Metering and Monitoring for a detailed description. MAIN Meter Events... -
Page 505: Table 8.3 Possible Warning Conditions (Flashing Trip Led)
Front-Panel Operations 8.13 Operation and Target LEDs the time of the trip. At this point, the LED will latch in and can be reset using the TARGET RESET pushbutton or the TAR R command as long as the target conditions are absent. For a concise listing of the default programming on the front-panel LEDs, see Table 4.89. -
Page 506: Figure 8.25 Target Reset Pushbutton
8.14 Front-Panel Operations Operation and Target LEDs remain, the relay re-illuminates the corresponding target LEDs. The TARGET RESET pushbutton also removes the trip automatic message displayed on the LCD menu screens if the trip conditions have cleared. Figure 8.25 TARGET RESET Pushbutton Lamp Test The TARGET RESET pushbutton also provides a front-panel lamp test. - Page 507 Front-Panel Operations 8.15 Operation and Target LEDs Pressing any one of these four pushbuttons asserts the corresponding PBn (n = 01 through 04) Relay Word bit, and the corresponding PBn_PUL Relay Word bit. The PBn Relay Word bit remains asserted as long as the pushbutton is pressed, but the PBn_PUL Relay Word bit asserts only for the initial processing interval, even if the button is still being pressed.
-
Page 508: Table 8.4 Sel-700Gt And Sel-700Gw Front-Panel Operator Control Functions
8.16 Front-Panel Operations Operation and Target LEDs Table 8.4 SEL-700GT and SEL-700GW Front-Panel Operator Control Functions Continually press the LOCK operator control pushbutton for three (3) seconds to engage/ ENABLED disengage the lock function (Latch LT01 functions as Lock with the latch in reset state LOCK equivalent to the engaged lock). -
Page 509: Table 8.5 Sel-700G And Sel-700G1 Front-Panel Operator Control Functions
Front-Panel Operations 8.17 Operation and Target LEDs Table 8.5 SEL-700G and SEL-700G1 Front-Panel Operator Control Functions Continually press the LOCK operator control pushbutton for three (3) seconds to engage/ ENABLED disengage the lock function (Latch LT01 functions as Lock with the latch in reset state LOCK equivalent to the engaged lock). - Page 510 This page intentionally left blank...
-
Page 511: Section 9: Analyzing Events
Section 9 Analyzing Events Instruction Manual Overview The SEL-700G Relay provides several tools (listed below) to analyze the cause of relay operations. Use these tools to help diagnose the cause of the relay operation and more quickly restore the protected equipment to service. ➤... -
Page 512: Event Reporting
Analyzing Events Event Reporting The SEL-700G provides Compressed ASCII event reports to facilitate event report storage and display. SEL communications processors and the Analytic Assistant SEL-5601 Software take advantage of the ERATOR Compressed ASCII format. Use the CHIS command to display Compressed ASCII event history information. -
Page 513: Figure 9.1 Example Event Summary
Analyzing Events Event Reporting TRI (Trigger Event Report) Command The sole function of the TRI serial port command is to generate event reports, primarily for testing purposes. See TRIGGER Command (Trigger Event Report) on page 7.47 for more information on the TRI (Trigger Event Report) command. -
Page 514: Table 9.1 Event Types
Analyzing Events Event Reporting The relay sends event summaries to all serial ports with setting AUTO := Y each time an event triggers. Event Type field displays the event type. Event types and the logic used to Event determine event types are shown in Table 9.1. Table 9.1 Event Types (Sheet 1 of 2) Event Type Event Type Logic... - Page 515 Analyzing Events Event Reporting Table 9.1 Event Types (Sheet 2 of 2) Event Type Event Type Logic Remote Trip REMTRIP AND TRIP CommIdleLossTrip (COMMIDLE OR COMMLOSS) AND TRIP Trigger Serial port TRI command ER Trigger ER Equation assertion Trip TRIP with no known cause Currents, Voltages, and RTD Temperatures The relay determines the maximum phase current during an event.
-
Page 516: Figure 9.2 Sample Event History
Analyzing Events Event Reporting The event history contains the following: ➤ Standard report header ➢ Relay and terminal identification ➢ Date and time of report ➢ Time source (Internal or IRIG-B) ➤ Event number, date, time, event type (see Table 9.1) ➤... - Page 517 Analyzing Events Event Reporting The SEL-700G supports the following four separate event report types (model dependent): ➤ Standard Analog Event Report (EVE command) ➤ Digital Event Report (EVE D command) ➤ Differential Event Report (EVE DIFz command, where z = 1, 2, or 3 for the three 87 elements) ➤...
-
Page 518: Table 9.2 Analog Event Report Columns Definitions
Analyzing Events Event Reporting the filtered values and reports these values in the standard, filtered event report (4 samples per cycle). To view the raw inputs to the relay, select the unfiltered event report by using the EVE R command. Use the unfiltered event reports to observe power system conditions: ➤... -
Page 519: Figure 9.3 Example Standard 15-Cycle Analog Event Report 1/4-Cycle Resolution
Analyzing Events Event Reporting Table 9.2 Analog Event Report Columns Definitions (Sheet 2 of 2) Column Column Description Heading Symbols Out 12 OUT101 AND NOT OUT102 NOT OUT101 AND OUT102 OUT101 AND OUT102 Out 3 OUT103 Note that the ac values change from plus to minus (–) values in Figure 9.3, indicating the sinusoidal nature of the waveforms. - Page 520 9.10 Analyzing Events Event Reporting -60.5 -43.5 102.5 53.5 47.0 -105.0 -3742 -2977 6656 603 59.99 . .. 84.5 -93.5 -85.5 89.0 -3.5 5546 -5992 -847 59.99 . .. 60.0 43.5 -103.5 -53.5 -47.5 104.5 3738 2979 -6658 -604 59.99 . .. -84.5 93.0 -8.5...
- Page 521 Analyzing Events 9.11 Event Reporting Serial No = 000000000000000 FID = SEL-700G-X134-V0-Z001001-D20100224 CID = 1C01 EVENT LOGS = Event: Diff 87 Trip Targets 11100000 Freqx (Hz) 59.99 Current Mag (X Side) 104.5 526.5 102.8 424.43 Current Mag (Y Side) 100.7 100.6 105.1 5.32...
- Page 522 9.12 Analyzing Events Event Reporting TIME_SRC:= IRIG1 TIME_SRC:= IRIG1 Group Settings := SEL-700G := GENERATOR RELAY PHROT := ABC X_CUR_IN:= NEUT CTRX := 500 INOM := 1.0 DELTAY_X:= WYE PTRX := 100.00 VNOM_X := 13.80 CTCONY := WYE CTRY := 500 PTRS := 100.00 CTRN...
- Page 523 Analyzing Events 9.13 Event Reporting Report Settings ESERDEL := N SER1 := IN101 IN102 PB01 PB02 PB03 PB04 52AX 52AY TRIPX TRIPY TRIP1 TRIP2 TRIP3 SER2 := ORED51T ORED50T 87U 87R OOST 21C1T 21C2T 3PWRX1T 3PWRX2T 3PWRY1T 3PWRY2T REF1F REF1R 24D1T 24C2T RTDT SER3 := 64G1T 64G2T 64F1T 64F2T 46Q1T 46Q2T LOPX LOPY 81X1T 81X2T 81Y1T 81Y2T...
-
Page 524: Figure 9.4 Derivation Of Analog Event Report Current Values And Rms Current Values From Sampled Current Waveform
9.14 Analyzing Events Event Reporting waveform and rms values. Figure 9.5 shows how the event report current column data can be converted to phasor rms values. Voltages are processed similarly. In Figure 9.4, note that you can use any two rows of current data from the analog event report, 1/4 cycle apart, to calculate rms current values. -
Page 525: Figure 9.5 Derivation Of Phasor Rms Current Values From Event Report Current Values
Analyzing Events 9.15 Event Reporting IA (RMS) 1/4 cyc. NOTE: The arctan function of many calculators and computing programs does not return the correct angle for the second and third quadrants (when X is negative). When in doubt, graph the X and Y quantities to confirm that your •... -
Page 526: Figure 9.6 Sample Cev Report Viewed With Analytic Assistant Or Quickset Via Sel-5601
9.16 Analyzing Events Event Reporting the previous event record). Use View Combined Event Files to simultaneously view as many as three separate events. To view the saved events using Event 2015 Software, click on the Load Event SYNCHRO function on the right side of the screen. As shown in Figure 9.6, all the ac analog data points shown in a CEV report when viewed with Analytic Assistant SEL-5601 or QuickSet... -
Page 527: Table 9.3 Digital Event Report Column Definitions
Analyzing Events 9.17 Event Reporting Digital Event Report The digital event report includes: ➤ Digital states of control and protection elements, including (EVE D Command) overcurrent and voltage elements, plus status of digital inputs and outputs and RTD status ➤ Event Summary ➤... - Page 528 9.18 Analyzing Events Event Reporting Table 9.3 Digital Event Report Column Definitions (Sheet 2 of 6) Column Designation Column Symbols Column Symbol RWBs 50N1 50N1P picked up 50N1T picked up 50N2 50N2P picked up 50N2T picked up 51N1 51NP picked up 51NT picked up 51NR picked up 46Q1...
- Page 529 Analyzing Events 9.19 Event Reporting Table 9.3 Digital Event Report Column Definitions (Sheet 3 of 6) Column Designation Column Symbols Column Symbol RWBs 3PWX3 3PWRX3P picked up 3PWRX3T picked up 3PWX4 3PWRX4P picked up 3PWRX4T picked up LOPX LOPX picked up ZLOADX ZLOADX picked up SWING picked up...
- Page 530 9.20 Analyzing Events Event Reporting Table 9.3 Digital Event Report Column Definitions (Sheet 4 of 6) Column Designation Column Symbols Column Symbol RWBs Y Side 50PY1/67PY1 50PY1P or 67PY1P picked up 50PY1T or 67PY1T picked up 50PY2/67PY2 50PY2P or 67PY2P picked up 50PY2T or 67PY2T picked up 50PY3A 50PY3AP picked up...
- Page 531 Analyzing Events 9.21 Event Reporting Table 9.3 Digital Event Report Column Definitions (Sheet 5 of 6) Column Designation Column Symbols Column Symbol RWBs 3PWY4 3PWRY4P picked up 3PWRY4T picked up LOPY LOPY picked up ZLOADY ZLOADY picked up SFY picked up 25AY 25AY1 picked up 25AY2 picked up...
- Page 532 9.22 Analyzing Events Event Reporting Table 9.3 Digital Event Report Column Definitions (Sheet 6 of 6) Column Designation Column Symbols Column Symbol RWBs Inputs 5056 IN505 picked up IN506 picked up Both IN505 and IN506 picked up Inputs 5078 IN507 picked up IN508 picked up Both IN507 and IN508 picked up Outputs 3012...
-
Page 533: Figure 9.8 Example Standard 15-Cycle Digital Event Report (Eve D X Command)
Analyzing Events 9.23 Event Reporting =>>EVE D <Enter> SEL-700G Date: 02/24/2010 Time: 19:08:09.705 GENERATOR RELAY Serial Number=000000000000000 FID=SEL-700G-X134-V0-Z001001-D20100224 CID=1C01 WindingX 50/67 7722 99555555 3333 RR RTD R PPPPPGGQQPGQVCX 555 44 22 PP77 PP999999 22 PPPP L O 7 66 44 2 DDD XXXXXXXXXXXX D 001 66 11 PPSS PPGGQQSS 44 WWWW O A 8 44 00 S5 XXX R FPP WBOAD... -
Page 534: Figure 9.9 Example 15-Cycle Stator Ground Event Report (Eve Gnd) 1/4 Cycle Resolution
9.24 Analyzing Events Event Reporting [13] ..rrr..b ..r ....r ..* ... .bb ....rrr..b ..r ....r ..* ... .bb ....rrr..b ..r .. - Page 535 Analyzing Events 9.25 Event Reporting 2972.3 1003.0 6665.8 **..2974.2 1004.0 6668.6 **..2975.1 1004.0 6666.6 **..2978.9 1006.0 6667.5 **..2972.2 1003.3 6665.1 **..2973.8 1003.8 6667.9* **..2973.8 1003.8 6665.9 **..
-
Page 536: Table 9.4 Stator Ground Event Report (Eve Gnd) Digital Column Definitions For Protection, Control, And I/O Elements
9.26 Analyzing Events Event Reporting Table 9.4 gives the ground event report digital column definitions for the protection and control elements and the base model inputs and outputs. Table 9.4 Stator Ground Event report (EVE GND) Digital Column Definitions for Protection, Control, and I/O Elements Column Designation Column Symbols Column Symbol RWBs 64G1... -
Page 537: Table 9.6 Differential Event Report Digital Column Definitions For Protection, Control, And I/O Elements
Analyzing Events 9.27 Event Reporting Table 9.5 Differential Event Report Column Definitions for Analog Quantities (Sheet 2 of 2) Column Description Heading IRT2 Restraint current for differential element 87–2 (multiples of TAP) I2F2 Second-harmonic current for differential element 87–2 (multiples of TAP) I2F4 Fourth-harmonic current for differential element 87–2 (multiples of TAP) I2F5... -
Page 538: Figure 9.10 Example Standard 15-Cycle Differential Event Report (Eve Dif2 Command)
9.28 Analyzing Events Event Reporting =>>EVE DIF2 <Enter> SEL-700G Date: 02/24/2010 Time: 19:08:09.705 GENERATOR RELAY Serial Number=000000000000000 FID=SEL-700G-X134-V0-Z001001-D20100224 CID=1C01 Differential Differential Quantities 8 87 87 87 87 Multiples of TAP HR HB T n t R 13 13 13 13 H 1 13 IOP2 IRT2... - Page 539 Analyzing Events 9.29 Event Reporting [14] 0.754 1.317 0.001 0.033 0.003 * 2..2..* 0.753 1.318 0.001 0.046 0.003 * 2..2..* 0.750 1.317 0.001 0.065 0.001 * 2..2..* 0.751 1.317 0.001...
-
Page 540: Figure 9.11 Example Sequential Events Recorder (Ser) Event Report
9.30 Analyzing Events Event Reporting Example SER Report The example SER report in Figure 9.11 includes records of events that occurred before the beginning of the event summary report in Figure 9.3. =>>SER <Enter> SEL-700G Date: 02/24/2010 Time: 19:15:40.570 GENERATOR RELAY Time Source: External Serial No = 000000000000000 FID = SEL-700G-X134-V0-Z001001-D20100224... - Page 541 Analyzing Events 9.31 Event Reporting Conditions When CLOSEX Asserted The SYN report shows the generator and system conditions at the time the CLOSEX was initiated. Conditions displayed include present slip frequency, actual generator and system frequencies, percent voltage difference, and actual generator and system voltages.
- Page 542 9.32 Analyzing Events Event Reporting synchronism-check function performs better to cause a breaker close exactly when the generator voltage phase angle difference equals CANGLE. Reset the Breaker Close Time Average Use the Access Level 2 SYN R command to reset the Breaker Close Time Average and breaker close operations counter.
-
Page 543: Section 10: Testing And Troubleshooting
Section 10 Testing and Troubleshooting Instruction Manual Overview Relay testing is typically divided into two categories: WARNING ➤ Before working on a CT circuit, first Tests performed at the time the relay is installed or apply a short to the secondary commissioned winding of the CT. -
Page 544: Figure 10.1 Low-Level Test Interface (J2)
10.2 Testing and Troubleshooting Testing Tools Low-Level Test The SEL-700G has a low-level test interface on the 4 ACI/3 AVI current/ voltage card, 1 ACI neutral current card, or 3 ACI current card (Slot ) and Interface 3 ACI/4 AVI current/voltage card, 2 AVI voltage card, 3 ACI current card, or 3 ACI/2 AVI current/voltage card (Slot ). -
Page 545: Table 10.1 Cable C700G Connection Options
Testing and Troubleshooting 10.3 Testing Tools Table 10.1 shows how to use the C700G cable for measuring the necessary quantities. For example, using C700G Connection Options No. 2 with connector C on Slot Z and D on Slot E, align channel 1 with IAX and CH#7 with IBY on the 4ACI/3AVI and 3AC1/4AVI boards, respectively. - Page 546 10.4 Testing and Troubleshooting Testing Tools Table 10.2 Resultant Scale Factors for Inputs (Sheet 2 of 2) Channel Circuit Board and Scale Factor Nominal Input Label Connector (A/V or V/V) J2 on Slot E card 250 V 218.4 J2 on Slot E card 250 V 218.4 J2 on Slot E card...
-
Page 547: Commissioning Tests
Testing and Troubleshooting 10.5 Commissioning Tests Step 8. Locate the 14-pin connector J2 on the board. It has four jumpers on pins 1-2, 3-4, 5-6, 13-14. Please remove these jumpers and save them for restoring the relay to normal operation after test. Connect the low-level signal connector of the C700G cable to J2, as shown in Figure 10.1 and Figure 10.2 (for example, ribbon cable C700G connector of SEL-RTS Test System). - Page 548 10.6 Testing and Troubleshooting Commissioning Tests Connection Tests Step 1. Remove control voltage and ac signals from the SEL-700G by opening the appropriate breaker(s) or removing fuses. Step 2. Isolate the relay contact assigned to be the TRIP output. Step 3. Verify correct ac and dc connections by performing point-to- point continuity checks on the associated circuits.
-
Page 549: Figure 10.3 Three-Phase Wye Ac Connections
Testing and Troubleshooting 10.7 Commissioning Tests +120˚ +120˚ –120˚ –120˚ PHROT := ABC PHROT := ACB When setting PHROT := ABC, set angle V = angle I 0˚ set angle V = angle I = —120˚ set angle V = angle I = 120˚... -
Page 550: Table 10.3 Serial Port Commands That Clear Relay Data Buffers
10.8 Testing and Troubleshooting Commissioning Tests PTRN, CTRX, CTRY, or CTRN (the settings are model dependent) settings and the fact that the quantities are displayed in primary units. If you are using a current transformer for the neutral, apply a single-phase current to the IN terminal. -
Page 551: Table 10.4 Ctrx Phase Current Measuring Accuracy
Testing and Troubleshooting 10.9 Commissioning Tests Step 21. Verify the following ac quantities by using the front-panel or serial port METER command. METER > Fundamental ➢ Phase current magnitudes should be nearly equal. ➢ Phase current angles should be balanced, have proper phase rotation, and have the appropriate phase relationship to the phase voltages. -
Page 552: Table 10.5 Ctry Phase Current Measuring Accuracy
10.10 Testing and Troubleshooting Commissioning Tests Step 5. Use Figure 10.6 and Table 10.5 to repeat Step 1 through Step 4. Current Test SEL-700G Source Figure 10.6 CTRY Current Source Connections Table 10.5 CTRY Phase Current Measuring Accuracy Expected A–Phase B–Phase C–Phase |I| Applied... -
Page 553: Table 10.6 Power Quantity Accuracy-Wye Voltages
Testing and Troubleshooting 10.11 Commissioning Tests Step 4. Apply the current and voltage quantities shown in Column 1 of Table 10.6. Values are given for PHROT := ABC and PHROT := ACB. Step 5. Use the front-panel function or the serial port MET METER command to verify the results. -
Page 554: Periodic Tests (Routine Maintenance)
10.12 Testing and Troubleshooting Periodic Tests (Routine Maintenance) Step 4. Apply the current and voltage quantities shown in Column 1 of Table 10.7. Values are given for PHROT := ABC and PHROT := ACB. Step 5. Use the front-panel or the serial port MET command to METER verify the results. -
Page 555: Self-Test
Testing and Troubleshooting 10.13 Self-Test Self-Test The SEL-700G runs a variety of self-tests. The relay takes the following corrective actions for out-of-tolerance conditions (see Table 10.9): ➤ Protection Disabled: The relay disables protection and control elements and trip/close logic. All output contacts are de- energized. - Page 556 10.14 Testing and Troubleshooting Self-Test Table 10.9 Relay Self-Tests (Sheet 2 of 4) Protection Auto Front Panel Self-Test Description Normal Disabled Alarm Message Message Corrective Range on Failure Status on Failure on Failure Action Front-Panel HMI (power up) STA C, to clear Latched the warning in the Fail if ID registers do not match expected or if...
- Page 557 Testing and Troubleshooting 10.15 Self-Test Table 10.9 Relay Self-Tests (Sheet 3 of 4) Protection Auto Front Panel Self-Test Description Normal Disabled Alarm Message Message Corrective Range on Failure Status on Failure on Failure Action ADCCHK (Slot E) <2.375 V Latched Status Fail Automatic restart Card E Fail...
-
Page 558: Troubleshooting
10.16 Testing and Troubleshooting Troubleshooting Table 10.9 Relay Self-Tests (Sheet 4 of 4) Protection Auto Front Panel Self-Test Description Normal Disabled Alarm Message Message Corrective Range on Failure Status on Failure on Failure Action CID (Configured IED Description) file (access) Status Fail CID File Failure Failure to Access/Read CID File... -
Page 559: Technical Assistance
10.17 Technical Assistance Technical Assistance We appreciate your interest in SEL products and services. If you have questions or comments, please contact us at: Schweitzer Engineering Laboratories, Inc. 2350 NE Hopkins Court Pullman, WA 99163-5603 U.S.A. Tel: +1.509.338.3838 Fax: +1.509.332.7990 Internet: selinc.com... - Page 560 This page intentionally left blank...
-
Page 561: Table A.1 Firmware Revision History
Appendix A Firmware and Manual Versions Instruction Manual Firmware Determining the To determine the firmware version, view the status report by using the serial port STATUS command or the front-panel STATUS pushbutton (see STATUS Firmware Version Command (Relay Self-Test Status) on page 7.44 for more information on the STA command). -
Page 562: Appendix A: Firmware And Manual Versions Firmware
Firmware and Manual Versions Firmware Table A.1 Firmware Revision History (Sheet 2 of 5) Firmware Identification (FID) Number Summary of Revisions Manual Date Code ➤ Increased the resolution of the slip frequency and the fre- quency of the VS channel to three decimal places in the compressed generator synchronism report (CGSR). - Page 563 Firmware and Manual Versions Firmware Table A.1 Firmware Revision History (Sheet 3 of 5) Firmware Identification (FID) Number Summary of Revisions Manual Date Code ➤ Changed the storage of latch and local bits from volatile to nonvolatile memory. ➤ Modified the firmware to make the MATHERR Relay Word bit visible.
- Page 564 Firmware and Manual Versions Firmware Table A.1 Firmware Revision History (Sheet 4 of 5) Firmware Identification (FID) Number Summary of Revisions Manual Date Code ➤ Corrected an Ethernet Failover Switching issue for dual- Ethernet models. ➤ Fixed an issue that caused port settings to not be accepted when the relay settings were downloaded using QuickSet SEL-5030 Software.
- Page 565 Firmware and Manual Versions Firmware Table A.1 Firmware Revision History (Sheet 5 of 5) Firmware Identification (FID) Number Summary of Revisions Manual Date Code ➤ Corrected IEC 61850 KEMA compliance issue (Sisco library). ➤ Corrected issue of SALARM not asserting for a settings group change.
-
Page 566: Table A.2 Devicenet Card Versions
Firmware and Manual Versions Firmware DeviceNet and The firmware on the DeviceNet interface has two versions as listed in Table A.2. The version number of this firmware is only accessible via Device Firmware Versions Net interface. SEL-700G needs DeviceNet firmware version 1.005. Table A.2 DeviceNet Card Versions DeviceNet Card Revisions... -
Page 567: Icd File
Firmware and Manual Versions ICD File ICD File Determining the ICD To find the ICD revision number in your relay, view the configVersion using the ID command. The configVersion is the last item displayed in the File Version in Your information returned from the ID command. - Page 568 Firmware and Manual Versions ICD File Table A.4 SEL-700G ICD Revision History (Sheet 2 of 3) Relay Architect Manual ERATOR ClassFile configVersion Summary of Revisions Firmware Architect File Software Date Version Compatibility Description Version Code ➤ Modified data types for MaxA, MinA, MaxPhV, MinPhV, MaxP2PV, and MinP2PV attributes in...
- Page 569 Firmware and Manual Versions ICD File Table A.4 SEL-700G ICD Revision History (Sheet 3 of 3) Relay Architect Manual ERATOR ClassFile configVersion Summary of Revisions Firmware Architect File Software Date Version Compatibility Description Version Code ➤ Remove UTC offset ICD-700G-R200-V0- R104 and higher 700G R104 and 1.1.102.0...
-
Page 570: Instruction Manual
A.10 Firmware and Manual Versions Instruction Manual Instruction Manual The date code at the bottom of each page of this manual reflects the creation or revision date. Table A.5 lists the instruction manual release dates and a description of modifications. The most recent instruction manual revisions are listed at the top. - Page 571 Firmware and Manual Versions A.11 Instruction Manual Table A.5 Instruction Manual Revision History (Sheet 2 of 8) Revision Date Summary of Revisions Section 9 ➤ Updated Table 9.1: Event Types. ➤ Updated Figure 9.9: Example 15-cycle Stator Ground Event Report (EVE GND) 1/4 Cycle Resolution. Section 10 ➤...
- Page 572 A.12 Firmware and Manual Versions Instruction Manual Table A.5 Instruction Manual Revision History (Sheet 3 of 8) Revision Date Summary of Revisions Section 4 ➤ Updated Configuration Settings. ➤ Updated Figure 4.16: 87N Element Logic Diagram. ➤ Updated Restricted Earth Fault Element. ➤...
- Page 573 Firmware and Manual Versions A.13 Instruction Manual Table A.5 Instruction Manual Revision History (Sheet 4 of 8) Revision Date Summary of Revisions Preface 20150410 ➤ Updated the Hazardous Locations Approvals label. Section 1 ➤ Added the applied current at which the burden is measured for I = 1 A and 5 A in Specifications.
- Page 574 A.14 Firmware and Manual Versions Instruction Manual Table A.5 Instruction Manual Revision History (Sheet 5 of 8) Revision Date Summary of Revisions Appendix H ➤ Updated Table H.2: Synchrophasor Order in Data Stream (Voltage and Currents). Appendix I Updated the setting description for the RBADPU setting prompt in Table I.5: M Protocol Settings.
- Page 575 Firmware and Manual Versions A.15 Instruction Manual Table A.5 Instruction Manual Revision History (Sheet 6 of 8) Revision Date Summary of Revisions Appendix F ➤ Added a note about GOOSE subscriptions retaining state until overwritten or the device restarts. ➤ Updated Figure F.1: SEL-700G Predefined Reports and Figure F.2: SEL-700G Datasets.
- Page 576 A.16 Firmware and Manual Versions Instruction Manual Table A.5 Instruction Manual Revision History (Sheet 7 of 8) Revision Date Summary of Revisions Appendix F ➤ Added SEL ICD File Versions. ➤ Revised tables F.7: Metering and Measurement Logical Nodes, F.8: Thermal Metering Data Logical Node Class Definition, and F.9: Demand Metering Statistics Logical Node Class Definition.
- Page 577 Firmware and Manual Versions A.17 Instruction Manual Table A.5 Instruction Manual Revision History (Sheet 8 of 8) Revision Date Summary of Revisions Section 10 ➤ Revised self-tests write-up to reflect automatic restarts for certain failures. Appendix A ➤ Updated for firmware revision R104. Appendix E ➤...
- Page 578 This page intentionally left blank...
-
Page 579: Appendix B: Firmware Upgrade Instructions
Appendix B Firmware Upgrade Instructions Instruction Manual Overview These firmware upgrade instructions apply to all SEL-700 series industrial products except the SEL-701 Relay and SEL-734 Meter. SEL occasionally offers firmware upgrades to improve the performance of your relay. Because the SEL-700G Relays store firmware in flash memory, changing physical components is not necessary. -
Page 580: Upgrade Firmware Using Ac Sel Erator Quickset
Firmware Upgrade Instructions Upgrade Firmware Using QuickSet ERATOR Upgrade Firmware Using QuickSet ERATOR Select Tools > Firmware Loader from the QuickSet menu bar to launch a wizard that walks you through the steps to load firmware into your SEL device. Refer to Section 3: PC Software for setup and connection procedures for QuickSet. - Page 581 Firmware Upgrade Instructions Upgrade Firmware Using QuickSet ERATOR b. Select a file name to save the selected settings or accept the defaults as shown. Click Save. c. The Transfer Status: Ymodem file read window shows the transfer progress of the settings file.
- Page 582 Firmware Upgrade Instructions Upgrade Firmware Using QuickSet ERATOR Step 2. Transfer Firmware. Click Next to begin the firmware transfer. Step 3. Load Firmware. During this step, the device is put in SEL . The BOOT transfer speed is maximized and the firmware transfer begins.
- Page 583 Firmware Upgrade Instructions Upgrade Firmware Using QuickSet ERATOR NOTE: The following screen can appear if you have one of the two conditions mentioned. If the relay is disabled as mentioned in condition number 2, check for the ENABLED LED on the front panel of the relay. If the ENABLED LED is STATUS FAIL not illuminated or the front panel displays Non_Vol Failure...
-
Page 584: Upgrade Firmware Using A Terminal Emulator
Firmware Upgrade Instructions Upgrade Firmware Using a Terminal Emulator Upgrade Firmware Using a Terminal Emulator The following instructions assume you have a working knowledge of your personal computer terminal emulation software. In particular, you must be able to modify your serial communications parameters (data rate, data bits, parity, etc.), select transfer protocol (Xmodem/CRC or 1k Xmodem/CRC), and transfer files (for example, send and receive binary files). -
Page 585: Figure B.1 Firmware File Transfer Process
Firmware Upgrade Instructions Upgrade Firmware Using a Terminal Emulator Step 9. Start the file transfer. Select the send file option in your communications software. Use the Xmodem protocol and send the file that contains the new firmware (for example, r101xxx.s19 or r101xxx.z19). The file transfer takes less than 5–15 minutes at 115200 bps, depending on the product. -
Page 586: Relays With Iec 61850 Option
Firmware Upgrade Instructions Relays With IEC 61850 Option Step 11. Change the data rate of the PC to match that of the relay prior to Step 5, and enter Access Level 2. Step 12. Issue the STATUS command; verify all relay self-test results are OK. -
Page 587: Technical Assistance
Firmware Upgrade Instructions Technical Assistance Technical Assistance We appreciate your interest in SEL products and services. If you have questions or comments, please contact us at: Schweitzer Engineering Laboratories, Inc. 2350 NE Hopkins Court Pullman, WA 99163-5603 U.S.A. Telephone: +1.509.338.3838 Fax: +1.509.332.7990 Internet: selinc.com... - Page 588 This page intentionally left blank...
-
Page 589: Appendix C: Sel Communications Processors
Appendix C SEL Communications Processors Instruction Manual SEL Communications Protocols The SEL-700G Relay supports the SEL protocols and command sets shown in Table C.1. Table C.1 Supported Serial Command Sets Command Set Description SEL ASCII Use this protocol to send ASCII commands and receive ASCII responses that are human readable with an appropriate terminal emulation program. -
Page 590: Table C.2 Compressed Ascii Commands
SEL Communications Processors SEL Communications Protocols Table C.2 lists the Compressed ASCII commands and contents of the command responses. Table C.2 Compressed ASCII Commands Command Response Access Level BNAME ASCII names of Fast Meter status bits CASCII Configuration data of all Compressed ASCII com- mands available at access levels >... -
Page 591: Sel Communications Processor
SEL Communications Processors SEL Communications Processor SEL Communications Processor SEL offers SEL communications processors, powerful tools for system integration and automation. The SEL-2030 series and the SEL-2020 communications processors are similar, except that the SEL-2030 series has two slots for network protocol cards. These devices provide a single point of contact for integration networks with a star topology, as shown in Figure C.1. -
Page 592: Table C.3 Sel Communications Processors Protocol Interfaces
SEL Communications Processors SEL Communications Processor Local HMI To Engineering To SCADA Modem SEL Communications Processor SEL Communications SEL Communications Processor Processor SEL IED SEL IED SEL IED SEL IED SEL IED SEL IED Non-SEL IED Non-SEL IED Figure C.2 Multitiered SEL Communications Processor Architecture You can add additional communications processors to provide redundancy and eliminate possible single points of failure. -
Page 593: Sel Communications Processor And Relay Architecture
SEL Communications Processors SEL Communications Processor and Relay Architecture SEL Communications Processor and Relay Architecture You can apply SEL communications processors and SEL relays in a limitless variety of applications that integrate, automate, and improve station operation. Most system integration architectures utilizing SEL communications processors involve either developing a star network or enhancing a multidrop network. -
Page 594: Figure C.3 Enhancing Multidrop Networks With Sel Communications Processors
SEL Communications Processors SEL Communications Processor and Relay Architecture Enhancing You can also use an SEL communications processor to enhance a multidrop architecture similar to the one shown in Figure C.3. In this example, the SEL Multidrop Networks communications processor enhances a system that uses the SEL-2701 with an Ethernet HMI multidrop network. -
Page 595: Sel Communications Processor Example
SEL Communications Processors SEL Communications Processor Example SEL Communications Processor Example This example demonstrates the data and control points available in the SEL communications processor when you connect an SEL-700G. The physical configuration used in this example is shown in Figure C.4. Personal Computer Cable C234A... -
Page 596: Table C.5 Sel Communications Processor Data Collection Automessages
SEL Communications Processors SEL Communications Processor Example Data Collection The SEL communications processor is configured to collect data from the SEL-700G, using the list in Table C.5. Table C.5 SEL Communications Processor Data Collection Automessages Message Data Collected 20METER Power system metering data 20DEMAND Demand metering data 20TARGET... -
Page 597: Table C.8 Communications Processor Meter Region Map For Gw Model
SEL Communications Processors SEL Communications Processor Example Relay Metering Data Table C.9 through Table C.15 show the meter data for different models of the SEL-700G that are available in the SEL communications processor and the location and data type for the memory areas within D1 (Data Region 1). The type field indicates the data type and size. -
Page 598: Table C.10 Communications Processor Meter Region Map For G0 Model With Synchronism
C.10 SEL Communications Processors SEL Communications Processor Example Table C.9 Communications Processor METER Region Map for G0 Model Without Synchronism (Sheet 2 of 2) Item Starting Address Type VBX (wye) or VBCX (delta) 2013h float VCX (wye) or VCAX (delta) 2015h float 2017h... -
Page 599: Table C.11 Communications Processor Meter Region Map For G1 Model Without Synchronism
SEL Communications Processors C.11 SEL Communications Processor Example Table C.11 Communications Processor METER Region Map for G1 Model Without Synchronism Item Starting Address Type _YEAR 2000h DAY_OF_YEAR 2001h TIME (ms) 2002h int[2] MONTH 2004h char DATE 2005h char YEAR 2006h char HOUR 2007h... -
Page 600: Table C.13 Communications Processor Meter Region Map For Gt Model With Single Synchronism
C.12 SEL Communications Processors SEL Communications Processor Example Table C.12 Communications Processor METER Region Map for G1 Model With Synchronism (Sheet 2 of 2) Item Starting Address Type 2013h float 2015h float VAX (wye) or VABX (delta) 2017h float VBX (wye) or VBCX (delta) 2019h float VCX (wye) or VCAX (delta) -
Page 601: Table C.14 Communications Processor Meter Region Map For Gt Model With Dual Single Synchronism
SEL Communications Processors C.13 SEL Communications Processor Example Table C.14 Communications Processor METER Region Map for GT Model With Dual Single Synchronism Item Starting Address Type _YEAR 2000h DAY_OF_YEAR 2001h TIME (ms) 2002h int[2] MONTH 2004h char DATE 2005h char YEAR 2006h char... -
Page 602: Table C.15 Communications Processor Target Region
C.14 SEL Communications Processors SEL Communications Processor Example Relay Word Table C.15 lists the Relay Word bit data available in the SEL communications processor TARGET region. Bits Information Table C.15 Communications Processor TARGET Region Relay Word Bits (in Bits 7–0) Address 2804h PWRUP... -
Page 603: Table C.16 Communications Processor Demand Region Map
SEL Communications Processors C.15 SEL Communications Processor Example Demand Data Table C.16 lists the demand data available in the SEL communications processor and the location and data type for the memory areas within D3 (Data Region 3). The type field indicates the data type and size. The type “int” is a 16-bit integer. - Page 604 This page intentionally left blank...
-
Page 605: Appendix Ddnp3 Communications
Appendix D DNP3 Communications Instruction Manual Overview The SEL-700G Relays provide a Distributed Network Protocol Version 3.0 (DNP3) Level 2 Outstation interface for direct serial and LAN/WAN network connections to the device. This section covers the following topics: ➤ Introduction to DNP3 on page D.1 ➤... - Page 606 DNP3 Communications Introduction to DNP3 Each level is a proper superset of the previous lower-numbered level. A higher-level device can act as a master to a lower-level device, but can only use the data types and functions implemented in the lower level device. For example, a typical SCADA master is a Level 3 device and can use Level 2 (or lower) functions to poll a Level 2 (or lower) device for Level 2 (or lower) data.
-
Page 607: Table D.2 Selected Dnp3 Function Codes
DNP3 Communications Introduction to DNP3 Table D.2 Selected DNP3 Function Codes Function Function Description Code Read Request data from the outstation Write Send data to the outstation Select First part of a Select-Before-Operate operation Operate Second part of a Select-Before-Operate operation Direct operate One-step operation with reply Direct operate, no reply... -
Page 608: Table D.3 Dnp3 Access Methods
DNP3 Communications Introduction to DNP3 than polled report-by-exception because that method does not require polling messages from the master. To properly evaluate which access method provides optimum performance for your application, you must also consider overall system size and the volume of data communication expected. Table D.3 DNP3 Access Methods Access Method Description... - Page 609 DNP3 Communications Introduction to DNP3 The DNP3 technical bulletin (DNP Confirmation and Retry Guidelines 9804-002) on confirmation processes recommends against using data link confirmations because these processes can add to traffic in situations where communications are marginal. The increased traffic reduces connection throughput further, possibly preventing the system from operating properly.
-
Page 610: Dnp3 In The Sel-700G
DNP3 Communications DNP3 in the SEL-700G TCP/UDP Selection The Committee recommends the selection of TCP or UDP protocol as per the guidelines in Table D.4. Table D.4 TCP/UDP Selection Guidelines Use in the case of… Most situations Non-broadcast or multicast Mesh Topology WAN Broadcast Multicast... - Page 611 DNP3 Communications DNP3 in the SEL-700G In both the unsolicited report-by-exception and quiescent polling methods shown in Table D.5, you must make a selection for the PUNSOLn setting. This setting enables or disables unsolicited data reporting at power up. If your DNP3 master can send a message to enable unsolicited reporting on the SEL-700G, you should set PUNSOLn to No.
-
Page 612: Figure D.2 Message Transmission Timing
DNP3 Communications DNP3 in the SEL-700G Random Delay MINDLY to MAXDLY Receipt of RX DATA or CTS TX DATA PREDLY PSTDLY Figure D.2 Message Transmission Timing Transmission Control If you use a media transceiver (for example, EIA-232 to EIA-485) or a radio system for your DNP3 network, you may need to adjust data transmission properties. -
Page 613: Table D.6 Sel-700G Event Buffer Capacity
DNP3 Communications DNP3 in the SEL-700G With no scaling, the value of 12.632 would be sent as 12. With a scaling setting of 1, the value transmitted is 126. With a scaling setting of 3, the value transmitted is 12632. You must make certain that the maximum value does not exceed 32767 if you are polling the default 16-bit variations for Objects 30 and 32, but you can send some decimal values using this technique. - Page 614 D.10 DNP3 Communications DNP3 in the SEL-700G time-synchronization messages.) It can be set to request time synchronization periodically by setting the TIMERQn setting to the necessary period. It can also be set to not request, but accept time synchronization (TIMERQn = M for “master”).
-
Page 615: Table D.7 Port Dnp3 Protocol Settings
DNP3 Communications D.11 DNP3 in the SEL-700G Table D.7 Port DNP3 Protocol Settings (Sheet 1 of 2) Name Description Range Default EDNP Enable DNP3 Sessions 0–3 DNPNUM DNP3 TCP and UDP Port 1–65534 20000 DNPADR Device DNP3 address 0–65534 Session 1 Settings DNPIP1 DNP Master IP Address (zzz.yyy.xxx.www) 15 characters... -
Page 616: Dnp3 Documentation
D.12 DNP3 Communications DNP3 Documentation Table D.7 Port DNP3 Protocol Settings (Sheet 2 of 2) Name Description Range Default Session 3 Settings DNPIP3 DNP Master IP Address (zzz.yyy.xxx.www) 15 characters “” DNPTR3 Transport protocol UDP, TCP · · · a, d URETRY3 Unsolicited messages maximum retry attempts 2–10... -
Page 617: Table D.9 Sel-700G Dnp Object List
DNP3 Communications D.13 DNP3 Documentation Table D.9 SEL-700G DNP Object List (Sheet 1 of 6) Request Response Obj. Var. Description Funct. Funct. Qual. Codes Qual. Codes Codes Codes 211 Device Attributes—User-specific sets of attributes 0,17 212 Device Attributes—Master data set prototypes 0,17 213 Device Attributes—Outstation data set prototypes 0,17... - Page 618 D.14 DNP3 Communications DNP3 Documentation Table D.9 SEL-700G DNP Object List (Sheet 2 of 6) Request Response Obj. Var. Description Funct. Funct. Qual. Codes Qual. Codes Codes Codes 247 Device Attributes—User assigned ID code/number 0,17 248 Device Attributes—Device serial number 0,17 249 Device Attributes—DNP subset and conformance 0,17...
- Page 619 DNP3 Communications D.15 DNP3 Documentation Table D.9 SEL-700G DNP Object List (Sheet 3 of 6) Request Response Obj. Var. Description Funct. Funct. Qual. Codes Qual. Codes Codes Codes 32-Bit Frozen Delta Counter 16-Bit Frozen Delta Counter 32-Bit Frozen Counter With Time of Freeze 16-Bit Frozen Counter With Time of Freeze 32-Bit Frozen Delta Counter With Time of Freeze 16-Bit Frozen Delta Counter With Time of Freeze...
- Page 620 D.16 DNP3 Communications DNP3 Documentation Table D.9 SEL-700G DNP Object List (Sheet 4 of 6) Request Response Obj. Var. Description Funct. Funct. Qual. Codes Qual. Codes Codes Codes Frozen Analog Input—All Variations 32-Bit Frozen Analog Input 16-Bit Frozen Analog Input 32-Bit Frozen Analog Input With Time of Freeze 16-Bit Frozen Analog Input With Time of Freeze 32-Bit Frozen Analog Input Without Flag...
- Page 621 DNP3 Communications D.17 DNP3 Documentation Table D.9 SEL-700G DNP Object List (Sheet 5 of 6) Request Response Obj. Var. Description Funct. Funct. Qual. Codes Qual. Codes Codes Codes Long Floating Point Analog Output Status 0, 1, 6, 7, 8 0, 1, 17, 28 Analog Output Block—All Variations 32-Bit Analog Output Block 3, 4, 5, 6...
-
Page 622: Table D.10 Dnp3 Reference Data Map
D.18 DNP3 Communications DNP3 Documentation Table D.9 SEL-700G DNP Object List (Sheet 6 of 6) Request Response Obj. Var. Description Funct. Funct. Qual. Codes Qual. Codes Codes Codes Small Packed Binary-Coded Decimal Medium Packed Binary-Coded Decimal Large Packed Binary-Coded Decimal Octet String Octet String Event Virtual Terminal Output Block... - Page 623 DNP3 Communications D.19 DNP3 Documentation Table D.10 DNP3 Reference Data Map (Sheet 2 of 2) Object Labels Description Binary Outputs 10, 12 RB01–RB32 Remote bits RB01–RB32 10, 12 RB01:RB02 Remote bit pairs RB01–RB32 RB03:RB04 RB05:RB06 • • • RB29:RB30 RB31:RB32 10, 12 Pulse Open Circuit Breaker X command 10, 12...
-
Page 624: Table D.11 Dnp3 Default Data Map
D.20 DNP3 Communications DNP3 Documentation Table D.11 DNP3 Default Data Map Object Default Index Point Label 01, 02 ENABLED TRIP STWARN STFAIL STSET IN101 IN102 7–99 A portion of these binary inputs can have default values as described in Default Binary Inputs on page D.20. Outside that scope, they contain the value NA. - Page 625 DNP3 Communications D.21 DNP3 Documentation ➤ Variation 246-RID setting ➤ Variation 247-RID setting ➤ Variation 248-Serial Number Variation 249 shall contain the DNP subset and conformance, “2:2009.” Variation 250 shall contain the product model, “SEL-700G Relay” and variation 252 shall contain “SEL.” Binary Inputs Binary Inputs (objects 1 and 2) are supported as defined by Table D.9.
-
Page 626: Table D.12 Sel-700G Object 12 Control Operations
D.22 DNP3 Communications DNP3 Documentation The SEL-700G also supports Pattern Control Blocks (Object 12, Variations 2 and 3) to control multiple binary output points. Variation 2 defines the control type (Trip/Close, Set/Clear, or Pulse) and the range of points to operate. Variation 3 provides a pattern mask that indicates which points in that range should be operated. - Page 627 DNP3 Communications D.23 DNP3 Documentation Unless otherwise indicated, analog values are reported in primary units. See Appendix K: Analog Quantities for a list of all available analog inputs. A dead-band check is done after any scaling has been applied. For all currents, the default scaling is the DECPLA setting on magnitudes and scale factor of 100 on angles.
-
Page 628: Figure D.3 Sample Response To Sho Dnp Command
D.24 DNP3 Communications DNP3 Documentation =>>SHO DNP 1 <Enter> DNP Map 1 Settings Binary Input Map BI_00 := ENABLED BI_01 := TRIP BI_02 := TRIPX BI_03 := TRIPY … BI_97 := IN101 BI_98 := IN102 BI_99 := 50PX1P Binary Output Map BO_00 := RB01 BO_01... -
Page 629: Figure D.4 Port Map Command
DNP3 Communications D.25 DNP3 Documentation =>MAP DNP 1 1 <Enter> SEL-700GT Date: 06/24/2009 Time: 09:33:39 INTERTIE RELAY Time Source: Internal Map1 Transport TCP Device IP Address 10.201.5.3 Master IP Address10.200.0.139 Device DNP TCP and UDP Port 20000 Device DNP Address 15 Master DNP Address 0 Binary Inputs --------------------------------------------------------------------------------... -
Page 630: Table D.13 Sample Custom Dnp3 Ai Map
D.26 DNP3 Communications DNP3 Documentation You can use the command SET DNP x, where x is the map number, to edit or create custom DNP3 data maps. You can also use QuickSet ERATOR SEL-5030 Software, which is recommended for this purpose. Scaling factors allow you to overcome the limitations imposed by the integer nature of the default variations of Objects 30 and 32. -
Page 631: Figure D.5 Sample Custom Dnp3 Ai Map Settings
DNP3 Communications D.27 DNP3 Documentation Table D.13 Sample Custom DNP3 AI Map (Sheet 2 of 2) Desired Dead Point Description Label Scaling Band Index X-Side AB Phase-to-Phase VABX_ANG Voltage Angle X-Side Frequency FREQX To set these points as part of custom map 1, you can use the SET DNP 1 AI_00 TERSE <Enter>... -
Page 632: Figure D.6 Analog Input Map Entry In Quickset Software
D.28 DNP3 Communications DNP3 Documentation Figure D.6 Analog Input Map Entry in QuickSet Software Figure D.7 AI Point Label, Scaling, and Dead Band in QuickSet The SET DNP x CO_00 <Enter> command allows you to populate the DNP counter map with per-point dead bands. Entering these settings is similar to defining the analog input map settings. -
Page 633: Figure D.9 Binary Output Map Entry In Quickset Software
DNP3 Communications D.29 DNP3 Documentation You can also use QuickSet to enter the BO map settings as shown in the screen capture in Figure D.9. Figure D.9 Binary Output Map Entry in QuickSet Software Date Code 20170814 Instruction Manual SEL-700G Relay... - Page 634 This page intentionally left blank...
-
Page 635: Appendix E: Modbus Rtu Communications
Appendix E Modbus RTU Communications Instruction Manual Overview This appendix describes Modbus RTU communications features supported by the SEL-700G Relay. Complete specifications for the Modbus protocol are available from the Modbus user’s group website at modbus.org. Enable Modbus TCP protocol with the optional Ethernet port settings. The SEL-700G supports as many as two Modbus TCP sessions. -
Page 636: Table E.2 Sel-700G Modbus Function Codes
Modbus RTU Communications Communications Protocol The SEL-700G SLAVEID setting defines the device address. Set this value to a unique number for each device on the Modbus network. For Modbus communication to operate properly, no two slave devices can have the same address. -
Page 637: Table E.3 Sel-700G Modbus Exception Codes
Modbus RTU Communications Communications Protocol Modbus Exception The SEL-700G sends an exception code under the conditions described in Table E.3. Responses Table E.3 SEL-700G Modbus Exception Codes Exception Error Type Description Code Illegal Function The received function code is either undefined or Code unsupported. -
Page 638: Table E.5 Responses To 01H Read Discrete Output Coil Query Errors
Modbus RTU Communications Communications Protocol Table E.4 01h Read Discrete Output Coil Status Command (Sheet 2 of 2) Bytes Field A successful response from the slave will have the following format: 1 byte Slave Address 1 byte Function Code (01h) 1 byte Bytes of data (n) n bytes... -
Page 639: Table E.7 02H Sel-700G Inputs
Modbus RTU Communications Communications Protocol To build the response, the device calculates the number of bytes necessary to contain the number of bits requested. If the number of bits requested is not evenly divisible by eight, the device adds one more byte to maintain the balance of bits, padded by zeroes to make an even byte. - Page 640 Modbus RTU Communications Communications Protocol Table E.7 02h SEL-700G Inputs (Sheet 2 of 4) Coil Address Function Code Coil Description (Decimal) Supported 272–279 Relay Element Status Row 34 280–287 Relay Element Status Row 35 288–295 Relay Element Status Row 36 296–303 Relay Element Status Row 37 304–311...
- Page 641 Modbus RTU Communications Communications Protocol Table E.7 02h SEL-700G Inputs (Sheet 3 of 4) Coil Address Function Code Coil Description (Decimal) Supported 616–623 Relay Element Status Row 77 624–631 Relay Element Status Row 78 632–639 Relay Element Status Row 79 640–647 Relay Element Status Row 80 648–655...
- Page 642 Modbus RTU Communications Communications Protocol Table E.7 02h SEL-700G Inputs (Sheet 4 of 4) Coil Address Function Code Coil Description (Decimal) Supported 960–967 Relay Element Status Row 120 968–975 Relay Element Status Row 121 976–983 Relay Element Status Row 122 984–991 Relay Element Status Row 123 992–999...
-
Page 643: Table E.8 Responses To 02H Read Input Query Errors
Modbus RTU Communications Communications Protocol The relay responses to errors in the query are shown in Table E.8. Table E.8 Responses to 02h Read Input Query Errors Communications Error Error Code Returned Counter Increments Invalid bit to read Illegal Data Address (02h) Invalid Address Invalid number of bits to read Illegal Data Value (03h) -
Page 644: Table E.11 04H Read Input Register Command
E.10 Modbus RTU Communications Communications Protocol Table E.11 04h Read Input Register Command Bytes Field Requests from the master must have the following format: 1 byte Slave Address 1 byte Function Code (04h) 2 bytes Starting Register Address 2 bytes Number of Registers to Read 2 bytes CRC-16... - Page 645 Modbus RTU Communications E.11 Communications Protocol Table E.14 01h, 05h SEL-700G Output (Sheet 2 of 4) Coil Address (Decimal) Function Code Supported Coil Description 01, 05 Pulse OUT302 1 second 01, 05 Pulse OUT303 1 second 01, 05 Pulse OUT304 1 second 01, 05 Pulse OUT305 1 second 01, 05...
- Page 646 E.12 Modbus RTU Communications Communications Protocol Table E.14 01h, 05h SEL-700G Output (Sheet 3 of 4) Coil Address (Decimal) Function Code Supported Coil Description 01, 05 RB19 01, 05 RB20 01, 05 RB21 01, 05 RB22 01, 05 RB23 01, 05 RB24 01, 05 RB25...
-
Page 647: Table E.15 Responses To 05H Force Single Coil Query Errors
Modbus RTU Communications E.13 Communications Protocol Table E.14 01h, 05h SEL-700G Output (Sheet 4 of 4) Coil Address (Decimal) Function Code Supported Coil Description 01, 05 Pulse RB28 01, 05 Pulse RB29 01, 05 Pulse RB30 01, 05 Pulse RB31 01, 05 Pulse RB32 Pulsing a Set remote bit causes the remote bit to be cleared at the end of the pulse (1 SEL... -
Page 648: Table E.18 08H Loopback Diagnostic Command
E.14 Modbus RTU Communications Communications Protocol 08h Loopback The SEL-700G uses this function to allow a Modbus master to perform a diagnostic test on the Modbus communications channel and relay. When the Diagnostic Command subfunction field is 0000h, the relay returns a replica of the received message. Table E.18 08h Loopback Diagnostic Command Bytes Field... -
Page 649: Table E.21 10H Preset Multiple Registers Query Error Messages
Modbus RTU Communications E.15 Communications Protocol Table E.20 10h Preset Multiple Registers Command (Sheet 2 of 2) Bytes Field 2 bytes Number of Registers 2 bytes CRC-16 The relay responses to errors in the query are shown in Table E.21. Table E.21 10h Preset Multiple Registers Query Error Messages Communications Error... -
Page 650: Table E.24 60H Read Parameter Conversion Field Definition
E.16 Modbus RTU Communications Communications Protocol Table E.23 60h Read Parameter Descriptor Field Definition (Sheet 2 of 2) Name Description DBL: 32-bit 1 when the following setting is a fractional value of this setting RA: RAM-only 1 when the setting is not saved in nonvolatile memory RR: Read-only if running 1 when the setting is read-only if in running/operational state... -
Page 651: Table E.26 61H Read Parameter Text Command
Modbus RTU Communications E.17 Communications Protocol 61h Read Parameter The SEL-700G uses this function to allow a Modbus master to read parameter text from the relay. One parameter text (setting name) is read in each query. Text Command Table E.26 61h Read Parameter Text Command Bytes Field Queries from the master must have the following format:... -
Page 652: Table E.29 61H Read Parameter Enumeration Text Query Error Messages
E.18 Modbus RTU Communications Communications Protocol The relay responses to errors in the query are as follows: Table E.29 61h Read Parameter Enumeration Text Query Error Messages Communications Error Error Code Returned Counter Increments Illegal parameter to read Illegal Address (02h) Invalid Address Illegal enumeration in index Illegal Data Value (03h) -
Page 653: Table E.32 7Eh Nop Command
Modbus RTU Communications E.19 Communications Protocol 7Eh NOP Command This function code has no operation. This allows a Modbus master to perform a control operation without any other Modbus command. This is only used inside of the 7Dh when no regular Modbus query is necessary. Table E.32 7Eh NOP Command Bytes Field... -
Page 654: Table E.33 Modbus Register Labels For Use With Set M Command
E.20 Modbus RTU Communications Communications Protocol Instruction Manual Table E.33 Modbus Register Labels for Use With SET M Command (Sheet 1 of 5) Register Register Register Register Instruction Manual Address Label Address Label Address Label Address Label SER_NUML QCXL VGY_MAG FPGA RES_316 Q3XH... - Page 655 Modbus RTU Communications E.21 Communications Protocol Table E.33 Modbus Register Labels for Use With SET M Command (Sheet 2 of 5) Register Register Register Register Address Label Address Label Address Label Address Label RES_447 RTD3 IAXMN KVR3XMNL RES_448 RTD4 IBXMX KVA3XMXH RES_449 RTD5...
- Page 656 E.22 Modbus RTU Communications Communications Protocol Table E.33 Modbus Register Labels for Use With SET M Command (Sheet 3 of 5) Register Register Register Register Instruction Manual Address Label Address Label Address Label Address Label RTD12MN AI503MNL MV03L MV25L AI301MXH AI504MXH MV04H MV26H...
- Page 657 Modbus RTU Communications E.23 Communications Protocol Table E.33 Modbus Register Labels for Use With SET M Command (Sheet 4 of 5) Register Register Register Register Address Label Address Label Address Label Address Label SC30 EVE_VCAY EXTIAY PCYL SC31 EVE_VGY EXTIBY P3YH SC32 EVE_VS...
- Page 658 E.24 Modbus RTU Communications Communications Protocol Table E.33 Modbus Register Labels for Use With SET M Command (Sheet 5 of 5) Register Register Register Register Instruction Manual Address Label Address Label Address Label Address Label ROW_4 1019 ROW_48 1063 ROW_92 1107 ROW_136 ROW_5...
-
Page 659: Modbus Register Map
Modbus RTU Communications E.25 Modbus Register Map Reading History Data Using the Modbus Register Map (Table E.34), you can download a complete history of the last 50 events via Modbus. The history contains the date and Using Modbus time stamp, type of event that triggered the report, currents, and voltages at the time of the event. - Page 660 E.26 Modbus RTU Communications Modbus Register Map Table E.34 Modbus Register Map (Sheet 2 of 28) DeviceNet Modbus Register Scale Parameter Address Name/Enums Units Default Factor Numbers Bit 8 = RST DEMAND Bit 9 = RST PEAK DEMAND Bits 10 = RST BKMONX DATA Bits 11 = RST BKMONY DATA Bits 12 = RST SYNC REPORT Bits 13–15 = Reserved...
- Page 661 Modbus RTU Communications E.27 Modbus Register Map Table E.34 Modbus Register Map (Sheet 3 of 28) DeviceNet Modbus Register Scale Parameter Address Name/Enums Units Default Factor Numbers 300 (R) IBY STATUS 301 (R) ICY STATUS 302 (R) IN STATUS 303 (R) VAX STATUS 304 (R) VBX STATUS...
- Page 662 E.28 Modbus RTU Communications Modbus Register Map Table E.34 Modbus Register Map (Sheet 4 of 28) DeviceNet Modbus Register Scale Parameter Address Name/Enums Units Default Factor Numbers 344 (R) 3V2X NSEQ VOLT 65535 0.01 345 (R) V1X PSEQ VOLT 65535 0.01 X-Side Power Data 346 (R)
- Page 663 Modbus RTU Communications E.29 Modbus Register Map Table E.34 Modbus Register Map (Sheet 5 of 28) DeviceNet Modbus Register Scale Parameter Address Name/Enums Units Default Factor Numbers Y-Side Voltage Data 391 (R) VABY 65535 0.01 392 (R) VABY ANGLE –1800 1800 393 (R) VBCY...
- Page 664 E.30 Modbus RTU Communications Modbus Register Map Table E.34 Modbus Register Map (Sheet 6 of 28) DeviceNet Modbus Register Scale Parameter Address Name/Enums Units Default Factor Numbers 437 (R) MVARHNY HI MVRh 65535 0.001 438 (R) MVARHNY LO MVRh 65535 0.001 439 (R) LAST RST TIME—ss...
- Page 665 Modbus RTU Communications E.31 Modbus Register Map Table E.34 Modbus Register Map (Sheet 7 of 28) DeviceNet Modbus Register Scale Parameter Address Name/Enums Units Default Factor Numbers RTD Data 485 (R) MAX WINDING RTD degC –32768 32767 7FFFh = Open 8000h = Short 7FFCh = Comm Fail 7FF8h = Stat Fail...
- Page 666 E.32 Modbus RTU Communications Modbus Register Map Table E.34 Modbus Register Map (Sheet 8 of 28) DeviceNet Modbus Register Scale Parameter Address Name/Enums Units Default Factor Numbers 531 (R) VCAY RMS 65535 0.01 532 (R) IN RMS 65535 533 (R) VS RMS 65535 0.01...
- Page 667 Modbus RTU Communications E.33 Modbus Register Map Table E.34 Modbus Register Map (Sheet 9 of 28) DeviceNet Modbus Register Scale Parameter Address Name/Enums Units Default Factor Numbers 575 (R) KW3PX MIN LO –32768 32767 576 (R) KVAR3PX MAX HI kVAR –32768 32767 577 (R) KVAR3PX MAX LO...
- Page 668 E.34 Modbus RTU Communications Modbus Register Map Table E.34 Modbus Register Map (Sheet 10 of 28) DeviceNet Modbus Register Scale Parameter Address Name/Enums Units Default Factor Numbers 619 (R) RTD10 MIN degC –32768 32767 620 (R) RTD11 MAX degC –32768 32767 621 (R) RTD11 MIN degC...
- Page 669 Modbus RTU Communications E.35 Modbus Register Map Table E.34 Modbus Register Map (Sheet 11 of 28) DeviceNet Modbus Register Scale Parameter Address Name/Enums Units Default Factor Numbers 661 (R) AI502 MX—LO –32768 32767 0.001 662 (R) AI502 MN—HI –32768 32767 0.001 663 (R) AI502 MN—LO...
- Page 670 E.36 Modbus RTU Communications Modbus Register Map Table E.34 Modbus Register Map (Sheet 12 of 28) DeviceNet Modbus Register Scale Parameter Address Name/Enums Units Default Factor Numbers Math Variables 706 (R) MV01—HI –32768 32767 0.01 707 (R) MV01—LO –32768 32767 0.01 708 (R) MV02—HI...
- Page 671 Modbus RTU Communications E.37 Modbus Register Map Table E.34 Modbus Register Map (Sheet 13 of 28) DeviceNet Modbus Register Scale Parameter Address Name/Enums Units Default Factor Numbers 750 (R) MV23—HI –32768 32767 0.01 751 (R) MV23—LO –32768 32767 0.01 752 (R) MV24—HI –32768 32767 0.01...
- Page 672 E.38 Modbus RTU Communications Modbus Register Map Table E.34 Modbus Register Map (Sheet 14 of 28) DeviceNet Modbus Register Scale Parameter Address Name/Enums Units Default Factor Numbers 826 (R) EVENT TYPE 0 = TRIP* 16 = OUT OF STEP TRIP 1 = DIFF 87 TRIP 17 = VOLT/HZ 24 TRIP 2 = REF TRIP...
- Page 673 Modbus RTU Communications E.39 Modbus Register Map Table E.34 Modbus Register Map (Sheet 15 of 28) DeviceNet Modbus Register Scale Parameter Address Name/Enums Units Default Factor Numbers 850 (R) EVENT FREQY 65535 6000 0.01 851 (R) EVNT MAX WDG RTD degC –32768 32767 852 (R)
- Page 674 E.40 Modbus RTU Communications Modbus Register Map Table E.34 Modbus Register Map (Sheet 16 of 28) DeviceNet Modbus Register Scale Parameter Address Name/Enums Units Default Factor Numbers Trip/Warn Data 901 (R) TRIP STATUS LO 65535 1001 Bit 0 = 50 PHASE Bit 1 = 50 GROUND Bit 2 = 50 NEGSEQ Bit 3 = 51 PHASE...
- Page 675 Modbus RTU Communications E.41 Modbus Register Map Table E.34 Modbus Register Map (Sheet 17 of 28) DeviceNet Modbus Register Scale Parameter Address Name/Enums Units Default Factor Numbers 904 (R) WARN STATUS HI 65535 1004 Bit 0 = UNDERVOLT 27P Bit 1 = OVERVOLT 59P Bit 2 = 46 NEGSEQ Bit 3 = VOLTS/HERTZ Bit 4 through Bit 15 = Reserved...
- Page 676 E.42 Modbus RTU Communications Modbus Register Map Table E.34 Modbus Register Map (Sheet 18 of 28) DeviceNet Modbus Register Scale Parameter Address Name/Enums Units Default Factor Numbers 952 (R) PFCY PWR FACTOR –100 0.01 1052 953 (R) PF3Y PWR FACTOR –100 0.01 1053...
- Page 677 Modbus RTU Communications E.43 Modbus Register Map Table E.34 Modbus Register Map (Sheet 19 of 28) DeviceNet Modbus Register Scale Parameter Address Name/Enums Units Default Factor Numbers 976 (R) ROW 5 1076 Bit 0 = 50QY2T Bit 1 = 50QY2P Bit 2 = 50QY1T Bit 3 = 50QY1P Bit 4 = 50GY2T...
- Page 678 E.44 Modbus RTU Communications Modbus Register Map Table E.34 Modbus Register Map (Sheet 20 of 28) DeviceNet Modbus Register Scale Parameter Address Name/Enums Units Default Factor Numbers 982 (R) ROW 11 1082 Bit 0 = 87R Bit 1 = 87R3 Bit 2 = 87R2 Bit 3 = 87R1 Bit 4 = 87U...
- Page 679 Modbus RTU Communications E.45 Modbus Register Map Table E.34 Modbus Register Map (Sheet 21 of 28) DeviceNet Modbus Register Scale Parameter Address Name/Enums Units Default Factor Numbers 988 (R) ROW 17 1088 Bit 0 = 59PY2T Bit 1 = 59PY2 Bit 2 = 59PY1T Bit 3 = 59PY1 Bit 4 = 59PX2T...
- Page 680 E.46 Modbus RTU Communications Modbus Register Map Table E.34 Modbus Register Map (Sheet 22 of 28) DeviceNet Modbus Register Scale Parameter Address Name/Enums Units Default Factor Numbers 994 (R) ROW 23 1094 Bit 0 = RTDFLT Bit 1 = RTDT Bit 2 = 49T Bit 3 = 49A Bit 4 = INADT...
- Page 681 Modbus RTU Communications E.47 Modbus Register Map Table E.34 Modbus Register Map (Sheet 23 of 28) DeviceNet Modbus Register Scale Parameter Address Name/Enums Units Default Factor Numbers 1016 (R) ROW 45 1116 Bit 0 = * Bit 1 = * Bit 2 = * Bit 3 = * Bit 4 = *...
- Page 682 E.48 Modbus RTU Communications Modbus Register Map Table E.34 Modbus Register Map (Sheet 24 of 28) DeviceNet Modbus Register Scale Parameter Address Name/Enums Units Default Factor Numbers 1022 (R) ROW 51 1122 Bit 0 = IN408 Bit 1 = IN407 Bit 2 = IN406 Bit 3 = IN405 Bit 4 = IN404...
- Page 683 Modbus RTU Communications E.49 Modbus Register Map Table E.34 Modbus Register Map (Sheet 25 of 28) DeviceNet Modbus Register Scale Parameter Address Name/Enums Units Default Factor Numbers Relay Elements 2100H (R) FAST STATUS 0 65535 Bit 0 = Faulted Bit 1 = Warning Bit 2 = IN1/IN101 Status Bit 3 = IN2/IN102 Status Bit 4 = IN3/IN401 Status...
- Page 684 E.50 Modbus RTU Communications Modbus Register Map Table E.34 Modbus Register Map (Sheet 26 of 28) DeviceNet Modbus Register Scale Parameter Address Name/Enums Units Default Factor Numbers 2110H (R) FAST STATUS 2 65535 Bit 0 = IN11/IN301 Status Bit 1 = IN12/IN302 Status Bit 2 = IN13/IN303 Status Bit 3 = IN14/IN304 Status Bit 4 = OUT11/OUT301 Status...
- Page 685 Modbus RTU Communications E.51 Modbus Register Map Table E.34 Modbus Register Map (Sheet 27 of 28) DeviceNet Modbus Register Scale Parameter Address Name/Enums Units Default Factor Numbers 3019H (R) MAX/MIN RST DATA 301AH (R) ANA INP DATA 301BH (R) MATH VARIABLES 301CH (R) DEVICE COUNTERS 301DH (R)
- Page 686 E.52 Modbus RTU Communications Modbus Register Map Table E.34 Modbus Register Map (Sheet 28 of 28) DeviceNet Modbus Register Scale Parameter Address Name/Enums Units Default Factor Numbers 400FH (R) PRODUCT SUPPORT BITS Bit 0 = 2nd IO Card installed Bit 1 through Bit 15 = Reserved 4010H (R/W) SETTINGS TIMEOUT 65535 4011H...
-
Page 687: Appendix F: Iec 61850 Communications
Appendix F IEC 61850 Communications Instruction Manual Features The SEL-700G Relay supports the following features using Ethernet and IEC 61850: ➤ SCADA—Connect as many as six simultaneous IEC 61850 MMS client sessions. The SEL-700G also supports as many as six buffered and six unbuffered report control blocks. See the CON Logical Device Table for Logical Node mapping that enables SCADA control via a Manufacturing Messaging Specification (MMS) browser. -
Page 688: Introduction To Iec 61850
IEC 61850 Communications Introduction to IEC 61850 Introduction to IEC 61850 In the early 1990s, the Electric Power Research Institute (EPRI) and the Institute of Electrical and Electronics Engineers, Inc. (IEEE) began to define a Utility Communications Architecture (UCA). They initially focused on inter- control center and substation-to-control center communications and produced the Inter-Control Center Communications Protocol (ICCP) specification. -
Page 689: Iec 61850 Operation
IEC 61850 Communications IEC 61850 Operation The IEC 61850 document set, available directly from the IEC at iec.ch, contains information necessary for successful implementation of this protocol. SEL strongly recommends that anyone involved with the design, installation, configuration, or maintenance of IEC 61850 systems be familiar with the appropriate sections of these documents. -
Page 690: Table F.2 Example Iec 61850 Descriptor Components
IEC 61850 Communications IEC 61850 Operation custom data models. Instead of having to look up data in a profile stored in its database, an IEC 61850 client can simply query an IEC 61850 device and receive a description of all logical devices, logical nodes, and available data. Unlike other Supervisory Control and Data Acquisition (SCADA) protocols that present data as a list of addresses or indices, IEC 61850 presents data with descriptors in a composite notation made up of components. - Page 691 IEC 61850 Communications IEC 61850 Operation IEC 61850 GOOSE objects can quickly and conveniently transfer status, controls, and measured values between peers on an IEC 61850 network. Configure SEL devices to respond to GOOSE messages from other network with Architect software. Also, configure outgoing GOOSE ERATOR messages for SEL devices in Architect.
-
Page 692: Table F.4 Buffered Report Control Block Client Access
IEC 61850 Communications IEC 61850 Operation Reports The SEL-700G supports buffered and unbuffered report control blocks in the report model as defined in IEC 61850-8-1:2004(E). The predefined reports shown in Figure F.1 are available by default via IEC 61850. Figure F.1 SEL-700G Predefined Reports There are 12 report control blocks, six buffered reports and six unbuffered. -
Page 693: Table F.5 Unbuffered Report Control Block Client Access
IEC 61850 Communications IEC 61850 Operation Similarly, for unbuffered reports, connected clients can edit the report parameters shown in Table F.5. Table F.5 Unbuffered Report Control Block Client Access User changeable User changeable RCB Attribute Default Values (Report Disabled) (Report Enabled) RptId URep01–URep06 RptEna... -
Page 694: Figure F.2 Sel-700G Datasets
IEC 61850 Communications IEC 61850 Operation Datasets Datasets are configured using Architect and contain data ERATOR attributes that represent real data values within the SEL-700G device. See Logical Nodes for the logical node tables that list the available data attributes for each logical node and the Relay Word bit mapping for these data attributes. -
Page 695: Figure F.3 Goose Quality
IEC 61850 Communications IEC 61850 Operation The time stamp is applied to all data and quality attributes (Boolean, Bstrings, Analogs, etc.) in the same fashion when the relay detects a data or quality change. However, there is a difference in how the relay detects the change between the different attribute types. - Page 696 F.10 IEC 61850 Communications IEC 61850 Operation GOOSE Processing SEL devices support GOOSE processing as defined by IEC 61850-7-1:2003(E), IEC 61850-7-2:2003(E), and IEC 61850-8-1:2004(E) via the installed Ethernet port. Outgoing GOOSE messages are processed in accordance with the following constraints: ➤...
-
Page 697: Iec 61850 Configuration
IEC 61850 Communications F.11 IEC 61850 Configuration ➢ Test Mode—this Boolean parameter of the incoming GOOSE is true. ➢ Decode Error—the format of the incoming GOOSE is not as configured. ➤ The SEL-700G discards incoming GOOSE under the following conditions: ➢... - Page 698 F.12 IEC 61850 Communications IEC 61850 Configuration outgoing GOOSE messages or creates new ones for each IED. The user can also select incoming GOOSE messages for each IED to receive from any other IEDs in the domain. Some measured values are reported to IEC 61850 only when the value changes beyond a defined dead-band value.
-
Page 699: Logical Node Extensions
IEC 61850 Communications F.13 Logical Node Extensions Logical Node Extensions The following Logical Nodes and Data Classes were created in this device as extensions to the IEC 61850 standard, in accordance with IEC 61850 guidelines. Table F.7 New Logical Node Extensions Logical Node Description or Comments 61850... -
Page 700: Table F.9 Demand Metering Statistics Logical Node Class Definition
F.14 IEC 61850 Communications Logical Node Extensions Table F.8 Thermal Metering Data Logical Node Class Definition (Sheet 2 of 2) Common Data Object M/O/C/E Data Explanation Name Class Tmp09 Temperature 9 Tmp10 Temperature 10 Tmp11 Temperature 11 Tmp12 Temperature 12 Transient data objects–the status of data objects with this designation is momentary and must be logged or reported to provide evidence of their momentary state. -
Page 701: Table F.10 Circuit Breaker Supervision (Per-Phase) Logical Node Class Definition
IEC 61850 Communications F.15 Logical Node Extensions Table F.10 Circuit Breaker Supervision (Per-Phase) Logical Node Class Definition Common Data Object Data Explanation M/O/C/E Name Class SCBR Class LNName The name shall be composed of the class name, LN-Prefix, and LN- Instance-ID according to IEC 61850-7-2. - Page 702 F.16 IEC 61850 Communications Logical Node Extensions Table F.12 Measurement Logical Node Class Definition (Sheet 2 of 2) Common Data Object Data Explanation M/O/C/E Name Class Phase-to-phase voltages Phase-to-ground voltages Phase currents Synchronizing Frequency Volts-per-Hz Field Insulation Resistance Transient data objects–the status of data objects with this designation is momentary and must be logged or reported to provide evidence of their momentary state.
-
Page 703: Table F.14 Metering Statistics Logical Node Class Definition
IEC 61850 Communications F.17 Logical Node Extensions Table F.14 Metering Statistics Logical Node Class Definition Common Data Object Data Explanation M/O/C/E Name Class MSTA Class LNName The name shall be composed of the class name, LN-Prefix, and LN- Instance-ID according to IEC 61850-7-2. Common Logical Node Information LN shall inherit all Mandatory Data from Common Logical Node Class. -
Page 704: Logical Nodes
F.18 IEC 61850 Communications Logical Nodes Table F.15 Circuit Breaker Logical Node Class Definition (Sheet 2 of 2) Common Data Object Data Explanation M/O/C/E Name Class Measured and Metered Values Switch position BlkOpn Block opening BlkCls Block closing Transient data objects–the status of data objects with this designation is momentary and must be logged or reported to provide evidence of their momentary state. - Page 705 IEC 61850 Communications F.19 Logical Nodes Table F.16 Logical Device: PRO (Protection) (Sheet 2 of 11) Logical Node Attribute Data Source Comment BYCSWI2 Pos.stVal 52AY?1:2 Breaker Y position (52A = false, breaker opened; 52A = true, breaker closed) BYRBRF2 OpEx.general BFTY 52Y breaker failure trip BYRBRF2...
- Page 706 F.20 IEC 61850 Communications Logical Nodes Table F.16 Logical Device: PRO (Protection) (Sheet 3 of 11) Logical Node Attribute Data Source Comment DXPTOF1 Str.general 81X1T X-Side, Level 1, over- and underfrequency element DXPTOF1 Str.dirGeneral unknown Direction undefined DXPTOF13 Op.general 81XT ORed, X-side, over- and underfrequency elements DXPTOF13 Str.general...
- Page 707 IEC 61850 Communications F.21 Logical Nodes Table F.16 Logical Device: PRO (Protection) (Sheet 4 of 11) Logical Node Attribute Data Source Comment DYPTOF9 Str.general 81Y3T Y-Side, Level 3, over- and underfrequency element DYPTOF9 Str.dirGeneral unknown Direction undefined F1PTOC18 Op.general 64F1T Level 1 field ground protection element timed out F1PTOC18 Str.general...
- Page 708 F.22 IEC 61850 Communications Logical Nodes Table F.16 Logical Device: PRO (Protection) (Sheet 5 of 11) Logical Node Attribute Data Source Comment GY1PIOC15 Str.dirGeneral unknown Direction undefined GY1PTOC3 Op.general 67GY1T Y-Side, Level 1 residual ground directional overcurrent trip GY1PTOC3 Str.general 67GY1P Y-Side, Level 1 residual ground directional overcurrent pickup GY1PTOC3...
- Page 709 IEC 61850 Communications F.23 Logical Nodes Table F.16 Logical Device: PRO (Protection) (Sheet 6 of 11) Logical Node Attribute Data Source Comment LOPYPTUV6 Op.general LOPY Y-side loss of potential LOPYPTUV6 Str.general LOPY Y-side loss of potential LOPYPTUV6 Str.dirGeneral unknown Direction undefined N1PIOC11 Op.general 50N1T...
- Page 710 F.24 IEC 61850 Communications Logical Nodes Table F.16 Logical Device: PRO (Protection) (Sheet 7 of 11) Logical Node Attribute Data Source Comment P51VPVOC2 Op.general 51VT Voltage-Restrained Phase Time-Overcurrent Element 51VT timed out P51VPVOC2 Str.general Voltage-restrained phase time-overcurrent element pickup P51VPVOC2 Str.dirGeneral unknown Direction unknown due to settings...
- Page 711 IEC 61850 Communications F.25 Logical Nodes Table F.16 Logical Device: PRO (Protection) (Sheet 8 of 11) Logical Node Attribute Data Source Comment PY1PTOV3 Op.general 59PY1T Y-Side, Level 1 phase overvoltage element trip PY1PTOV3 Str.general 59PY1 Y-Side, Level 1 phase overvoltage element pickup PY1PTOV3 Str.dirGeneral unknown...
- Page 712 F.26 IEC 61850 Communications Logical Nodes Table F.16 Logical Device: PRO (Protection) (Sheet 9 of 11) Logical Node Attribute Data Source Comment QX1PIOC17 Str.general 50QX1P X-Side, Level 1 negative-sequence instantaneous overcurrent element pickup QX1PIOC17 Str.dirGeneral unknown Direction undefined QX1PTOV5 Op.general 59QX1T X-Side, Level 1 negative-sequence overvoltage element trip QX1PTOV5...
- Page 713 IEC 61850 Communications F.27 Logical Nodes Table F.16 Logical Device: PRO (Protection) (Sheet 10 of 11) Logical Node Attribute Data Source Comment REF1PPDIF4 Op.general REF1P Restricted earth fault inverse-time O/C element timed out REF1PPDIF4 Str.general REF1F REF element forward (internal) fault declaration REF1PPDIF4 Str.dirGeneral REF1F?0:1...
-
Page 714: Table F.17 Logical Device: Met (Metering)
F.28 IEC 61850 Communications Logical Nodes Table F.16 Logical Device: PRO (Protection) (Sheet 11 of 11) Logical Node Attribute Data Source Comment S1PTOV13 Op.general 59S1T Level 1 sync overvoltage element trip S1PTOV13 Str.general 59S1 Level 1 sync overvoltage element pickup S1PTOV13 Str.dirGeneral unknown... - Page 715 IEC 61850 Communications F.29 Logical Nodes Table F.17 Logical Device: MET (Metering) (Sheet 2 of 7) Logical Node Attribute Data Source Comment METXMDST1 DmdA.nseq.instCVal.mag.f 3I2XD X-side negative-sequence current demand METXMDST1 DmdVArh.instMag.f MVARHNX Reactive energy, 3-phase negative X-side METXMDST1 DmdWh.instMag.f MWHNX Real energy, 3-phase negative X-side METXMDST1 PkDmdA.phsA.instCVal.mag.f...
- Page 716 F.30 IEC 61850 Communications Logical Nodes Table F.17 Logical Device: MET (Metering) (Sheet 3 of 7) Logical Node Attribute Data Source Comment METXMMXU1 TotPF.instMag.f PF3X X-side power factor, magnitude 3-phase METXMMXU1 TotVA.instMag.f X-side apparent power magnitude, 3-phase METXMMXU1 TotVAr.instMag.f X-side reactive power magnitude, 3-phase METXMMXU1 TotW.instMag.f X-side real power magnitude, 3-phase...
- Page 717 IEC 61850 Communications F.31 Logical Nodes Table F.17 Logical Device: MET (Metering) (Sheet 4 of 7) Logical Node Attribute Data Source Comment METXMSTA1 MinP2PV.phsBC.instCVal.mag.f VBCXMN X-side voltage, B-to-C-phase, minimum magnitude METXMSTA1 MinP2PV.phsCA.instCVal.mag.f VCAXMN X-side voltage, C-to-A-phase, minimum magnitude METXMSTA1 MinPhV.phsA.instCVal.mag.f VAXMN X-side voltage, A-phase-to-neutral, minimum magnitude METXMSTA1...
- Page 718 F.32 IEC 61850 Communications Logical Nodes Table F.17 Logical Device: MET (Metering) (Sheet 5 of 7) Logical Node Attribute Data Source Comment METYMMXU2 PhV.res.instCVal.ang.f VGY_ANG Y-side zero-sequence voltage, angle METYMMXU2 PhV.res.instCVal.mag.f VGY_MAG Y-side zero-sequence voltage, magnitude METYMMXU2 PPV.phsAB.instCVal.ang.f VABY_ANG Y-side voltage, A-to-B-phase, angle METYMMXU2 PPV.phsAB.instCVal.mag.f VABY_MAG...
- Page 719 IEC 61850 Communications F.33 Logical Nodes Table F.17 Logical Device: MET (Metering) (Sheet 6 of 7) Logical Node Attribute Data Source Comment METYMSTA2 MaxVAr.instMag.f KVAR3YMX Y-side reactive power magnitude, 3-phase, maximum METYMSTA2 MaxW.instMag.f KW3YMX Y-side real power magnitude, 3-phase, maximum METYMSTA2 MinA.phsA.instCVal.mag.f IAYMN...
-
Page 720: Table F.18 Logical Device: Con (Remote Control)
F.34 IEC 61850 Communications Logical Nodes Table F.17 Logical Device: MET (Metering) (Sheet 7 of 7) Logical Node Attribute Data Source Comment THERMMTHR1 MaxOthTmp.instMag.f RTDOTHMX Other maximum RTD temperature THERMMTHR1 Tmp01.instMag.f– RTD1–RTD12 RTD1–RTD12 temperature Tmp12.instMag.f Functional Constraint = ST THERMMTHR1 EEHealth.stVal RTDFLT?1:3 RTD input or communication status... - Page 721 IEC 61850 Communications F.35 Logical Nodes Table F.19 Logical Device: ANN (Annunciation) (Sheet 2 of 5) Logical Node Attribute Data Source Comment MVGGIO12 AnIn01.instMag.f– MV01–MV32 Math Variables (MV01 to MV32) AnIn32.instMag.f SCGGIO20 AnIn01.instMag.f– SC01–SC32 SELOGIC Counters (SC01 to SC32) AnIn32.instMag.f Functional Constraint = ST BWXASCBR1 ColOpn.stVal...
- Page 722 F.36 IEC 61850 Communications Logical Nodes Table F.19 Logical Device: ANN (Annunciation) (Sheet 3 of 5) Logical Node Attribute Data Source Comment INEGGIO17 Ind01.stVal–Ind08.stVal IN501–IN508 Digital Inputs (IN501 to IN508)—Slot E LBGGIO25 Ind01.stVal–Ind32.stVal LB01–LB32 Local Bits (LB01 to LB32) LTGGIO5 Ind01.stVal–Ind32.stVal LT01–LT32 Latch Bits (LT01 to LT32)
- Page 723 IEC 61850 Communications F.37 Logical Nodes Table F.19 Logical Device: ANN (Annunciation) (Sheet 4 of 5) Logical Node Attribute Data Source Comment RMBAGGIO8 Ind01.stVal–Ind08.stVal RMB1A–RMB8A Receive M (RMB1A to RMB8A) IRRORED RMBBGGIO10 Ind01.stVal–Ind08.stVal RMB1B–RMB8B Receive M (RMB1B to RMB8B) IRRORED SVGGIO3 Ind01.stVal–Ind32.stVal SV01–SV32...
-
Page 724: Protocol Implementation Conformance Statement
F.38 IEC 61850 Communications Protocol Implementation Conformance Statement Table F.19 Logical Device: ANN (Annunciation) (Sheet 5 of 5) Logical Node Attribute Data Source Comment TLEDGGIO6 Ind03.stVal–Ind08.stVal TLED_01–TLED_06 Target LEDs TLED_01 to TLED_06 TMBAGGIO9 Ind01.stVal–Ind08.stVal TMB1A–TMB8A Transmit M (TMB1A to TMB8A) IRRORED TMBBGGIO11 Ind01.stVal–Ind08.stVal... -
Page 725: Table F.23 Mms Service Supported Conformance
IEC 61850 Communications F.39 Protocol Implementation Conformance Statement MMS Conformance The Manufacturing Messaging Specification (MMS) stack provides the basis for many IEC 61850 Protocol services. Table F.23 defines the service support requirement and restrictions of the MMS services in the SEL-700 series products supporting IEC 61850. - Page 726 F.40 IEC 61850 Communications Protocol Implementation Conformance Statement Table F.23 MMS Service Supported Conformance (Sheet 2 of 3) MMS Service Supported CBB Client-CR Supported Server-CR Supported start stop resume reset kill getProgramInvocationAttributes obtainFile defineEventCondition deleteEventCondition getEventConditionAttributes reportEventConditionStatus alterEventConditionMonitoring triggerEvent defineEventAction deleteEventAction alterEventEnrollment reportEventEnrollmentStatus...
-
Page 727: Table F.24 Mms Parameter Cbb
IEC 61850 Communications F.41 Protocol Implementation Conformance Statement Table F.23 MMS Service Supported Conformance (Sheet 3 of 3) MMS Service Supported CBB Client-CR Supported Server-CR Supported reportAccessControlledObjects deleteAccessControlList alterAccessControl ReconfigureProgramInvocation Table F.24 lists specific settings for the MMS parameter Conformance Building Block (CBB). -
Page 728: Table F.26 Variableaccessspecification Conformance Statement
F.42 IEC 61850 Communications Protocol Implementation Conformance Statement Table F.26 VariableAccessSpecification Conformance Statement VariableAccessSpecification Client-CR Supported Server-CR Supported listOfVariable variableSpecification alternateAccess variableListName Table F.27 VariableSpecification Conformance Statement VariableSpecification Client-CR Supported Server-CR Supported name address variableDescription scatteredAccessDescription invalidated Table F.28 Read Conformance Statement Read Client-CR Supported Server-CR Supported... -
Page 729: Table F.31 Getnamedvariablelistattributes Conformance Statement
IEC 61850 Communications F.43 Protocol Implementation Conformance Statement Table F.30 DefineNamedVariableList Conformance Statement (Sheet 2 of 2) Client-CR Supported Server-CR Supported DefineVariableAccessAttributes variableSpecification alternateAccess Response Table F.31 GetNamedVariableListAttributes Conformance Statement Client-CR Supported Server-CR Supported GetNamedVariableListAttributes Request ObjectName Response mmsDeletable listOfVariable variableSpecification alternateAccess Table F.32 DeleteNamedVariableList... -
Page 730: Acsi Conformance Statements
F.44 IEC 61850 Communications ACSI Conformance Statements ACSI Conformance Statements Table F.34 ACSI Basic Conformance Statement Client/Subscriber Server/Publisher SEL-700G Support Client-Server Roles Server side (of Two-Party Application-Association) Client side (of Two-Party Application-Association) SCMS Supported SCSM: IEC 61850-8-1 used SCSM: IEC 61850-9-1 used SCSM: IEC 61850-9-2 used SCSM: other Generic Substation Event Model (GSE) -
Page 731: Table F.36 Acsi Services Conformance Statement
IEC 61850 Communications F.45 ACSI Conformance Statements Table F.35 ACSI Models Conformance Statement (Sheet 2 of 2) Client/Subscriber Server/Publisher SEL-700G Support M7-10 Unbuffered report control M8-1 sequence-number M8-2 report-time-stamp M8-3 reason-for-inclusion M8-4 data-set-name M8-5 data-reference M8-6 BufTm M8-7 IntgPd M-8-8 Logging Log control M9-1... - Page 732 F.46 IEC 61850 Communications ACSI Conformance Statements Table F.36 ACSI Services Conformance Statement (Sheet 2 of 4) Client/ Service/ SEL-700G Services AA: TP/MC Subscriber Publisher Support Logical Device (Clause 8) LogicalDeviceDirectory Logical Node (Clause 9) LogicalNodeDirectory GetAllDataValues Data (Clause 10) GetDataValues SetDataValues GetDataDirectory...
- Page 733 IEC 61850 Communications F.47 ACSI Conformance Statements Table F.36 ACSI Services Conformance Statement (Sheet 3 of 4) Client/ Service/ SEL-700G Services AA: TP/MC Subscriber Publisher Support Logging (Clause 14) Log Control Block GetLCBValues SetLCBValues QueryLogByTime QueryLogByEntry GetLogStatusValues Generic Substation Event Model (GSE) (Clause 14.3.5.3.4) GOOSE-Control-Block SendGOOSEMessage GetReference...
- Page 734 F.48 IEC 61850 Communications ACSI Conformance Statements Table F.36 ACSI Services Conformance Statement (Sheet 4 of 4) Client/ Service/ SEL-700G Services AA: TP/MC Subscriber Publisher Support Command-Termination TimeActivated-Operate File Transfer (Clause 20) GetFile SetFile DeleteFile GetFileAttributeValues Time (Clause 5.5) Time resolution of internal 20 (1 µs) clock (nearest negative power of 2 in seconds)
-
Page 735: Appendix G: Devicenet Communications
Appendix G DeviceNet Communications Instruction Manual Overview This appendix describes DeviceNet communications features supported by the SEL-700G Generator and Intertie Protection Relay. DeviceNet is a low-level communications network that provides direct connectivity among industrial devices, resulting in improved communication and device-level diagnostics that are otherwise either unavailable or inaccessible through expensive hardwired I/O interfaces. -
Page 736: Features
DeviceNet Communications Features Features The DeviceNet Card features the following: ➤ The card receives the necessary power from the DeviceNet network. ➤ Rotary switches let you set the node address and network data rate prior to mounting in the SEL-700G and applying power. Alternatively, the switches can be set to positions that allow for configuration of these settings over the DeviceNet network, utilizing a network configuration tool such as RSNetWorx for... -
Page 737: Electronic Data Sheet
DeviceNet Communications Electronic Data Sheet Electronic Data Sheet The Electronic Data Sheet (EDS) is a specially formatted file that includes configurable parameters for the device and public interfaces to those parameters. The EDS file contains information such as number of parameters; groupings;... - Page 738 This page intentionally left blank...
-
Page 739: Appendix H Synchrophasors
Appendix H Synchrophasors Instruction Manual Overview The SEL-700G Relay provides Phasor Measurement Unit (PMU) capabilities when connected to an IRIG-B time source with an accuracy of ±10 µs or better. Synchrophasor data are available via the MET PM ASCII command and the C37.118 Protocol. -
Page 740: Synchrophasor Measurement
Synchrophasors Synchrophasor Measurement ➤ Small-signal analysis ➤ Power-system disturbance analysis The SEL-3306 Synchrophasor Processor is a PC-based communications processor specifically designed to interface with PMUs. The SEL-3306 has two primary functions. The first is to collect and correlate synchrophasor data from multiple PMUs. -
Page 741: Figure H.2 Waveform At Relay Terminals May Have A Phase Shift
Synchrophasors Synchrophasor Measurement Δt 94.851 Measured Waveform –94.851 Actual Waveform Figure H.2 Waveform at Relay Terminals May Have a Phase Shift t Compensation Angle --------------------------------- - • 360 ---------------------------- freq nominal t • freq • 360 nominal Equation H.1 If the time shift on the PT measurement path t... -
Page 742: Settings For Synchrophasors
Synchrophasors Settings for Synchrophasors Settings for Synchrophasors The phasor measurement unit (PMU) settings are listed in Table H.1. Modify these settings when you want to use the C37.118 synchrophasor protocol. The Global enable setting EPMU must be set to Y before the remaining SEL-700G synchrophasor settings are available. - Page 743 Synchrophasors Settings for Synchrophasors Table H.1 PMU Settings in the SEL-700G for C37.118 Protocol in Global Settings (Sheet 2 of 2) Setting Description Default NUMDSW Number of 16-bit Digital Status Words (0, 1) TREA1 Trigger Reason Bit 1 (SEL TRIP OR ER OGIC TREA2 Trigger Reason Bit 2 (SEL...
- Page 744 Synchrophasors Settings for Synchrophasors PMSTN and PMID Defines the name and number of the PMU. The PMSTN setting is an ASCII string with as many as 16 characters. The PMID setting is a numeric value. Use your utility or synchrophasor data concentrator naming convention to determine these settings.
-
Page 745: Table H.2 Synchrophasor Order In Data Stream (Voltages And Currents)
Synchrophasors Settings for Synchrophasors PHCURR PHCURR selects which current side (X or Y or Both) to include in the data packet. Consider the burden on your synchrophasor processor and offline storage requirements when deciding how much data to transmit. This setting is one of the seven settings that determine the minimum port SPEED necessary to support the synchrophasor data packet rate and size. -
Page 746: Table H.3 User-Defined Analog Values Selected By The Numana Setting
Synchrophasors Settings for Synchrophasors The choices for this setting depend on the synchrophasor system design. ➤ Setting NUMANA := 0 sends no user-definable analog values. ➤ Setting NUMANA := 1–4 sends the user-definable analog values, as listed in Table H.3. The format of the user-defined analog data is always floating point, and each value occupies four bytes. -
Page 747: Serial Port Settings For Ieee C37.118 Synchrophasors
Synchrophasors Serial Port Settings for IEEE C37.118 Synchrophasors The SEL-700G automatically sets the TREA1–TREA4 or PMTRIG Relay Word bits based on their default SEL control equation. To change the OGIC operation of these bits they must be programmed. You can use these bits to send various messages at a low bandwidth via the synchrophasor message stream. -
Page 748: Ethernet Port Settings For Ieee C37.118 Synchrophasors
H.10 Synchrophasors Ethernet Port Settings for IEEE C37.118 Synchrophasors Ethernet Port Settings for IEEE C37.118 Synchrophasors IEEE C37.118 compliant synchrophasors are available via serial or Ethernet port. The associated Ethernet port settings are shown in Table H.6. Ethernet port setting EPMIP cannot be set when Global setting EPMU := N. Synchrophasors must be enabled (EPMU := Y) before EPMIP can be set. -
Page 749: Figure H.4 Tcp Connection
Synchrophasors H.11 Ethernet Port Settings for IEEE C37.118 Synchrophasors PMOTS1 and PMOTS2 These settings select the PMU Output Transport Scheme for Session 1 and Session 2, respectively. PMOTSn := TCP This setting establishes a single, persistent TCP socket for transmitting and receiving synchrophasor messages (both commands and data), as illustrated in Figure H.4. -
Page 750: Synchrophasor Relay Word Bits
H.12 Synchrophasors Synchrophasor Relay Word Bits PMOTSn := UDP_S This setting establishes a single persistent UDP socket to transmit NOTE: The UDP setting options synchrophasor messages. Synchrophasor data are transmitted whenever new (UDP_T, UDP_U, and UDP_S) allow for data are read. With this communications scheme, the relay sends a both Multicast and Unicast IP addresses. -
Page 751: Table H.8 Time-Synchronization Relay Word Bits
Synchrophasors H.13 Synchrophasor Relay Word Bits Table H.8 Time-Synchronization Relay Word Bits Name Description IRIGOK Asserts while relay time is based on IRIG-B time source. TSOK Time Synchronization OK. Asserts while time is based on an IRIG-B time source of sufficient accuracy for synchrophasor measurement. PMDOK Phasor measurement data OK. -
Page 752: View Synchrophasors Using The Met Pm Command
H.14 Synchrophasors View Synchrophasors Using the MET PM Command Table H.9 TQUAL Bits Translation to Time Quality (Sheet 2 of 2) TQUAL8 TQUAL4 TQUAL2 TQUAL1 Value Time Quality 10 milliseconds 100 milliseconds 1 second 10 seconds 100 seconds 1000 seconds 10000 seconds Fault The Relay Word bit PMDOK indicates that the phasor measurement data are... -
Page 753: C37.118 Synchrophasor Protocol
Synchrophasors H.15 C37.118 Synchrophasor Protocol Figure H.7 shows a sample MET PM command response. The synchrophasor data are also available via the HMI > Meter PM menu in QuickSet, and have a similar format to Figure H.7. You can use the MET PM time command to direct the SEL-700G to display the synchrophasor for an exact specified time, in 24-hour format. -
Page 754: Table H.10 Frequency Tracking Side And Quantity Based On The Sel-700G Model
H.16 Synchrophasors C37.118 Synchrophasor Protocol Settings Affect The SEL-700G allows several options for transmitting synchrophasor data. These are controlled by Global settings described in Settings for Message Contents Synchrophasors on page H.4. You can select how often to transmit the synchrophasor messages (MRATE) and which synchrophasors to transmit (PHDATAV and PHDATAI). -
Page 755: Table H.11 Size Of A C37.118 Synchrophasor Message
Synchrophasors H.17 C37.118 Synchrophasor Protocol Table H.11 Size of a C37.118 Synchrophasor Message Bytes Number of Bytes Possible Number Item of Quantities Minimum Maximum Quantity Fixed Synchrophasors 0–18 Frequency/DFDT 2 (fixed) Analog Values 0–4 Digital Status Words 0–1 Total (Minimum and Maximum) Table H.12 lists the data settings available on any SEL-700G serial port (setting SPEED), and the maximum message size that can fit within the port bandwidth. -
Page 756: Ieee C37.118 Pmu Setting Example
H.18 Synchrophasors IEEE C37.118 PMU Setting Example controls the PMU functions of the SEL-700G, with IEEE C37.118 commands, including commands to start and stop synchrophasor data transmission, and commands to request a configuration block from the relay, so the synchrophasor processor can automatically build a database structure. The SEL-700G does not begin transmitting synchrophasors until an enable message is received from the synchrophasor processor. -
Page 757: Table H.13 Example Synchrophasor Global Settings
Synchrophasors H.19 IEEE C37.118 PMU Setting Example The protection settings are not shown. The protection engineer performs a bandwidth check, using Table H.11, and determines the necessary message size. The system requirements, in order of appearance in Table H.11, are: ➤... -
Page 758: Table H.15 Example Synchrophasor Sel Ogic Settings
H.20 Synchrophasors IEEE C37.118 PMU Setting Example The three Relay Word bits this example requires must be placed in certain SEL OGIC variables. Make the settings in Table H.15 in all seven setting groups. Table H.15 Example Synchrophasor SEL Settings OGIC Setting Value... -
Page 759: Appendix I: Mirrored Bits Communications
Appendix I Communications IRRORED Instruction Manual Overview is a direct relay-to-relay communications protocol that allows IRRORED IEDs to exchange information quickly, securely, and with minimal expense. Use M for functions such as remote control and remote sensing. IRRORED The SEL-700G Generator and Intertie Protection Relay supports two communications channels, designated A and B. - Page 760 Communications IRRORED Operation Table I.1 Number of M Messages for Different Data Rates IRRORED NOTE: Exercise caution when applying a M channel to IRRORED Data Rate Transmission Rate of M Packets relays that protect systems that may IRRORED not be synchronized, as the 2400 15 ms automatic pacing modes operate...
- Page 761 Communications IRRORED Operation Table I.2 Positions of the M IRRORED Bit/ RMB8A RMB7A RMB6A RMB5A RMB4A RMB3A RMB2A RMB1A RMB8B RMB7B RMB6B RMB5B RMB4B RMB3B RMB2B RMB1B Table I.3 shows an example of the values of the M for a IRRORED RXDFLT setting of 10100111.
- Page 762 Communications IRRORED Operation In summary, when a relay detects an error, it transmits an attention message until it receives an attention message with its own TX_ID included. If three or four relays are connected in a ring topology, the attention message goes all the way around the loop until the originating relay receives it.
-
Page 763: Settings
Communications IRRORED Settings Use the CBADPU setting to determine the ratio of channel down time to the total channel time before the meter element CBADA is asserted. The times used in the calculation are those that are available in the COM records. See the COMMUNICATIONS Command in Section 7: Communications for more information. - Page 764 Communications IRRORED Settings Table I.5 M Protocol Settings (Sheet 2 of 2) IRRORED Factory- Setting Setting Description Default Prompt Setting RMB2DO RMB2 Dropout Debounce Messages (1–8 messages) RMB3PU RMB3 Pickup Debounce Messages (1–8 messages) RMB3DO RMB3 Dropout Debounce Messages (1–8 messages) RMB4PU RMB4 Pickup Debounce Messages (1–8 messages) RMB4DO...
-
Page 765: Table J.1 Sel-700G Relay Word Bits
Appendix J Relay Word Bits Instruction Manual Overview The protection and control element results are represented by Relay Word bits in the SEL-700G Relay. Each Relay Word bit has a label name and can be in either of the following states: ➤... -
Page 766: Appendix J: Relay Word Bits Overview
Relay Word Bits Overview Table J.1 SEL-700G Relay Word Bits (Sheet 2 of 5) Relay Word Bits Bit/ 87N1 87N1T 87N2 87N2T 40Z1 40Z1T 40Z2 40Z2T 50NREF1 REF1EN 50GREF1 REF1F REF1R REF1P REF1BYP 64G1 64G1T 64G2 64G2T T64G N64G 51CT 64F1 64F1T 64F2... - Page 767 Relay Word Bits Overview Table J.1 SEL-700G Relay Word Bits (Sheet 3 of 5) Relay Word Bits Bit/ IN501 IN502 IN503 IN504 IN505 IN506 IN507 IN508 LINKA LINKB PMDOK SALARM WARNING TSOK IRIGOK FAULT 87AP 87AT LOPX LOPY CFGFLT LINKFAIL PASEL PBSEL ZLOUTY...
- Page 768 Relay Word Bits Overview Table J.1 SEL-700G Relay Word Bits (Sheet 4 of 5) Relay Word Bits Bit/ SC09QU SC10QU SC11QU SC12QU SC13QU SC14QU SC15QU SC16QU SC09QD SC10QD SC11QD SC12QD SC13QD SC14QD SC15QD SC16QD SC17QU SC18QU SC19QU SC20QU SC21QU SC22QU SC23QU SC24QU SC17QD...
-
Page 769: Table J.2 Hidden Overcurrent Element Relay Word Bits Per The Sel-700G Model
Relay Word Bits Overview Table J.1 SEL-700G Relay Word Bits (Sheet 5 of 5) Relay Word Bits Bit/ DI_A1 DI_B1 DI_C1 DI_A2 DI_B2 DI_C2 FSYNCACT VSYNCACT TQUAL8 TQUAL4 TQUAL2 TQUAL1 DSTP LPSEC LPSECP FDIRPY RDIRPY TUTCS TUTC1 TUTC2 TUTC4 TUTC8 TUTCH 50QFX 50QRX... - Page 770 Relay Word Bits Overview Table J.2 Hidden Overcurrent Element Relay Word Bits Per the SEL-700G Model (Sheet 2 of 3) SEL-700G Model SEL-700G0/G0+ SEL-700G1/G1+ SEL-700GT SEL-700GT+ SEL-700GW 50PX3AP HIDDEN 50PX3AT HIDDEN 50PX3BP HIDDEN 50PX3BT HIDDEN 50PX3CP HIDDEN 50PX3CT HIDDEN ORED50T 50PY3AP HIDDEN 50PY3AT...
-
Page 771: Definitions
Relay Word Bits Definitions Table J.2 Hidden Overcurrent Element Relay Word Bits Per the SEL-700G Model (Sheet 3 of 3) SEL-700G Model SEL-700G0/G0+ SEL-700G1/G1+ SEL-700GT SEL-700GT+ SEL-700GW 67PY1P HIDDEN HIDDEN HIDDEN 67PY1T HIDDEN HIDDEN HIDDEN 67PY2P HIDDEN HIDDEN HIDDEN 67PY2T HIDDEN HIDDEN HIDDEN... - Page 772 Relay Word Bits Definitions Table J.3 Relay Word Bit Definitions for the SEL-700G (Sheet 2 of 22) Definition 21C2P Zone 2 compensator distance element instantaneous pickup 21C2T Zone 2 compensator distance element timed out 24C2 Level 2 volts/hertz composite element pickup 24C2T Level 2 volts/hertz composite element timed out 24CR...
- Page 773 Relay Word Bits Definitions Table J.3 Relay Word Bit Definitions for the SEL-700G (Sheet 3 of 22) Definition 27V1X2 X-side Level 2 positive-sequence undervoltage element pickup 27V1X2T X-side Level 2 positive-sequence undervoltage element trip 27V1X3 X-side Level 3 positive-sequence undervoltage element pickup 27V1X3T X-side Level 3 positive-sequence undervoltage element trip 27V1X4...
- Page 774 J.10 Relay Word Bits Definitions Table J.3 Relay Word Bit Definitions for the SEL-700G (Sheet 4 of 22) Definition 40Z1 Zone 1 instantaneous loss-of-field mho element 40Z1T Zone 1 time-delayed loss-of-field mho element 40Z2 Zone 2 instantaneous loss-of-field mho element 40Z2T Zone 2 time-delayed loss-of-field mho element 46Q1...
- Page 775 Relay Word Bits J.11 Definitions Table J.3 Relay Word Bit Definitions for the SEL-700G (Sheet 5 of 22) Definition 50PDIRY Three-phase overcurrent threshold exceeded 50PX1P X-side Level 1 phase instantaneous overcurrent element pickup 50PX1T X-side Level 1 phase instantaneous overcurrent element trip 50PX2P X-side Level 2 phase instantaneous overcurrent element pickup 50PX2T...
- Page 776 J.12 Relay Word Bits Definitions Table J.3 Relay Word Bit Definitions for the SEL-700G (Sheet 6 of 22) Definition 51CR Voltage-controlled phase time-overcurrent element 51CT fully reset 51CT Voltage-controlled phase time-overcurrent element 51CT timed out 51GXP X-side residual-ground time-overcurrent element pickup 51GXR X-side residual-ground time-overcurrent element reset 51GXT...
- Page 777 Relay Word Bits J.13 Definitions Table J.3 Relay Word Bit Definitions for the SEL-700G (Sheet 7 of 22) Definition 59GY2 Y-side Level 2 residual-ground overvoltage element pickup 59GY2T Y-side Level 2 residual-ground overvoltage element trip 59PPX1 X-side Level 1 phase-to-phase overvoltage element pickup 59PPX1T X-side Level 1 phase-to-phase overvoltage element trip 59PPX2...
- Page 778 J.14 Relay Word Bits Definitions Table J.3 Relay Word Bit Definitions for the SEL-700G (Sheet 8 of 22) Definition 59V1X3 X-side Level 3 positive-sequence overvoltage element pickup 59V1X3T X-side Level 3 positive-sequence overvoltage element trip 59V1X4 X-side Level 4 positive-sequence overvoltage element pickup 59V1X4T X-side Level 4 positive-sequence overvoltage element trip 59V1X5...
- Page 779 Relay Word Bits J.15 Definitions Table J.3 Relay Word Bit Definitions for the SEL-700G (Sheet 9 of 22) Definition 67GY1T Y-side Level 1 residual-ground directional overcurrent trip 67N1P X-side Level 1 neutral-ground directional overcurrent pickup 67N1T X-side Level 1 neutral-ground directional overcurrent trip 67N2P X-side Level 2 neutral-ground directional overcurrent pickup 67N2T...
- Page 780 J.16 Relay Word Bits Definitions Table J.3 Relay Word Bit Definitions for the SEL-700G (Sheet 10 of 22) Definition 81XT ORed, X-side, over- and underfrequency elements 81Y1T Y-side, Level 1, over- and underfrequency element 81Y2T Y-side, Level 2, over- and underfrequency element 81Y3T Y-side, Level 3, over- and underfrequency element 81Y4T...
- Page 781 Relay Word Bits J.17 Definitions Table J.3 Relay Word Bit Definitions for the SEL-700G (Sheet 11 of 22) Definition 87SC3 Restrained High Security Differential Element 3 (not considering harmonic blocks) 87SN1 Restrained Sensitive Differential Element 1 (not considering harmonic blocks) 87SN2 Restrained Sensitive Differential Element 2 (not considering harmonic blocks) 87SN3...
- Page 782 J.18 Relay Word Bits Definitions Table J.3 Relay Word Bit Definitions for the SEL-700G (Sheet 12 of 22) Definition BFIX 52X Breaker Failure Initiation asserted BFIY 52Y Breaker Failure Initiation asserted BFTX 52X Breaker Failure trip BKRCF Generator breaker close failed BND1A Abnormal Frequency Band 1 alarm (measured frequency between UBND1 and LBND1 settings...
- Page 783 Relay Word Bits J.19 Definitions Table J.3 Relay Word Bit Definitions for the SEL-700G (Sheet 13 of 22) Definition CLOSEX Close logic output for Breaker X CLOSEY Close logic output for Breaker Y Close SEL control equation CLX OGIC Close SEL control equation CLY OGIC COMMFLT...
- Page 784 J.20 Relay Word Bits Definitions Table J.3 Relay Word Bit Definitions for the SEL-700G (Sheet 14 of 22) Definition DRDOPT External event detector (DRDOPT1 OR DRDOPT2 OR DRDOPT3) DRDOPT1 Differential Element 1 external event detector DRDOPT2 Differential Element 2 external event detector DRDOPT3 Differential Element 3 external event detector DSABLSET...
- Page 785 Relay Word Bits J.21 Definitions Table J.3 Relay Word Bit Definitions for the SEL-700G (Sheet 15 of 22) Definition GNDEMY Y-side zero sequence current demand pickup GSRTRG Trigger for generator start report GX1DIR Directional control for element 50GX1/67GX1 and 51GX GX2DIR Directional control for element 50GX2/67GX2 GY1DIR...
- Page 786 J.22 Relay Word Bits Definitions Table J.3 Relay Word Bit Definitions for the SEL-700G (Sheet 16 of 22) Definition LBOKA Channel A, looped back ok LBOKB Channel B, looped back ok LINK1 Asserted when a valid link is detected on Port 1 LINKA Asserts if Ethernet Port A detects link LINKB...
- Page 787 Relay Word Bits J.23 Definitions Table J.3 Relay Word Bit Definitions for the SEL-700G (Sheet 17 of 22) Definition OUT101 Control equation for Contact Output OUT101 OUT102 Control equation for Contact Output OUT102 OUT103 Control equation for Contact Output OUT103 OUT301–OUT308 Control equation for contact outputs OUT301–OUT308 (available only with optional I/O module)
- Page 788 J.24 Relay Word Bits Definitions Table J.3 Relay Word Bit Definitions for the SEL-700G (Sheet 18 of 22) Definition QY2DIR Directional control for element 50QY2/67QY2 RB01–RB08 Remote Bits 1–8 RB09–RB16 Remote Bits 9–16 RB17–RB24 Remote Bits 17–24 RB25–RB32 Remote Bits 25–32 RBADA Channel A, outage duration over threshold RBADB...
- Page 789 Relay Word Bits J.25 Definitions Table J.3 Relay Word Bit Definitions for the SEL-700G (Sheet 19 of 22) Definition RTD1A–RTD4A RTD1A through RTD4A: alarms RTD1T–RTD4T RTD1T through RTD4T: trips RTD5A–RTD8A RTD5A through RTD8A: alarms RTD5T–RTD8T RTD5T through RTD8T: trips RTD9A–RTD12A RTD9A through RTD12A: alarms RTD9T–RTD12T RTD9T through RTD12T: trips...
- Page 790 J.26 Relay Word Bits Definitions Table J.3 Relay Word Bit Definitions for the SEL-700G (Sheet 20 of 22) Definition SV25T–SV32T control equation variable SV25T through SV32T with settable pickup and OGIC dropout time delay SWING Single blinder: 78R1/78R2 and 78Z1 assert Double blinder: 78R1 and 78R2 assert or only 78R1 asserts T01_LED control equation: drives T01_LED...
- Page 791 Relay Word Bits J.27 Definitions Table J.3 Relay Word Bit Definitions for the SEL-700G (Sheet 21 of 22) Definition TSNTPB SNTP Secondary Server is active TSNTPP SNTP Primary Server is active TSOK Asserts if current time source accuracy is sufficient for synchronized phasor measurements TUTC1 Offset hours from UTC time, binary, add 1 if asserted...
- Page 792 J.28 Relay Word Bits Definitions Table J.3 Relay Word Bit Definitions for the SEL-700G (Sheet 22 of 22) Definition VDIFY Intertie and system voltage difference within acceptable bounds VLOWER Lower voltage for autosynchronism VPOLVX X-side positive-sequence polarization voltage valid VPOLVY Y-side positive-sequence polarization voltage valid VRAISE Raise voltage for autosynchronism...
- Page 793 Appendix K Instruction Manual Analog Quantities The SEL-700G Relay contains several analog quantities that you can use for more than one function. The actual analog quantities available depend on the part number of the relay used. Analog quantities are typically generated and used by a primary function, such as, metering.
-
Page 794: Table K.1 Analog Quantities
Analog Quantities Table K.1 Analog Quantities (Sheet 2 of 9) Label Description Units 3I2X_MAG Negative-sequence current A primary 3I2X_ANG Angle of the negative-sequence current degrees IAY_MAG A-phase line current A primary IAY_ANG Angle of the A-phase line current degrees IBY_MAG B-phase line current A primary IBY_ANG... - Page 795 Analog Quantities Table K.1 Analog Quantities (Sheet 3 of 9) Label Description Units VABY_MAG A-to-B phase voltage V primary VABY_ANG Angle of the A-to-B phase voltage degrees VBCY_MAG B-to-C phase voltage V primary VBCY_ANG Angle of the B-to-C phase voltage degrees VCAY_MAG C-to-A phase voltage...
- Page 796 Analog Quantities Table K.1 Analog Quantities (Sheet 4 of 9) Label Description Units A-phase reactive power kVAR primary B-phase reactive power kVAR primary C-phase reactive power kVAR primary 3-phase reactive power kVAR primary A-phase apparent power kVA primary B-phase apparent power kVA primary C-phase apparent power kVA primary...
- Page 797 Analog Quantities Table K.1 Analog Quantities (Sheet 5 of 9) Label Description Units Maximum/Minimum Metering MM_LRDH Max/min last reset date/time high word MM_LRDM Max/min last reset date/time middle word MM_LRDL Max/min last reset date/time low word IAXMX A-phase maximum current A primary IBXMX B-phase maximum current...
- Page 798 Analog Quantities Table K.1 Analog Quantities (Sheet 6 of 9) Label Description Units VBCYMN B-to-C phase minimum voltage V primary VCAYMN C-to-A phase minimum voltage V primary VAYMN A-phase minimum voltage V primary VBYMN B-phase minimum voltage V primary VCYMN C-phase minimum voltage V primary VSMN...
- Page 799 Analog Quantities Table K.1 Analog Quantities (Sheet 7 of 9) Label Description Units RMS Metering IAXRMS A-phase rms current A primary IBXRMS B-phase rms current A primary ICXRMS C-phase rms current A primary IAYRMS A-phase rms current A primary IBYRMS B-phase rms current A primary ICYRMS...
- Page 800 Analog Quantities Table K.1 Analog Quantities (Sheet 8 of 9) Label Description Units 3I2XPD Negative-sequence current peak demand A primary IAYPD A-phase current peak demand A primary IBYPD B-phase current peak demand A primary ICYPD C-phase current peak demand A primary IGYPD Residual current peak demand A primary...
- Page 801 Analog Quantities Table K.1 Analog Quantities (Sheet 9 of 9) Label Description Units WEARBY B-phase breaker wear WEARCY C-phase breaker wear Date/Time DATE Present date TIME Present time YEAR Year number (0000-9999) DAYY Day of year number (1-366) WEEK Week number (1-52) DAYW Day of week number (1-7) MINSM...
- Page 802 This page intentionally left blank...
- Page 803 Glossary Instruction Manual Abbreviation for amps or amperes; units of electrical current magnitude. A Windows-based program that simplifies settings and provides analysis sup- ERATOR QuickSet SEL-5030 port. Software Architect Design and commissioning tool for IEC 61850 communications. ERATOR SEL-5032 Software Ambient Temperature Temperature of the ambient air adjacent to the protected equipment.
- Page 804 GL.2 Glossary ASCII—Dropout Time ASCII Abbreviation for American Standard Code for Information Interchange. Defines a standard way to communicate text characters between two elec- tronic devices. The SEL-700G Generator and Intertie Protection Relay uses ASCII text characters to communicate using the relay front- and rear-panel EIA-232 serial ports.
- Page 805 Glossary GL.3 EEPROM—IN EEPROM Abbreviation for Electrically Erasable Programmable Read-Only Memory. Nonvolatile memory where relay settings, event reports, SER records, and other nonvolatile data are stored. Event History A quick look at recent relay activity that includes a standard report header; event number, date, time, and type;...
- Page 806 GL.4 Glossary LCD—PT Abbreviation for Liquid Crystal Display. Used as the relay front-panel alpha- numeric display. Abbreviation for Light-Emitting Diode. Used as indicator lamps on the relay front panel. Protocol for direct relay-to-relay communications. IRRORED NEMA Abbreviation for National Electrical Manufacturers Association. Neutral A protection element that causes the relay to trip when the neutral current Overcurrent Element...
- Page 807 Glossary GL.5 RAM—SEL Control Equation OGIC Abbreviation for Random Access Memory. Volatile memory where the relay stores intermediate calculation results, Relay Word bits, and other data that are updated every processing interval. Rate-of-Change of A protection element that causes the relay to trip when the measured electrical Frequency Element system rate of change of frequency exceeds a settable rate.
- Page 808 GL.6 Glossary Sequential Events Recorder—Z-Number Sequential A relay function that stores a record of the date and time of each assertion and Events Recorder deassertion of every Relay Word bit in a settable list. Provides a useful way to determine the order and timing of events following a relay operation. Abbreviation for Sequential Events Recorder or the relay serial port command to request a report of the latest 1024 sequential events.
- Page 809 Index Instruction Manual Page numbers appearing in bold mark the location of the topic’s primary discussion. Symbols *, Largest Current 9.9 Card Terminal Numbers 1 ACI card 2.9 >, Trigger Row 9.9 10 RTD card 2.11 2 AVI card 2.8 Access Levels 7.18 3 ACI/2 AVI card number 2.7 communications ports 7.16...
-
Page 810: Table 4.99 Dnp Map Settings
IN.2 Index D—D HISTORY 7.32 rear panel 4.221 IDENTIFICATION 7.33 set relay 6.4 IRIG 7.5 Synchrophasors (C37.118 protocol) H.1 – H.20 L_D 7.34 Communications Ports LDP 7.33 See Communications LOO, LOO A, LOO B 7.34 Compressed ASCII 9.2 LOOPBACK 7.34 Configurable Label Kit 1.6 8.13 MAC 7.35... -
Page 811: Table 7.52 Summary Command
Index IN.3 E—F Differential Elements 4.6 – 4.31 Event Summary 9.3 – harmonic blocking 4.11 contents 9.3 harmonic restraint 4.11 currents, voltages, RTD temperatures 9.5 operate quantities 4.6 event type 9.4 TAP calculations 4.24 SUMMARY command 7.46 Dimensions mechanical 2.2 Factory Default panel cut 2.2 LEDs 8.12... - Page 812 IN.4 Index G—M Functional Tests 10.9 – 10.12 current 10.9 Jumpers 2.16 power and power factor 10.10 analog card (V or I) 2.16 test connections 10.9 10.10 analog card configuration 2.16 voltages, delta 10.11 breaker control 2.18 voltages, wye 10.10 Password 2.18 Fundamental Metering 5.3 2.18...
- Page 813 Index IN.5 N—P reactive power 5.2 Power Supply real power 5.2 fuse ratings 2.37 root-mean-squared (rms) 5.9 Power, Power Factor RTD temperatures 5.5 functional test 10.10 synchrophasor 5.12 H.14 meter 5.4 temperature 5.5 power factor measurement convention 5.2 thermal 5.5 Protection Element voltage 5.4 100% stator ground 4.38...
- Page 814 IN.6 Index R—S Control Equations 4.196 OGIC circuit breaker auxiliary 4.191 Rack Mounting Accessory 1.6 contact output 4.205 Reactive counters 4.203 power measurement convention 5.2 event trigger 9.2 Reactive Power operators 4.196 – 4.200 See Meter PMU trigger H.8 Real Power Relay Word bits J.1 See Meter timers 4.200...
- Page 815 Index IN.7 T—Z Synchroscope 3.14 Trip/Close Logic 4.186 breaker status 52A 4.191 System backup protection elements 4.47 trip equation TR 4.187 trip unlatch ULTRIP 4.191 Targets 8.12 Troubleshooting 10.16 front-panel function 8.12 setting error messages 6.6 reset targets 8.13 Typographic Conventions xxvi view using communications port 7.46 Temperature See Resistance Temperature Device (RTD)
- Page 816 This page intentionally left blank...
- Page 817 SEL-700G Relay Command Summary Instruction Manual The table below lists the front serial port ASCII commands associated with particular activities. The commands are shown in uppercase letters, but they can also be entered using lowercase letters. Serial Port Command Command Description Access Level 0 Commands Goes to Access Level 1.
- Page 818 SEL-700G Relay Command Summary Serial Port Command Command Description FIL READ filename Transfers settings file filename from the relay to the PC. FIL SHOW filename Displays contents of the file filename. Displays generator operating statistics report. Displays the generator autosynchronism report history. Triggers generator autosynchronism report data capture.
- Page 819 SEL-700G Relay Command Summary Serial Port Command Command Description SER C or R Clears SER data. SER D Displays SER delete report, which shows deleted items (use when SER auto-deletion is selected to remove chatter). SHO n Displays relay settings for group n (n = 1, 2, or 3). If n is not specified, default is the active settings group. SHO F Displays front-panel settings.
- Page 820 SEL-700G Relay Command Summary Serial Port Command Command Description GRO n Modifies active group setting. Loads new firmware. Enables loopback testing of M channels. IRRORED LOO A Enables loopback on M Channel A for the next 5 minutes. IRRORED LOO B Enables loopback on M Channel B for the next 5 minutes.
- Page 821 SEL-700G Relay Command Summary Instruction Manual The table below lists the front serial port ASCII commands associated with particular activities. The commands are shown in uppercase letters, but they can also be entered using lowercase letters. Serial Port Command Command Description Access Level 0 Commands Goes to Access Level 1.
- Page 822 SEL-700G Relay Command Summary Serial Port Command Command Description FIL READ filename Transfers settings file filename from the relay to the PC. FIL SHOW filename Displays contents of the file filename. Displays generator operating statistics report. Displays the generator autosynchronism report history. Triggers generator autosynchronism report data capture.
- Page 823 SEL-700G Relay Command Summary Serial Port Command Command Description SER C or R Clears SER data. SER D Displays SER delete report, which shows deleted items (use when SER auto-deletion is selected to remove chatter). SHO n Displays relay settings for group n (n = 1, 2, or 3). If n is not specified, default is the active settings group. SHO F Displays front-panel settings.
- Page 824 SEL-700G Relay Command Summary Serial Port Command Command Description GRO n Modifies active group setting. Loads new firmware. Enables loopback testing of M channels. IRRORED LOO A Enables loopback on M Channel A for the next 5 minutes. IRRORED LOO B Enables loopback on M Channel B for the next 5 minutes.
Need help?
Do you have a question about the SEL-700G Series and is the answer not in the manual?
Questions and answers