
Related Manuals for Erbauer EMIS216S


Summary of Contents for Erbauer EMIS216S
- Page 1 EAN: 3663602797234 EMIS216S EAN: 3663602797241 EMIS254S EAN: 3663602797319 EMIS305S ORIGINAL INSTRUCTIONS V10818...
- Page 2 Safety instructions Product description Assembly Care & maintenance Guarantee Declaration of conformity...
- Page 3 WARNING! Please read all safety warnings carefully and be sure that they are fully understood before handling the tool.
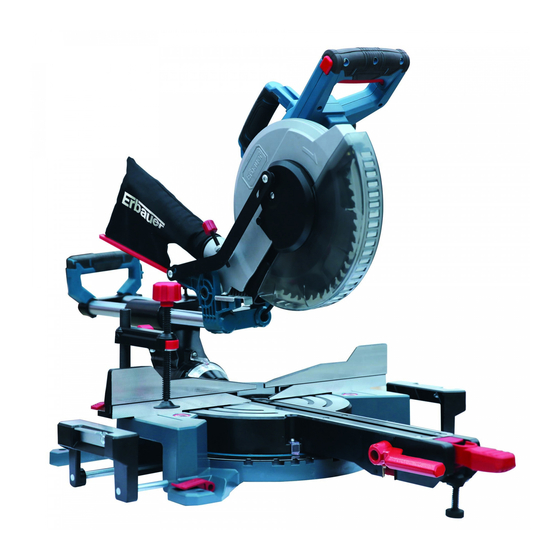
- Page 4 Product description...
- Page 5 34d 34e...
- Page 7 11d 11a...
- Page 8 Safety instructions GENERAL POWER TOOL SAFETY WARNING WARNING Read all safety warnings, instructions, illustrations and Failure to follow all injury. Save all warnings and instructions for future reference. The term “power tool” in the warnings refers to your mains-operated (corded) power tool or battery-operated (cordless) power tool. WORK AREA SAFETY a) Keep work area clean and well lit.
- Page 9 b) Avoid body contact with earthed or grounded surfaces, such as pipes, radiators, ranges and refrigerators. There is an increased risk of electric shock if your body is earthed or grounded. c) Do not expose power tools to rain or wet conditions. Water entering a power tool will increase the risk of electric shock.
- Page 10 b) Do not use the power tool if the switch does not turn it on and off. Any power tool that cannot be controlled with the switch is dangerous and must be repaired. c) Disconnect the plug from the power source and/or remove the battery pack, if detachable, from the power tool before making any adjustments, changing accessories, or storing power tools.
- Page 11 d) Push the saw through the workpiece. Do not pull the saw through the workpiece. To make a cut, raise the saw head and pull it out over the workpiece without cutting, start the motor, press the saw head down and push the saw through the workpiece.
- Page 12 such as rods or tubing. Rods have a tendency to roll while being cut, causing the blade to “bite” and pull the work with your hand into the blade. p) Let the blade reach full speed before contacting the workpiece. This will reduce the risk of the workpiece being thrown.
- Page 13 s) Ensure that the air vents are always unobstructed and clear. Clean them if necessary with a soft brush. Blocked air vents may lead to overheating and damage the product. Switch the product off immediately if you are disturbed while working by other people entering the working area.
- Page 14 • lung cancer • Silicosis • Chronic obstructive pulmonary disease (COPD). The risk of lung disease is linked to people who regularly breathe construction dust over a period of time, not on the odd occasion. To protect the lung, the COSHH Regulations sets a limit on the amount of these dusts that you can breathe (called a Workplace Exposure Limit or WEL) when averaged over a normal working day.
- Page 15 WARNING! The noise emission during actual use of the power tool can differ from the declared values depending on the ways in which the tool is used especially what kind of workpiece is processed. WARNING! Identify safety measures to protect the operator that are based on an estimation of exposure in the actual conditions of use (taking account of all parts of the operating cycle such as the times when the tool is switched off and when it is running idle in addition to the trigger time).
- Page 16 RESIDUAL RISKS Even if you are operating this product in accordance with all the safety requirements, potential risks of injury and damage remain. The following dangers can arise in connection with the structure and design of this product: Health defects resulting from vibration emission if the product is being used over long periods of time or not adequately managed and properly maintained.
- Page 17 21. Mitre angle adjustment lever 32. Lower retractable blade guard 22. Bevel angle locking lever 33. Guard mounting plate* 23. Turntable 34. Saw blade* 24. Locking bolt 35. Cutting depth gauge 25. LED light* 36. Sliding bar 26. Spindle locking button 37.
- Page 18 Manufacturing date code; year of manufacturing (20yy) and week of manufacturing (Wxx) Built in Laser Guide 3 metre Power Cord Length Technical data For EMIS216S Rated voltage, frequency : 220-240 V~, 50 Hz Rated power input : 1400 W Rated no load speed n...
- Page 19 For EMIS254S Rated voltage, frequency : 220-240 V~, 50 Hz Rated power input : 1800 W Rated no load speed n : 4500 min Blade size : Ø254 mm X Ø30 mm X 2.4 mm 48 T Cutting capacity (bevel/mitre) : 0º...
- Page 20 Rating label explanation EMIS216S = Model number E = Erbauer MIS = Mitre Saw 216= Blade Size S=Sliding EMIS254S = Model number E = Erbauer MIS = Mitre Saw 254= Blade Size S=Sliding EMIS305S = Model number E = Erbauer...
- Page 21 WARNING! The product must be fully assembled before operation! Do not use a product that is only partly assembled or assembled with damaged parts! Wear protective gloves for this assembly work and always lay the product Follow the assembly instructions step-by-step and use the pictures provided as a visual guide to easily assemble the product! Do not connect the product to power supply before it is completely assembled!
- Page 22 (33) can be slid to the side (Fig. D step 3). For EMIS216S, press down the operating handle (1) to help sliding. 3. Press the spindle locking button (26) fully and hold it in position. (Fig. E) 4.
- Page 23 screw (34a). Tighten the clamping screw anti-clockwise with the provided multi tool while the spindle locking button (26) is pressed. 9. Push the lower retractable blade guard to slide the guard mounting plate (33) downward and tighten the locking screw (33a) with the provided multi tool. 10.
- Page 24 The product can be used with the dust collection bag (5) or an external dust extraction device. Dust collection bag 1. Attach the dust collection bag (5) to the dust extraction outlet (41) (Fig. G). 2. Pull the dust collection bag off to remove it from the appliance. 3.
- Page 25 Controls WARNING! Always switch the product off and disconnect it from power supply before making any adjustments! Adjusting mitre angle (Fig. J, K) 1. Unlock the turntable locking handle (20) (Fig. J step 1). 2. Press the mitre angle adjustment lever (21) downward and hold it in positon. (Fig.
- Page 26 3. Move the operating handle (1) until the bevel angle pointer (10a) aligns with the desired angle on the bevel scale (10) (Fig. L step 3). WARNING! Always ensure the saw blade does not interfere with the fence or any other parts. Remove the fence if necessary. 4.
- Page 27 Adjusting fence (Fig. P) 1. Unlock the fence locking lever (37) (step 1). 2. Slide the fence (13) to desired position (step 2). 3. Lock the fence locking lever (37) (step 3). Ensure the saw blade does not interfere with the fence by conducting a “dry run”...
- Page 28 Laser (Fig. R, S) Use the laser as guide when cutting. 1. Switch the laser (31) on by pressing the “laser” symbol of the laser switch (3). 2. Switch the laser off by pressing the “OFF” of the laser switch. The laser line should be aligned with the blade cutting path.
- Page 29 Take the cutting slit into consideration when cutting along marked cutting lines. Do not cut directly on the line but next to it. 6. Pull the operating handle (1) forwards until the centre of the saw blade (34) is directly over the front edge of the workpiece. WARNING! Turn the lower retractable blade guard (32) by hand to test if WARNING! Always ensure the saw blade does not interfere with the fence or any other parts.
- Page 30 Bevel cutting Bevel cutting is the same as slide cutting, except that the saw blade bevel angle is set to an angle other than 0°. 1. Adjust the saw blade to the desired bevel angle. Make sure the bevel angle locking 2.
- Page 31 Clean 1. Clean the product with a dry cloth. Use a brush for areas that are hard to reach. 2. In particular clean the switches and air vents after every use with a cloth and brush. 3. Remove stubborn dirt with high pressure air (max. 3 bar). 4.
- Page 32 10 AMP fuse Connect approved to Blue to BS 1362 N(Neutral) Brown L(Live) Outer sleeve Cable grip WARNING! Never connect live or neutral wires to the earth terminal of the plug, which is marked with E. disposing of the plug and severed cable, it must be destroyed to prevent engaging into a socket.
- Page 33 Storage 1. Switch the product off and disconnect it from the power supply. 2. Clean the product as described above. 3. Slide the cutting head fully forwards and tighten the slide locking knob (8) if necessary. 4. Follow the reverse order of “Assembly – Operation position” to set the product at locking position.
- Page 34 Problem Possible cause Solution 3. Product does not 3.1. Not connected to power 3.1. Connect to power supply supply 3.2. Saw blade is worn or 3.2. Replace with new one damaged 3.3. Bevel and mitre angle 3.3. Check and adjust incorrectly adjusted according to the instruction manual...
- Page 35 This guarantee is limited to parts recognised as defective. It does not, in any case, cover ancillary costs (movement, labour) and direct and indirect damage. If the Erbauer power tool is defective during the guarantee period, then we reserve the right, at our discretion, to replace the item with a product of equivalent quality and functionality or to provide a refund.
-
Page 36: Declaration Of Conformity
3 Sheldon Square London W2 6PX United Kingdom Declare that the product 1400W SLIDING MITRE SAW, EMIS216S 1800W SLIDING MITRE SAW, EMIS254S 1800W SLIDING MITRE SAW, EMIS305S Serial number: from 000001 to 999999 Complies with the essential health and safety requirements of the following Directives:... - Page 37 Manufacturer • Fabricant • Producent • Hersteller • Producător • Fabricante: Kingfisher International Products Limited, 3 Sheldon Square, London, W2 6PX, United Kingdom www.kingfisher.com/products Distributor: B&Q plc, Chandlers Ford, Hants, SO53 3LE United Kingdom www.diy.com Screwfix Direct Limited, Trade House, Mead Avenue, Yeovil, BA22 8RT, United Kingdom www.screwfix.com...
Need help?
Do you have a question about the EMIS216S and is the answer not in the manual?
Questions and answers
laser light is on but not showing on timber why
The laser light on the Erbauer EMIS216S may not be showing on timber due to several reasons:
1. Laser Misalignment – The laser guide may need adjustment to properly align with the cutting area.
2. Obstruction – Dust or debris on the laser lens can block the light. Cleaning it may resolve the issue.
3. Power Supply Issue – The laser may not be receiving power due to a loose connection or a faulty switch.
4. Ambient Lighting – Bright lighting conditions may make the laser difficult to see on the timber surface.
5. Defective Laser Unit – If the laser is damaged or faulty, it may require repair or replacement by the manufacturer or an authorized agent.
Checking these factors can help identify and resolve the issue.
This answer is automatically generated