
Related Manuals for McConnel RoboCut


Summary of Contents for McConnel RoboCut
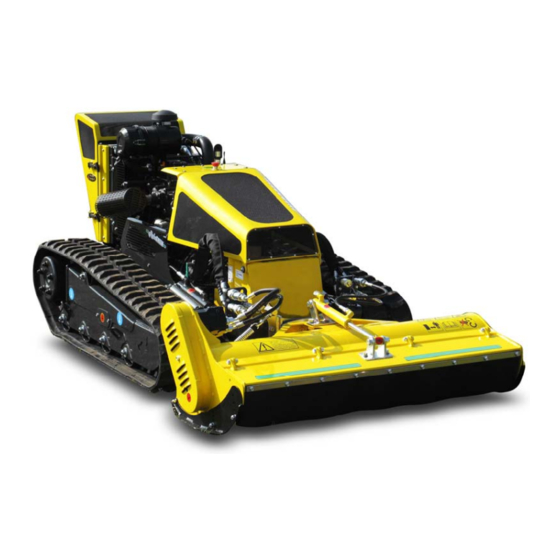
- Page 1 McCONNEL Publication 679 August 2011 Part No. 22674.79 Revision: 30.06.17 ROBOCUT REMOTE CONTROLLED MOWER Operator & Parts Manual Machines from 07-13 / Serial No. 011400323 ►...
- Page 2 VERIFICATION OF WARRANTY REGISTRATION DEALER WARRANTY INFORMATION & REGISTRATION VERIFICATION It is imperative that the selling dealer registers this machine with McConnel Limited before delivery to the end user – failure to do so may affect the validity of the machine warranty.
- Page 3 12 months, unless a different period is specified. 1.02. All spare parts supplied by McConnel Ltd and purchased by the end user are warranted to be free from defects in material and workmanship from the date of sale to the original purchaser for a period of 6 months.
- Page 4 McConnel Ltd web site and confirms the registration to the purchaser by completing the confirmation form in the operator’s manual. 2.02. Any fault must be reported to an authorised McConnel Ltd dealer as soon as it occurs. Continued use of a machine, after a fault has occurred, can result in further component failure for which McConnel Ltd cannot be held liable.
- Page 5 DECLARATION OF CONFORMITY Conforming to EU Machinery Directive 2006/42/EC McCONNEL LIMITED, Temeside Works, Ludlow, Shropshire SY8 1JL, UK Hereby declare that: The Product; Radio Controlled Tracked Mower Product Code; RMOW Serial No. & Date ………………………………… Type ………………………… Manufactured in; Italy Complies with the required provisions of the Machinery Directive 2006/42/EC The machinery directive is supported by the following harmonized standards;...
- Page 6 For Safety and Performance… ALWAYS READ THIS BOOK FIRST McCON NEL LIMITED Temeside Works Ludlow Shropshire England Telephone: 01584 873131 www.mcconnel.com...
-
Page 8: Table Of Contents
LIST OF CONTENTS Page No. Operator Section General Information Features & Specifications Safety Information Safety Decals & Warnings Safety Devices & Emergency Stop Machine Delivery Machine Overview Display LCD Radio Control Unit Starting the Engine Driving & Manoeuvring Emergency Manual Control Unit Pre-Operation Checks Operation Operating Position &... -
Page 10: General Information
GENERAL INFORMATION Always read this manual before attempting to operate the machine – whenever any doubt exists contact your dealer or the McConnel Service Department for advice and assistance. Use only McConnel Genuine Service Parts on McConnel Equipment and Machines DEFINITIONS –... -
Page 11: Features & Specifications
FEATURES & SPECIFICATIONS RoboCut 40HP (29kW) 3 Cylinder ISUZU Diesel Engine ○ Tracked Carriage Hydraulically Driven via Piston Pumps ○ Self-Tightening Tracks ○ Remote Controlled Operation (up to 150m range) ○ Rubber Tracks with Removable Riveted Stirrups ○ Rubber Stopper Spike Protection for Transport ○... -
Page 12: Safety Information
SAFETY INFORMATION This machine has the potential to be extremely dangerous - in the wrong hands it can kill or maim; It is therefore imperative that both owner and operator of the machine reads and understands the following section to ensure they are fully aware of the dangers that do, or may exist, and their responsibilities surrounding the use and operation of the machine. - Page 13 Operators should practice operation on flat open ground to familiarise themselves with driving and manoeuvring the machine before attempting to use it on sloping ground. Operators should practice manoeuvring the machine around obstacles without the flail head running before using the machine for work purposes. ...
- Page 14 Should a machine overturn, a suitable crane or winch should be used to recover it, keep all persons at a safe distance before and during recovery. Do not operate the machine in foggy or frosty conditions as there is increased risk of accidents.
- Page 15 SAFETY & WARNING DECALS 1. WARNING: Read the manual first. 2. DANGER: Risk of thrown objects, keep your distance. 3. DANGER: Electrical voltage and harmful substances. 4. DANGER: Acid, read the user and maintenance manual. 5. DANGER: Rotating components, keep clear. 6.
-
Page 16: Safety Devices & Emergency Stop
SAFETY DEVICES & EMERGENCY STOP Automatic Emergency Safety Features As the RoboCut is operated by remote control and the user is not directly operating the driving elements of the machine specific safety features have been built in to protect the user, third party persons and the machine itself;... -
Page 17: Machine Delivery
MACHINE DELIVERY The machine will be delivered ready for use having been pre-filled with all necessary lubricants and fluids other than fuel. Before use all packaging must be removed and the transport fasteners loosened. The reception antenna will be supplied as a loose item and must be screwed onto the machines receiver prior to use. -
Page 18: Machine Overview
MACHINE OVERVIEW – Component Identification ◄ Right Side View 1. Oil Tank 2. Diesel Fuel Tank 3. Track Tensioner Access 4. Track Roller 5. Drive Wheel 6. Alternator (12V) Left Side View ► 1. Hydraulic Motor 2. Electrics 3. Warning Beacon Mount 4. - Page 19 Engine Right Side View ► 1. Radiator Filler 2. Radio Control Antenna 3. Warning Beacon Mount 4. Emergency Stop Switch 5. Electric Plug for Services (12V) 6. Horn 7. Electric Compressor (Self-Cleaning Radiator Fan) 8. Ant-vibration Engine Support 9. Exhaust Pipe 10.
-
Page 20: Display Lcd
Ignition Panel Components 1. Display LCD 2. Ignition Switch 3. Emergency Stop Switch Display LCD (CANBUS) 1. Alternator 2. Engine Oil Low Pressure 3. Pre-heater (optional feature) 4. Engine Stop 5. Service 6. Parking Brake 7. Water Temperature 8. Page Up 9. - Page 21 When the correct service work has been performed contact McConnel Service on +44 (0)1584 875 848 to obtain a 4 digit code needed to reset the counter. Note: the service warning symbol will continue to flash each time the engine is started until the service counter has been reset.
- Page 22 3. Confirm the entry by pressing the enter button The 4 digit service reset code is available from McConnel Service on: +44 (0)1584 875 848 CAUTION! Entering a service code without performing the correct scheduled maintenance will void machine warranty.
- Page 23 ‘Alarm’ and a numeric error code to identify the component that has malfunctioned. Refer to the chart below for identification of the source of the fault and report it to McConnel Service if the problem persists. Error Code Cause...
-
Page 24: Radio Control Unit
Radio Control Unit – Control Locations & Functions A. Left Joystick ▲ ▲ Drive (Forward) O Default O Drive Swap Mode Drive (Reverse) switch L activated B. Right Joystick Steering (Left / Right) ◄O► Flail Head (Up / Down) ... -
Page 25: Starting The Engine
STARTING THE ENGINE Before attempting to start the engine ensure you have read and understood the manual and observe all safety instructions surrounding use of the engine and machine. WARNING! Engine must only be started in open air, never in an enclosed environment. Before Starting ... - Page 26 DRIVING & MANOUEVERING THE MACHINE Operation of the machine must only be performed by a responsible person who has read the manual and is familiar with the machine controls and all aspects relating to its safe use. It is advisable that all new operators practice using the machine, without the cutting head running, in a safe open area in order to familiarise themselves with the controls and movements of the machine.
- Page 27 Steering Direction Control The steering direction of the machine is controlled by sideways operation of the right-hand joystick (B); moving the lever to the right will steer the machine to the right and moving the lever to the left will steer the machine left. Steering is achieved by adjusting the speed or the turning direction of the tracks in relation to each other;...
- Page 28 Flail Head Rotor Controls Operation of the rotor is controlled by using switches ‘J & ‘F ’. Each of the switch performs a dual function; switch ‘J’ is for pre- setting the rotor cutting direction and for switching the rotor off, and switch ‘F’ is for starting the rotor and adjusting its speed.
- Page 29 Flail Hood Control (Machines Operating with Flailhead Attachment) The flail head is equipped with hydraulically operated front hood allowing the operator to remotely adjust its opening position to suit differing materials and conditions. The hood, which is powered by a hydraulic ram, is controlled by up and down operation of switch ‘I’; the switch is self-centering so operation of the hood in either direction only occurs when the switch is held in the up or down ‘on’...
- Page 30 Clean Fix Control Clean Fix is a built in ‘self-clean’ feature designed to reduce the build up of dirt and dust in the radiator matrix; on activation of the its control switch (‘M’) the blades of the fan change angle diverting air flow back through the radiator thus removing dirt and dust particles.
- Page 31 Manual Control Unit (Emergency Track Operation only) A manual control device for track operation is provided with the machine to allow the operator to bypass the Radio Controller in the event of a controller malfunction. When connected to the machine, this devise will allow the operator to raise and lower the flailhead and manoeuvre the mower in any direction.
- Page 32 Converting the Machine for use with the Manual Control Unit The method of adapting the machine for use with the manual control unit requires attachment of the Control Unit and deactivation of the Brake Control Module; the procedures are as follows; Control Unit Attachment Connect the manual c ontrol unit to its connection poi nt on the elec tronic ignition box, this point is located on the right hand side of the machine as shown in the photos below.
-
Page 33: Pre-Operation Checks
PRE-OPERATION CHECKS WARNING! All checks or inspections of the machine should be performed with the machine parked on firm level ground with the engine switched off and the starting key removed. The following checks should be made daily before using the machine; ... -
Page 34: Operation
OPERATION Always wear safety shoes, ear defenders and safety glasses when operating the machine. Always work in good lighting conditions. If necessary, use artificial lighting in compliance with local rules in force. Do not smoke near the machine; oils, fuels and lubricants are flammable. Before moving the machine, ensure that there are no persons, animals, or obstacles in the work zone. - Page 35 If the machines changes direction, and the track cannot move sideways due to the presence of an obstacle, there is a risk that the track can be damaged or come of its seat; wherever possible avoid turning the machine when it is against an obstacle, if unavoidable, make manoeuvres slowly and gradually until clear of the object.
-
Page 36: Operating Position & Distance
Operating Position & Distance 60° 20° 20° 60° Slope Working... -
Page 37: Maintenance
MAINTENANCE SECTION Diesel Engine Maintenance For specific service and maintenance information regarding the diesel engine, refer to the engine manufacturer’s handbook provided with the machine. Ensure all service and maintenance work on the engine is carried out at the intervals stated in that manual. Maintenance Scheme (General Machine) After Initial 8 Hours - New Machine Check nuts, bolts, pipes and hoses for tightness –... - Page 38 Maintenance Scheme (Track Components) Daily Checks Check track tension. Check condition of gear motors. Check track condition; replace tracks when there is less than 10mm of tread remaining or sooner if there are visible signs of deep cuts or cracks. Check there are no stones or foreign bodies within the tracks, rollers, gears or sprockets.
- Page 39 Cleaning the Air Filters Grills & Radiator If the machine is running, reduce to minimum revs and allow engine to run for a further minute before switching off – remove and pocket the ignition key. Clean outsides of air suction grills before releasing the three rubber hooks and opening the cover.
- Page 40 Checking Hydraulic Oil Level The procedure for checking and replenishing the machines hydraulic oil is as follows; Park the machine on a firm level site. Ensure engine is switch off and the key removed and pocketed. Release rubber hooks and raise the front engine cover.
- Page 41 Engine Oil Replacement and Filter Change Oil Capacity: 6.1L without filter 6.6L with filter Oil Type: MOBIL SUPER 3000 X1 5W-40 The procedure for changing the engine oil and filter is as follows; Park the machine on a firm level site. ...
- Page 42 Hydraulic Oil Replacement and Filter Change Hydraulic Oil Tank Capacity: 18 Litres Complete System Capacity: 28 Litres The procedure for changing the hydraulic oil and filter is as follows; Remove the protection plate from the underside of the hydraulic oil tank. Note: Removal of the plate allows access to both the hydraulic tank drain plug and the fuel tank drain plug –...
- Page 43 Hydraulic Distributor Valve The distributor valve that controls the hydraulic functions of the machine is located under the vehicle and is only accessible from beneath the machine. When working on this, or any other item located under the machine, great care must be adopted to ensure the machine is securely positioned before attempting to access or work on the component.
- Page 44 Fuel Filter Cleaning / Replacement The procedure for cleaning or renewing the fuel filter is as follows; Park the machine on a firm level site, switch the engine off and open the engine cover. Fuel Filter Fuel Supply Tap Close the fuel supply tap located on the filter housing. ...
- Page 45 Fuel Filter Water Drain Water will accumulate in the filter bowl that will from time to times need to be purged; the frequency of this task will primarily depend on the quality of the diesel being used. The filter bowl should be regularly inspected, and water drained off as and when required. The procedure for draining the water is as follows;...
- Page 46 Support Springs The hydraulic rams that position the front mounted flailhead are equipped with support springs, the support pressure offered by the springs can be adjusted to suit differing needs and applications by altering their work position tension. The procedure for adjusting the springs is as follows;...
- Page 47 Replacing Tracks Tracks must be changed when only 10mm of tread remains, or before if they show signs of excessive cuts or cracks. The components shown below are constituent parts of the track system illustrated here for identification purposes. Lower Roller Unit Sprocket Assembly Tracked Undercarriage Backstay...
- Page 48 Track Tension Kit (Optional) A grease tensioner system controls the track tension on the machine. Keeping the tracks correctly tensioned is an important duty that must be carried out at the intervals stated in the maintenance schedule; failure to observe the correct tension can result in the tracks coming off the machine during operations.
-
Page 49: Undercarriage Specifications
UNDERCARRIAGE SPECIFICATIONS Loading Capacity 1.2T Length 1548mm Axle to axle length 1192mm Track height 479.5mm Crossmember height (from ground) 150mm Fixed undercarriage width 1260mm Number of lower rollers per side (per machine) 4 + 4 (8) Number of upper rollers per side (per machine) 1 + 1 (2) Track width 230mm... - Page 50 ELECTRICAL SYSTEM (Machines Serial No. ROBO071300323 onwards) Fuses & Relays Fuel Pump 7.5 Amp Actuator 7.5 Amp +15 Controllers & Display 5 Amp Hold Solenoid + Safety Stopdown 10 Amp Pull Solenoid 30 Amp +15 Warnings Relay 5 Amp Beacon 15 Amp Horn 10 Amp...
-
Page 51: Troubleshooting
TROUBLESHOOTING Symptom Possible Cause Solution Track damage. Excessive tread wear; Replace track. Loosening/breaking of internal structural steel rope. Track slackens frequently. Faulty tensioner valve. Replace valve. Damaged tensioner seal. Replace seal. Worn tensioner components. Replace worn components. Upper track does not stay in Track slide worn. - Page 52 ROBOCUT - Parts Manual - For machines 07/13 onwards From S/No: ROBO071300323 (Rev. 11.09.17)
-
Page 54: Parts Section
LIST OF CONTENTS Page No. Parts Section Chassis Assembly Track Roller Assemblies Track Tensioner Assemblies Rubber Tracks Equipment Mounting Assembly Engine Cover Assembly Radiator Cover Assembly Machine Cover Assembly Roll bar Assembly Diesel Engine Diesel Engine Components Pumps Assembly (Early Machines) Pumps Assembly (Current Machines) Actuator Assembly Reversible Fan Assemblies... -
Page 55: Chassis Assembly
CHASSIS ASSEMBLY McCON NEL ROBOCUT... - Page 56 CHASSIS ASSEMBLY McCON NEL ROBOCUT REF. QTY. PART No. DESCRIPTION CHASSIS ASSEMBLY 4000006 DRIVE SPROCKET 4000263 RUBBER TRACK 250/72/47 4000352 CYLINDRIC HEAD SCREW 4000357 KNURLED WASHER 4000360 RH TRACK DRIVE MOTOR 4001226 TRACK MOTOR COVER 4000316 FLANGED HEAD SCREW 4000011...
-
Page 57: Track Roller Assemblies
TRACK ROLLER ASSEMBLIES McCON NEL ROBOCUT... - Page 58 TRACK ROLLER ASSEMBLIES McCON NEL ROBOCUT REF. QTY. PART No. DESCRIPTION TRACK ROLLER ASSEMBLIES 4000362 UPPER ROLLER ASSEMBLY - Comprising of: 4000355 LOCK NUT 4000019 WASHER 4000361 WASHER 4000351 ROLLER WASHER 4000780 ROLLER SEAL 4000023 CIRCLIP 4000781 TRACK ROLLER BEARING...
-
Page 59: Track Tensioner Assemblies
TRACK TENSIONER ASSEMBLIES McCON NEL ROBOCUT... - Page 60 TRACK TENSIONER ASSEMBLIES McCON NEL ROBOCUT REF. QTY. PART No. DESCRIPTION TRACK TENSIONER ASSEMBLIES MECHANICAL TENSIONER - Comprising of: 4000782 4000783 TENSIONER LEVER 4000784 SPACER 4000785 TENSIONER 4000786 HEX HEAD SCREW 4000787 4000788 4000018 LOCKNUT 4000253 WASHER HYDRAULIC TENSIONER - Comprising of:...
-
Page 61: Rubber Tracks
RUBBER TRACKS McCON NEL ROBOCUT... - Page 62 RUBBER TRACKS McCON NEL ROBOCUT REF. QTY. PART No. DESCRIPTION RUBBER TRACKS 4000263 RUBBER TRACK 250/72/47 4000333 SUPER RUBBER TRACK 280/72/47 4000290 RUBBER TRACK (MOVEABLE STIRRUPS) 4000035 STEEL STIRRUP 4000037 BOLT 4000264 RIVETED STIRRUP KIT - Comprising of: 4000036 RUBBER TRANSPORT BLOCK...
-
Page 63: Equipment Mounting Assembly
EQUIPMENT MOUNTING ASSEMBLY McCON NEL ROBOCUT... - Page 64 EQUIPMENT MOUNTING ASSEMBLY McCON NEL ROBOCUT REF. QTY. PART No. DESCRIPTION EQUIPMENT MOUNTING ASSEMBLY 4000365 CYLINDRIC HEAD SCREW 4000078 WASHER 4000366 HOSE CLAMP 4000018 LOCK NUT 4000363 RH HOSE SUPPORT BRACKET 4000789 WASHER 4000108 CYLINDRIC HEAD SCREW 4000370 BAR WASHER...
-
Page 65: Engine Cover Assembly
ENGINE COVERS ASSEMBLY McCON NEL ROBOCUT... - Page 66 ENGINE COVERS ASSEMBLY McCON NEL ROBOCUT REF. QTY. PART No. DESCRIPTION ENGINE COVERS ASSEMBLY 4000169 RADIATOR LEFT SUPPORT 4000170 RADIATOR RIGHT SUPPORT 4000176 HEADLESS SCREW 4000075 AUTOGRIP NUT 9100103 WASHER 4000375 SIDE PROTECTION SUPPORT 4000379 FLANGED HEAD SCREW 4000164 RIGHT SIDE BONNET...
-
Page 67: Radiator Cover Assembly
RADIATOR COVERS ASSEMBLY McCON NEL ROBOCUT... - Page 68 RADIATOR COVERS ASSEMBLY McCON NEL ROBOCUT REF. QTY. PART No. DESCRIPTION RADIATOR COVERS ASSEMBLY 4000401 RADIATOR BONNET ASSEMBLY - comprising of: 4001229 LOCKNUT 9100102 WASHER 4000155 CENTRAL LOWER MESH 4000154 SIDE MESH 4000107 CYLINDRIC HEAD SCREW 4000798 WASHER 4000799 LOCKNUT...
-
Page 69: Machine Cover Assembly
MACHINE COVERS ASSEMBLY McCON NEL ROBOCUT... - Page 70 MACHINE COVERS ASSEMBLY McCON NEL ROBOCUT REF. QTY. PART No. DESCRIPTION MACHINE COVERS ASSEMBLY 4000386 ANTI-VIBRATION BLOCK 9163003 LOCK NUT 4000321 WASHER (LARGE SERIES) 4000353 FLANGED HEAD SCREW 4000800 RUBBER GASKET 4000801 ELECTRICAL BOX COVER 4000388 RUBBER WASHER 4000161 VALVE COVER PLATE...
-
Page 71: Roll Bar Assembly
ROLL BAR ASSEMBLY McCON NEL ROBOCUT... - Page 72 ROLL BAR ASSEMBLY McCON NEL ROBOCUT REF. QTY. PART No. DESCRIPTION ROLL BAR ASSEMBLY 4000805 ROLL BAR KIT - comprising of: 4000151 ROLL BAR SUPPORT 4000152 ROLL BAR 4000175 HEX HEAD SCREW 9100207 SPRING WASHER 0100106 WASHER...
-
Page 73: Diesel Engine
DIESEL ENGINE McCON NEL ROBOCUT... - Page 74 DIESEL ENGINE McCON NEL ROBOCUT REF. QTY. PART No. DESCRIPTION DIESEL ENGINE 4000701 ISUZU ENGINE (40HP) 4000275 MOTOR BELT 4000054 AIR FILTER MOUNTING 4000353 FLANGED HEAD SCREW 4000381 AUTOGRIP NUT 4000380 FLANGED HEAD SCREW 4001231 RADIATOR BRACKET 4000806 HEXAGON HEAD SCREW...
- Page 75 DIESEL ENGINE McCON NEL ROBOCUT...
- Page 76 DIESEL ENGINE McCON NEL ROBOCUT REF. QTY. PART No. DESCRIPTION DIESEL ENGINE (Continued) 4000261 SECONDARY AIR FILTER 4000260 PRIMARY AIR FILTER 4000280 FILTER HOUSING CAP 4000279 RUBBER VALVE 4000281 CLOGGING SENSOR 4001233 ALTERNATOR LID 4000810 FLANGED HEAD SCREW 4000062 EXHAUST SUPPORT...
-
Page 77: Diesel Engine Components
DIESEL ENGINE COMPONENTS McCON NEL ROBOCUT... - Page 78 DIESEL ENGINE COMPONENTS McCON NEL ROBOCUT REF. QTY. PART No. DESCRIPTION DIESEL ENGINE COMPONENTS 4000403 OIL SENSOR 4000404 SOLENOID - ELECTRICAL STOP 4000405 ALTERNATOR 4000406 STARTER MOTOR 4000407 SOLENOID - STARTER MOTOR 4000408 DIPSTICK 4000409 SETSCREW 9100106 WASHER 4000761 KNURLED WASHER...
-
Page 79: Pumps Assembly (Early Machines)
(Builds S/No: ►ROBO071100027 ) PUMPS ASSEMBLY McCON NEL ROBOCUT... -
Page 80: Pumps Assembly (Current Machines)
(Builds S/No: ►ROBO071100027 ) PUMPS ASSEMBLY McCON NEL ROBOCUT REF. QTY. PART No. DESCRIPTION PUMPS ASSEMBLY (Early Builds) Machines S/N: ►ROBO071100027 4000429 FLYWHEEL PUMP ADAPTOR 4000410 KNURLED WASHER 4000209 HEX HEAD SCREW 4000297 FLYWHEEL 4000430 FLANGED HEAD SCREW 4000431 PUMP MANIFOLD... -
Page 81: Pumps Assembly (Current Machines)
PUMPS ASSEMBLY (Current Builds) McCON NEL ROBOCUT... - Page 82 PUMPS ASSEMBLY (Current Builds) McCON NEL ROBOCUT REF. QTY. PART No. DESCRIPTION PUMPS ASSEMBLY (Current Builds) Machines S/N: ROBO071100028 ► 4000429 FLYWHEEL PUMP ADAPTOR 4000410 KNURLED WASHER 4000209 HEX HEAD SCREW 4000297 FLYWHEEL 4000430 FLANGED HEAD SCREW 4000431 PUMP MANIFOLD...
-
Page 83: Actuator Assembly
ACTUATOR ASSEMBLY McCON NEL ROBOCUT... - Page 84 ACTUATOR ASSEMBLY McCON NEL ROBOCUT REF. QTY. PART No. DESCRIPTION ACTUATOR ASSEMBLY (Early Builds) 4000057 BRACKET (Item discontinued) 4000441 COUNTERSUNK HEAD SCREW 4000442 FLANGED HEAD SCREW 4000086 ACTUATOR 4000381 AUTOGRIP NUT 4000078 WASHER 4000806 HEX HEAD SCREW 4000316 FLANGED HEAD SCREW...
- Page 85 (S/No. ►ROBO031400418) FAN ASSEMBLY McCON NEL ROBOCUT...
-
Page 86: Reversible Fan Assemblies
(S/No. ►ROBO031400418) FAN ASSEMBLY McCON NEL ROBOCUT REF. QTY. PART No. DESCRIPTION REVERSIBLE FAN ASSEMBLY 4001237 COMPRESSOR ASSEMBLY - comprising of: 4001238 CYLINDRIC HEAD SCREW 4000789 WASHER 4000450 COMPRESSOR CLAMP 4000449 FLANGED NUT 4000446 COMPRESSOR 4000453 HOSE CLAMP 4001239 KNURLED WASHER... - Page 87 (S/No. ROBO031400419 ►ROBO031600824) FAN ASSEMBLY McCON NEL ROBOCUT...
-
Page 88: Reversible Fan Assemblies
(S/No. ROBO031400419 ►ROBO031600824) FAN ASSEMBLY McCON NEL ROBOCUT REF. QTY. PART No. DESCRIPTION REVERSIBLE FAN ASSEMBLY Machines S/No: ROBO031400418 ►ROBO031600824 4001098 REVERSIBLE FAN 4000543 CYLINDRIC HEAD SCREW 4001099 FAN BLADE 4001100 ADAPTOR 4003186 HYDRAULIC HOSE 4001546 VALVE BLOCK 4001656 CARTRIDGE... - Page 89 (S/No. ROBO031600825 ►) FAN ASSEMBLY McCON NEL ROBOCUT...
- Page 90 (S/No. ROBO031600825 ►) FAN ASSEMBLY McCON NEL ROBOCUT REF. QTY. PART No. DESCRIPTION REVERSIBLE FAN ASSEMBLY Machines S/No: ROBO031600825 ► 4001414 REVERSIBLE FAN 4000543 CYLINDRIC HEAD SCREW 4001418 FAN BLADE KIT (SET OF 2 BLADES) 4001100 ADAPTOR 4003186 HYDRAULIC HOSE...
-
Page 91: Diesel Fuel Circuit
DIESEL FUEL CIRCUIT McCON NEL ROBOCUT... - Page 92 DIESEL FUEL CIRCUIT McCON NEL ROBOCUT REF. QTY. PART No. DESCRIPTION DIESEL FUEL CIRCUIT 4000292 PRIMARY FUEL FILTER 4000341 FUEL FILTER CAP 4000342 PRIMARY FILTER CARTRIDGE 9213144 HEX HEAD SCREW 9100104 WASHER 4000467 HOSE CLAMP 4000096 FUEL TANK 4000126 FUEL PUMP...
-
Page 93: Oil Tank Assembly
OIL TANK ASSEMBLY McCON NEL ROBOCUT... - Page 94 OIL TANK ASSEMBLY McCON NEL ROBOCUT REF. QTY. PART No. DESCRIPTION OIL TANK ASSEMBLY 4000097 OIL TANK 7315750 FLANGED HEAD SCREW 4000127 PLUG 4000148 LEVEL SENSOR 4000124 OIL CAP / LEVEL 4000475 OIL FILTER SENSOR BRACKET 4000476 FILTER CLOGGING SWITCH...
-
Page 95: Electrical Components
ELECTRICAL COMPONENTS McCON NEL ROBOCUT... - Page 96 ELECTRICAL COMPONENTS McCON NEL ROBOCUT REF. QTY. PART No. DESCRIPTION ELECTRICAL COMPONENTS 4000283 ROTATING LIGHT (BEACON) 4000284 LIGHT CONNECTION 4000823 WASHER 4000544 WASHER 4000789 WASHER 4000824 SCREW 4000452 SCREW 4000181 BATTERY 4000306 RED EMERGENCY SWITCH 4000307 PLUG 4000308 CONNECTOR 4000309...
- Page 97 ELECTRICAL COMPONENTS McCON NEL ROBOCUT...
- Page 98 ELECTRICAL COMPONENTS McCON NEL ROBOCUT REF. QTY. PART No. DESCRIPTION ELECTRICAL COMPONENTS (Continued) 4000329 BATTERY CABLE - POSITIVE (+) 4000330 BATTERY CABLE - NEGATIVE (-) 4000331 STARTER MOTOR/ALTERNATOR POWER LINE 4000838 SWITCH 4000114 WASHER 4000839 ANTI-VIBRATION 4000840 SCREW 4000841 4000842...
-
Page 99: Electrical Wiring
ELECTRICAL WIRING McCON NEL ROBOCUT... - Page 100 ELECTRICAL WIRING McCON NEL ROBOCUT REF. QTY. PART No. DESCRIPTION ELECTRICAL WIRING 4000477 CONNECTOR 4000478 CONNECTOR 4000479 CONNECTOR 4000480 CONNECTOR 4000481 CONNECTOR 4000482 CONNECTOR 4000483 CONNECTOR 4000484 CONNECTOR 4000485 CONNECTOR 4000486 CONNECTOR 4000487 RUBBER CABLE SLEEVE 4000337 CONNECTOR 4000837 WIRING LOOM - CHASSIS LINE...
-
Page 101: Control Transmitting/Receiving Units
CONTROL TRANSMITTING/RECEIVING UNITS McCON NEL ROBOCUT... - Page 102 CONTROL TRANSMITTING/RECEIVING UNITS McCON NEL ROBOCUT REF. QTY. PART No. DESCRIPTION CONTROL TRANSMITTING/RECEIVING UNITS 4000282 AERIAL KIT 4001438 AERIAL ANTENNA 4000494 ANTENNA (EUR) 4000495 ANTENNA (USA) 4000717 SWITCH COVER 4000718 START KEY CONNECTOR KIT 4000349 START KEY 4000719 PROPORTIONAL JOYSTICK (SINGLE AXIS)
-
Page 103: Intake & Drain Pumps
INTAKE & DRAIN PUMPS McCON NEL ROBOCUT... - Page 104 INTAKE & DRAIN PUMPS McCON NEL ROBOCUT REF. QTY. PART No. DESCRIPTION INTAKE & DRAIN PUMPS 4000533 HYDRAULIC HOSE 4000534 HYDRAULIC HOSE 4000535 HYDRAULIC HOSE 4000536 HYDRAULIC HOSE 4000537 HYDRAULIC HOSE 4000538 HYDRAULIC HOSE 4000539 HYDRAULIC HOSE 4000540 HYDRAULIC HOSE...
-
Page 105: Tracks Hydraulic Circuit
TRACK HYDRAULIC CIRCUIT McCON NEL ROBOCUT... - Page 106 TRACK HYDRAULIC CIRCUIT McCON NEL ROBOCUT REF. QTY. PART No. DESCRIPTION TRACK HYDRAULIC CIRCUIT 4000564 HYDRAULIC HOSE 4000565 HYDRAULIC HOSE 4000566 HYDRAULIC HOSE 4000567 HYDRAULIC HOSE 4000568 HYDRAULIC HOSE 4000569 HYDRAULIC HOSE 4000570 HYDRAULIC HOSE 4000571 HYDRAULIC HOSE 4000572 HYDRAULIC HOSE...
-
Page 107: Hydraulic Rams Circuit
HYDRAULIC RAMS CIRCUIT McCON NEL ROBOCUT... - Page 108 HYDRAULIC RAMS CIRCUIT McCON NEL ROBOCUT REF. QTY. PART No. DESCRIPTION HYDRAULIC RAMS CIRCUIT 4000583 HYDRAULIC HOSE 4000584 HYDRAULIC HOSE 4000585 HYDRAULIC HOSE 4000586 HYDRAULIC HOSE 4000579 CONNECTOR 4000587 CONNECTOR 4000588 TEE FITTING 4000882 RESTRICTOR 4000697 RESTRICTOR 4000368 GREASE NIPPLE HYDRAULIC RAM (S/No.
-
Page 109: Hydraulic Equipment Circuit
HYDRAULIC EQUIPMENT CIRCUIT McCON NEL ROBOCUT... - Page 110 HYDRAULIC EQUIPMENT CIRCUIT McCON NEL ROBOCUT REF. QTY. PART No. DESCRIPTION HYDRAULIC EQUIPMENT CIRCUIT 4000589 HYDRAULIC HOSE 4000590 HYDRAULIC HOSE 4000591 HYDRAULIC HOSE 4000592 HYDRAULIC HOSE 4000593 HYDRAULIC HOSE 4000594 HYDRAULIC HOSE 4000595 HYDRAULIC HOSE 7315797 CONNECTOR 4000587 CONNECTOR 4000596...
-
Page 111: Flailhead Assembly
FLAILHEAD ASSEMBLY – Robocut S/No: ►ROBO021400399 McCON NEL ROBOCUT FLAILHEAD – Head S/No: ►1301213020399... - Page 112 – Robocut S/No: ►ROBO021400399 FLAILHEAD ASSEMBLY McCON NEL ROBOCUT FLAILHEAD – Head S/No: ►1301213020399 REF. QTY. PART No. DESCRIPTION FLAILHEAD ASSEMBLY 4000182 CYLINDER FIXING STIRRUP 4000184 STOP BRACKET 4000183 RUBBER STOP 4000185 RAM BRACKET 4000186 HYDRAULIC RAM 4000187 HEAD CASING (1.3m)
- Page 113 FLAILHEAD ASSEMBLY – Robocut S/No: ►ROBO021400399 McCON NEL ROBOCUT FLAILHEAD – Head S/No: ►1301213020399...
- Page 114 – Robocut S/No: ►ROBO021400399 FLAILHEAD ASSEMBLY McCON NEL ROBOCUT FLAILHEAD – Head S/No: ►1301213020399 REF. QTY. PART No. DESCRIPTION FLAILHEAD ASSEMBLY (Continued) 4000217 SCREW 4000218 SPRING (Item now obsolete use Spring 4000749) 4000219 SPRING (Not compatible with Spring Bracket 4000204)
- Page 115 – Robocut S/No: ROBO021400400 ► FLAILHEAD ASSEMBLY McCON NEL ROBOCUT FLAILHEAD – Head S/No: 1301213020400 ►...
- Page 116 – Robocut S/No: ROBO021400400 ► FLAILHEAD ASSEMBLY McCON NEL ROBOCUT FLAILHEAD – Head S/No: 1301213020400 ► REF. QTY. PART No. DESCRIPTION ROBOCUT FLAILHEAD ASSEMBLY Builds - Serial No. 1301213020400 ► 4000182 CYLINDER FIXING STIRRUP 4001381 WASHER 4000183 RUBBER STOP 4000184...
- Page 117 – Robocut S/No: ROBO021400400 ► FLAILHEAD ASSEMBLY McCON NEL ROBOCUT FLAILHEAD – Head S/No: 1301213020400 ►...
- Page 118 – Robocut S/No: ROBO021400400 ► FLAILHEAD ASSEMBLY McCON NEL ROBOCUT FLAILHEAD – Head S/No: 1301213020400 ► REF. QTY. PART No. DESCRIPTION ROBOCUT FLAILHEAD ASSEMBLY Builds - Serial No. 1301213020400 ► 4000077 4001425 4000221 4000186 HYDRAULIC RAM 4000757 4000758 WASHER 4000759...
-
Page 119: Rotors & Flails
ROTORS & FLAILS – Robocut S/No: ►ROBO021400399 McCON NEL ROBOCUT FLAILHEAD – Head S/No: ►1301213020399... - Page 120 – Robocut S/No: ►ROBO021400399 ROTORS & FLAILS McCON NEL ROBOCUT FLAILHEAD – Head S/No: ►1301213020399 REF. QTY. PART No. DESCRIPTION ROTORS & FLAILS ASSEMBLY 4000190 1.3M ROTOR (Y-FLAILS TYPE) 4000241 STEEL BUSHING 4000242 Y-FLAIL (6mm) 4000243 HAMMER FLAIL (Early Type) ►06/14 4000244 1.3M ROTOR (HAMMER FLAIL TYPE)
- Page 121 – Robocut S/No: ROBO021400400 ► ROTORS & FLAILS McCON NEL ROBOCUT FLAILHEAD – Head S/No: 1301213020400 ►...
- Page 122 – Robocut S/No: ROBO021400400 ► ROTORS & FLAILS McCON NEL ROBOCUT FLAILHEAD – Head S/No: 1301213020400 ► REF. QTY. PART No. DESCRIPTION ROTORS & FLAILS ASSEMBLY Builds - Serial No. 1301213020400 ► 4000190 1.3M ROTOR (Y-FLAILS TYPE) 4000244 1.3M ROTOR (HAMMER FLAIL TYPE) 4003147 1.3M ROTOR c/w Y-FLAILS...
-
Page 123: Flailhead Hydraulic Assembly
HYDRAULIC ASSEMBLY – Robocut S/No: ►ROBO021400399 McCON NEL ROBOCUT FLAILHEAD – Head S/No: ►1301213020399... - Page 124 HYDRAULIC ASSEMBLY – Robocut S/No: ►ROBO021400399 McCON NEL ROBOCUT FLAILHEAD – Head S/No: ►1301213020399 REF. QTY. PART No. DESCRIPTION HYDRAULIC ASSEMBLY 4001389 HYDRAULIC HOSE 4001390 HYDRAULIC HOSE 4000765 HYDRAULIC HOSE 4000766 HYDRAULIC HOSE 4000767 HYDRAULIC HOSE 7315797 CONNECTOR 4000579 CONNECTOR...
- Page 125 – Robocut S/No: ROBO021400400 ► HYDRAULIC ASSEMBLY McCON NEL ROBOCUT FLAILHEAD – Head S/No: 1301213020400 ►...
- Page 126 – Robocut S/No: ROBO021400400 ► HYDRAULIC ASSEMBLY McCON NEL ROBOCUT FLAILHEAD – Head S/No: 1301213020400 ► REF. QTY. PART No. DESCRIPTION HYDRAULIC ASSEMBLY Builds - Serial No. 1301213020400 ► 4001389 HYDRAULIC HOSE 4001390 HYDRAULIC HOSE 4000765 HYDRAULIC HOSE 4000766 HYDRAULIC HOSE...
-
Page 127: Decal Kit
ROBOCUT DECAL KIT McCON NEL ROBOCUT REF. QTY. PART No. DESCRIPTION 4000700 ROBOCUT DECAL KIT 1290829 DECAL - MCCONNEL ROUNDEL 1290954 DECAL - ROBOCUT 1290955 DECAL - ROBOCUT 1300 1290956 DECAL - ROBOCUT (OVERLAY) -
Page 128: Service Parts
SERVICE PARTS - Filters & Filter Cartridges McCON NEL ROBOCUT FUEL FILTER (Part No. 4000105) PRIMARY FUEL FILTER OIL FILTER (Part No. 4000257) Fitted to Early Models HYDRAULIC OIL FILTER CARTRIDGE (Part No. 4000258) Fitted to Later Models HYDRAULIC OIL FILTER CARTRIDGE (Part No. 4000259) PRIMARY AIR FILTER CARTRIDGE (Part No. - Page 130 McConnel Limited, Temeside Works, Ludlow, Shropshire SY8 1JL. England. Telephone: 01584 873131. Facsimile: 01584 876463. www.mcconnel.com...
Need help?
Do you have a question about the RoboCut and is the answer not in the manual?
Questions and answers