
Related Manuals for Mira Orbis


Summary of Contents for Mira Orbis
- Page 1 Mira Orbis Thermostatic Electric Shower Installation and User Guide These instructions are to be left with the user...
-
Page 2: Table Of Contents
Caution! ....................6 Pack Contents Checklist ................ 8 Specifications ..................9 Installation Requirements ..............9 Installation ..................... 12 Installation of Mira Orbis ..............12 Commissioning ..................16 User Instructions ................... 18 Clock Setting ..................23 Fault Diagnosis ..................25 Heater Settings ................... 25 Maintenance ................... -
Page 3: Introduction
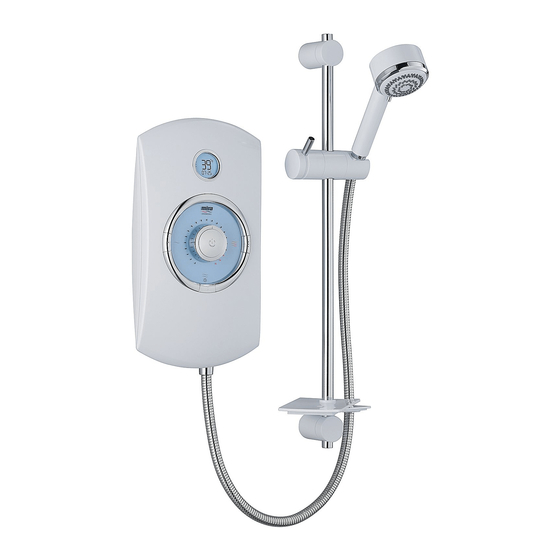
The Mira Orbis comes complete with a set of Mira Energise Shower Fittings. Mira Orbis 9.0 kW A 9.0 kW 240 V AC (8.2 kW 230 V AC) heater with Mira Energise adjustable spray handset with four different spray actions (start, soothe, force and eco*). Supplied complete with flexible hose, clamp bracket assembly, slide bar, supports, hose... -
Page 4: Guarantee
Heavy Commercial Healthcare Guarantee For domestic installations, Mira Showers guarantee the Mira Orbis against any defect in materials or workmanship for a period of two years from the date of purchase (shower fittings for one year). For non-domestic installations, Mira Showers guarantee the Mira Orbis against any defect in materials or workmanship for a period of one year from the date of purchase. -
Page 5: Important Safety Information
1.11. DO NOT fit any form of outlet flow control as the outlet acts as a vent for the tank body. Only Mira recommended outlet fittings should be used. 1.12. This product is not suitable for areas with high humidity (i.e steam rooms). -
Page 6: Caution
1.14. This appliance must be provided with means for disconnection that is incorporated into the fixed wiring in accordance with the relevant local wiring regulations. Caution! 2.1. Read all of these instructions and retain this guide for later use. 2.2. The electrical installation must comply to 'BS 7671 - Requirements for Electrical Installations', commonly referred to as the IEE Wiring Regulations - Part 7, or any particular regulations and practices, specified by the local electricity supply company. - Page 7 2.9. If any of the following conditions occur, isolate the electricity and water supplies and refer to 'To contact us', on the back page of this guide. 2.9.1. If the cover is not correctly fitted and water has entered the appliance case.
-
Page 8: Pack Contents Checklist
Pack Contents Checklist Tick the appropriate boxes to familiarise yourself with the part names and to confirm that the parts are included. Mira Orbis 1 x Mira Orbis 1 x Olive 1 x Compression Nut 3 x Fixing Screws 3 x Wall Plugs... -
Page 9: Specifications
Minimum static pressure 20 kPa (0.2 bar) to keep the inlet valve closed. 2. Electrical • The Mira Orbis 9.0 kW requires a 40 Amp circuit protection device. • The Mira Orbis 9.8 kW requires a 45 Amp circuit protection device. - Page 10 flexible outlet fittings. However, there will be occasions when it will not provide a suitable solution. In these instances an outlet double checkvalve, e.g. a Mira DCV-H, must be fitted. This will increase the required supply pressure typically by 0.1 bar (see section “Accessories”).
- Page 11 • In a domestic installation, the rating of the electricity supplier’s fuse and the consumer unit must be adequate for the additional demand. All Mira electric showers are high power units, it is essential to contact your electricity supplier to ensure that the supply is adequate for the product. Voltage drop due to local heavy demand will reduce the shower’s performance.
-
Page 12: Installation
Installation Installation of Mira Orbis Warning! Turn off the electrical and water supplies before proceeding with the installation of the Mira Orbis. The electricity must be turned off at the mains and the appropriate circuit fuse removed, if applicable. Note! An installation template is supplied to help you install the Mira Orbis. - Page 13 Make sure that sufficient electrical supply cable is available for connection to the terminal block. Drill and plug the top two fixing holes. Secure the Mira Orbis to the wall with the screws provided. Drill the bottom fixing hole with the product in place. Alternative fixings (not supplied) may be necessary for some wall structures.
- Page 14 Feed cable into Case. Fit Earth sleeve (not supplied) and strip insulation. Do not twist cable cores. Important! Make sure that the inlet earth wire is routed as shown. Failure to do so may cause product malfunction. L = BROWN E = GREEN/YELLOW Firmly connect the conductors.
- Page 15 Holes For Cover Retaining Screws Case Insert Fixing Screw Terminal Block Heater Tank Electrical Supply Cable Inlet Connector Assembly Cold Water Supply Service Tunnel Pipe (Bottom Entry)
-
Page 16: Commissioning
Commissioning If you are unsure how an electric shower works, please read through the User Instructions section before continuing. Note! The temperature display throughout this guide will depend upon inlet supply conditions and product settings. Electrical supply is turned Turn control to full cold. Turn the water supply off at the mains. - Page 17 0 - 10 Secs Press the ‘Medium’ button, Turn control to full cold. The temperature will rise light on the button comes slightly as indicated by the temperature indicator. 5 - 10 Secs The flow rate will increase. Press the ‘High’ button, light on the button comes Press STOP button, light on the temperature indicator dims to standby...
-
Page 18: User Instructions
Note! A slight hissing sound may be heard from the Mira Orbis during operation. High mains water pressure and high shower temperatures will affect the tone. This is quite normal in use. - Page 19 Thermostatic (Temperature-Stable) The shower's top priority is to keep the desired water temperature constant. Electric showers with thermostatic control are able to keep a stable temperature across the range from hot to cold, whilst also dealing with fluctuations in electrical and water supplies.
- Page 20 The Effect of Seasonal Changes For a cold shower select ‘Low’. For a summer warm shower select ‘Medium’. For a winter warm shower select ‘High’. During extremes of mains water supply temperature, adjust heater setting to obtain a better showering temperature. The Effect of Other Water Devices Example of how shower temperature stabilises due to pressure changes.
- Page 21 Using your Shower Read the section “Important Safety Information” first. Clock (seconds) Temperature Display (Backlit during operation) Temperature of Shower Low Flow Indicator Temperature Limit Indicator Temperature Setting Clock (hours/minutes) Start/Stop Button Heater Settings Low, Medium, High...
- Page 22 Temperature of Shower Clock The temperature indicator becomes Switch on the electrical supply and illuminated. press the ‘Start/Stop’ button Check the water temperature before Set to the desired position. entering shower. Allow 10 - 15 seconds for any temperature adjustments to reach the handset. Press STOP button, the light on the button Residual water may drain over a goes out.
-
Page 23: Clock Setting
Clock Setting Clock Make sure that the product is in ‘Standby’ state (i.e. Isolator switch on). Press and hold the ‘Medium Power ’ button - the clock backlight will come on full brightness. After a delay of a few seconds the hour segments of the clock start flashing Press ‘Medium Power’... - Page 24 LCD Indications The table below shows what is shown on the LCD display once the shower has been installed and is in use. Product State LCD Display Backlight Comments Blank Product turned off at pull cord Standby Clock shown including second indicators Product turned on Clock Shown...
-
Page 25: Fault Diagnosis
Fault Diagnosis The trouble shooting information tabled below gives details on probable causes and remedies should difficulties be encountered whilst the shower is in operation. Warning! There are no user serviceable components beneath the cover of the appliance. Only a competent tradesperson should remove the front cover! Heater Settings Medium High... - Page 26 Symptom Low Flow Heater Setting Probable Cause Probable Remedy Back Light Low/Medium/ Light High Shower cycles Medium/High Thermostatic Replace. form hot to mechanism is faulty cold or damaged. Medium/High Scaled Heater Tank Replace. Assy. Medium/High Damaged Hose. Replace. Handset Insufficient water The minimum static dripping supply pressure for...
- Page 27 Symptom Low Flow Heater Setting Probable Cause Probable Remedy Light Back Low/Medium/ High Light Low or no flow Handset blocked. Remove and clean. rate Heater tank Replace. In hard excessively scaled. water areas consider the use of a water softener. No information Faulty Control Replace Control...
- Page 28 Faulty Control Replace. board. E1 displayed Check thermistor is Refit. on screen plugged in. Note! The Mira Orbis Thermostatic Shower offers a water saving feature where the shower will automatically switch OFF after 40 minutes of continuous use.
-
Page 29: Maintenance
Maintenance Handset - Cleaning Clean with mild washing up detergent or soap solution. Wipe dry with a soft cloth. Poor shower performance can be avoided by cleaning the spray plate. Use thumb or soft cloth to wipe rubber nozzles. The handset must also be descaled regularly. -
Page 30: Clock Battery Replacement Procedure
Clock Battery Replacement Procedure Warning! There are no user serviceable components beneath the cover of the appliance. Only a competent tradesperson should remove the front cover! Read the section “Important Safety Information” first. Isolate the electrical supply before commencing this procedure. The electricity must be turned off at the mains and the appropriate circuit fuse removed, if applicable. -
Page 31: Dimensions
Dimensions... -
Page 32: Wiring Diagram
Wiring Diagram... -
Page 33: Spare Parts
Spare Parts Mira Orbis 405.58 Inlet Connector Assembly 406.27 Inlet Filter (with ‘O’ seal fitted) 416.38 Clamp Bracket (Inlet) 416.51 Solenoid Coil 1563.518 Component Pack - components identified ‘B’ 1563.522 Cover Seal (not shown) 1563.541 Screw Pack - components identified ‘A’... - Page 34 1647.109 1647.096 1647.105 1647.098 1647.099 1647.100 1647.103 406.27 1647.101 1647.102 405.58 416.38 1647.109 416.51 1647.150 1647.104 1647.148 1647.108 1647.107 1647.149 1647.106...
-
Page 35: Accessories
ACCESSORIES Genuine Mira accessories can be purchased direct from Customers Services (our contact details can be found on the back cover of this guide) or from approved stockists or merchants. Everclear Showerhead Logic Showerhead Holder Double Outlet Check Valve White - 2.1616.030 White - 2.1605.149... -
Page 36: Notes
Notes... - Page 37 Notes...
- Page 38 Notes...
-
Page 39: Customer Services
fi lters) or where no fault has been found with guarantee period and beyond. You have the assurance of a the product. fully trained Mira Technician, genuine Mira spare parts and ● Water or electrical supply, waste and isolation issues. a 12 month guarantee on any chargeable work done. - Page 40 Mira is a registered trade mark of Kohler Mira Limited. The company reserves the right to alter product specifications without notice. www.mirashowers.com 1075158-W2-D (J01A, J01B, J01C) © Kohler Mira Limited, June 2010...
Need help?
Do you have a question about the Orbis and is the answer not in the manual?
Questions and answers