Table of Contents
Advertisement
Advertisement
Table of Contents

Related Manuals for RIEJU NUUK URBAN


Summary of Contents for RIEJU NUUK URBAN
- Page 1 NUUK URBAN /CARGO /TRACKER...
- Page 2 * GARANTIE CONSTRUCTEUR D’1 AN (PIÈCES ET MAIN D’OEUVRE). ONE YEAR OF WARRANTY (PARTS AND MANPOWER). UN AÑO DE GARANTÍA (MANO DE OBRA Y PIEZAS...
- Page 3 …for everyday adventure RIEJU S.A. appreciates the confidence you have placed in our company and congratulates you on your good choice. The vehicle Nuuk Urban/Tracker/Cargo is the result of the long experience developing high performance vehicles. This owner's Manual is intended to indicate the use and maintenance of your vehicle, please read carefully the instructions and information given below.
-
Page 4: Table Of Contents
…for everyday adventure INDICE .……….13 Description of the vehicle ……..…...…..……………….7 Dashboard Indicators ..……….13 Ignition Lock Important points of the vehicle Locking and unlocking the handlebars ……..…………….8 ……………………………….……….14 Delivery of the vehicle ………………..………………….9 DIGITAL DISPLAY ……………..……..….……….14 1. – Time …..……..….14 Chassis identification Number ….………………….10 2. - Page 5 …for everyday adventure INDEX …..…..….17 Main elements of the vehicle DIGITAL DISPLAY Indicators ………....16 …..…....….17 Selection button ........17 Light switch 1.-Left turn indicator ..16 ......18 Indicator switch 2.-Road Light Indicator ....16 ........19 Horn push button 3.-Vehicle Fault Indicator ..16 ........19 Emergency stop 4.-Right turn indicator …..16...
- Page 6 …for everyday adventure Pre-driving checks ..44 Maintenance Start up ..44 ..26 Periodic reviews To brake ..45 ..26 Transmission adjustment ..46 Brake system Operation of the vehicle ..46 ..28 Starter Battery Ignition sequence ..47 ..28 Fuses Navigating the Menus ..48 ..29 Cleaning Driving modes ..49...
-
Page 7: Description Of The Vehicle
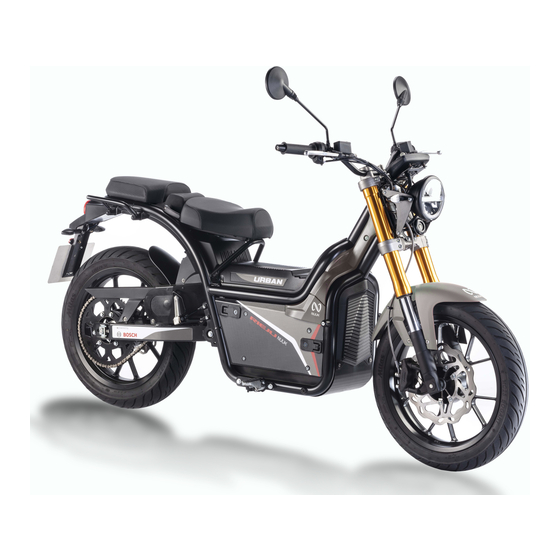
…for everyday adventure Description of the vehicle This vehicle is an electric motorbike of the category L3e-A1, equivalent to a motorcycle of combustion of 125 C.C. assembled with a power train of latest generation BOSCH brand with a motor of direct current that provides a power of 8.5 KW. The vehicle incorporates a central motor and two-stage transmission by belt and chain. -
Page 8: Important Points Of The Vehicle
…for everyday adventure Important points of the vehicle The NUUK electric bike is designed to be a sturdy vehicle with low maintenance. Despite this, it is important to take into account certain points to prolong your life and benefits to the maximum. The main elements of the electric vehicle are: Battery –... -
Page 9: Delivery Of The Vehicle
…for everyday adventure Delivery of the vehicle- important points to explain to any operator of the vehicle. User MANUAL- Explain the importance of reading and understanding all information. To emphasize the sections on safety and maintenance practices. Registration Card Guarantee-fill in the required information, and deliver the copy to the customer. Operation- explain the correct handling of the vehicle. -
Page 10: Chassis Identification Number
…for everyday adventure Chassis identification Number The vehicle identification number is stamped on the right side of the chassis steering tube and the manufacturer's label is located on the left side. This identification number will be necessary for the certificate of specification, insurance, registration, etc. -
Page 11: Vehicle Identification
…for everyday adventure Vehicle identification 1. – Brake Fluid tank. 2. – Mode and illumination switch. 3. – Dashboard 4. – Power switch 5. – Battery Lock 6. – Motor 7. – Battery/ECU 8. – Side Stand 9. – Center Stand 10.-Emergency stop 11.- Throttle 12. -
Page 12: Controls And Instruments
…for everyday adventure Controls and instruments 1. – Light switch. 2. – DigitalDashboard. 3. – Key Lock on. 4. – Battery indicator. 5. – Brake Fluid tank. 6. – Brake Fluid tank. 7. – Brake lever. 8. – Brake lever. 9. -
Page 13: Dashboard Indicators
…for everyday adventure Dashboard instruments and indicators Ignition Lock The lock is located in the central part of the handlebar, between the handlebar and the Display. Controls vehicle ignition and handlebar lock. 1-Steering lock, electrical system disconnected. 2-In this position the electrical system is disconnected. 3-The electrical system is activated and can be started. -
Page 14: Digital Display
…for everyday adventure DISPLAY DIGITAL 1.-Time The date and time can be changed in the Settings menu 2.-Driving mode You can change the mode with the up and down buttons. 3. – Speed. Indicates the instantaneous speed. You can switch between km/h and mph in the settings menu. -
Page 15: Ambient Temperature
…for everyday adventure DISPLAY DIGITAL 6. – Temperature Indicates the ambient temperature of the vehicle. You can switch between º C and º F from the Settings menu. 7. – Energy consumption/recovery Graphic indicator instantaneous energy consumption. The higher the power consumption of the system, the more segments are illuminated in this indicator. -
Page 16: Digital Display
…for everyday adventure DIGITAL DISPLAY Indicators 1. – Left Flashing indicator Lights up when the left indicator is activated. 2. – Road Light Indicator Turns on when the road lights are on. 3. – Vehicle fault indicator. Indicates a system error. Turn off the vehicle And wait 40 seconds. -
Page 17: Light Switch
…for everyday adventure Main elements of the vehicle Light switch The light switch consists of three positions: -Dipped light (short). Resting position (1) High Beam road Light (long). Pull the trigger forward (2) Burst (high beam) road light. Pull the trigger backwards (3) Caution Only use high beam light if there are no vehicles or people in Front or to make alerts in case of danger or emergency. - Page 18 …for everyday adventure Main elements of the vehicle Mode Selector switch The selector switch is a 3-position pushbutton: up, down and select. Used to navigate through the Display menus. -Down (1) Select (2) Top (3) To raise or lower a position in the menu, press the selector switch to the right or left respectively, to select the selected position, press the switch.
-
Page 19: Horn Push Button
…for everyday adventure Main elements of the vehicle Horn push button Use push button (1) to operate the horn. Caution Remember you should only use it in case of danger or emergency. Emergency power stop Use the emergency stop switch (2) to stop the vehicle. Turning off the switch will cut the vehicle’s power and acceleration. - Page 20 …for everyday adventure Main elements of the vehicle Lift and fold the seat The rear seat of the vehicle can be lifted to discover a rear load surface or to perform the back-up function. 1 – Pull the lever located on the right side of the seat to unlock the movement.
-
Page 21: Throttle
…for everyday adventure Main elements of the vehicle Throttle Grip Turn the throttle grip backward to accelerate and forward to decelerate. Releasing the throttle grip will return to its initial position and activate the motor brake, slowing the bike. Caution The electric vehicle makes less noise than a petrol motorcycle so the use of this can surprise pedestrians in the vicinity of the vehicle causing possible accidents. -
Page 22: Front Brake
…for everyday adventure Main elements of the vehicle Right brake When the right brake lever is actuated, the front and rear brakes are activated thanks to the brake splitter. The braking is 70% to the front brake and 30% to the rear brake. When the lever is actuated, at the same time, the brake switch is activated, sending a signal to the rear brake light. -
Page 23: Starter Battery
…for everyday adventure Main elements of the vehicle Starter Battery The vehicle has a 12v and 12Ah starter Battery, which is located under the central cover of the vehicle. It is used to start the vehicle initially. When the system is activated by pressing a brake lever and the up or down button, the starter battery stops supplying the system, the traction battery takes over and also charges the starter battery at the same time. -
Page 24: Tyres
…for everyday adventure Main elements of the vehicle Tires The pressure of the tyres directly influence the stability and comfort of the vehicle, the braking distance, and especially the safety of the user, therefore it is recommended to check the inflation pressures regularly. Caution Do not overload the vehicle as in addition to losing stability, it increases tire wear. -
Page 25: Stands
…for everyday adventure Main elements of the vehicle Stands The vehicle has 2 stands, one side (1) and the other Central (2). To facilitate the deployment of any of the two stands these incorporate a support (A and B) to support the foot and be able to deploy correctly. -
Page 26: Pre-Driving Checks
…for everyday adventure Pre-driving checks Check table Check the following points before using your vehicle Component Check If necessary... Throttle Grip The Operation Adjust or replace Tyres pressure, state and wear Inflate or replace Battery The Charge Charge Steering Operation The smoothness of the direction Adjust or replace The flexibility of movement... - Page 27 …for everyday adventure Component Check If necessary... Brake Discs That are not damaged and Replace Completely clean Brakes The Levers operate properly Adjust Brake fluid level is correct Top Up Attention Pre-use checks must be performed every time the vehicle is used. If an anomaly is spotted during the checks, it must be rectified before using the vehicle.
-
Page 28: Operation Of The Vehicle
…for everyday adventure Operation of the vehicle It is very important to know your vehicle thoroughly, as well as its operation. Ignition sequence To start the vehicle, insert the key into the ignition lock and turn clockwise to the on position. The Display will turn on indicating the vehicle's activation sequence as well as the front and rear lights of the vehicle. -
Page 29: Navigating The Menus
…for everyday adventure Navigating the Menus Once the vehicle is turned on, use the up and down buttons and select the mode switch, located on the left side of the handlebar, to navigate through the different menu options. By pressing up from the NEUTRAL driving mode, you will find the GO, CRUISE and BOOST modes. By pressing down from the NEUTRAL driving mode you will find the manoeuvre CRAWL modes reverse gear and forward, used to move slowly in both directions. - Page 30 …for everyday adventure Navigating the Menus Press the Select button to switch between different driving data: total km, partial km, partial driving time, average consumption, average speed. The driving data will be shown in the bottom left of the display consecutively. Press the Select button for approximately two seconds from the GO driving mode to reset the driving data except Total Press the Select button for two seconds from the NEUTRAL driving mode or from the home screen to access the settings menu or the user Manual.
-
Page 31: Driving Modes
…for everyday adventure Driving modes The vehicle has 3 driving modes, called GO, CRUISE and BOOST, and two other manoeuvre modes called CRAWL where the vehicle moves slowly. GO: More efficient speed mode. The delivery of power and the high speed are limited electronically, getting the highest range/autonomy. -
Page 32: Settings Menu
…for everyday adventure Settings menu Vehicle data In the vehicle Data menu you will be able to see all the driving data on the same screen. Smartphone In the Smartphone menu you can configure the connectivity with your smartphone. Date and time In the date and time menu you can set the date and time displayed. - Page 33 …for everyday adventure Power Bar The Power bar is a graphical indicator that measures instant energy consumption/recovery during driving. The top of the bar represents the energy consumed, while the lower part represents the energy recovered during braking. The higher the energy consumed/recovered, the greater number of segments will light up on the part of the corresponding bar.
-
Page 34: Power Bar
…for everyday adventure Power Bar Depending on the selected driving mode or battery charge status, part of the top segments of the power bar will remain locked, indicating the instantaneous power available in each situation. This is represented in the power bar with hollow segments. - Page 35 …for everyday adventure Power Bar When the battery is fully charged, the regenerative braking function remains locked until the battery is discharged slightly (approximately 97%). This situation is indicated on the power bar with the segments corresponding to the hollow regenerative brake. Temperature limiting power In case of excessive temperature in any of the components of the vehicle, it will limit the available power to avoid the deterioration of components.
-
Page 36: Braking
…for everyday adventure Braking To brake, the left and right brakes must be applied at the same time increasing the pressure progressively. The regenerative braking mode, similar to the engine brake of a combustion vehicle, is activated at the moment the throttle is released. -
Page 37: Traction Batteries
…for everyday adventure Traction Batteries The battery is one of the most important elements of the vehicle, because it is the element that stores the energy that allows the movement. Proper battery maintenance will be crucial to maintaining the vehicle's initial performance in time. -
Page 38: Connection And Extraction
…for everyday adventure Traction Batteries Connection and Extraction To remove the batteries, follow the following sequence: Place the bike on the center stand. Insert the key into the locks located on the side cover of the vehicle, and turn it clockwise to lock the lock or anti-clockwise to unlock it. Unfold the lock lever and turn the lock left anti-clockwise and clockwise so that the inside face of the lock is facing upward. - Page 39 …for everyday adventure Traction Batteries Connection and Extraction To remove the batteries, follow the following sequence: Disconnect the battery from the bike by pulling on the red handle of the connector. The bike must be turned off when the battery is switched off. Release the Velcro on the strap and release the strap rings on both sides of the belt from the hooks that attach it to the door.
-
Page 40: Load
…for everyday adventure Traction Batteries Load The Moto Nuuk has an integrated charger that will charge all the installed traction batteries. To connect the battery, follow the following sequence: 1.-Use the ignition key of the motorbike to open the charging cable compartment. Turn the ignition key clockwise to open the compartment and lift the lid. - Page 41 …for everyday adventure Traction Batteries Charging 3.-Select the charging mode between normal charge and fast charge. When connecting the charging cable to a plug, the charge will automatically start in the normal charge mode. The normal charging time is approximately 5 hours.
-
Page 42: Correct Operation
…for everyday adventure Battery Correct operation The following section explains how to use the batteries to obtain the best performance. The bike has installed two lithium batteries, which operate in parallel. To ensure proper operation, both batteries must be charged and discharged simultaneously. -
Page 43: Prolonged Storage
…for everyday adventure Traction Battery Prolonged storage The NUUK motorcycle battery has an internal control system and can be stored for extended periods of time, provided it is maintained under the conditions described below. To minimize the impact of a prolonged stop, the traction battery (48v) must be charged between 40% and 60% of the total. -
Page 44: Maintenance
…for everyday adventure Maintenance Periodic reviews An electric vehicle needs much less maintenance than a traditional explosion vehicle, however it is necessary to carry out proper maintenance of the mechanical elements for their correct operation and to lengthen the life of the vehicle. First Service Second Service Each... -
Page 45: Transmission Adjustment
…for everyday adventure Maintenance Transmission adjustment The transmission for the electric motorbike consists of a double stage formed by a belt and a chain, which are joined by an intermediate pulley. The belt provides smooth operation and protects the motor from vibration, while the chain provides robustness to operation and facilitates maintenance processes. -
Page 46: Brake System
…for everyday adventure Maintenance Brake system The Electric motorcycle NUUK has a combined braking system, in such a way that when the front brake is actuated, the braking will be divided by 70% in the front brake and 30% in the rear brake. When the rear brake is actuated, only the rear brake will be actuated. -
Page 47: Fuses
…for everyday adventure Maintenance Fuses The electric motorcycle NUUK has several fuses for the protection of the system. The lighting system fuses are located under the left side cover. To access them, remove the left side cover and the fuse box cover. The starter battery fuse is located next to the positive terminal of the starter battery, following the wiring. -
Page 48: Cleaning
Do not use degreasing elements, Rieju is not responsible for the use of degreasing elements that Stain or deteriorate parts of the vehicle. Rieju is not responsible for possible damages and damage caused by the use of pressurized water for cleaning of the vehicle. -
Page 49: Prolonged Storage
…for everyday adventure Long-term cleaning and storage Prolonged storage For prolonged storage of the vehicle it is advisable to pre-clean as described above. In prolonged storage The most critical point is the correct maintenance of the battery, in order not to damage the vehicle, follow these steps before storage specified in the section on prolonged battery storage. - Page 50 …for everyday adventure Technical specifications of the vehicle – 4 KW Steel Motor Material ESM (Electric excited Synchronous Motor) Double stage Belt-chain 1:10,15 Voltage Transmission Ø 41 mm 90 mm travel Power Front suspension 4 KW Mono shock absorber on left side. Torque Rear suspension 430 Nm...
- Page 51 …for everyday adventure Technical data of the vehicle – 8.5 KW Motor ESM (Electric excited Synchronous Motor) Material Steel Voltage Transmission Double stage Belt-chain 1:10,15 Power 8.5 KW Front suspension Ø 41 mm 90 mm travel Torque 430 Nm Rear suspension Mono damper on left side.
Need help?
Do you have a question about the NUUK URBAN and is the answer not in the manual?
Questions and answers