Polycom VVX 150 User Manual
Business ip phones
Hide thumbs
Also See for VVX 150:
- Full user manual (21 pages) ,
- Administrator's manual (12 pages) ,
- Configuration manual (11 pages)
Table of Contents
Advertisement
Advertisement
Table of Contents

Related Manuals for Polycom VVX 150


Summary of Contents for Polycom VVX 150
- Page 1 USER GUIDE 5.8.0 | May 2018 | 3725-48813-001 ® ® Polycom Business IP Phones...
- Page 2 Open Source Software Used in this Product This product may contain open source software. You may receive the open source software from Polycom up to three (3) years after the distribution date of the applicable product or software at a charge not greater than the cost to Polycom of shipping or distributing the software to you.
-
Page 3: Table Of Contents
Contents Before You Begin....................9 Audience, Purpose, and Required Skills................9 Related Documentation.......................9 ® ® Getting Started with Polycom Business IP Phones......10 Overview of Phone Hardware and Keys................10 VVX 150 Hardware....................10 VVX 250 Hardware....................12 VVX 350 Hardware....................14 VVX 450 Hardware....................16 Securing Your Phone with the Security Slot............18... - Page 4 Ignore or Silence an Incoming Call................ 46 Reject Incoming Calls.....................46 Reject Calls from a Contact..................46 Rejecting Calls with Do Not Disturb............... 46 Reject Anonymous Calls..................48 Redirecting Incoming Calls....................48 Forwarding Incoming Calls to a Contact..............48 Divert Calls to a Contact..................49 Polycom, Inc.
- Page 5 Placing a SCAP Call....................60 Answering a SCAP Call..................61 Bridge In to an Active SCAP Call................61 Leave a Bridge SCAP Call..................61 Make an Active SCAP Call Public................61 Make an Active SCAP Call Private.................62 Holding or Passing SCAP Calls................62 Polycom, Inc.
- Page 6 Save a Recent Call Entry..................75 Contact Directory......................75 Search for a Contact in the Contact Directory............75 Add a Contact to the Contact Directory..............75 View Contact Information..................76 Update a Contact's Information................76 Delete a Contact from the Contact Directory............76 Polycom, Inc.
- Page 7 Corporate Directory......................77 Searching the Corporate Directory.................77 Add Corporate Directory Contacts to the Contact Directory........78 ® ® BroadSoft Directories on Polycom Business IP Phones........78 View a List of BroadSoft Contacts................78 Searching the BroadSoft Directory.................79 Add BroadSoft Contacts to the Contact Directory..........80 Managing a Personal BroadSoft Directory.............
- Page 8 Password Required to Access Basic Settings..............109 Choose a Theme for Your Phone................... 109 Set the Language......................110 Disable Call Waiting......................110 Time and Date Display....................111 Change the Time and Date Format..............111 Disable the Time and Date Display..............111 Backlight Intensity and Timeout..................111 Polycom, Inc.
- Page 9 Reactivate Headset Memory Mode..............124 Using Electronic Hookswitch................124 Disconnect Your Headset..................126 Controlling Your Phone with Polycom Desktop Connector..........126 Setting Up and Enabling the Polycom Desktop Connector........126 Using the Polycom Desktop Connector..............129 Accessibility Features .................. 133 Features for Hearing-Impaired Users................133...
- Page 10 USB Port......................... 140 Check the Status of the Calendar................... 140 GENBAND Address Book....................141 View the Status of the Personal Address Book............141 Polycom Desktop Connector...................141 Troubleshoot Audio and Echo Issues................142 Recording Issues and Solutions..................142 Reset the Phone to Factory Defaults................143 Using an Approved Power Source..................
-
Page 11: Before You Begin
Before You Begin Topics: • Audience, Purpose, and Required Skills • Related Documentation This Polycom VVX Business IP Phones User Guide contains overview information for navigating and ® ® performing tasks on Polycom Business IP Phones. ® ® This user guide contains information for the following Polycom products: •... -
Page 12: Getting Started With Polycom ® Vvx ® Business Ip Phones
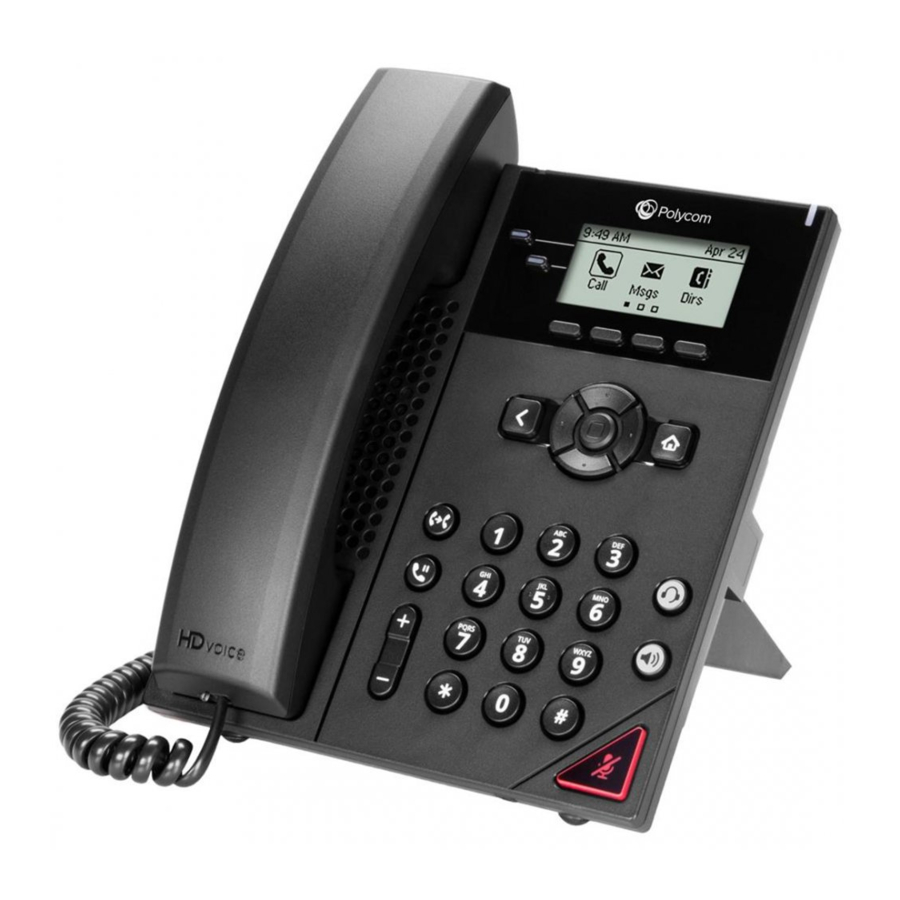
Setup Sheet for your phone available on your phone's support page on Polycom Voice Support. VVX 150 Hardware The following figure displays the hardware features on the VVX 150 business IP phones. The table lists each feature numbered in the figure. Polycom, Inc. - Page 13 ® ® Getting Started with Polycom Business IP Phones VVX 150 hardware features VVX 150 Hardware Feature Descriptions Reference Feature Feature Description Number Line keys Enable you to select a phone line, view calls on a line, or quickly call a favorite contact.
-
Page 14: Vvx 250 Hardware
® ® Getting Started with Polycom Business IP Phones Reference Feature Feature Description Number Speakerphone key Enables you to place and receive calls using the speakerphone. Headset key Enables you to place and receive calls through a headset. Home key... - Page 15 ® ® Getting Started with Polycom Business IP Phones VVX 250 hardware features VVX 250 Hardware Features Reference Feature Feature Description Number Line keys Enable you to select a phone line, view calls on a line, or quickly call a favorite contact.
-
Page 16: Vvx 350 Hardware
® ® Getting Started with Polycom Business IP Phones Reference Feature Feature Description Number Speakerphone key Enables you to place and receive calls using the speakerphone. Headset key Enables you to place and receive calls through a headset. USB Port Enables you to attach a USB flash drive or USB headset. - Page 17 ® ® Getting Started with Polycom Business IP Phones VVX 350 hardware features VVX 350 Hardware Feature Descriptions Reference Feature Feature Description Number Line keys Enable you to select a phone line, view calls on a line, or quickly call a favorite contact.
-
Page 18: Vvx 450 Hardware
® ® Getting Started with Polycom Business IP Phones Reference Feature Feature Description Number Dial pad Enables you to enter numbers, letters, and special characters. You can also use the dial pad keys to select menu items that have index numbers. - Page 19 ® ® Getting Started with Polycom Business IP Phones VVX 450 hardware features VVX 450 Hardware Feature Descriptions Reference Feature Feature Description Number Line keys Enable you to select a phone line, view calls on a line, or quickly call a favorite contact.
-
Page 20: Securing Your Phone With The Security Slot
® ® Getting Started with Polycom Business IP Phones Reference Feature Feature Description Number Dial pad Enables you to enter numbers, letters, and special characters. You can also use the dial pad keys to select menu items that have index numbers. -
Page 21: Access The Main Menu
® ® Getting Started with Polycom Business IP Phones ▪ Lines Screen—Displays your phone lines, favorites, and conditional soft keys. Access the Main Menu On VVX business IP phones, you can access phone features and settings from the Main Menu screen. -
Page 22: Access The Lines Screen
• During a call, select the Lines soft key. • When off-hook on a VVX 150 phone, select the New Call soft key. Switch Among Phone Screens You can see any phone screen by pressing the Home key . Although you can access any phone screen from whatever screen you are on, certain screens are only accessible if your phone is idle or has one or more calls in progress. -
Page 23: Icons And Status Indicators On Vvx Business Ip Phones
• Press the Calls soft key to access the Calls screen from the Lines screen. • On VVX 150 phones, press the C > L soft key to display the Lines screen from the Calls screen. • On VVX 150 phones, press the L > C soft key to display the Calls screen from the Lines screen. -
Page 24: Entering Information In Data Fields
® ® Getting Started with Polycom Business IP Phones Icon Description Icon Description Do Not Disturb enabled Presence status (Away) Favorite Presence status (Do Not Disturb) Placed call Presence status (Offline) Received call Presence status (Offline) Missed call New message... -
Page 25: Entering Information Using The Dial Pad
® ® Getting Started with Polycom Business IP Phones Mode Options Encoding Options abc (to enter lowercase only) 123 (to enter numbers only) ASCII (for regular text) Latin (to enter accented characters) Katakana (for Japanese characters) Unicode (to store characters as double bytes) -
Page 26: Entering Chinese Characters With Pinyin
® ® Getting Started with Polycom Business IP Phones Task Action Enter a space Select Encoding, and select one of the alphabetic Abc, ABC, or abc. Press the 0 key. You cannot enter a space when you are in numerical (123) mode. -
Page 27: Logging In To And Locking Your Phone
Polycom phone before you can use one. By default, Polycom devices do not require you to log in before you can use them. However, if you do not log in, you see the default profile. When you log in, you have full access to your personal settings and your directory. -
Page 28: Log Out Of The Phone
Your system administrator provides you with login credentials that you can use to log in to a visitor desk phone. By default, Polycom phones do not require you to log in before you can use them. However, if you do not log in, you see only the phone's default profile. -
Page 29: Log Out Of A Visitor Desk Phone
Procedure 1. Select the Guest Out soft key. 2. If prompted, enter your guest PIN. Your personal profile is no longer accessible, and the phone displays the default host profile. Polycom, Inc. -
Page 30: Log In To A Guest Acd Phone
3. For User, enter the username for your account. 4. For Password, enter your password for your account. Locking Your Phone Your system administrator provides you with a user password that you can use to unlock VVX business IP phones. Polycom, Inc. -
Page 31: Lock Your Phone
Your phone is locked. Tip: You can quickly lock your phone by selecting the Lock soft key. When you do this, you cannot choose how to handle incoming calls. Your phone uses the default setting or the last setting selected. Polycom, Inc. -
Page 32: Unlock The Phone
1. Navigate to Settings > Advanced. 2. Enter your user password and select Enter. 3. On the Advanced screen, select Change User Password. 4. On the Change User Password screen, enter your old and new user password and select Enter. Polycom, Inc. -
Page 33: Audio Calls
VVX business IP phones can manage between eight and 24 audio calls depending on the model. VVX 150 phones can manage a maximum of eight active, incoming, and held audio calls at a time. VVX 250, 350, and 450 phones can manage a maximum of 24 active, incoming, and held audio calls at a time. - Page 34 You can place calls to contacts from the Recent Calls list, which contains calls that were recently placed, answered, or missed. Procedure 1. Navigate to Directories and select Recent or Recent Calls. 2. From the Calls List screen, select a contact and select Dial. Polycom, Inc.
- Page 35 5. If the call is not placed automatically, select Dial. Call a Contact from the Directory Search Screen You can search for and call contacts from the Search screen in your directory on VVX business IP phones. Procedure 1. Navigate to Directories and select a directory. Polycom, Inc.
- Page 36 4. After the call is answered, speak your message then select End Call. Place an Intercom Call During a Call You can place an intercom call to another contact during an active call. Procedure 1. Select Hold > Intercom. Polycom, Inc.
-
Page 37: Redial A Number
When you receive an incoming call on VVX business IP phones, you can choose to answer the call in various ways, including answering calls automatically, in the Incoming Calls screen, in the Calls screen, and during a call. Polycom, Inc. - Page 38 When Auto Answer is enabled and you receive an incoming call while in a call, the incoming call is not answered until you end or hold the current call. Procedure 1. Navigate to Settings > Basic > Preferences. 2. Select Auto Answer. Polycom, Inc.
-
Page 39: Switch Among The Handset, Headset, And Speakerphone
When using the headset, the Headset key glows green if an analog headset is connected or blue if a USB headset is connected. For VVX 150 phones, the headset and speakerphone keys do not glow and the Headset icon displays in the status bar. -
Page 40: Mute And Unmute Audio
A hold icon is displayed on the line of the held call, and a red LED light flashes on the line key for all phones except VVX 150 phones. Resume a Call You can view and resume all held calls on the phone. -
Page 41: End An Active Audio Call
1. During a call, do one of the following • Press Transfer to use the default transfer type. • Press and hold Transfer to use the non-default transfer type. For example, if Blind is the default, press and hold Transfer to perform a Consultative transfer. Polycom, Inc. -
Page 42: Cancel A Transfer
Retrieve a Parked BroadSoft Call When a contact parks a call on your line, the status message and the Call Park icon display on your phone until the parked call is either retrieved, ignored, or the parked caller ends the call. Polycom, Inc. -
Page 43: Retrieve A Parked Broadsoft Call On Another Phone
On VVX business IP phones, you can see the number of calls on the line from the Lines screen, as shown next. A green light on the line key indicates a line with an active call, and a red light indicates a line with one or more held calls. Polycom, Inc. -
Page 44: Display Calls From The Lines Screen
From the Lines screen, press the Calls soft key. • On VVX 150 phones, press the L > C soft key. The Calls screen is displayed with the list of active and held calls for each line on the phone. -
Page 45: Managing Calls Remotely
1. Select UC-One on the Home screen or navigate to Settings > Features > UC-One Call Settings. 2. Select a line. 3. Select BroadWorks Anywhere and press Add. 4. Enter information for the Status, Name, Primary Number, and Alt. Number/SIP URI fields, if applicable. Polycom, Inc. -
Page 46: Managing Calls With Broadsoft Uc-One Remote Office
You can answer all incoming calls to your desk phone on your mobile phone or home office phone. Any calls you place to contacts from your remote office number show your desk phone number on the caller Polycom, Inc. -
Page 47: Ignoring Or Rejecting Incoming Calls
Do Not Disturb to reject all calls for a brief time period. Note: You cannot reject calls on shared lines. You can only silence the ringer. Polycom, Inc. -
Page 48: Ignore Or Silence An Incoming Call
If you have new messages or you have enabled call forwarding, the messages or forwarding icon display instead of the DND icon. • The message Do Not Disturb displays in the status bar on all phones. • The DND icon on the Home screen changes from Polycom, Inc. - Page 49 Audio Calls For VVX 150 phones, the line icon changes to Note: When you set your presence status to Do Not Disturb and enable DND on your phone, a message stating that your status is set to Do Not Disturb scrolls under the time display, and the DND icon does not display in the status bar.
-
Page 50: Reject Anonymous Calls
2. From the Call Forwarding screen, enter the forwarding number, and select Forward. Forward All Incoming Calls to a Contact You can set up your phone to forward all incoming calls to a contact using one of the following forwarding types: • Always—Forwards all incoming calls. Polycom, Inc. -
Page 51: Divert Calls To A Contact
2. From the Contact Directory, select a contact. 3. From the Contact Information screen, select Edit. 4. From the Edit Contact screen, select Divert Contact, and enter a contact's number. 5. Select Auto Divert > Enabled. 6. Select Save. Polycom, Inc. -
Page 52: Conference Calls
VVX business IP phones. VVX 150 phones can manage a maximum of four active or held conference calls at a time. All other VVX business IP phones can manage a maximum of 12 active or held conference calls at a time. However, you can have only one active conference call in progress with numerous other conference calls on hold. -
Page 53: Join Calls To Create A Conference Call
When you place a conference call on hold, you place all conference participants on hold. Procedure 1. Select Hold. Resume a Conference Call Resuming a held conference call enables all participants to hear the audio of everyone on the call. Procedure 1. Select Resume. Polycom, Inc. -
Page 54: Split A Conference Call
List information about a participant, such as the participant's name, number, and call details, including whether the call is muted, held, or is video-enabled. This feature is not available for VVX 150 phones. Check with your system administrator to find out if this feature is available on your phone. -
Page 55: Initiate An Advanced Conference Call
24 advanced conference calls at a time on your phone, if enabled on the server. However, you can have only one active conference call in progress on your phone. This feature is not supported on VVX 150 phones. Check with your system administrator to find out if this feature is available on your phone. -
Page 56: Join Two Calls Into An Advanced Conference Call
Chairpersons can mute all conference participants at one time or mute an individual participant. Only chairpersons can mute and unmute conference participants. If a chairperson mutes a participant's audio, a mute icon is displayed in the roster next to each person who is muted. Polycom, Inc. - Page 57 1. Select a participant and press Far Mute. 2. Select the muted participant and press Unmute. Remove Advanced Conference Participants A chairperson can remove any participant from the conference call. Procedure 1. In the roster, select a participant and select Remove. Polycom, Inc.
-
Page 58: Shared Lines
Missed Calls list on all the phones. If you have an incoming call on a shared line and you or any of the other phones answer the call, the call is not logged as missed on any phone. Polycom, Inc. -
Page 59: Hold A Call Privately On A Shared Line
Only one contact can barge in on a call at a time. Contacts can barge in on remote held calls using the Normal barge in mode but cannot barge in on parked calls. This feature is not supported on VVX 150 phones. Check with your system administrator to find out if this feature is available on your phone. -
Page 60: Genband's Multiple Appearance Directory Number - Single Call Appearance
Ask your system administrator about the maximum number of participants allowed on a bridge call. Procedure 1. Press and hold the corresponding line key for the shared line for one second. 2. Select the Barge In soft key. Polycom, Inc. -
Page 61: Leave A Bridge Call
After you enable privacy for an active call on a public shared line, you cannot disable privacy for the call. You can allow other MADN members to join the active call by transferring the call or initiating a conference call. Polycom, Inc. -
Page 62: Alcatel-Lucent Shared Call Appearance
Additionally, all group members can view the status of a call on the shared line on their phones. Each line supports up to 21 call appearances. Placing a SCAP Call Any group member can place a call on the Shared Call Appearance line. Polycom, Inc. -
Page 63: Answering A Scap Call
SCAP members to bridge in to the active call. Procedure 1. During an active call, select Share. The call is now public, the Private soft key is displayed, and other group members can bridge into the call. Polycom, Inc. -
Page 64: Make An Active Scap Call Private
When your phone is registered with a BroadWorks server and you are signed into the phone with your BroadSoft UC-One credentials, you can use the Simultaneous Ring feature to add a list of up to 10 extensions and phone numbers that will ring simultaneously when you receive an incoming call on your line. Polycom, Inc. -
Page 65: Create A Personal Ring Group
Procedure 1. Select UC-One on the Home screen or navigate to Settings > Features > UC-One Call Settings. 2. Select a line. 3. Select Simultaneous Ring Personal. 4. Select the numbers you want to remove and press Delete. Polycom, Inc. -
Page 66: Broadsoft Executive-Assistant
BroadSoft BroadCloud portal. Procedure 1. On the Home screen of the executive’s phone, select Executive. 2. Select Filter Criteria. 3. Choose one of the following: • All Calls • Internal Calls Polycom, Inc. -
Page 67: Assistant Options
1. On the Home screen of the assistant’s phone, select Assistant. 2. On the Overview Executive screen, select Executives then choose an executive. 3. Select On behalf and enter the contact’s number or choose a contact from Recent Calls or the directory. 4. Select Dial. Polycom, Inc. -
Page 68: Pick Up A Held Executive Call On A Shared Line
On shared lines, the executive and assistant can view the status of calls on both phones and choose which call to pick up. Procedure 1. Press and hold the line key with the held call. 2. Select the held call, and select the Pick Call soft key. Polycom, Inc. -
Page 69: Pick Up A Held Executive Call On A Private Line
Assistants cannot silently barge in on executive calls. Procedure 1. During an active call on the executive's line, press and hold the executive line key. 2. Select the S-Barge In soft key. Polycom, Inc. -
Page 70: Recording Audio Calls
For example, on June 22, 2012, at 11:22 a.m., you answer a call from person A. During your call with person A, you answer calls from person B and person C. All three calls are recorded in the same file. Polycom, Inc. -
Page 71: Record A Call
When you resume a recording after pausing, the recording continues within the same file. Procedure 1. Select Resume. Stop Recording You can choose to stop recording a call before the call ends. The recording also stops when the active call ends, no matter who ended the call. Polycom, Inc. -
Page 72: Record A Conference Call
Note: You cannot open and play recordings when you are in an active call or if you're recording a call. If you try to, a message indicating that the action was canceled is displayed. Place the call on hold before playing the recordings. The recording stops playing when you resume the call. Polycom, Inc. -
Page 73: Pause And Resume Played Recordings
2. Select a recording. 3. Select Rename, update the file name, and select OK. Delete a Recording When you have played a recording or need additional space on your USB drive, you can delete recordings from the phone. Polycom, Inc. - Page 74 Recording Audio Calls Procedure 1. Navigate to Settings > Features > Removable Storage Media > Browse Recordings. A list of recordings display. 2. Select a recording. 3. Select Delete. Polycom, Inc.
-
Page 75: Call Lists And Directories
Contact Directory • Corporate Directory ▪ BroadSoft Directories on Polycom VVX Business IP Phones • Managing the GENBAND Address Books All VVX phones support a Recent Calls list, a Contact Directory and a Corporate Directory. The phones can also support a BroadSoft Directory and the GENBAND Address Books depending on your server and if enabled by your system administrator. -
Page 76: Sort Entries By Call Type
2. Select Edit. 3. Edit the number and select Dial. Delete a Recent Call Entry You can delete any recent call entry from the Recent Calls list. Procedure 1. Select Info next to a call record. 2. Select Delete. Polycom, Inc. -
Page 77: Save A Recent Call Entry
First and Last Name—The name of your contact • Contact—Your contact's phone number • Job Title—Your contact's position • Email—Your contact’s personal or work email address • Favorite Index—An index number that displays in your Favorites list • Label—A label or title for your contact Polycom, Inc. -
Page 78: View Contact Information
You can delete any contact from the Contact Directory. Procedure 1. Navigate to Directories > Contact Directory. 2. From the Contact Directory, select a contact. 3. From the Contact Information screen, select Delete. A confirmation message is displayed, confirming that you want to delete the contact. Polycom, Inc. -
Page 79: Corporate Directory
Save your last search results if you would like to see them displayed in the Corporate Directory the next time you view it. Procedure 1. Navigate to Settings > Basic > Preferences. 2. Select Corporate Directory > View Persistency and select Enabled. Each time you view the Corporate Directory, your last search results automatically display. Polycom, Inc. -
Page 80: Add Corporate Directory Contacts To The Contact Directory
3. Select Save. 4. Enter any additional contact information and select Save. ® ® BroadSoft Directories on Polycom Business IP Phones If enabled by your system administrator, you can access, search for, and call contacts in any of your company's BroadSoft directories from any phone. -
Page 81: Searching The Broadsoft Directory
3. On the Advanced Search screen, choose to search for a contact by first name, last name, or a contact number. 4. In the search field, enter your search criteria and select Submit. 5. Choose your contact. A contact details screen is displayed. Polycom, Inc. -
Page 82: Add Broadsoft Contacts To The Contact Directory
4. Edit your contact's name or number. 5. Select Save. Delete a BroadSoft Contact from the Personal Directory You can delete any contact from the Personal Directory. Procedure 1. Navigate to Directories > Personal Directory. 2. From the Contact Information screen, select Delete. Polycom, Inc. -
Page 83: Managing The Genband Address Books
If you want to modify a GAB contact's information, you need to save the contact to the Contact Directory or the Personal Address Book, if enabled. When you save a contact to the Contact Directory or PAB, you can modify and save the contact's information in the PAB or Contact Directory. Polycom, Inc. -
Page 84: Using The Personal Address Book
PAB from the Features or Directory menu on all VVX phones. Note: Before importing contacts to your Polycom phone, make sure you save all of your contacts to your PAB using your GENBAND Personal Agent on your computer. Saving all of your contacts to the PAB ensures that your contacts are downloaded to the Contact Directory on your phone. - Page 85 GENBAND Server. After the contact information is updated on the server, your PAB contact's information is updated immediately on your phone, and a notification with the nickname of the modified contact is displayed on Polycom, Inc.
- Page 86 Call Lists and Directories the phone. When a contact is deleted, the phone deletes the contact from the PAB without any notification. Polycom, Inc.
-
Page 87: Favorites And Contact Lists
4. Select Yes to automatically accept an index number or select Edit Index to enter a unique index number. You can enter a number up to 99 for VVX 150 phones or 9999 for all other VVX phones. Viewing Favorites You can view favorites on your VVX phone in the Favorites list in the Directory or the New Call screen. -
Page 88: Reorder Favorites
Buddy list. You can also view your buddies' status from the Lines and Home screens, if your buddy is a favorite. Add Contacts to Your Buddy List If you want to monitor contacts' status, add them to your Buddy list. Polycom, Inc. -
Page 89: View Your Buddy List
Buddies' Presence Information Your buddies display an icon next to their name to indicate their status. The following table shows the general icons and the status they represent. Buddy Status and Icons Buddy Status Icon Available Busy Away Polycom, Inc. -
Page 90: View Your Watcher List
A list of contacts that cannot monitor your status is displayed. 2. Select Blocked List. Unblock a Contact From the Blocked list, you can unblock contacts and allow them to monitor your phone's status. Procedure 1. Navigate to Settings > Features > Presence. Polycom, Inc. -
Page 91: Managing Broadsoft Uc-One Favorites And Contacts
You can see your BroadSoft UC-One contacts marked as favorites in the UC-One Contacts list and on the Lines screen on VVX business IP phones. The VVX 150 phones do not support BroadSoft UC-One favorites. Contact your system administrator to find out if this feature is available on your phone. -
Page 92: Filter Broadsoft Uc-One Favorites
Select Favorites to display only your BroadSoft UC-One Favorites on the Home screen and in the UC-One Contacts list. • Select Online to display only the BroadSoft UC-One contacts that are currently online on the Home screen and in the UC-One Contacts list. Polycom, Inc. -
Page 93: Search For Broadsoft Uc-One Contacts
Note: For more information on Using BroadSoft applications, refer to web pages BroadSoft UC-One BroadSoft Instant Messaging & Presence. Procedure 1. Select Directories > UC-One Contacts. 2. Select Search. 3. Enter your contact's first or last name. A list of search results display. Polycom, Inc. -
Page 94: Accessing, Sending, And Broadcasting Messages
Note: Contact your system administrator or service provider for information on setting or changing your voicemail greeting. Access Voicemail Messages Voicemail is available on all Polycom VVX phones. Note: For information on remotely accessing your voicemail, contact your system administrator or service provider. -
Page 95: Remove The Message Alert
Select Edit to compose a custom message, and enter your message. 7. Select Send. Read Instant Messages Instant messages display in the order they are received with the first message received displaying first. Procedure 1. Navigate to Messages. 2. Select Instant Messages. Polycom, Inc. -
Page 96: Reply To Instant Messages
Do Not Disturb is enabled. • Emergency—By default, broadcasts sent to group 25 are considered Emergency broadcasts. An Emergency broadcast interrupts Normal broadcasts, Priority broadcasts, and active calls and plays out at near maximum volume even if Do Not Disturb is enabled. Polycom, Inc. -
Page 97: Send A Group Page
Note: You adjust the volume of a Normal, non-emergency page while it plays, and the phone uses the adjusted volume for all subsequent non-emergency pages. However, only your system administrator can change the volume of an Emergency page. Polycom, Inc. -
Page 98: Group Paging Settings
However, you cannot disable your subscriptions to Paging Groups 24 and 25. Procedure 1. Navigate to Settings > Basic > Preferences > Paging/PTT Configuration. 2. Select Group Paging > Group Subscriptions. 3. From the Group Subscriptions screen, select the group you want to subscribe to and select Yes. Polycom, Inc. -
Page 99: Broadcasting Messages With Push To Talk
This behavior is similar to a phone call. Tip: To automatically send a PTT broadcast on the default channel, press and hold Talk. After the transmitting beep, begin speaking. Procedure 1. Select Talk. Polycom, Inc. -
Page 100: Receiving Ptt Broadcasts
Procedure 1. Do one of the following, • For broadcasts that play automatically during a call, hold the call to hear only the broadcast. • For Pending broadcasts, select Accept or hold the call. Polycom, Inc. -
Page 101: Reply To Ptt Broadcasts
Note: The features described in this section require access to the Basic settings menu on the phone. If your phone requires a password to access the Basic settings menu, contact your system administrator for assistance customizing your phone. Polycom, Inc. - Page 102 PTT broadcast interrupts active calls and you hear the audio of the call and the broadcast. Procedure 1. Navigate to Settings > Basic > Preferences > Paging/PTT Configuration. 2. Select PTT Push to Talk > Accept While Busy and select Enable. Polycom, Inc.
-
Page 103: Phone Applications
1. Do one of the following: • To view a meeting, use the Navigation keys to select a meeting or tap the meeting. • To view the previous day, select Previous. • To view an upcoming day, select Next. Polycom, Inc. -
Page 104: Navigate To Other Views
Month view displays all the days in the month, with a dot next to the days that have meetings. The current day is displayed in a darker color, and days you select display in gray. This feature is not available on VVX 150 phones. Check with your system administrator to find out if this feature is available on your phone. -
Page 105: Meeting Reminders
Audible Always (default)—An alert tone plays each time a meeting reminder displays. Procedure 1. Navigate to Settings > Basic > Preferences. 2. Select Calendar Settings > Reminder Settings. 3. Select Reminder Type and choose a meeting reminder type. Polycom, Inc. -
Page 106: Joining Calendar Meetings
Procedure 1. Do one of the following: • From Meeting view, select More Actions and select a number. • From the meeting reminder, select Details > More Actions and select a number. Polycom, Inc. -
Page 107: Navigating The Web And Idle Browsers
Home page, or return to your phone's Home screen. The following table lists the navigation soft keys that display in the Web Browser. Navigating the Web Browser Icon Action Returns to the previous web page. Polycom, Inc. - Page 108 Displays the toolbar permanently so it does not hide every three seconds. Enables the toolbar to hide every three seconds. To display a hidden toolbar, you have to press the touchscreen until the toolbar displays. Exits the Web Browser and returns to the phone's Home screen. Polycom, Inc.
-
Page 109: Connecting To A Wireless Network
Enabling wireless connectivity automatically disables the Ethernet port. Note: VVX phones do not support WEP. Procedure 1. Insert the Polycom Wi-Fi wireless network adapter into the USB port of your VVX phone. 2. Select Start. 3. Select Wi-Fi, then select On. -
Page 110: Connect To A Secured Wireless Network
Remove a Wireless Network You can remove a saved wireless network connection on your VVX phone. Procedure 1. Go to Settings > Basic > Wi-Fi. 2. Select the connected wireless network SSID from the list. 3. Select Forget. Polycom, Inc. -
Page 111: Vvx
On the VVX 250, 350, and 450 business IP phones, you can choose a theme for your phone. The theme controls the way the icons and screens display on your phone. You can choose between the following themes, as shown in the following figures: • Classic • BroadSoft (available when signed into your BroadSoft account) Polycom, Inc. -
Page 112: Set The Language
4. Select Yes to reboot your phone and apply the changes. Set the Language Polycom phones support several languages that you can choose to display on the phone. Check with your system administrator to find out exactly which languages are supported on your phone. -
Page 113: Time And Date Display
• Backlight On—The brightness of the screen when there is activity. • Backlight Idle—The brightness of the screen when there is no activity. • Maximum Intensity—The brightness scale that applies to both Backlight On and Backlight Idle intensities. Polycom, Inc. -
Page 114: Set The Backlight Intensity
You can also add personal photos on your phone using the Web Configuration Utility or a USB flash drive. This feature is not available on VVX 150 phones. Check with your system administrator to find out if this feature is available on your phone. -
Page 115: Adding Personal Photos As Your Background
Progressive or multiscan JPEG images are not supported. • The phone screen sizes vary by phone: ◦ VVX 150 phone screens are 132 x 48 pixels. ◦ VVX 250 phone screens are 320 x 240 pixels. ◦ VVX 350 phone screens are 320 x 240 pixels. -
Page 116: Reset Your Background
The screen saver automatically starts each time your phone is idle for a certain amount of time. You can stop the screen saver at any time by pressing any key or touching the screen. When your phone is idle again for a specified period of time, the screen saver starts again. Polycom, Inc. -
Page 117: Use Personal Photos As Screen Savers
Go back and make sure the information you entered is correct. 7. Navigate to Settings > Basic > Preferences. 8. Select Screen Saver > Screen Saver screen and select Enabled. Polycom, Inc. -
Page 118: Disable The Screen Saver
Contact your system administrator. Procedure 1. Select Settings > Features > Removable Storage Media > Picture Frame. Your pictures display one-by-one, like a slide show, and navigation icons display beneath your pictures, as shown next. Polycom, Inc. -
Page 119: Picture Frame Icons
Set the picture that currently displays as the background picture for your phone. Power-Saving Mode By default, Polycom phones are set to enter power-saving mode and turn off the screen after being idle for a certain period of time to conserve energy. -
Page 120: Change Your Office Hours For Power-Saving Mode
5. Select User Input Idle Timeout and enter the number of minutes (1 to 10 minutes) the phone should wait after a key press or screen select before starting power-saving mode. 6. Select Save. Polycom, Inc. -
Page 121: Changing Audio Settings
2. From the Contact Directory, select a contact. 3. From the Contact Information screen, select Edit. 4. From the Edit Contact screen, select Ring Type and select a ringtone. 5. Select Play to hear the ringtone. 6. Select Save. Polycom, Inc. -
Page 122: Change The Volume
2. Select Acoustic Fence and select Enable. Updating Your Buddy Status Polycom phones enable you to sign into and update your presence status on your phone to let contacts know when you are busy or available. You can update your status to one of the following: •... -
Page 123: Automatically Update Your Buddy Status
For example, if you are classified as a Top Secret user, you can lower your classification level to Secret or Restricted during a call. You cannot change the security classification when the phone is idle and not in a call. Polycom, Inc. - Page 124 2. On the Security Classification screen, choose one of the following options: ▪ Top Secret ▪ Secret ▪ Restricted ▪ Classified A notification displays on all call participants' phones informing them that the classification level of the call has changed. Polycom, Inc.
-
Page 125: Phone Accessories And Computer Applications
(EHS). You can connect an analog headset to all VVX phones or a USB headset to VVX 250, 350, and 450 phones. See Feature Profile 37477: Using Headsets with Polycom Phones on Polycom Support for a list of compatible headsets. -
Page 126: Use Your Headset For All Calls
Typically, you can work wirelessly up to 300 feet (91 meters) from your phone and still use the EHS controls. Check with your headset's user guide for the precise range restrictions. See Feature Profile 37477: Using Headsets with Polycom Phones on Polycom Support for a list of compatible headsets. - Page 127 Procedure 1. Connect your headset and EHS adapter to your phone. See the Quick Start Guide for your phone on Polycom Voice Support for information on connecting a headset to your phone. 2. Navigate to Settings > Basic > Preferences.
-
Page 128: Disconnect Your Headset
The PDC is compatible with any language your phone and computer supports. Contact your system administrator to find out if your phone supports the PDC. This feature is not available on VVX 150 phones. Check with your system administrator to find out if this feature is available on your phone. - Page 129 Connect Using the Indirect Method If your phone and computer are connected through a switch, use the indirect method to enable the PDC. This method requires you to find your computer's IP address and manually enter your computer access credentials. Polycom, Inc.
- Page 130 Procedure 1. On your computer, click Start > Programs > Polycom > Polycom Desktop Connector. The PDC icon is displayed as an active program on your taskbar as shown next. 2. On your phone, navigate to Settings > Basic > PDC Configuration.
-
Page 131: Using The Polycom Desktop Connector
Using Keyboard Shortcuts to Perform Tasks on Your Phone The Polycom Desktop Connector application extends your keyboard and mouse functionality from your computer onto your phone. You can perform the following tasks using the application:... - Page 132 Do Not Disturb Directories menu Alt + F7 Messages menu Alt + F8 New Call soft key Talk soft key (if PTT is enabled) Alt + F9 End Call soft key ACD Sign In (if enabled) Alt + F10 Settings. Polycom, Inc.
- Page 133 3. Move your cursor onto your phone's display screen. The PDC program changes your keyboard language when you move your cursor onto your phone's screen. 4. On the phone, enter text in your chosen language. The following graphic shows Russian characters entered on a VVX phone. Polycom, Inc.
- Page 134 Phone Accessories and Computer Applications Tip: To change your keyboard language back to the original, press the keyboard shortcut Left Alt + Left Shift to toggle your keyboard language. Polycom, Inc.
-
Page 135: Accessibility Features
Polycom products include a number of features to accommodate hearing, vision, or mobility-impaired users. Features for Hearing-Impaired Users Polycom phones include many features that enable users with hearing impairments to use various features on the phone. The following table lists the accessibility features for hearing-impaired users. -
Page 136: Features For Mobility-Impaired Users
Icons and Status Indicators on VVX Business IP Phones on page 21 Features for Mobility-Impaired Users Polycom phones include features that enable users with mobility impairments to perform various functions on the phone. The following table lists the accessibility features for mobility-impaired users. -
Page 137: Features For Vision-Impaired And Blind Users
Accessibility Features Features for Vision-Impaired and Blind Users Polycom phones include various features that enable users with visual impairments to use many of the features on the phone. The following table lists the accessibility features for visually-impaired and blind users. -
Page 138: Maintaining Polycom ® Vvx ® Business Ip Phones
® ® Maintaining Polycom Business IP Phones Topics: • Investigate Warnings • Remove Warnings • Restart Your Phone • Update the Phone's Configuration • Test the Hardware ▪ Cleaning the Screen • View Software Details • Updating the Phone Software When the phone is not operating properly, you can investigate or troubleshoot issues along with any other tasks your administrator may ask you to perform. -
Page 139: Restart Your Phone
® ® Maintaining Polycom Business IP Phones Restart Your Phone Your system administrator may ask you to restart the phone if it malfunctions or to assist in troubleshooting. Caution: Before you restart the phone, contact your system administrator. If the phone is malfunctioning, you may be able to restore normal operation without restarting it. -
Page 140: Cleaning The Screen
® ® Maintaining Polycom Business IP Phones • Display Diagnostics • Brightness Diagnostics • LED Diagnostics • Keypad Diagnostics Cleaning the Screen The phone screens require minor maintenance, but you may need to clean the screen periodically. Use a clean, dry, microfiber cloth—the kind you would use to clean glass surfaces—to wipe the screen. -
Page 141: Postpone Software Updates
® ® Maintaining Polycom Business IP Phones Procedure 1. Press the SWUpdate soft key. Postpone Software Updates Instead of updating your software immediately, you can choose to postpone the update for a later time. You can choose to postpone the software update from 15 minutes up to six hours. You can postpone the software update up to three times. -
Page 142: Troubleshooting
Reset the Phone to Factory Defaults ▪ Using an Approved Power Source If you are having issues with your Polycom phone, you can try the troubleshooting options and solutions in the following topics to resolve certain issues. Speakerphone If your speakerphone doesn't work, your system administrator may have disabled it. If this is the case, a message displays after you press the speakerphone key informing you that Handsfree mode is disabled. -
Page 143: Genband Address Book
Server URL • Registration Index and User ID Polycom Desktop Connector If you encounter any issues using the Polycom Desktop Connector (PDC), see the following table for possible solutions to common problems. Common PDC Problems and Solutions Issue Corrective Action... -
Page 144: Troubleshoot Audio And Echo Issues
New Call soft key. To place a call, enter the phone number and select the Dial soft key or tap I want to change the phone that is connected to the Disable the Polycom Desktop Connector, which is Polycom Desktop Connector. already connected to your computer and is in active state on your phone. -
Page 145: Reset The Phone To Factory Defaults
If you connect the wrong power supply to your phone, such as the power supply for a different or older Polycom phone, it could damage the phone, the phone will not function as expected, and it can void your warranty.
Need help?
Do you have a question about the VVX 150 and is the answer not in the manual?
Questions and answers