Advertisement
Quick Links
Advertisement

Related Manuals for VERITAS Carver's Bench


Summary of Contents for VERITAS Carver's Bench
- Page 1 Carver’s Bench Owner’s Manual 05A04.01...
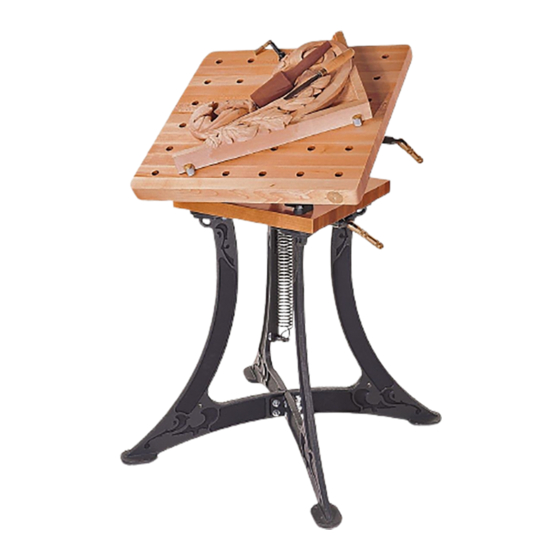
- Page 2 Bracket Sub-Assembly Work Surface Square-Head Bolt Frame Hex-Head Bolts Base Slab Rotate Clamp Lower Support Block Support Bar Tilt Clamp Leather Pad Retaining Spring Strap Tension Rods Pedestal Leg Assembly Figure 1: Exploded assembly of the Veritas Carver’s Bench.
- Page 3 ® Veritas Carver's Bench Assembly Attaching the Support Bar The work surface is packaged separately from the bracket Slide the rounded end of the support bar through the hole in sub-assembly for easier handling of the components. Some the base slab, orienting it so that the support bar spring assembly will be required before the product can be used.
- Page 4 Figure 10: Securing the tilt clamp bar retaining strap. Figure 7: Closed carver’s bench top with lower support Preparing the Supporting Base block installed. ® If you have purchased the Veritas Cast-Iron Pedestal Attaching the Tilt Clamp Bar Legs, assemble them now, following the instructions there Slide the "...
- Page 5 ® Veritas Carver's Bench Optional Tension Rods Note: It does not matter which set of legs the tension rods are If you will be doing heavy carving with mallet blows near the attached to, the effect will be the same.
-
Page 6: Maintenance
Legs Instructions), or drill through the feet and fasten the table directly to the fl oor. You will want to be sure the bench The Veritas Carver’s Bench is assembled from several location allows for the full range of motion before drilling cast-iron parts. - Page 7 ® Veritas Carver's Bench Making Your Own Base The base shown in Figure 18 is modelled on the construction ® of the Veritas Workbench. The entire assembly is held together with lag screws and tension rods. This provides a stiff base; however, the geometry required to keep the mechanism clear results in a fairly small front-to-back footprint.
- Page 8 ® A Veritas Wonder Pup Clamp is included with your Adjustable in all three axes, the Veritas Carver’s Vise does carver’s bench; however, they may be purchased separately for small work what your carver’s bench does for large pieces. if you fi nd you need extra clamping The cast ZA-12 alloy base and robust clamping mechanism capacity.
Need help?
Do you have a question about the Carver's Bench and is the answer not in the manual?
Questions and answers