Table of Contents
Advertisement
Advertisement
Table of Contents

Related Manuals for VERITAS Mk.II Honing


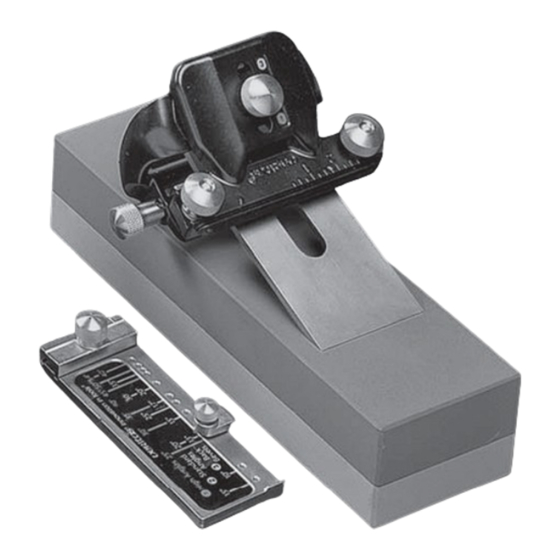
Summary of Contents for VERITAS Mk.II Honing
- Page 1 Mk.II Honing Guide 05M09.01 U.S. Pat. No. 7,553,216...
- Page 2 ® This Veritas Mk.II Honing Guide is an all-in-one system for sharpening edge-cutting tools. The great advantage of this system is that it has everything you need to precisely set primary bevel angles for high-angle and standard-angle blades, as well as back bevels. The ranges are numbered and color-coded for clarity and ease of use.
- Page 3 it should be well lapped near the cutting edge. In this lapping process, be sure to keep the face of the blade fl at; otherwise, you could gouge the face of the blade or create an unintentional back bevel. When you have the back well lapped, polish it on a 4000 or 8000 grit stone.
- Page 4 Step 3: Setting the Registration Jig The registration jig ensures your blade is centered and squared in the blade carrier and sets the blade projection for the desired bevel angle. Slide the registration jig onto the dovetail feature along the front of the blade carrier. Set the registration jig such that the pointer on the top jaw of the jig aligns with the approximate width of your blade on the scale on the top of the blade carrier (see Figure 4).
- Page 5 Step 4: Installing the Blade For reliable results, the blade must be properly installed in the guide. Loosen the two blade clamp knobs on the blade carrier. Open the clamp bar wide enough to slide the blade in. The knobs must be loosened and tightened in small increments.
- Page 6 Step 6: Honing the Micro-Bevel One of the features of the honing guide is that the blade can be quickly and easily honed to a razor-sharp edge by adding a micro-bevel (or secondary bevel) to the primary bevel. A smooth micro-bevel on the blade produces the same result as honing the complete bevel, since only the cutting edge itself has any effect when cutting.
- Page 7 To create back-bevel angles of 10° or higher, simply set the blade carrier in the (green) Blade installed bevel up. back-bevel confi guration and the blade registration stop on the (green) scale. Install the blade with the primary bevel up (as shown in Figure 11), and the micro-bevel knob in the 12 o’clock position.
- Page 8 Setting Other Angles ® The blade stop on the Veritas Mk.II Honing Guide’s registration jig has discrete positions for preset bevel angles, providing quick, accurate sharpening and perfectly repeatable results. The registration jig not only squares the blade in the carrier, but also sets the appropriate blade projection for the desired bevel angle.
- Page 9 Table 1: Obtaining Other Angles by Adjusting Wheel Setting Knob Standard Angles Arrow Direction Arrow Direction Hole Up Back Front Down Hole Up Back Front Down 15.0 15.4 15.8 16.2 26.5 27.0 28.0 28.4 16.0 16.5 16.9 17.3 30.0 30.4 31.7 32.1 19.4...
- Page 10 Alternatively, the blade projection can be set according to the desired bevel angle, as shown in Table 2. Measure from the edge of the registration jig and mark the line on the bottom of the jig. Align the edge of your blade to this line. Blade Projection Figure 14: Measuring blade projection.
- Page 11 Honing Guide Maintenance Your honing guide needs to be oiled regularly. The machining tolerances on this guide are tight to make it as accurate and as durable as possible. Since the guide is exposed to water and abrasive particles in use, fi ne particles can get between the roller and the cam to interfere with smooth operation.
- Page 12 Accessories 05M09.03 Skew Registration Jig 05M09.05 Camber Roller Assembly 814 Proctor Avenue 1090 Morrison Drive Ogdensburg, New York Ottawa, Ontario 13669-2205 USA K2H 1C2 Canada INS-267 Rev. D customerservice@veritastools.com © Veritas Tools Inc. 2011 Printed in Canada. www.veritastools.com...
- Page 13 Narrow-Blade Head 05M09.09 Patent Pending...
- Page 14 The Veritas ® Narrow-Blade Head is designed to hold narrow blades square to the standard Mk.II honing guide, and works with the straight roller base and angle registration jig. Narrow-Blade Carrier Blade Clamp Knob Clamp Jaws Figure 1: Narrow-blade carrier components.
- Page 15 Once the blade carrier is installed, slide the angle registration jig onto the dovetail feature along the front of the narrow-blade carrier. Locate the registration stop for the desired bevel angle. Registration Jig Clamp Knob Angle Registration Jig Registration Stop Figure 3: Connecting the registration jig onto the narrow-blade carrier.
- Page 16 814 Proctor Avenue 1090 Morrison Drive Ogdensburg NY 13669-2205 Ottawa ON K2H 1C2 United States Canada customerservice@veritastools.com © Veritas Tools Inc. 2015 www.veritastools.com 801 INS-393 Rev. A...
Need help?
Do you have a question about the Mk.II Honing and is the answer not in the manual?
Questions and answers