Table of Contents
Advertisement
Advertisement
Table of Contents

Related Manuals for EUFY RoboVac 30C


Summary of Contents for EUFY RoboVac 30C
- Page 1 Owner’s Manual RoboVac 30C (T2118) T2118 51005001159 V01...
-
Page 2: Table Of Contents
Clean the Side Brushes Replace the Side Brushes Clean the Sensors and Charging Pins Clean the Swivel Wheel Troubleshooting Specifications Customer Service Thank you for purchasing RoboVac 30C. Read all instructions before using this product, and keep it properly for future reference. -
Page 3: Important Safety Instructions
Important Safety Instructions To reduce the risk of injury or damage, read these safety instructions carefully and keep • If the room to be cleaned has a balcony, a physical barrier should be used to prevent them at hand when setting up, using, and maintaining this device. access to the balcony and to ensure safe operation. - Page 4 Consignes de Sécurité This equipment generates, uses, and can radiate radio frequency energy and, if not installed and used in accordance with the instructions, may cause harmful interference to radio communications. However, there is no guarantee that interference will not occur in a particular installation.
-
Page 5: About Your Robovac
Il n'y a pas de pièces réparables par l'utilisateur. • Ne pas utiliser sur un sol inachevé, non scellé, ciré ou accidenté au risque d'endommager le sol ou l'appareil. Utiliser uniquement sur des surfaces dures ou sur RoboVac 30C Charging Base Remote Control des tapis à... -
Page 6: Robovac Anatomy
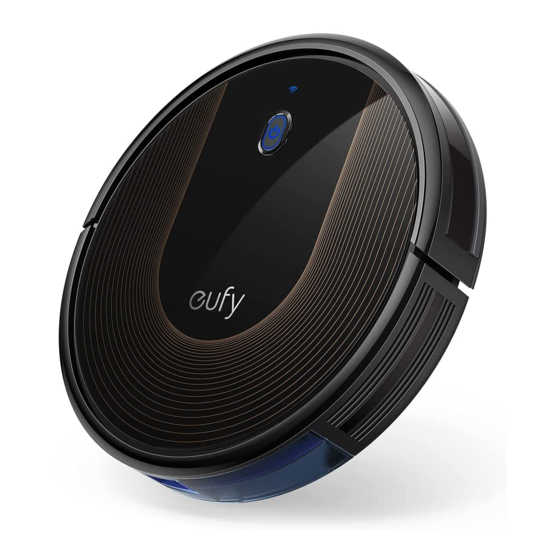
RoboVac Anatomy Dust Collector Top & Side Pre-filter Auto cleaning Start/Stop button Wi-Fi status light Bumper High-performance filter Foam filter Infrared sensor Suction Inlet Dust collector Dust collector release button Dust collector Bottom Charging contact pins Drop sensors Hall sensors Swivel wheel Side brushes Suction inlet... -
Page 7: Led Indication
Remote Control (Wi-Fi Status Light) Status Slowly flashing blue Waiting for connection Return RoboVac to Charging Base Rapidly flashing blue Connecting with your wireless router Adjust suction power level in Auto and Quick Solid blue Connected to your wireless router Cleaning modes Start Auto cleaning / Stop cleaning Using Your RoboVac... -
Page 8: Preparation
Anti-drop sensors prevent RoboVac from tumbling down stairs and steep drops. They Place the Charging Base on a hard, level surface and against a wall. may work less effectively if dirty or used on reflective/very dark-colored floors. It is recommended to apply the Boundary Strip(s) to block off areas where RoboVac may fall. Place physical barriers or Boundary Strips in front of fireplaces and areas that may cause damage to RoboVac if entered. -
Page 9: Use Your Robovac With The Eufyhome App
Method 1: Attach RoboVac to the Charging Base by aligning its charging pins with the • RoboVac is attached to the Charging Base to ensure it has enough power during charging pins on the base. setup. EufyHome EufyHome 1. Download the EufyHome app from the App Store (iOS devices) or Google Play (Android Method 2: Press on the remote control to return RoboVac to the Charging Base. -
Page 10: Start / Stop Cleaning
Schedule Cleaning Press on RoboVac or on the remote control to start cleaning in Auto Mode. With the EufyHome app, you can schedule RoboVac to start cleaning at a particular time. • You can set the time and customize the cleaning schedules from Sunday to Saturday on the EufyHome app. - Page 11 2. Spot cleaning 4. Quick cleaning RoboVac intensively cleans a specific area in a spiral pattern, useful if there is a RoboVac will automatically stop cleaning after 30 minutes and return to the Charging Base concentrated area of dust or debris. In Spot mode, RoboVac will stop cleaning after 2 in this mode.
-
Page 12: Use The Boundary Strip
• RoboVac is connected with the EufyHome app. • You have an Alexa-enabled device (i.e. eufy Genie, Amazon Echo, Echo Dot and Amazon Tap, Echo Show, Echo Spot) or a device enabled with the Google Assistant (i.e. -
Page 13: Cleaning And Maintenance
Ok Google, ask RoboVac to find my robot. - For more information about how RoboVac works with Amazon Alexa / the Google Assistant, visit https://www.eufylife.com and go to PRODUCTS>Cleaning>RoboVac 30C Remove the pre-filter by pulling the hooks as shown. for details. -
Page 14: Clean The Rolling Brush
Take out the foam filter and high-performance filter. Press down to snap the brush guard into place. Clean the dust collector and filters with a vacuum cleaner or a cleaning brush. Put the filters and pre-filter back together in the dust collector. Clean the Side Brushes Foreign substances, such as hair, can easily get tangled in the side brushes, and dirt may adhere to them. -
Page 15: Replace The Side Brushes
Clean the Swivel Wheel Only use the side brushes when they are completely dry. Hair or dust particles can easily get entangled in the swivel wheel. Be sure to clean the swivel wheel periodically and as needed. Replace the Side Brushes Wheel Axle The side brushes may become bent or damaged after being used for a period of time. -
Page 16: Troubleshooting
When RoboVac is in trouble, it will emit a series of short or long beeps and the red indicator • Check if the indicator on the Charging Base lights up. If on RoboVac will be solid or flashing. not, contact the eufy service center to repair or replace the Charging Base. Flashing red indicator light RoboVac cannot be • Dust off the charging contact pins with a dry cloth. - Page 17 If you cannot control RoboVac with your smartphone, try the solutions below to solve the • Turn off RoboVac, then remove and problem. If the problem persists, contact the eufy service center for help. empty the dust collector. Three beeps RoboVac’s suction fan is stuck.
-
Page 18: Specifications
Specifications Product Model T2118 Input 19 V 0.6 A Battery Voltage DC 14.4 V Power Consumption 40 W DC 14.4 V Battery Type Li-ion 2600 mAh Dust Collector Capacity 0.6 L Cleaning Time Max. 100 mins Charging Time 300 - 360 mins Input 19 V 0.6 A...
Need help?
Do you have a question about the RoboVac 30C and is the answer not in the manual?
Questions and answers