Keurig Platinum B70 Owner's Manual
Hide thumbs
Also See for Platinum B70:
- Use and care manual (32 pages) ,
- Owner's manual (16 pages) ,
- Setup manual (2 pages)
Table of Contents
Advertisement
Advertisement
Table of Contents

Related Manuals for Keurig Platinum B70


Summary of Contents for Keurig Platinum B70
- Page 1 Owner’ s manual Platinum B70 Keurig Brewer ®...
-
Page 2: Important Safeguards
Contact Keurig Customer Service to instructions before it is used. 21. Consult a qualified electrician if the report any malfunction of or damage grounding instructions are not completely 4. - Page 3 TABLE OF CONTENTS KEURIG GOURMET SINGLE CUP HOME BREWING SYSTEM ® Platinum B70 — Using Your Brewer CAUTION: There are two sharp needles that puncture the K-Cup portion pack, ® one above the K-Cup Holder and the other in the bottom of the K-Cup Holder.
-
Page 4: Helpful Hints
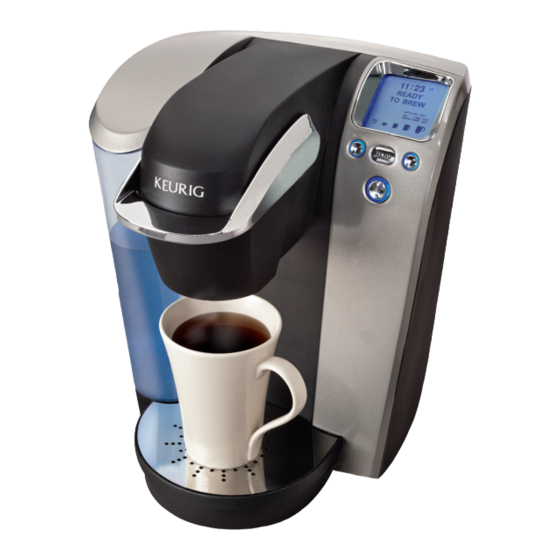
3. For the best tasting gourmet coffee, tea or To brew into a travel mug, simply remove the Brewer behind the Drip Tray (when removed). hot cocoa, Keurig recommends using bottled Drip Tray Assembly and place the travel mug or filtered water. - Page 5 Features Platinum — Model B70 Brewer Controls and Indicators Platinum B70 Brewer Water Reservoir Lid Funnel K-Cup Portion Pack Drip Tray Base LCD Control Center ® Assembly Housing Easy-Fill Lid K-Cup Portion Pack Vent Left Button ® Holder (F and G are the...
-
Page 6: Setting Up Your Brewer
SECTION 1 Set-Up & First Brew Lock Tab fig. IMPorTanT: You cannot use your Keurig Brewer until it has been set ® up for its first use. noTe: If Brewer has been exposed to temperatures below freezing, allow Brewer at least two hours to reach room temperature before brewing. - Page 7 Place a K-Cup portion pack in the K-Cup NOTE: You may see small amounts of water coming ® ® fig. Holder (fig. 6). from the Vent and dripping into the Water Reservoir during this and subsequent heating — this is normal. CAUTION: There are two sharp needles that puncture the K-Cup , one above the K-Cup...
- Page 8 The Brewer will CAUTION: K-Cup ® not allow you to brew when “ADD WATER” is will be hot. MENU MENU displayed (fig. 9). Enjoy your first cup BREW BREW of Keurig Brewed ® gourmet coffee, tea or hot cocoa!
-
Page 9: Purging The Brewer
Purging the Brewer The Water Reservoir can be filled in two ways. Open the Easy-Fill Lid and pour water directly into the Water Reservoir If your Brewer has not been used for more than one week, you should purge while it is still attached to the Brewer, then close the Lid. The entire the water from the inner tank. -
Page 10: Programming On/Off Features
SECTION 2 Controls & Indicators (LCD Control Center) Setting the clock The correct time should now be displayed in the LCD Control Center. NOTE: If power is interrupted to the Brewer by unplugging it, or if power is Setting the clock is optional. When the clock is set, the time will appear in lost, follow the procedure above to reset the time as the clock will not be the LCD Control Center. - Page 11 b. Press or hold the Left Button under the c. Press or hold the Right Button under the fig. fig. blinking “H” to advance 1 hour at a time, up “M” to scroll through the minutes to your to 9 hours. desired “ON TIME”...
-
Page 12: Programming Brew Temperature
SECTION 2 Controls & Indicators (LCD Control Center) Programming Brew Temperature (187° – 192º F) simply press the Power Button and you can fig. brew as soon as the water is heated and the “READY TO BREW” indicator is displayed on The Brewer brews at a preset temperature of 192°. -
Page 13: Cleaning External Parts
SECTION 3 Cleaning & Maintenance cleaning external Parts To change the brew temperature again, repeat steps 1 through 3 to change the temperature up or down, remembering that the temperature can only be between 187° and 192° . Regular cleaning of the Brewer’s external components is recommended. NOTE: At high altitudes (over 5,000 feet) if boiling occurs use the tempera- Never immerse the Brewer in water or other liquids. - Page 14 SECTION 3 Cleaning & Maintenance (continued) 2. Cleaning the Funnel —The Funnel can be 1. Rinse the filter screen with the strong force of water from your faucet. fig. removed from the K-Cup Holder by pulling 2. If you have a sprayer, aim the water spray at the filter screen. ®...
-
Page 15: De-Scaling
De-Scaling Instructions Service A. PREPARE Beyond these recommended cleaning and maintenance procedures this Step 1: To begin, you will need the following: Brewer is not user serviceable. For service, please refer to the Warranty At least 48 ounces of undiluted white vinegar section of this guide. -
Page 16: Section 4 Troubleshooting
SECTION 4 Troubleshooting SITUATION SOLUTION SITUATION SOLUTION Brewer does not Plug Brewer into an independent outlet. Brewing a The Exit Needle may be clogged (refer to page 14). • • have power Check to be sure that it is plugged in securely. partial cup Clean the K-Cup Holder Assembly if necessary and... -
Page 17: Section 5 Warranty
Brewer so that your purchase information will be stored SPECIFICALLY DISCLAIMS ALL OTHER WARRANTIES WITH RESPECT TO in our system. Keurig will, at its option, repair or replace the Brewer without YOUR B70 BREWER, INCLUDING ANY IMPLIED WARRANTY OF MERCHANT charge upon its receipt of proof of the date of purchase. - Page 20 P/N 60-201202-000 Rev D 04/11 ClICK, Call Or sHOP I www.keurig.com I 1.866.901.BREW I At over 18,000 stores in the U.S. and Canada Keurig, Incorporated For Household Use Only 55 Walkers Brook Drive Reading, MA 01867 Covered by U.S. Patent Numbers 7,398,726, 7,165,488,...
Need help?
Do you have a question about the Platinum B70 and is the answer not in the manual?
Questions and answers