Table of Contents
Advertisement
Available languages
Available languages
CAUTION: There are two sharp needles that
puncture the K-Cup
®
portion pack, one
above the K-Cup Holder and the other in the
bottom of the K-Cup Holder.
To avoid risk of injury, do not put your
fingers in the K-Cup Chamber.
CAUTION: There is extremely hot water in
the K-Cup Holder during the brew process.
To avoid risk of injury, do not lift the Handle
or open the K-Cup Chamber during the
brew process.
SHORT CORD INSTRUCTIONS: A short power
supply cord is provided to reduce the risk of
becoming entangled in or tripping over a longer
cord.
If an extension cord is used, (1) the marked
electrical rating of the cord set or extension cord
should be at least as great as the electrical rating of
the appliance, (2) the cord should be arranged so
that it will not drape over the countertop or table-
top where it can be pulled on by children or tripped
over unintentionally and (3) the extension cord
must include a 3-prong grounding plug.
THIS PRODUCT IS FOR HOUSEHOLD USE ONLY.
WARNING
RISK OF FIRE OR ELECTRIC SHOCK
DO NOT OPEN
WARNING: TO REDUCE THE RISK OF FIRE
OR ELECTRIC SHOCK, DO NOT REMOVE
THE BOTTOM COVER. NO USER
SERVICEABLE PARTS ARE INSIDE. REPAIR
SHOULD BE DONE BY AUTHORIZED
SERVICE PERSONNEL ONLY.
KEURIG
®
GOURMET SINGLE CUP
HOME BREWING SYSTEM
Special Edition - Model B60
Use & Care Guide
TABLE OF CONTENTS
SECTION 1
SET-UP & OPERATION
Helpful Hints . . . . . . . . . . . . . . . . . . . . . . . .
Unpacking . . . . . . . . . . . . . . . . . . . . . . . . . . .
Features . . . . . . . . . . . . . . . . . . . . . . . . . . . .
Set-Up & First Brew . . . . . . . . . . . . . . . . . .
SECTION 2
LCD Control Center . . . . . . . . . . . . . . . . . . .
Cleaning . . . . . . . . . . . . . . . . . . . . . . . . . . . . 12
De-Scaling . . . . . . . . . . . . . . . . . . . . . . . . . . 13
Storage . . . . . . . . . . . . . . . . . . . . . . . . . . . . . 14
SECTION 4
. . . . . . . . . . . . . . . . . 15
SECTION 5
. . . . . . . . . . . . . . . . . . . . . . . . . . 16
Pour des directives en Français,
veuillez vous reporter à la page 17.
Record your Brewer Serial Number here.
The Serial Number is located on the
bottom of the Brewer on a white sticker.
_________________________________
4
4
5
6
9
3
Advertisement
Table of Contents

Related Manuals for Keurig B60


Summary of Contents for Keurig B60
-
Page 1: Table Of Contents
K-Cup ® portion pack, one above the K-Cup Holder and the other in the Special Edition - Model B60 bottom of the K-Cup Holder. Use & Care Guide To avoid risk of injury, do not put your TABLE OF CONTENTS fingers in the K-Cup Chamber. -
Page 2: Helpful Hints
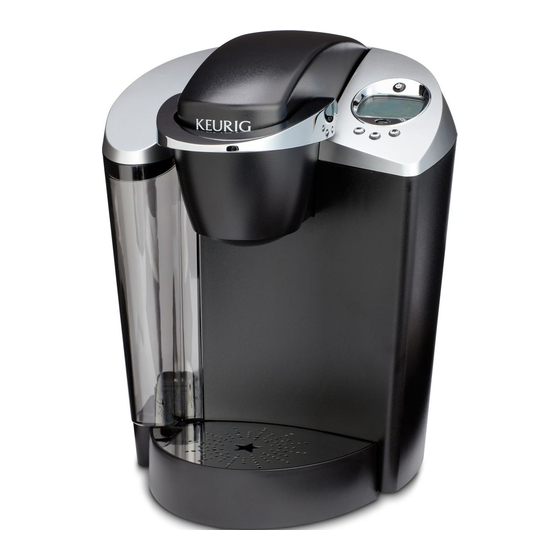
To brew into a travel mug, simply remove the Drip Tray Assembly and place the travel mug on the Drip Tray Base. ® portion packs. Features Special Edition - Model B60 Brewer Water Reservoir Lid Water Reservoir Water Reservoir Lock Tab Slots Handle K-Cup ®... -
Page 3: Set-Up & First Brew
10. Lift the Handle and remove and dispose of the used K-Cup. CAUTION: K-Cup will be hot. READY 11. Enjoy your first cup of Keurig Brewed gourmet coffee or tea! 12. Your Brewer may display ‘NOT READY’ as it heats water for the next brew cycle. The Travel Mug ‘READY TO BREW’... -
Page 4: Controls & Indicators
Stopping the Brew Process Brewing Hot Water If you need to stop the brewing after the Your Brewer is able to produce a cup of hot process has started, press the Power Button to water for making hot chocolate, for use in turn the Brewer ‘OFF’. - Page 5 c. After setting the desired AUTO-OFF time, b. Press or hold the blue Cup button under press the MENU button four times to the H to scroll through the hours to your scroll through the remaining program- desired ON time hour. ming options and exit the programming c.
-
Page 6: Cleaning & Maintenance
SECTION 3 CLEANING & MAINTENANCE Cleaning External Parts 2. Cleaning the Funnel The Funnel can be removed from the K-Cup Regular cleaning of the Brewer’s external components is recommended. Holder by pulling on it until it snaps off. The Funnel is dishwasher safe. To replace it just 1. -
Page 7: Storage
Storage Empty the Water Reservoir before storing and take care to ensure that you store your Brewer in a safe and frost free environment. Please be sure to store your Brewer in its upright position to avoid water leakage from the inner tank. -
Page 8: Warranty
SECTION 5 WARRANTY Limited One Year Warranty Keurig warrants that your Brewer will be free Other Limitations of defects in materials or workmanship under THIS WARRANTY IS EXCLUSIVE AND IS IN normal home use for one year from the date LIEU OF ANY OTHER EXPRESS WARRANTY, of purchase. -
Page 9: Réglages Et Fonctionnement De La Cafetière
® . Pour éviter tout Manuel d’utilisation et d’entretien risque de blessure, ne pas mettre les doigts du Édition Spéciale - Modèle B60 dans le compartiment de la K-Cup. TABLE DES MATIÈRES ATTENTION : L’eau se trouvant dans le SECTION 1 support à... -
Page 10: Caractéristiques
Édition Spéciale - IMPORTANT : N’utilisez par votre cafetière Modèle de cafetière B60 Keurig avant de l’avoir préparée pour une première utilisation, tel qu’indiqué ci-dessous. REMARQUE : Si la cafetière a été placée dans un endroit où la température était sous le point de congélation, il est recommandé... - Page 11 11. Il ne vous reste plus qu’à savourer votre première tasse de café gourmet ou de thé Travel Mug Button MENU Keurig Brewed Cup Button 12. Si votre cafetière indique ensuite ‘NOT READY’ (PAS PRÊT), c'est qu'elle réchauffe Mug Button l'eau pour une prochaine infusion.
- Page 12 SECTION 2 COMMANDES ET VOYANTS Afficheur de messages à cristaux liquides Réglage de l’horloge REMARQUE : Si la cafetière est débranchée Le réglage de l’horloge est facultatif. Quand ou s’il y a une panne d’électricité, suivez la l’horloge est réglée, l’heure est affichée sur procédure ci-dessous pour régler à...
-
Page 13: Nettoyage Et Entretien
messages indiquera que vous avez réglé Régler la température de l'eau entre 187 et une heure de mise en marche automa- 192 °F (86 - 89 °C) tique et/ou une heure d’arrêt automatique. La cafetière infuse le café à une température g. - Page 14 Détartrage de votre cafetière Détartrage La teneur en minéraux et en chlore de l’eau a. PRÉPARATION varie d’un endroit à un autre. Selon la teneur étape : Assurez-vous d’avoir au moins en minéraux de l’eau de votre région, il peut y 1,4 litre (48 oz) de vinaigre blanc non dilué.
- Page 15 SECTION 4 DÉPANNAGE PROBLÈME SOLUTION La cafetière ne • Branchez la cafetière séparément. fonctionne pas • Vérifiez que la cafetière est bien branchée. • Branchez la cafetière dans une autre prise. • Réenclenchez le disjoncteur au besoin. • Assurez-vous que le bouton de mise en marche a été actionné et que la lumière verte s’allume.
Need help?
Do you have a question about the B60 and is the answer not in the manual?
Questions and answers
When priming a new machine, the Travel Mug button does not light up when the word Prime is on the LCD screen.
The Travel Mug button does not light up on the Keurig B60 when the word "PRIME" is on the LCD screen because the brewer must be primed before its first use. Until priming is complete, the brew buttons, including the Travel Mug button, are disabled to prevent accidental activation.
This answer is automatically generated
When priming, the Travel Mug button does not light up and flash when Prime is displayed on the LCD screen. And under the water reservoir a blue light is flashing.
If the Travel Mug button does not light up and flash during priming on a Keurig B60 and a blue light is flashing under the water reservoir, it likely means the brewer is not properly primed or the K-Cup® portion pack was inserted during priming, which should not be done. Remove any K-Cup, ensure the water reservoir is filled and seated correctly, then restart the priming process.
This answer is automatically generated