Table of Contents
Advertisement
Quick Links
Advertisement
Table of Contents

Related Manuals for Samsung OfficeServ SOHO


Summary of Contents for Samsung OfficeServ SOHO
- Page 1 User Guide...
-
Page 2: Safety Concerns
NOTE Indicates additional information for reference. Symbols Caution Indication of a general caution Restriction Indication for prohibiting an action for a product Instruction Indication for commanding a specifically required action © SAMSUNG Electronics Co., Ltd. -
Page 3: Warning
Insert power cord tightly and fully into the outlet. This is to prevent fires. Adapter Fixing Screw Fix OfficeServ SOHO and power adapter by using screws after connecting the power adapter. Failing to do so can cause fire or electrocution. - Page 4 Do not place the product near items that can start a fire(e.g., cigarette fire, heaters). Failing to do so can cause fire or electrocution. Do not place the product under direct sunlight. The product may not operate properly due to damaged components. © SAMSUNG Electronics Co., Ltd.
- Page 5 This is to prevent fires and electrocution. If the product makes strange sound, smell, or smoke, unplug the cord immediately and contact the service center. Failing to do so can cause fire or electrocution. © SAMSUNG Electronics Co., Ltd.
-
Page 6: Caution
Accurately install and properly use the product according to the user guide. This is to prevent malfunctions and reductions in product lifetime. Do not install the product on unstable places. This is to protect the product from falling. © SAMSUNG Electronics Co., Ltd. - Page 7 The power adapter type may be various depending on countries. The product may not operate normally if the voltage is improper. Clean the produce with a dry cloth after unplugging the power cord. This is to protect the product from damage. © SAMSUNG Electronics Co., Ltd.
-
Page 8: Table Of Contents
C onnecting OfficeServ SOHO with Desktop / Laptop Computers ......30 C onnecting Desktop / Laptop Computer to OfficeServ SOHO Wirelessly ....... 30 C onnecting Desktop / Laptop Computer to OfficeServ SOHO by LAN Cable ....32 T HINGS YOU SHOULD KNOW S creens ........................34... - Page 9 D ialing Numbers Saved in [M](Memory) Button ............... 53 D ialling using the PhoneBook ..................54 A NSWERING CALLS B efore Answering Calls ...................55 A nswering Method ......................55 C all Refusal / Call Deflection ................... 56 © SAMSUNG Electronics Co., Ltd.
- Page 10 A nswering Intercom Calls ..................57 A nswering from OfficeServ SOHO .................. 57 A nswering from WLAN phone ..................58 A nswering External Calls ..................59 A nswering from OfficeServ SOHO .................. 59 A nswering from Mobile ....................60 C all Pick Up .......................61...
-
Page 11: Samsung Electronics Co., Ltd
U nit Change ........................94 S ound .........................95 R ing Tone ........................95 K eyTone ........................... 95 V olume ..........................96 S ervices ........................97 P hone Setup ......................99 M y Phone ........................99 © SAMSUNG Electronics Co., Ltd. - Page 12 E aasy Install ........................143 D B Config ........................143 U pgrade ......................... 144 P assword ........................144 S tatus ..........................145 A NNEX W hat is OfficeServ SOHO CRM? ................146 S pecification ......................147 © SAMSUNG Electronics Co., Ltd.
-
Page 13: Preparation
WLAN phone. Redial Users can redial a number selected from the call list. In addition, the auto-redial function repeatedly attempts connection to a busy line for a certain time period. © SAMSUNG Electronics Co., Ltd. - Page 14 Wireless data service enables a clean office without cables. No Power Operation You can make or receive external calls using the handset even during power failures.(Only PSTN 1 is supported. However, other functions will be disabled.) © SAMSUNG Electronics Co., Ltd.
-
Page 15: Product Content
Phone Jack Cables(2) Fixing Screw(1) (1 Standard Type) Quick Installation Guide User Guide User Guide WIP-5000M Mobile Phone For descriptions on the WIP-5000M WLAN phone, provided with OfficeServ SOHO, refer to the ‘WIP-5000M User Guide’. © SAMSUNG Electronics Co., Ltd. -
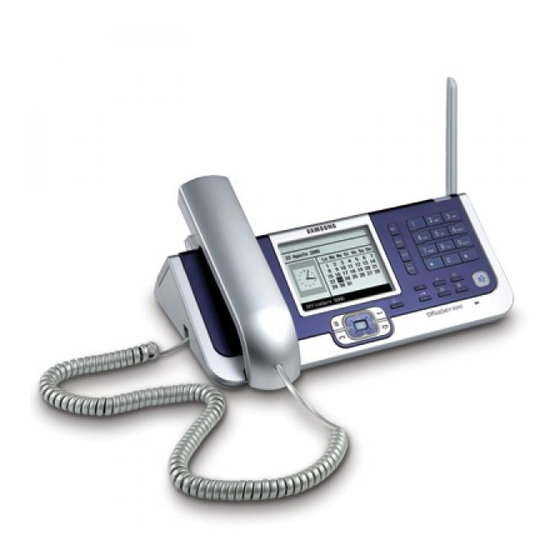
Page 16: Front Panel
Front Panel Buttons on the front panel of the OfficeServ SOHO are described below: Name Button Function LCD Screen Display the status, phone number, menu, and various massages. M1~M4(Memory) Frequently used numbers are saved as Memory buttons. Button Dial Button Button used for entering numbers and characters. - Page 17 - Press the send button in a standby state to retrieve the list of recent calls. Menu Button Used for using menu functions such as: SMS, PhoneBook, E-Diary, Sound, Services, Phone Setup. © SAMSUNG Electronics Co., Ltd.
-
Page 18: Installation
INSTALLATION The installation procedure of OfficeServ SOHO is described below: Check Installation Environment - Check network configuration - Check connecting system of internal/external network OfficeServ SOHO connect - Basic Connection: Handset, trunk cable, Internet cable, and Power cable - Option: FAX and PC or PDA... -
Page 19: Environment Description
Environment Description This section describes the user environment before installing OfficeServ SOHO. Network Configuration Diagram The network configuration diagram of OfficeServ SOHO is shown below: Internal Network Configuration WLAN phone PSTN or IDSN (C.O. line) Wireless Internet (IEEE802.11 b/g) Laptop... -
Page 20: Check The Following Network Environment
• information. LAN Environment of PC: The OfficeServ SOHO can be connected only to PCs that have a LAN card. Check if a LAN/WLAN card is equipped on the PC. Types and number of terminals - Mobile terminal: WLAN phone(WIP-5000M), Laptop computer, PDA... -
Page 21: Checking External Network Environment Of User
Checking External Network Environment of User Check the external network environment of the user before installing OfficeServ SOHO. When using static IP When using a static IP assigned by the ISP, set to Static, and enter the assigned IP address, gateway, subnet mask, and DNS address. -
Page 22: Officeserv Soho Connection (Isdn Type)
Connect the handset to the connection port on the left side of the OfficeServ SOHO. ISDN Network Connection: Connect the BRI to the ISDN port of the OfficeServ SOHO by using the ISDN access cable. © SAMSUNG Electronics Co., Ltd. - Page 23 Connect the facsimile, Answering Device or Single line Telephone to the port of the OfficeServ SOHO by using a phone cable.(RJ-11). PC Connection: Connect the LAN port of the PC to the LAN port of the OfficeServ SOHO by using a LAN cable.(RJ-45). LAN Connection: Connect the LAN port of the external modem to the WAN port of the OfficeServ SOHO by using a LAN cable.(This is not applicable to an internal ADSL modem.)
-
Page 24: Officeserv Soho Connection (Pstn Type)
Turn off the power of the external modem, OfficeServ SOHO, and PC(or facsimile) before installation. Handset Connection: Connect the handset to the connection port on the left side of the OfficeServ SOHO. Single Line Telephone Connection: Connect the facsimile, Answering Device or Single line Telephone to the port of the OfficeServ SOHO by using a phone cable.(RJ-11). -
Page 25: Easy Installation Of Officeserv Soho
PC Connection: Connect the LAN port of the PC to the LAN port of the OfficeServ SOHO by using a LAN cable.(RJ-45). LAN Connection: Connect the LAN port of the external modem to the WAN port of the OfficeServ SOHO by using a LAN cable.(This is not applicable to an internal ADSL modem.) -
Page 26: Easy Install
Easy Install Start Easy Install Connect the Internet cable(LAN cable) to the OfficeServ SOHO and press [OK] to start the installation. Time Setup: This is only for PSTN Type (Model: SIT200EM) Enter the current date and time and press [OK]. - Page 27 DNS: Enter DNS(Domain Name Server) address • 3. DHCP Select this item if you are a DHCP user. Press [OK] to set up the Internet automatically. 4. Setup Later To skip Internet setup, select this item and press [OK]. © SAMSUNG Electronics Co., Ltd.
- Page 28 (e.g., 0292189765) and select, per each of them, the destination of the incoming calls, by pressing [OK] to confirm each entry. To continue, once the ISDN setting procedure is concluded, select Go to CLIP Settings and press [OK]. © SAMSUNG Electronics Co., Ltd.
-
Page 29: Wlan
• optional. To skip this entry, press the [OK] button. Turn on the WLAN WIP-5000M phone and press the [OK] button of the OfficeServ SOHO. Register the WLAN WIP-5000M phone according to the procedure described in the section ‘Easy Registration(38page)’ inherent to the WIP-5000M and press [OK]. -
Page 30: Connecting Officeserv Soho With Desktop / Laptop Computers
Connecting OfficeServ SOHO with Desktop / Laptop Computers You can use the Internet on a desktop or a laptop computer using OfficeServ SOHO. You can connect a desktop or a laptop computer to OfficeServ SOHO in a wireless method(using a WLAN card) or in a wired method(using a wired LAN card and a LAN cable). -
Page 31: S Ecurity
WLAN, refer to the user guide of the program. Enter the same SSID set in the OfficeServ SOHO. To check the SSID of the OfficeServ SOHO, refer to the procedure described in the ‘Note’ paragraph on the next page. -
Page 32: Connecting Desktop / Laptop Computer To Officeserv Soho By Lan Cable
Connecting Desktop / Laptop Computer to OfficeServ SOHO by LAN Cable If the computer has been connected to the Internet before, additional setting is not required. Check the Internet connection(LAN cable status) by referring to ‘OfficeServ SOHO connection’, and execute the Internet Explorer. If the computer is not... - Page 33 Press [Start] and select [Control Panel]. Double-click [Network Connection]. Right-click [Local Area Connection] and select [Properties]. Double-click [Internet Protocol(TCP/IP)]. Select [Obtain an IP address automatically] and [Obtain DNS address automatically]. Click [OK] to finish the setting. © SAMSUNG Electronics Co., Ltd.
-
Page 34: T Hings You Should Know
THINGS YOU SHOULD KNOW Screens Major screens that are displayed on the LCD of OfficeServ SOHO are described below: Main Screen The default background screen of the main screen is shown below. The background screen can be changed by pressing [Menu] button and selecting [Phone Setup] [1. -
Page 35: Station Status Display Screen
Menus Displayed During a Call Available menus may differ depending on the system version. You can use direction buttons to view menus that are not shown on the screen. ‘RETRY’ menu is not displayed during intercom calls. © SAMSUNG Electronics Co., Ltd. -
Page 36: Menu Screen
WLAN functions as icons. This menu may be different according to the country. Entering Characters You can use the dial button and the [Menu] button of OfficeServ SOHO to enter or edit letters, numbers, and special characters. MENU Button Dial Button ©... -
Page 37: Selecting Entry Mode
Dial Button Character A B C D E F G H I J K L M N O P Q R S T U V W X Y Z * / . space # @ - © SAMSUNG Electronics Co., Ltd. -
Page 38: Entering Numbers
[0] button. - Press the [C] button to erase an entered character. Press the [C] button briefly to erase characters one by one, or press and hold the button to erase all characters. © SAMSUNG Electronics Co., Ltd. -
Page 39: Making Calls
Listen to the voice and speak to the microphone. Press [Speaker] button again to end the call. You can lift the handset while speaking through • the speakerphone to continue the call by using the handset. © SAMSUNG Electronics Co., Ltd. -
Page 40: Making Intercom Calls
Making Intercom Calls This section describes how to make an internal call. Making an Intercom Call This function is used for making an internal call from OfficeServ SOHO to a WLAN phone or vice versa. Calling From OfficeServ SOHO to WLAN phone Lift the handset. - Page 41 Calling from WLAN phone to OfficeServ SOHO or to Another WLAN phone Press the number of the recipient’s station. Press the [Send] button to hear a connecting tone. Start conversation when the recipient answers. Calling from a/b port phone to OfficeServ SOHO or to WLAN phone Lift the handset of the a/b port Phone Press the number of the recipient’s station.
- Page 42 Calling from [Station Status Display Screen] of OfficeServ SOHO Press the [Internal Call] button while the phone is in standby mode. Select a WLAN phone from the ‘Station Status Display Screen’. <PSTN Type> <ISDN Type> Press the [OK] button to dial the selected station.
-
Page 43: Callback
Your phone rings when the recipient finishes the earlier call. A message indicating callback is displayed on the • LCD. Lift the handset and the recipient’s station will ring. Start conversation when the recipient answers. © SAMSUNG Electronics Co., Ltd. -
Page 44: Making External Calls
This chapter describes how to make an external call from OfficeServ SOHO or a WLAN phone. Making an External Call This function is used for making an external call from OfficeServ SOHO or a WLAN phone. Calling from OfficeServ SOHO Lift the handset. - Page 45 Calling from Mobile Enter an external phone number. Press the [Send] button to hear a connecting tone. Start conversation when the recipient answers. © SAMSUNG Electronics Co., Ltd.
- Page 46 Calling from a/b port phone Lift the handset of a/b port phone. Enter the Trunk Access Number first, and enter Please Dial the recipient’s number. Start conversation when the recipient answers. © SAMSUNG Electronics Co., Ltd.
-
Page 47: Making Calls Using Pause
Making Calls Using Pause You can use the pause function when making a call from the OfficeServ SOHO or from a WLAN phone to an Automatic Response System(ARS). Pause Function Pause function refers to using the pause character when dialing numbers for making a call to an Automatic Response System(ARS) such as telebanking. -
Page 48: Auto Redial
[Speaker] button to start conversation. The Speaker LED is blinked until answering the call. • Canceling Auto Redial To cancel the auto redial function, press dial button, [Speaker] button or lift and replace the handset. © SAMSUNG Electronics Co., Ltd. -
Page 49: Callback (Ccbs / Ccnr) (Isdn Only)
Press [Menu] [CALL BACK], if the external called does not answer of is busy. On hearing the confirmation tone, replace the handset. When the called is IDLE state, OfficeServ SOHO is called the reserved number automatically. © SAMSUNG Electronics Co., Ltd. -
Page 50: New Call (Pstn Only)
Press the target phone number on hearing the dial tone. Making Intercom / External Calls This chapter describes how to make an external or intercom call from OfficeServ SOHO or a WLAN phone. Dialing The Most Recent Dialed Number This function is used to dial the most recently dialed internal/external number. -
Page 51: Dialing Using Recent Call Log
Press the [OK] button to display the user name, • registered to the phonebook, the call time, and call duration. Press [Send] button to dial the selected number. Speak through the speakerphone or handset. © SAMSUNG Electronics Co., Ltd. -
Page 52: Speed Dialing
Start conversation when the recipient answers. Registering Speed Dial Number For procedure on registering a speed phone number, a speed phone number, refer to the ‘PhoneBook’ section of ‘MENU’. © SAMSUNG Electronics Co., Ltd. -
Page 53: Dialing Numbers Saved In [M](Memory) Button
Start conversation when the recipient answers. Registering a Phone Number to [M](Memory) Button For procedure on registering a number to a [M](memory) button, refer to the ‘PhoneBook’ section of ‘MENU’. © SAMSUNG Electronics Co., Ltd. -
Page 54: D Ialling Using The Phonebook
Options are By Name/ By Number/ By Location/ By • Group/ By Time Enter the information according to the option, and select the number, Press [Send] button to dial the selected number. Start conversation when the recipient answers. © SAMSUNG Electronics Co., Ltd. -
Page 55: Answering Calls
Press the [Speaker] button again to hang up. You can lift the handset while speaking through the • speakerphone to continue the call by using the handset. © SAMSUNG Electronics Co., Ltd. -
Page 56: Call Refusal / Call Deflection
‘DEFLECT’. And press [OK]. If you select the DEFLECT, Enter the station number you want the call diverted to. And press ‘#’ or [OK] button. If you press the ‘*’, it is cleared the number you enter. © SAMSUNG Electronics Co., Ltd. -
Page 57: Answering Intercom Calls
Answering Intercom Calls This function allows you to answer internal calls incoming to OfficeServ SOHO or a WLAN phone. Answering from OfficeServ SOHO Call from On receiving a call, the bell rings and an incoming message is displayed on the LCD. -
Page 58: Answering From Wlan Phone
Call from On receiving a call, the bell rings and an incoming message is displayed on the LCD. 123456789 Press the [Send] button to answer the call. Press the [End] button to disconnect the call. © SAMSUNG Electronics Co., Ltd. -
Page 59: Answering External Calls
Answering External Calls This section describes how to answer an external call. Answering from OfficeServ SOHO On receiving an external call, the phone rings and a green lamp lights on the corresponding C.O. line button. Lift the handset to answer the call. -
Page 60: Answering From Mobile
Answering from Mobile Call from On receiving a call, the bell rings and an incoming message appears on the LCD. Press the [Send] button to answer the call. Press the [End] button to disconnect the call. © SAMSUNG Electronics Co., Ltd. -
Page 61: Call Pick Up
Select the flashing station number from the screen. <PSTN Type> <ISDN Type> Start conversation. Replace the handset to disconnect the call. Press the [Speaker] button again when using the • speakerphone. © SAMSUNG Electronics Co., Ltd. -
Page 62: Functions Used During Calls
Replace the handset when the handset answers the call. Replace the handset while the transfer tone is • ringing to transfer the call unconditionally. Otherwise, wait until the destination user answers the call to transfer the call after consulting the user. © SAMSUNG Electronics Co., Ltd. -
Page 63: Mute
Press [Mute] key during the call, [Mute] LED is changed to RED. Mute function is enable. Press [Mute] key again, [Mute] LED is off. Mute function is disable. © SAMSUNG Electronics Co., Ltd. -
Page 64: During External Calls
Otherwise, wait until the destination user answers the call to transfer the call after consulting the user. Call Transfer On successful transfer, the color of the C.O. line lamp changes from green to red. © SAMSUNG Electronics Co., Ltd. -
Page 65: Trunk Flash
Trunk Flash The trunk flash function is a additional function of a trunk switch connected to the OfficeServ SOHO and will only be provided if the trunk switch supports the function. © SAMSUNG Electronics Co., Ltd. -
Page 66: Keypad Facility (Isdn Only)
This is achieved by means of an intercept function. Press [Menu] Button during the external call. And select ‘MCID’. The switching centre will then trace back the call to its point of origin © SAMSUNG Electronics Co., Ltd. -
Page 67: Parking A Call (Isdn Only)
[ANSWER] or [R], You can answer the other call. - If you would like to refuse the other call, Press [Menu] [REFUSAL]. - If you would like the deflect the other call, press [Menu] [DEFLECT]. © SAMSUNG Electronics Co., Ltd. -
Page 68: Conference During Intercom / External Calls
When the third party answers the call, press [Menu] and select [CONFERENCE]. Conference member numbers appears. To remove a member from the conference, enter • the phone number of the member while the ‘Make Next Call’ message is displayed. © SAMSUNG Electronics Co., Ltd. -
Page 69: Convenient Features
Select [Menu] [Phone Setup] [5. Global Setup] [1. Feature On.Off] [3. CID Detection] to display Caller ID. [ISDN] It is not need the additional settings, CID is displayed if the network is serviced the CLIP © SAMSUNG Electronics Co., Ltd. -
Page 70: Conference
Move the curser to the target group and press the • [Menu] button to edit or delete the group. Press the [Send] button to make a call to the recipient. © SAMSUNG Electronics Co., Ltd. -
Page 71: Each Conference
Enter the target phone number and press the [Send] button to connect the recipient. Press the [Menu] button and select the [Sending] • menu. Then, the call is connected to the recipient. Once the recipient answers the phone, the conference call starts. © SAMSUNG Electronics Co., Ltd. -
Page 72: Do Not Disturb (Dnd)
When DND function is set, the DND icon is • displayed on the main screen, and the DND button of the [Station Status Display Screen] is expressed in black. © SAMSUNG Electronics Co., Ltd. -
Page 73: Canceling Dnd
<PSTN Type> <ISDN Type> DND is cancelled, and the ‘DND is cancelled’ message is displayed on the main screen. When DND function is cancelled, the DND icon • disappears from the main screen. © SAMSUNG Electronics Co., Ltd. -
Page 74: Group Listening
You can enable others to hear the conversation of a call through the speaker. The microphone is disabled. Press the [Speaker] button during a call. Other people can hear the conversation. Press the [Speaker] button to turn off the speaker. © SAMSUNG Electronics Co., Ltd. -
Page 75: Menu
MENU This section describes how to set various menus of OfficeServ SOHO. You can select a menu either by using the direction key to move to an item and pressing the [OK] button or by entering the item number. Main Menu Press the [Menu] button to display the following main menu on the LCD screen when the OfficeServ SOHO is in a standby mode.