Advertisement
Quick Links
Download this manual
See also:
User Manual
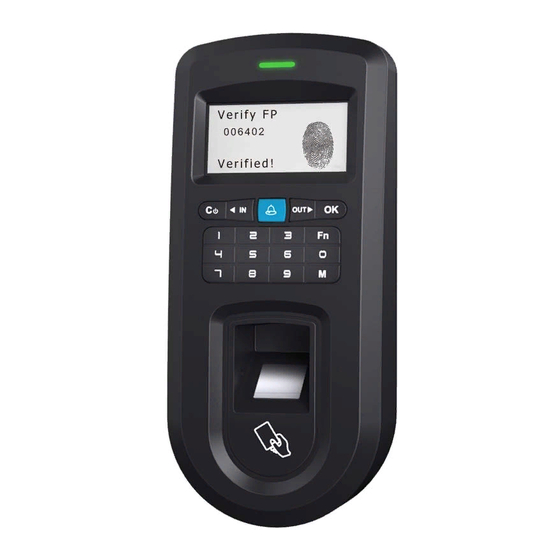
Reader Appearance
40mm
80mm
IN
IN
14:03
14:03
09
09
10-29-09
10-29-09
THU
THU
180mm
F i n g e r p r i n t A c c e s s c o n t r o l
C a r d A c c e s s c o n t r o l
S i d e V i e w
F r o n t V i e w
F r o n t V i e w
Cancel/Power Key
Menu Key
Exit/Cancel the Present Operation
Enter System Management Menu
Power on/Power off
Workcode Setup Key
State Key(Clock In)/Up
Door Bell Key
State Key(Clock Out)/Down
Num. Keys
0-9
Confirm Key
Enter Employee ID or Password
Confirm Present Operation
Operation Guide
Enroll User:
1
Each user can register two fingerprints, one password and one RFID card.
IN
MENU
User
09 : 00
User
Enroll
[M]
[OK]
26
Setup
Delete
10-11-17
WED
USB Flash
Verify Mode
Select [User]
Select [Enroll]
Enroll Fingerprint:
Place the same finger on the sensor twice in a row to enroll fingerprints.
Press [IN] or [OUT] key to select 1 or 2, 1 is to register the 1st FP,2 is for 2nd FP.
Enroll FP
Enroll
Enroll FP
FP
1/2
press [OK]
[OK]
Password/Card
Place Finger #1
Esc-C
Set-OK
Select [FP]
Enroll fingerprint
Enroll Password:
Password length: 0-999999.
Enroll
Enroll PWD
FP
1/2
press [OK]
[OK]
[OK]
Password
/Card
PWDID
******
Esc-C
Set-OK
Esc-C
Set-OK
Select [Password]
Input password
Enroll Card
:
Enroll
Enroll Card
FP
1/2
press [OK]
[OK]
Password/
Card
Swipe card!
Esc-C
Set-OK
Select [Card]
Swipe the card
Admin Setup:
2
Admin(Administrator) has full access permissions to the device. It is recommended to assign a minimum of
two administrators to each unit.
MENU
User
Admin Setup
▼
Group Setup
User
[OK]
[OK]
Admin Setup
Setup
USB Flash
Admin Clear
Esc-C
Select [User]
Selelct [Admin Setup]
Menu List
Press [M] key to enter system management menu.
(This requires the administrator authorization if there is admin
registered in the system.) Menu List:
Restart
Dev ID
Button
Time
Language
Enroll
Calibration
Delete
Workcode Scope
Verify Mode
User
Daylight Saving
Group Setup
Net
Admin Setup
Anti-Back
Admin Clear
Precision
Unlock
System
Door Alert
Auto Off
Auto Update
Setup
Image Disp.
Log Alert
Log Setup
Re-Verify
Keypad, LCD, Sensor, Wet FP Adjust,Flash
Hardware Test
System Info
User, FP, Log, Serial,FirmVer
Enroll
▼
[OK]
ID
008101
Esc-C
Set-OK
(ID:000001-999999)
Input user ID
Enroll FP
Enroll FP
Enroll FP
Take Off!
Place Finger #2
Take Off!
Enroll PWD
Enroll PWD
PWDID
[OK]
******
008101-P
Confm
Cancel-C
Sav-OK
******
Input password again
Press [OK] to save
Enroll Card
Enroll Card
008101-C
Cancel-C
Sav-OK
Press [OK] to save
Admin Setup
Admin Setup
Admin Setup
ID
[OK]
[OK]
[OK]
ID
000000
008101
Add-OK
No-C
Yes-OK
Esc-C
Input Admin ID
Setup successful
Other Setup
Verify Mode:
M→[User]→[OK]→[Verify Mode]→[OK]→[OK]→Input employee ID→[OK]→
Use [ /IN]/[OUT/ ] to select 'ANY/RF+FP/PW+FP/RF+PW/ID+FP'→[OK]→[OK].
Item
Any
Fingerprint only, RFID Card only or ID+Password only
It requires both RFID Card and Fingerprint
RF+FP
verification together
It requires both Password and Fingerprint verification
Mode
PW+FP
together
IP Address
It requires both RFID Card and Password verification
RF+PW
Subnet Mask
together
MAC Address
ID+FP
Enter the user ID first then verify the Fingerprint
Gateway IP
Factory default
setting
Local Port
Group Setup:
M→[User]→[OK]→[Group Setup]→[OK]→[OK]→
Input employee ID→[OK]→Input the group ID→[OK]→[OK].
Item
G00
The user in Group00 can not open the door
G01
The user in Group01 can open the door anytime
It is according to the Group & Time zone setting which
G02-16
can be set through the software
Factory default
setting
Tips: Group setup is used for managing the access control privileges. Each group can
contain 4 time zones.
Dev ID:
M→[Setup]→[OK]→[System]→[OK]→[Dev ID]→[OK]→
Input the device's ID→[OK]→[C]→[OK].
Item
Device ID of the unit which is required in software
1-99999999
communication
Factory default
setting
Tips: It doesn't allow duplicate Device ID in one LAN. Otherwise, it will cause software
communication error.
Language:
M→[Setup]→[OK]→[System]→[OK]→[Language]→[OK]→
Use [ /IN]/[OUT/ ] to select ENG/FRCH/GERM/...→[OK]→[C]→[OK].
Item
Enroll FP
Languages
Optional 4 languages.
008101-1
Cancel-C
Sav-OK
Factory default
Press [OK] to save
Related Language
setting
Place finger straight and
flat on the sensor. Insure
maximum sensor coverage.
008101
Add-OK
WorkCode:
M→ [Setup]→[OK]→[System]→[OK]→[WorkCode Scope]→[OK]
→Input Max→[OK]→Input Min→[OK] →[C]→[OK].
Explanation
Item
0-999999
Factory default
setting
Tips: WorkCode indicates the work type,easily distinguishes which attendance record
is related to which work type.
Net:
M→ [Setup]→[OK]→[System]→[OK]→[Net]→[OK]→to select [Mode/IP Address/Subnet Mask
/MAC Address/Gateway IP/Server IP/Server Port]→[OK]→Modify parameters→[C]→[OK].
Item
Any
TCP/IP Server mode: Common network mode
Mode
TCP/IP Client mode: Only communicate
with the PC which has static IP
Set terminal IP address when communication
of TCP/IP, IP address must be a static
IP Address
IP address.
Explanation
Subnet Mask
Subnet Mask of the LAN
Unique Physical address of the network moudle. This
MAC Address
setting can not be modified.
Gateway IP
Default Gateway of the LAN
It's the Software Port number used when the
Server Port
read is configured for TCP/IP communication.
G01
Unlock:
M→ [Setup]→[OK]→[System]→[OK]→[Unlock]→[OK]→No/1~15→[OK]→
[C]→[OK]. 'No'-no delay time; The maximum delay time is 15 seconds.
Item
The time range of device control electric lock in an
Explanation
1-15
open position,unit for seconds.
The device does not generate a door open signal after
No
successful verification.
Factory default
1
setting
Door Alert:
M→ [Setup]→[OK]→[System]→[OK]→[Door Alert]→[OK]→
to select No/1~99→[OK]→[C]→[OK]. 'No'-no alert signal.
Item
Explanation
It generates the door open alarm signal if the door open
1-250
time is longer than the preset value,unit for seconds.
No
Disable the door open alarm
Factory default
setting
Illustration for placing fingerprint
Place finger in the center of the sensor.
V1.5
Explanation
Valid scope for the Workcode
Max 999999
Min
0
Factory default
Explanation
setting
Server Mode
192.168.0.218
255.255.255.0
192.168.0.1
5010
Explanation
5
Explanation
15
Place finger on the sensor surface
Advertisement

Related Manuals for Anviz VF30


Summary of Contents for Anviz VF30
- Page 1 V1.5 Reader Appearance Menu List Other Setup Press [M] key to enter system management menu. Verify Mode: WorkCode: 40mm 80mm M→ [Setup]→[OK]→[System]→[OK]→[WorkCode Scope]→[OK] M→[User]→[OK]→[Verify Mode]→[OK]→[OK]→Input employee ID→[OK]→ Use [ /IN]/[OUT/ ] to select ‘ANY/RF+FP/PW+FP/RF+PW/ID+FP’→[OK]→[OK]. →Input Max→[OK]→Input Min→[OK] →[C]→[OK]. (This requires the administrator authorization if there is admin Explanation Item Explanation...
- Page 2 V1.5 Access Control Reader & Access Control Power Supply Package List Reader Instruction Package Connector Jack Accessory Package 14:03 14:03 10-29-09 10-29-09 Access control Exit Button windows COMPACT Windows 98 Windows 2000 CD-ROM Windows XP Windows Vista Windows 7 Access Control Power Supply Door Sensor Installation Diagram Active Door Bell...
Need help?
Do you have a question about the VF30 and is the answer not in the manual?
Questions and answers