Table of Contents
Advertisement
Advertisement
Table of Contents

Related Manuals for Ubiquiti UCK-G2-PLUS


Summary of Contents for Ubiquiti UCK-G2-PLUS
- Page 1 Model: UCK-G2-PLUS...
-
Page 2: Table Of Contents
Table of Contents Introduction Hardware Overview Hardware Installation Powering the Cloud Key Gen2 Plus Optional Rackmount Accessory Setting Up UniFi SDN via App Pre-installed Software Setting Up UniFi Protect via App Chrome Instructions Setting Up UniFi SDN Setting Up UniFi Protect Cloud Key G2+ Settings HDD Replacement Specifications... -
Page 3: Introduction
Introduction Thank you for purchasing the Ubiquiti Networks® UniFi® Cloud Key Gen2 Plus. This Quick Start Guide is designed to guide you through installation and also includes warranty terms. Package Contents UniFi Cloud Key Gen2 Plus System Requirement Web Browser: Google Chrome (Other browsers may have limited functionality.) - Page 4 Network Topology A DHCP-enabled network (for the Cloud Key Gen 2 Plus to obtain an IP address) UniFi Cloud Key Gen2 Plus UniFi PoE Switch UniFi Security Gateway (DHCP Server) Internet Sample Network Diagram...
-
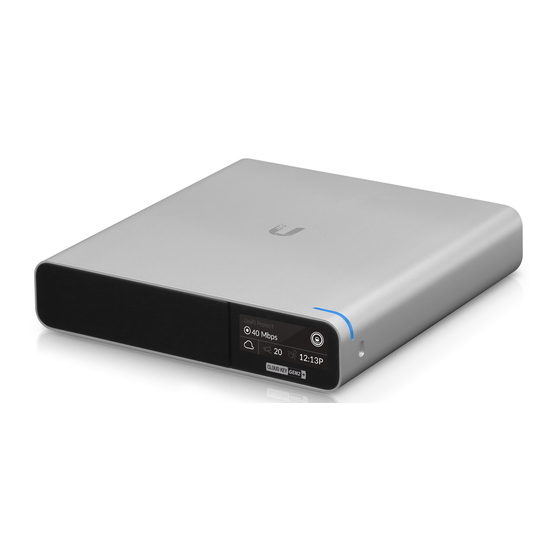
Page 5: Hardware Overview
Hardware Overview Front Panel LED Color State Status White Solid Device is ready to be configured Flashing Device is booting up Device is initializing/deinitializing Heartbeat Firmware update in process Blue Solid Device is configured and ready Flashing Main power has been lost and device is counting down. - Page 6 Front Panel Screen HDD Bay Location of the 2.5" SATA hard disk drive LCD Screen Displays device status information and will vary based on the application currently in use Last Motion UniFi SDN Display UniFi Protect Display LCD Display for UniFi SDN Icon Description UniFi SDN Controller name and bandwidth...
- Page 7 Back Panel Reset microSD USB Type C Button Slot Port Power Button USB Type C Ethernet Power Port Port Reset The Reset button serves two functions: • Restart Press and release the Reset button quickly. • Restore to Factory Default Settings Press and hold the Reset button for more than five seconds, until the status LED begins flashing white.
- Page 8 Side Panels Security Slot Rack-Mount Rack-Mount Notch Notch Security Slot Allows the Cloud Key Gen 2 Plus to be used with a Kensington security lock (not included). When used, it also prevents removal of the HDD while the device is in use. Rack-Mount Notch Secures the Cloud Key Gen2 Plus into the docking bay of the optional Rackmount Accessory, model...
- Page 9 Bottom Panel 13-Pin Connector HDD Latch 13-Pin Connector Connects the Cloud Key Gen2 Plus to the optional Rackmount Accessory, model CKG2-RM (sold separately). The CKG2-RM has a docking bay for the Cloud Key Gen2 Plus and allows you to install it in a standard 19" rack. Note: Out of the box, the 13-Pin Connector is covered with a black sticker to protect it from dust and dirt.
-
Page 10: Hardware Installation
Hardware Installation 1. Connect an Ethernet cable (not included) to the Ethernet Port. 2. Connect the other end of the Ethernet cable to a port on a network switch, such as a UniFi PoE Switch. -
Page 11: Powering The Cloud Key Gen2 Plus
Powering the Cloud Key Gen2 Plus Use an 802.3af-compliant switch, such as a UniFi PoE Switch, a USB power source, or 48V PoE adapter (not included). UniFi Switch The Cloud Key Gen 2 Plus can be powered by a UniFi PoE Switch or other 802.3af-compliant switch. -
Page 12: Optional Rackmount Accessory
Optional Rackmount Accessory There is an optional UniFi Rackmount Accessory (sold separately) that can mount the Cloud Key Gen2 Plus in a standard 19" rack. Lock Tab Docking To install the Rackmount Accessory, follow these instructions: 1. Attach the Rackmount Accessory to the rack using four Mounting Screws. - Page 13 When connecting the Cloud Key Gen2 Plus to the Rackmount Accessory, the width of the Docking Bay must be adjusted to accommodate the dimensions. To adjust the Docking Bay: 1. Press down on the Lock Tab and slide the docking bay cover open until it locks into place.
-
Page 14: Setting Up Unifi Sdn Via App
Setting Up UniFi SDN via App Download and install the UniFi SDN app to configure the Cloud Key Gen2 Plus. Note: Ensure that Bluetooth is enabled on your mobile device. You will need to set up the Cloud Key Gen2 Plus with your mobile device and be within 1.5 m (5’) from where it is installed. - Page 15 2. Once detected, the app will automatically connect to the Cloud Key Gen2 Plus and the LED will begin to flash blue. If more than one controller is detected, swipe through the app screens horizontally until you locate the correct Cloud Key Gen2 Plus.
- Page 16 4. When the Cloud Controller Access screen appears, select the services you wish to enable by tapping the toggle switch to on, for each of the following items: Enable Cloud Access, Allow Local Login with SSO, and Enable UniFi Protect. When you are finished, tap Next.
- Page 17 5. When the Adopt Devices screen appears, tap the option button next to each device you wish to adopt. To skip the adoption process, tap Finish and proceed to step 8. 6. Once you’ve selected one or more UniFi Access Points to adopt, an additional step will be added to the setup process allowing you to create a wireless network.
- Page 18 7. When the Add Wireless Network screen appears, tap the toggle switch to on and create a wireless network name and password. When you are finished, tap Finish. Note: You may also create an optional guest network by tapping the Enable Guest Access toggle switch to on and following the on-screen instructions.
-
Page 19: Pre-Installed Software
9. Installation is now complete. When the Setup Complete screen appears, tap Done. Pre-installed Software The UniFi SDN Controller and UniFi Protect software applications come pre-installed on the Cloud Key Gen2 Plus. Note: You can run the UniFi SDN Controller or UniFi Protect software individually, or you can run both applications simultaneously. -
Page 20: Setting Up Unifi Protect Via App
Setting Up UniFi Protect via App Download and install the UniFi Protect app to configure the Cloud Key Gen2 Plus. Note: When you first launch UniFi Protect, the app will prompt you to enable Bluetooth and other relevant features necessary to provide the best user experience possible. - Page 21 2. When the Controllers screen appears, it will list any existing managed UniFi Protect controllers, as well as the status of the cloud services and version information for each. To add a new controller, tap Add Controller. Note: If your app was previously connected to a controller, it will automatically connect to that controller.
- Page 22 4. Once connected, the first of two Device setup screens will appear. Enter a Device name for the UniFi Protect controller and tap Next. 5. When the second Device setup screen appears, select the services you wish to enable by tapping the toggle switch to on, for each of the following items: Enable Cloud Access (which is currently enabled by default and cannot be disabled at this time), Allow Local Login with SSO, and...
- Page 23 6. When the Camera Setup screen appears, tap Add cameras now to set up UniFi cameras connected to your network. 7. When the Select cameras screen appears, tap each camera in the list you would like to add to your UniFi Protect system.
- Page 24 8. A Name your camera screen appears individually for each camera you selected in step 7. Enter a name for each camera and tap Next, repeating this process until all cameras have been named. 9. If necessary, any camera requiring a firmware upgrade will update at this time.
- Page 25 10. Tap the side menu in the upper-left corner of the app for additional information. a. Tap Cameras to view the live feeds for your cameras. b. Tap Users to view, add, or delete users in UniFi Protect. c. Tap System Settings to view configuration information or to reset your controller.
-
Page 26: Chrome Instructions
Chrome Instructions Use the Chrome browser to set up your Cloud Key Gen2 Plus. 1. Ensure that your host system is on the same Layer-2 network as the Cloud Key Gen2 Plus. 2. Launch the Chrome web browser and type the IP address of your Cloud Key Gen2 Plus into the address field. -
Page 27: Setting Up Unifi Sdn
Setting Up UniFi SDN 1. When the UniFi Setup Wizard screen appears, select your country and timezone and click Next. 2. Select each of the devices you would like to configure and click Next. 3. If configuring a UniFi access point during setup, a Configure WiFi screen will prompt you to create a wireless network name (SSID) and password. - Page 28 4. On the Controller Access screen, create an admin account for the SDN controller and click Next. 5. Confirm your SDN settings and click Finish. To update any of these settings, click Back to visit a previous section and make the necessary changes. When you return to this screen, click Finish.
- Page 29 Accessing UniFi SDN 1. Launch the Chrome web browser and type the IP address of your Cloud Key Gen2 Plus into the address field. Press enter (PC) or return (Mac). https://192.168.1.8 2. When the splash screen appears, click Launch under UniFi SDN.
- Page 30 Controller Sections Icon Description The Dashboard screen provides a visual overview of your network’s status, including latency and throughput information for each client and device. The Statistics screen provides a visual representation of the clients and network traffic on your managed UniFi SDN network.
-
Page 31: Setting Up Unifi Protect
Setting Up UniFi Protect 1. Set up and configure your NVR. a. Enter a name in the NVR Name field. b. Select your timezone from the Timezone dropdown list. c. Click End User License Agreement to view the license and click the checkbox to accept the license agreement. d. - Page 32 Click Select All to add all of the cameras listed. b. Enter a name to identify each camera you've selected. c. Click Add Selected Cameras to continue. 4. Click Allow to link your NVR to your cloud account. 5. Click Ubiquiti to sign in to your cloud account.
- Page 33 6. When the setup process finishes, click Continue. 7. The UniFi Protect system is now complete.
- Page 34 Accessing UniFi Protect 1. Launch the Chrome web browser and type the IP address of your Cloud Key Gen2 Plus into the address field. Press enter (PC) or return (Mac). https://192.168.1.8 2. When the splash screen appears, click Launch under UniFi Protect.
- Page 35 UniFi Protect Sections The Cameras screen lists all cameras currently managed by UniFi Protect. The Live View screen lists all live view layouts for UniFi Protect. Click Add Live View to create a new live view. Review events recorded by UniFi Protect. Customize your events by selecting a camera from the drop-down list and creating a specific date range of recordings to view.
-
Page 36: Cloud Key G2+ Settings
Cloud Key G2+ Settings Enter the username and password credentials associated with your UBNT or cloud access account and click Login to access the UniFi Management Portal. Accessing UniFi Management Portal 1. The UniFi Management Portal opens up to the Overview section of the Cloud Key Gen2 Plus settings and configuration. - Page 37 3. The System Stats screen provides statistical information about the Cloud Key Gen2 Plus, including workload, temperature, and memory usage. 4. From the Overview screen, click Configure to access the system settings and application services information. 5. Use the Configuration screen to update the system settings, restart the Cloud Key Gen2 Plus, or start/stop any of the pre-installed application services.
-
Page 38: Hdd Replacement
HDD Replacement The Cloud Key Gen2 Plus comes pre-installed with a 1TB SATA HDD. If you want to replace it, you must use a 2.5” SATA HDD and follow these instructions: 1. Back up your data from the drive. 2. Power off the Cloud Key Gen 2 Plus to prevent any software disruption. - Page 39 5. Insert one side of the replacement HDD into the tray first, at a slight angle. 6. Press the other side down into place and ensure the drive is fully seated and secure on both sides. 7. Slide the HDD tray back into the drive bay and press firmly until it is fully seated and all the way in.
-
Page 40: Specifications
Specifications UCK-G2-PLUS Dimensions 131.16 x 27.10 x 134.20 mm (5.16 x 1.07 x 5.28") Weight 582 g (1.28 lb) Enclosure Anodized Aluminum Management Interface UniFi Management Portal; UniFi SDN; UniFi Protect Hard Drive Capacity 1 TB 2.5" SATA HDD (user-expandable) -
Page 41: Safety Notices
UBIQUITI NETWORKS under normal use and operation. UBIQUITI NETWORKS’ sole and exclusive obligation and liability under the foregoing warranty shall be for UBIQUITI NETWORKS, at its discretion, to repair or replace any Product that fails to conform to the above warranty during the above warranty period. - Page 42 (VI) has no original Ubiquiti MAC label, or is missing any other original Ubiquiti label(s); or (VII) has not been received by Ubiquiti within 30 days of issuance of the RMA.
- Page 43 No Products will be accepted for replacement or repair without obtaining a Return Materials Authorization (RMA) number from UBIQUITI NETWORKS during the warranty period, and the Products being received at UBIQUITI NETWORKS’ facility freight prepaid in accordance with the RMA process of UBIQUITI NETWORKS.
-
Page 44: Compliance
Compliance Changes or modifications not expressly approved by the party responsible for compliance could void the user’s authority to operate the equipment. This device complies with Part 15 of the FCC Rules. Operation is subject to the following two conditions. This device may not cause harmful interference, and This device must accept any interference received, including interference that may cause undesired operation. - Page 45 Battery Warning Do not expose batteries to heat or fire. Avoid storage in direct sunlight. Do not use any batteries that are not designed for use with this device. Always purchase the battery recommended by the device manufacturer for the equipment. Secondary cells and batteries need to be charged before use.
- Page 46 RoHS/WEEE Compliance Statement English European Directive 2012/19/EU requires that the equipment bearing this symbol on the product and/or its packaging must not be disposed of with unsorted municipal waste. The symbol indicates that this product should be disposed of separately from regular household waste streams.
- Page 47 Français La directive européenne 2012/19/UE exige que l’équipement sur lequel est apposé ce symbole sur le produit et/ou son emballage ne soit pas jeté avec les autres ordures ménagères. Ce symbole indique que le produit doit être éliminé dans un circuit distinct de celui pour les déchets des ménages.
-
Page 48: Declaration Of Conformity
Français [French] Le soussigné, UBIQUITI NETWORKS, déclare que l’équipement radioélectrique du type UCK-G2-PLUS est conforme à la directive 2014/53/UE. Le texte complet de la déclaration UE de conformité est disponible à l’adresse internet suivante: www.ubnt.com/compliance Deutsch [German] Hiermit erklärt UBIQUITI NETWORKS, dass der Funkanlagentyp UCK-G2-PLUS... - Page 49 Slovenčina [Slovak] UBIQUITI NETWORKS týmto vyhlasuje, že rádiové zariadenie typu UCK-G2-PLUS je v súlade so smernicou 2014/53/EÚ. Úplné EÚ vyhlásenie o zhode je k dispozícii na tejto internetovej adrese: www.ubnt.com/compliance Slovenščina [Slovenian] UBIQUITI NETWORKS potrjuje, da je tip radijske opreme UCK-G2-PLUS skladen z Direktivo 2014/53/EU.
- Page 50 Networks, the Ubiquiti U logo, the Ubiquiti beam logo, TOUGHCable, UniFi, UniFi Protect, and UniFi SDN are trademarks or registered trademarks of Ubiquiti Networks, Inc. in the United States and in other countries. Apple and the Apple logo are trademarks of Apple Inc., registered in the U.S. and other countries.
Need help?
Do you have a question about the UCK-G2-PLUS and is the answer not in the manual?
Questions and answers