Advertisement
Quick Links
Installation instructions for CHTO-01
Chrysler vehicles
KIT FEATURES
• Provides accessory (12-volt 10 amp)
• Retains R.A.P. (retained accessory power)
• Used in amplified, non-amplified systems, or digital amplified systems
• Provides NAV outputs (parking brake, reverse, and V.S.S.)
• ASWC-1 harness included (ASWC-1 sold separately)
• Adjustable gain control for overall volume (on amplified systems)
• Retains blind spot detection system (if equipped)
• High level speaker input
• Micro "B" USB updatable
• Retains balance and fade
METRA. The World's best kits.™
CHTO-01
2004-2010
APPLICATIONS
See inside front cover
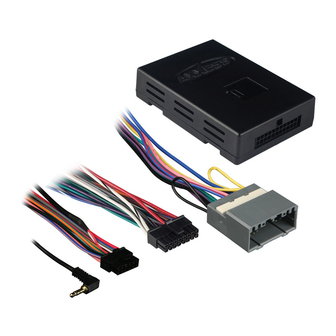
INTERFACE COMPONENTS
• CHTO-01 Interface • 16-pin harness with
stripped leads • 10-pin harness to 22-pin Chrysler
harness with stripped leads • 4-pin harness with
stripped leads
TOOLS REQUIRED
• Cutting tool • Tape • Crimping tool • Connectors
(example: butt-connectors, bell caps, etc.)
CAUTION: Metra recommends disconnecting the
negative battery terminal before beginning any
installation. All accessories, switches, and especially
air bag indicator lights must be plugged in before
reconnecting the battery or cycling the ignition.
NOTE: Refer to the instructions included with the
aftermarket radio.
Advertisement

Related Manuals for Axxess CHT0-01


Summary of Contents for Axxess CHT0-01
- Page 1 Installation instructions for CHTO-01 CHTO-01 INTERFACE COMPONENTS • CHTO-01 Interface • 16-pin harness with Chrysler vehicles stripped leads • 10-pin harness to 22-pin Chrysler harness with stripped leads • 4-pin harness with 2004-2010 stripped leads APPLICATIONS TOOLS REQUIRED See inside front cover • Cutting tool • Tape • Crimping tool • Connectors (example: butt-connectors, bell caps, etc.) KIT FEATURES • Provides accessory (12-volt 10 amp) • Retains R.A.P. (retained accessory power) • Used in amplified, non-amplified systems, or digital amplified systems • Provides NAV outputs (parking brake, reverse, and V.S.S.) • ASWC-1 harness included (ASWC-1 sold separately) CAUTION: Metra recommends disconnecting the •...
- Page 2 CHTO-01 Applications Connections to be made CHRYSLER From the 16-pin harness 300 2005-2007 • Connect the (2) Red wires to the ignition/accessory wire of the aftermarket radio. Aspen 2007 • Connect the Orange/White wire to the illumination wire of the aftermarket radio. If the aftermarket radio DODGE does not have an illumination wire, tape off the Orange/White wire. Caliber 2007-2008 • Connect the Blue/White wire to the amp turn on wire of the aftermarket radio. Charger 2006-2007 Dakota 2005-2007 • Tape up the Brown wire. It will not be used in this application. Durango 2004-2007 Magnum 2005-2007 For vehicles with built-in navigation (only), make the following connections: Ram 1500 2006-2008 •...
- Page 3 CHTO-01 Connections to be made • Connect the Green wire to the radio’s left rear positive speaker output. Tip: If you are unsure if your vehicle is amplified or not, note that these following wires will only be populated in the factory harness if non-amplified. • Connect the Green/Black wire to the radio’s left rear negative speaker output. • Connect the White wire to the left front positive speaker output of the •...
- Page 4 Installation instructions for CHTO-01 Installing the CHTO-01 • With all connections completed to the aftermarket radio, plug the 22-pin harness into the vehicles wiring harness. • Reconnect the negative battery terminal. • Cycle the key, by turning the ignition on for 30 seconds. Then off and on again to test the radio. Testing the CHTO-01 • Turn the ignition on if not already, and then turn the radio on to verify that the radio works. Check balance and fader controls for proper operation. For amplified models only: • To adjust the overall volume of your audio system rotate the potentiometer, which is located on the 16-pin side of the interface clockwise. Our installation parts and kits make aftermarket stereo and video installation a breeze. METRA.
Need help?
Do you have a question about the CHT0-01 and is the answer not in the manual?
Questions and answers