Table of Contents
Advertisement
Advertisement
Table of Contents

Related Manuals for Roberts CR99712


Summary of Contents for Roberts CR99712
- Page 1 CR9971 2 Band Auto Set Dual Alarm Clock Radio Please read this manual before use...
-
Page 2: Table Of Contents
Contents Contents... 1 Controls...2-5 Switching.on... 6 Setting.the.time.manually... 6 Setting.the.year.manually... 7 Setting.the.date.manually... 7. Setting.alarm.times..8 Setting.alarm.mode... 8 Setting.alarm.day... 9 Weekday.alarm..9 Weekend.alarm... 10 Everyday.alarm... 10 Monday.to.Saturday.alarm... 11 Sunday.only.alarm..11 Checking.alarm.times... 12 Checking.alarm.mode... 12 Snooze.control... 13 Sleep.timer... -
Page 3: Controls
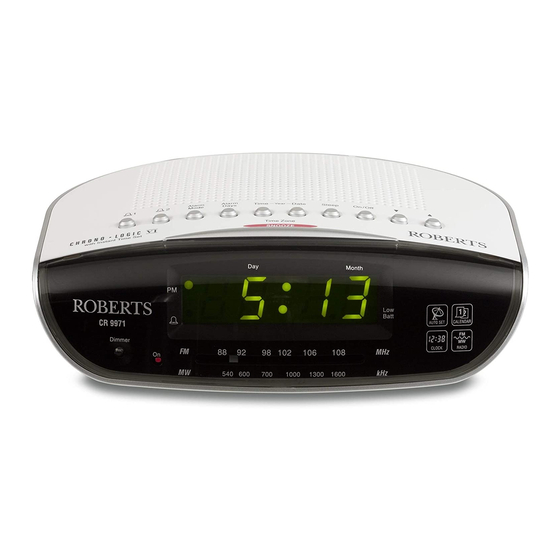
Controls (Top) 1. Alarm 1 button 2. Alarm 2 button 3. Alarm mode button 4. Alarm days button If.you.need.any.further.advice,.please.call.our.Technical.Helpline.on.:-.. 020.8758.0338.(Mon-Fri) 5. Time button 9. On/Off button 6. Snooze/Time Zone button 10. Down button 7. Date button 11. Up button 8. Sleep button... - Page 4 Controls (Front) 12. PM indicator 13. Alarm indicator 14. Low battery indicator 15. LED display 16. Dial scale 17. Auto dimmer...
- Page 5 Controls (Right side) If.you.need.any.further.advice,.please.call.our.Technical.Helpline.on.:-.. 020.8758.0338.(Mon-Fri) 18. Wave band selector switch 19. Volume control 20. Tuning control...
- Page 6 Controls (Base) 21. Battery compartment 22. Headphone socket...
-
Page 7: Switching.on
2. After a few seconds the time, day and date will set automatically. Your clock radio is fitted with a long life back-up battery to maintain the factory set time, day and date. Your clock radio will automatically reset to the correct time should the power source be interrupted. It will also automatically adjust for summer/winter time. -
Page 8: Setting.the.year.manually
Setting the year manually 1. To set the year hold down both theTime and Date buttons. The display will change to show the year. 2. Whilst holding down the Time and Date buttons set the correct year by using the Up or Down buttons. When the Time and Date buttons are released the display will revert to showing the time. -
Page 9: Setting.alarm.times
Setting alarm times Your clock radio has two separate alarms which can be set to activate at different times. 1. Press and hold down the Alarm 1 or Alarm 2 buttons. 2. Whilst holding down the Alarm 1 or Alarm 2 buttons press the Up or Down buttons to set the alarm time. -
Page 10: Setting.alarm.day
Setting alarm day Your clock radio has five different day options for each of the alarms. The Alarm days are: Weekdays only display shows 1-5 Weekends only display shows 6-7 Everyday display shows 1-7 Monday to Saturday display shows 1-6 Sunday only display shows 7-7 Weekday alarm 1. Press and hold down the Alarm 1 or Alarm 2 buttons (depending on which alarm you wish to set day for). 2. Whilst holding down Alarm 1 or Alarm 2 buttons repeatedly press and release the Alarm Days button until display shows 1-5. -
Page 11: Weekend.alarm
Weekend alarm 1. Press and hold down the Alarm 1 or Alarm 2 buttons (depending on which alarm you wish to set day for). 2. Whilst holding down Alarm 1 or Alarm 2 buttons repeatedly press and release the Alarm days button until display shows 6-7. 3. -
Page 12: Monday.to.saturday.alarm
Monday to Saturday alarm 1. Press and hold down the Alarm 1 or Alarm 2 buttons (depending on which alarm you wish to set day for). 2. Whilst holding down Alarm 1 or Alarm 2 buttons repeatedly press and release the Alarm days button until display shows 1-6. 3. -
Page 13: Checking.alarm.times
Checking alarm times 1. Press and hold down either Alarm 1 or Alarm 2 buttons depending which alarm you want to check. The display will change from normal time to alarm time. Release the Alarm 1 or Alarm 2 buttons to return to normal time. -
Page 14: Snooze.control
60 minute alarm period. 2. During the snooze interval the alarm LED will flash. Sleep timer You can program your clock radio to play the radio for up to 90 minutes and then switch off. 1. Press the Sleep button. The display will show the sleep time. -
Page 15: Listening.to.the.radio
3. Tune in to the desired station using the Tuning control. 4. Adjust volume using the Volume control. 5. The Wire aerial located on the rear of your clock radio is for FM reception. The wire should be fully extended and positioned for optimum reception. -
Page 16: Auto.dimmer
A fresh backup battery can supply power to your clock radio’s computer memory for 3 years even if it is never connected to a mains supply. If your clock radio was connected to the... -
Page 17: Changing.the.back-Up.battery
This will provide power whilst the original battery is removed. 4. Open the battery cover located on the underside of the clock radio by pushing the cover in the direction of the arrow. 5. Remove old battery from holder. Replace new battery with facing upwards. -
Page 18: Time.zones
Time Zones Your clock radio is set to UK time zone 12 GMT (UTC). Should you wish to take your clock radio to other countries the time zone will need to be reset. 1. Press and hold down the Snooze/Time Zone button - the display will show the time zone currently selected e.g. -
Page 19: Headphone Socket
Headphone socket A 3.5mm Headphone Socket located on the rear of your clock radio is provided for use with either headphones or an earpiece. Inserting a plug automatically mutes the internal loudspeaker. If.you.need.any.further.advice,.please.call.our.Technical.Helpline.on.:-.. 020.8758.0338.(Mon-Fri) -
Page 20: Circuit Features
Specifications Power Requirements Mains AC 230 volts, 50Hz Back-up Battery 1 x CR2032 Lithium (3 - 5 year life) Frequency Coverage 87.5 - 108MHz 515 - 1635 kHz The Company reserves the right to amend the specification without notice. Circuit features Loudspeaker only Aerial System 8 ohms Wire Aerial Built-in Ferrite aerial... -
Page 21: Mains Supply
General Do not allow this unit to be exposed to moisture (e.g. dripping or splashing) or to temperatures exceeding 70 degrees centigrade. It is recommended that the FM band be used wherever possible as better results in terms of quality and freedom from interference will usually be obtained than on the MW band. -
Page 22: Notes
Notes:... -
Page 23: Guarantee
In the event that it is not possible to return the instrument to the Roberts' dealer from whom it was purchased, please contact Roberts Radio Technical Services at the address shown on the rear of this manual. - Page 24 ROBERTS RADIO TECHNICAL SERVICES 97-99 Worton Road Isleworth Middlesex TW7 6EG Technical Helpline:- 020 8758 0338 (Mon-Fri) Website:.http://www.robertsradio.co.uk Issue 2...
Need help?
Do you have a question about the CR99712 and is the answer not in the manual?
Questions and answers
clock stopped and will not restart
The Roberts CR99712 clock may have stopped because it has been disconnected from the AC mains supply or the back-up battery is depleted. To restart it, reconnect the mains plug to the mains outlet. If the issue persists, check and replace the back-up battery if necessary. Refer to the section on Back-up Battery in the manual for further details.
This answer is automatically generated