Erbe VIO 300 D User Manual
Electrosurgical unit for cutting and coagulation
Hide thumbs
Also See for VIO 300 D:
- User manual (182 pages) ,
- Service manual (110 pages) ,
- Service manual (84 pages)
Table of Contents
Advertisement
Quick Links
Advertisement
Table of Contents

Related Manuals for Erbe VIO 300 D


Summary of Contents for Erbe VIO 300 D
- Page 1 VIO 300 D User manual 12.04 V 1.4.x ERBE...
- Page 3 VIO 300 D User manual...
- Page 4 The User Manual is digitally printed only on delivery of your machine. All information is up to date. The ERBE documentation team would like to improve its products for your benefit, and I would therefore be very pleased to re- ceive suggestions, criticism and questions as well as positive comments.
-
Page 5: Table Of Contents
Table of Contents Table of Contents Chapter Title Page Safety instructions ................ 9 Intended use ......................9 Safety notations......................9 Safety of equipment and accessories ............... 9 Importance of the User Manual and training of medical personnel......9 Protection from the risk of electric shock .............. 10 Ambient conditions .................... - Page 6 Table of Contents Creating programs for ReMode function ..............42 Calling up Setup .....................46 Description of socket hardware ..........49 Purchasing further receptacles................49 Sockets for different modes and instrument connectors.........49 Monopolar socket ....................49 Bipolar socket......................51 Multifunctional receptacle..................52 Socket for patient plate...................53 Monopolar Standard Modes ............
- Page 7 Ambient conditions ....................127 Electrical installation ................... 127 Install electrosurgical unit on overhead support ..........128 Installing the unit on an ERBE equipment cart ........... 129 Cleaning and Disinfection ............131 Wipe disinfection ....................131 Instructions for cleaning and disinfection............131 Safety Instructions ....................
- Page 8 Table of Contents / 144...
-
Page 9: Safety Instructions
1 • Safety instructions CHAPTER 1 Safety instructions Intended use The VIO 300 D is an electrosurgical unit for cutting and coagulation. Thanks to its performance features it offers universal applications. Safety notations WARNING! The WARNING! safety indication refers to a risk of personal injury. -
Page 10: Protection From The Risk Of Electric Shock
ERBE is not responsible for damage caused by user error. In the event of uncertainties or if you have any questions, please contact ERBE. We will be glad to give you further assistance and will be pleased to receive your sug- gestions concerning this User Manual. -
Page 11: Maintenance
The unit must not be used following failure of display elements. Electrical capacity of The ERBE instructions for use of the instruments indicate the maximum electrical instruments capacity of the instrument. Check that the instrument is suitable for the required mode and the required power limitation. - Page 12 1 • Safety instructions Power output The power output should be set as low as possible for the relevant purpose. An apparently low output value or functional failure of the electrosurgical unit dur- ing normal operation may be caused by poor positioning of the patient plate or in- sufficient contact in its lines.
-
Page 13: Safety Features
2 • Safety Features CHAPTER 2 Safety Features NESSY What is NESSY? The unit is equipped with a Neutral Electrode Safety System (NESSY), which mon- itors the neutral electrode, warns of critical situations, and thus prevents burns. How effective the monitoring is depends on whether you choose a single surface or dual surface neutral electrode and on the NESSY setting. -
Page 14: How Do I Receive Information About The Safety Status Of The Neutral Electrode
To optimally utilize the unit's monitoring functions, ERBE recommends connecting connected. "Neutral electrode: a dual-surface electrode, and in particular the ERBE NESSY Omega electrode. Dual surface" or "Neutral elec- Apart from many other advantages, this electrode virtually eliminates any possibil- trode: Either way"... - Page 15 2 • Safety Features Application direction of the contact surface relative to the conduction direction When dual-surface electrodes are used, NESSY also monitors the direction of ap- plication of the contact surface relative to the conduction direction. The high-fre- quency current is not, as a rule, distributed evenly over the contact surface of the neutral electrode.
- Page 16 2 • Safety Features Checking function of the NESSY window when a dual-surface electrode is connected with "Neutral electrode: Dual sur- face" or "Neutral electrode: Either way" setup Fig. 2-3 If you press the Focus button on the neutral electrode socket, you change to the NESSY window.You will see a traffic-light symbol (1).
-
Page 17: Automatic Monitoring Of Equipment Output Error
2 • Safety Features • Safety status Green. The unit can be activated without any danger for the patient. • Safety status Red. You cannot activate the unit. The middle indicator (2) shows the contact resistance as a numerical value. The diagram on the right (3) shows the contact resistance as a bar. -
Page 18: Protection From Operating Errors
2 • Safety Features automatic switch-off of a HF generator should not take place too quickly as this would hinder the operating surgeon with cutting or coagulation. Setting of the ON time can only be carried out by a technician in the service programs. WARNING! For safety reasons modification of the automatic restriction of the maximum ON time must only be carried out when all users of the respective unit have been... -
Page 19: Description Of The Controls
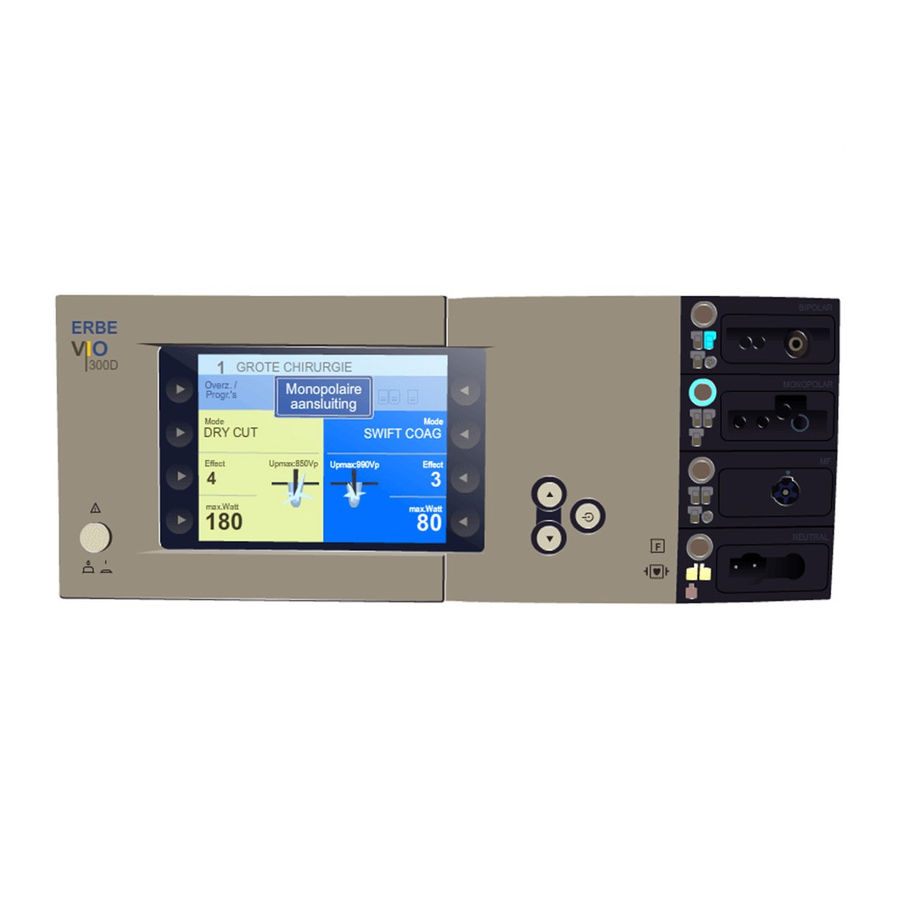
3 • Description of the Controls CHAPTER 3 Description of the Controls Controls of the front panel Fig. 3-1 (1) Power switch Power Unit on / off (1a) Symbol Read the user manual before switching on and using the unit. (10) Up / down Adjustment buttons These buttons always have a function when they appear in the display. - Page 20 3 • Description of the Controls (16) Footswitch Pilot lamps The footswitch symbol lights up when the respective footswitch is assigned to the scoket. (17) Auto Start When this lamp is lit up, Auto Start is active. (18) Patient plates Single-surface or dual-surface patient plate connected.
-
Page 21: Controls On The Back
The dual-pedal footswitch can be connected to either receptacle (1) or receptacle (2). The same applies to the single-pedal footswitch. (3) ECB sockets (ECB means ERBE Communication Bus) You can connect other units to the electrosurgical unit, e. g. an APC or a smoke evacuator. - Page 22 Connect the unit to a properly installed grounded outlet. Only use the ERBE power cord or an equivalent power cord for this purpose. The power cord must bear the na- tional test symbol. If the unit is installed on the ERBE VIO-CART, make the power connection with the power cord of the VIO-CART.
-
Page 23: Working With The Electrosurgical Unit: A Tutorial
VIO-CART. The tutorial is based on a sample In this tutorial you will learn how to operate the VIO 300 D electrosurgical unit us- configuration ing a sample configuration. Although the unit you have before you may be config- ured differently, the structure of the user environment and operation of the functions is nevertheless identical. - Page 24 4 • Working with the Electrosurgical Unit: a Tutorial 3. Getting an overview: assign- ment of the active program for the electrosurgical unit Fig. 4-1 Once the performance test has been completed, you will see the window Guide. Here you can see the number (1) and the name (2) of the active program. In this ex- ample it is the program 1 program xy.
- Page 25 IES 2 on the front panel of the electrosurgical unit and keep it pressed until you see the IES 2 settings for VIO 300 D window. You can also scroll to the IES 2 settings for APC window. Although the functions of the IES 2 are set on the electrosurgical unit, operation of the IES 2 is described in a separate user manual.
-
Page 26: Adopt Program
4 • Working with the Electrosurgical Unit: a Tutorial Adopt Program Adopt Program Fig. 4-3 If you want to accept the active Existing Program, press the selection button next to the menu item Adopt program. You will then move to the window Cut / Coag Set- tings. - Page 27 4 • Working with the Electrosurgical Unit: a Tutorial 2. Select Program Fig. 4-5 You will then move to the window Select Program. You will then see a selection list of programs (1). 1. If you press the Up/Down buttons (2), and more than 4 programs are stored, the window scrolls in the program selection list.
-
Page 28: The Basic Concept Of The Electrosurgical Unit: Focusing Attention On The Functions Of A Receptacle (Focus View)
4 • Working with the Electrosurgical Unit: a Tutorial The basic concept of the electrosurgical unit: focusing attention on the functions of a receptacle (Focus View) Fig. 4-7 The window Cut / Coag Settings The window Cut / Coag Settings focuses attention on the functions of a receptacle as you only ever see the CUT settings (1) and COAG settings (2) of one receptacle. -
Page 29: Setting Cut Mode
4 • Working with the Electrosurgical Unit: a Tutorial Setting Cut mode 1. Call up CUT mode Fig. 4-8 Press the selection button next to the menu item Mode. 2. Select CUT mode Fig. 4-9 You will then move to the window Select cut mode. On the right you will see a se- lection list of modes (1). -
Page 30: Setting Cut Effect
4 • Working with the Electrosurgical Unit: a Tutorial Fig. 4-10 Scroll with the Up/Down buttons or use the Select button next to the "Other modes" menu item to display the description of the mode selected. After you have read the text, press the selection button next to the menu item Return. You will then move back to the window Select cut mode. -
Page 31: Selecting Cut Max. Wattage
4 • Working with the Electrosurgical Unit: a Tutorial 2. Choose CUT Effect Fig. 4-12 You will then move to the window Select Cut Effect. You will see a numerical display for the effect (1) and a display in the form of a bar diagram (2). -
Page 32: Select Coag Mode, Coag Effect And Coag Power Limitation
4 • Working with the Electrosurgical Unit: a Tutorial 2. Select Cut power limitation Fig. 4-14 You will then move to the window Cut power limitation. Selection of a power lim- itation level is for the safety of the patient and protects the instrument from damage. You will see a numerical display for the power limitation (1) and a display in the form of a bar diagram (2). - Page 33 4 • Working with the Electrosurgical Unit: a Tutorial 1. Call up window Select activa- tion type Fig. 4-15 1. First use a Focus button (1) to select a receptacle to which you want to allocate a footswitch. You will see the functions of the receptacle in the window Cut / Coag Settings.
-
Page 34: Activation Of Cut And Coag Modes With Fingerswitch, Auto Start
4 • Working with the Electrosurgical Unit: a Tutorial The active footswitch is marked in green. Use the selection button to select a foot- switch, e. g. the yellow pedal of the dual-pedal footswitch (2). Orientation: Footswitch display in the window Cut / Coag Set- tings and on the receptacle Fig. -
Page 35: The Focus View And Activation Concept Of The Electrosurgical Unit. What Points Must I Observe
4 • Working with the Electrosurgical Unit: a Tutorial The Focus View and activation concept of the electrosurgical unit. What points must I observe? Instrument at monopolar and bipolar receptacle Fig. 4-19 Please imagine the following situation: The yellow pedal CUT (1) is allocated to the monopolar receptacle. -
Page 36: How Do I Receive Information About The Safety Status Of The Neutral Electrode
4 • Working with the Electrosurgical Unit: a Tutorial Unit - NE con- Skin - NE NE applica- Higher safety for patients nection contact tion direction with low skin resistance Dual surface NE / "NE: Dynamic" setting Dual surface NE / "NE: Dual sur- face"... - Page 37 To optimally utilize the unit's monitoring functions, ERBE recommends connecting connected. "Neutral electrode: a dual-surface electrode, and in particular the ERBE NESSY Omega electrode. Dual surface" or "Neutral elec- Apart from many other advantages, this electrode virtually eliminates any possibil- trode: Either way"...
- Page 38 4 • Working with the Electrosurgical Unit: a Tutorial If the currents differ too greatly from each other, the dual-surface electrode symbol on the VIO illuminates red. Monopolar mode cannot be activated. If you attempt ac- tivation, an audible warning signal is emitted. A red warning message appears on the display: When applying the neutral electrode, ensure that the line of symmetry points toward the operating field.
-
Page 39: Saving The Amended Basic Program Under A New Name
4 • Working with the Electrosurgical Unit: a Tutorial Checking function of the NESSY window when a dual-surface electrode is connected with "Neutral electrode: dynamic" setup Fig. 4-23 If you press the Focus button on the neutral electrode socket, you change to the NESSY window. - Page 40 4 • Working with the Electrosurgical Unit: a Tutorial Save changed Basic program as a new program Fig. 4-24 Press the Enter button. You will then move to the window Save as. Optionally you can enter a password for the new program. The program can then only be overwritten or deleted after entering the password.
-
Page 41: Overwriting A Program
4 • Working with the Electrosurgical Unit: a Tutorial Overwriting a program You can change the settings of a program and overwrite it with the new settings. Overwrite changed program Test Fig. 4-25 1. Call up the program Test. Change any setting. 2. -
Page 42: Creating Programs For Remode Function
4 • Working with the Electrosurgical Unit: a Tutorial Creating programs for ReMode function What is the ReMode function With the ReMode switch of the footswitch (1) or certain handles (2) you can switch used for? between two programs a and b without having to operate the unit. If you are alternating between two programs a and b, the unit always calls up pro- gram a after switch-on, even if you switched off with program b. - Page 43 4 • Working with the Electrosurgical Unit: a Tutorial Create programs 3a ReMode and 3b ReMode to familarize yourself with the first ReMode option Fig. 4-29 1. Call up the Basic Program. Call up the monopolar receptacle. 2. Change the setting according to the following specifications: AUTO CUT, Effect 5, 100 W.
- Page 44 4 • Working with the Electrosurgical Unit: a Tutorial Fig. 4-31 Fig. 4-32 6. You will then move to the window Cut / Coag Settings. There you will see the name of the program 3 ReMode at the top of the window . Change the settings of the program 3 ReMode according to the following specifications: DRY CUT, Effect 3, 80 W.
- Page 45 4 • Working with the Electrosurgical Unit: a Tutorial Fig. 4-34 9. You will then move to the window Save as. Press the Enter button. The program will be saved. Switch between program 3a ReMode and 3b ReMode Fig. 4-35 The system has renamed program 3 ReMode as 3a ReMode and saved a program 3b ReMode.
-
Page 46: Calling Up Setup
4 • Working with the Electrosurgical Unit: a Tutorial Fig. 4-36 Fig. 4-37 In the program 3a ReMode you will see the settings of the monopolar receptacle of this program. The footswitch (CUT and COAG) is allocated to the monopolar re- ceptacle. - Page 47 4 • Working with the Electrosurgical Unit: a Tutorial Fig. 4-38 Fig. 4-39 Fig. 4-40 Brightness Display of screen brightness in 16 levels. Volume Selection of the volume level of the warning signals in 16 levels. The warning sig- nals must be clearly audible! Volume button Selection of the button volume in 16 levels.
- Page 48 4 • Working with the Electrosurgical Unit: a Tutorial Power display If you switch on the output display, you will see a bar diagram on activation of the unit. The diagram shows the maximum possible output in the respective mode. The green line represents the power limitation.
-
Page 49: Description Of Socket Hardware
A receptacle module consists of a front plate, receptacle insert and two holding clips. Installation in the electrosurgical unit is simple and can be carried out quickly by any technician authorized by ERBE. Sockets for different modes and instrument connectors In this chapter the receptacles are described from the aspect of their usage and com- patibility with various instrument connectors. - Page 50 Fig. 5-1 ERBE No. 20140-620 The receptacle module is suitable for the following connectors: monopolar recepta- cle based on ERBE standard. Contact ring which transmits activation signal dia. 9 mm. HF contact ring dia. 5 mm. Receptacle module MO 4 Fig.
-
Page 51: Bipolar Socket
Fig. 5-5 ERBE No. 20140-610 The receptacle module is suitable for the following connectors: Bipolar connector based on ERBE standard. Rear contact ring dia. 8 mm, front contact ring dia. 4 mm. Socket module BI 2-pin 22 Fig. 5-6 ERBE No. 20140-612 The receptacle module is suitable for the following connectors: international bipolar connector with 2 pins, pin spacing 22 mm. -
Page 52: Multifunctional Receptacle
BIPOLAR FORCED COAG Optional bipolar • BiClamp • BIPOLAR PRECISE CUT • BIPOLAR PRECISE COAG Socket module MF-0 Instrument compatibility Fig. 5-8 ERBE No. 20140-630 The receptacle module is suitable for the following connectors: 5-pole ERBE mul- tifunctional connector. / 144... -
Page 53: Socket For Patient Plate
The receptacle is used to connect a patient plate with monopolar modes. Socket module NE 6 Connector compatibility Fig. 5-9 ERBE No. 20140-640 The receptacle module is suitable for the following connectors: ERBE patient plate connector Ø 6.35 mm. Socket module NE 2-pin Fig. 5-10 ERBE No. 20140-641 The receptacle module is suitable for the following connectors: Patient plate con- nector with 2 pins. - Page 54 5 • Description of socket hardware / 144...
-
Page 55: Monopolar Standard Modes
6 • Monopolar Standard Modes CHAPTER 6 Monopolar Standard Modes AUTO CUT Properties Reproducible, gentle cuts, extra kind to tissue, minimal to medium hemostasis. PPS (Power Peak System) The AUTO CUT mode is equipped with PPS. A special problem during incision may be posed by the initial incision phase, in particular when the cutting electrode is pressed firmly against the tissue to be cut before activation of the HF generator so that the cutting electrode has a relatively extensive and thus low-resistance contact... - Page 56 6 • Monopolar Standard Modes Performance diagrams AUTO CUT = 500 Ohm Effect 8 Effect 7 Effect 6 Effect 5 Effect 4 Effect 3 Effect 2 Effect 1 Power HF max. (W) Fig. 6-1 AUTO CUT Effect 8 Effect 7 Effect 6 Effect 5 Effect 4...
-
Page 57: High Cut
6 • Monopolar Standard Modes AUTO CUT Effect 8 Effect 7 Effect 6 Effect 5 Effect 4 Effect 3 Effect 2 Effect 1 Power (W) Fig. 6-3 HIGH CUT Properties Reproducible tissue-sparing cuts, in particular in poorly conductive and varying tis- sue. - Page 58 6 • Monopolar Standard Modes Crest factor 1.4 (at R = 500 ohms) Rated load resistor 500 ohms Max. HF peak voltage 950 Vp (with an arc) Number of effects Constancy of effects automatic control of arc intensity HF power limitation 10 watts to 300 watts in 1 watt steps Max.
-
Page 59: Dry Cut
6 • Monopolar Standard Modes HIGH CUT Effect 8 Effect 7 Effect 6 Effect 5 Effect 4 Effect 3 Effect 2 Effect 1 Power (W) Fig. 6-6 DRY CUT Properties Intense haemostasis with somewhat slower cutting speed. Areas of use E.g. - Page 60 6 • Monopolar Standard Modes HF power limitation 10 watts to 200 watts in 1 watt steps Max. power output at rated load resis- 200 watts ± 20% Performance diagrams Fig. 6-7 Fig. 6-8 / 144...
-
Page 61: Dry Cut
6 • Monopolar Standard Modes DRY CUT 1600 1400 Effect 8 1200 Effect 7 Effect 6 1000 Effect 5 Effect 4 Effect 3 Effect 2 Effect 1 Power (W) Fig. 6-9 DRY CUT ° Properties Intense haemostasis with somewhat slower cutting speed. Difference compared with Dry Changed ratio of crest factor to RF peak voltage. - Page 62 6 • Monopolar Standard Modes Performance diagrams Fig. 6-10 Fig. 6-11 / 144...
-
Page 63: Soft Coag
6 • Monopolar Standard Modes Fig. 6-12 SOFT COAG Properties Carbonization of the tissue is prevented, adhesion of the electrode to the tissue is greatly reduced. Greater coagulation intensities than in other COAG modes. If you want to use the potentially high coagulation intensities of SOFT COAG to the full, select a low effect level and carry out coagulation for a longer period. - Page 64 6 • Monopolar Standard Modes HF power limitation 5 watts to 200 watts in 1 watt steps Max. power output at rated load resis- 200 watts ± 20% Performance diagrams Fig. 6-13 Fig. 6-14 / 144...
-
Page 65: Swift Coag
6 • Monopolar Standard Modes SOFT COAG Effect 8 Effect 7 Effect 6 Effect 5 Effect 4 Effect 3 Effect 2 Effect 1 100 125 150 175 200 225 250 Power (W) Fig. 6-15 SWIFT COAG ° Properties Fast effective coagulation which is very suitable for dissection with high haemosta- sis due to its limited tissue-cutting property. - Page 66 6 • Monopolar Standard Modes Performance diagrams Fig. 6-16 Fig. 6-17 / 144...
-
Page 67: Swift Coag
6 • Monopolar Standard Modes Fig. 6-18 SWIFT COAG Properties Fast effective coagulation which is very suitable for dissection with high haemosta- sis due to its limited tissue-cutting property. Applications Coagulation and dissection. Suitable electrodes Ball electrodes for coagulation only, knife or spatula electrodes for dissection and coagulation. - Page 68 6 • Monopolar Standard Modes Performance diagrams SWIFT COAG = 500 Ohm Effect 8 Effect 7 Effect 6 Effect 5 Effect 4 Effect 3 Effect 2 Effect 1 Power HF max. (W) Fig. 6-19 SWIFT COAG Effect 8 Effect 7 Effect 6 Effect 5 Effect 4...
-
Page 69: Forced Coag
6 • Monopolar Standard Modes SWIFT COAG 3000 2500 Effect 8 Effect 7 2000 Effect 6 Effect 5 1500 Effect 4 Effect 3 1000 Effect 2 Effect 1 Power (W) Fig. 6-21 FORCED COAG Properties Effective, fast "standard" coagulation. Areas of use Contact coagulation, clamp coagulation, e.g. - Page 70 6 • Monopolar Standard Modes Performance diagrams Fig. 6-22 FORCED COAG Effect 4 Effect 3 Effect 2 Effect 1 1000 10000 Resistance (Ohm) Fig. 6-23 / 144...
-
Page 71: Spray Coag
6 • Monopolar Standard Modes FORCED COAG 1800 1600 1400 1200 Effect 4 Effect 3 1000 Effect 2 Effect 1 Power (W) Fig. 6-24 SPRAY COAG Properties Contact-free, efficient surface coagulation, low penetration depths. Automatic dos- ing of power within the pre-selected limits. Areas of use Coagulation of diffuse hemorrhage. - Page 72 6 • Monopolar Standard Modes Performance diagrams SPRAY COAG = 500 Effect 1-2 Power HF max. (W) Fig. 6-25 SPRAY COAG Effect 2 Effect 1 1000 10000 Resistance (Ohm) Fig. 6-26 / 144...
- Page 73 6 • Monopolar Standard Modes SPRAY COAG 4500 4000 3500 3000 2500 Effect 2 Effect 1 2000 1500 1000 Power (W) Fig. 6-27 / 144...
- Page 74 6 • Monopolar Standard Modes / 144...
-
Page 75: Bipolar Standard Modes
7 • Bipolar Standard Modes CHAPTER 7 Bipolar Standard Modes BIPOLAR CUT Properties Cutting current that only flows directly around the distal end of the applicator. You can use the effect levels to set the degree of haemostasis at the cut edge. PPS (Power Peak System) The BIPOLAR CUT mode is equipped with PPS. - Page 76 7 • Bipolar Standard Modes Performance diagrams BIPOLAR CUT = 500 Ohm Effect 2 - 8 Effect 1 Power HF max. (W) Fig. 7-1 BIPOLAR CUT Effect 8 Effect 7 Effect 6 Effect 5 Effect 4 Effect 3 Effect 2 Effect 1 1000 10000...
-
Page 77: Bipolar Soft Coag
7 • Bipolar Standard Modes BIPOLAR CUT Effect 8 Effect 7 Effect 6 Effect 5 Effect 4 Effect 3 Effect 2 Effect 1 Power (W) Fig. 7-3 BIPOLAR SOFT COAG Properties Lower voltages, carbonisation of the tissue is prevented, adhesion of the electrode to the tissue is very much reduced. - Page 78 7 • Bipolar Standard Modes Number of effects Constancy of effects automatic control of HF peak voltage HF power limitation 1 watt to 120 watts in 1 watt steps Max. power output at rated load resis- 120 watts ± 20% Performance diagrams BIPOLAR SOFT = 75 Ohm...
-
Page 79: Bipolar Forced Coag
7 • Bipolar Standard Modes BIPOLAR SOFT Effect 8 Effect 7 Effect 6 Effect 5 Effect 4 Effect 3 Effect 2 Effect 1 Power (W) Fig. 7-6 BIPOLAR FORCED COAG Properties Fast bipolar coagulation. Areas of use All bipolar coagulation procedures in which you want to coagulate vessels fast and effectively or want to replace monopolar forceps coagulation. - Page 80 7 • Bipolar Standard Modes Performance diagrams BIPOLAR FORCED = 300 Effect 1-2 Power HF max. (W) Fig. 7-7 BIPOLAR FORCED Effect 1-2 1000 10000 Resistance (Ohm) Fig. 7-8 / 144...
- Page 81 7 • Bipolar Standard Modes BIPOLAR FORCED Effect 2 Effect 1 Power (W) Fig. 7-9 / 144...
- Page 82 7 • Bipolar Standard Modes / 144...
-
Page 83: Monopolar Optional Modes
8 • Monopolar Optional Modes CHAPTER 8 Monopolar Optional Modes PRECISE CUT Properties Very fine adjustment, minimum necroses at the cut edge, very fine power output in a range of 1 to 50 watts. Areas of use E.g. cuts in operations where strain on the tissue or patient must be kept to a mini- mum, e.g. - Page 84 8 • Monopolar Optional Modes Performance diagrams PRECISE CUT = 500 Ohm Effect 4 - 8 Effect 3 Effect 2 Effect 1 Power HF max. (W) Fig. 8-1 PRECISE CUT Effect 8 Effect 7 Effect 6 Effect 5 Effect 4 Effect 3 Effect 2 Effect 1...
-
Page 85: Endo Cut Q
8 • Monopolar Optional Modes PRECISE CUT Effect 8 Effect 7 Effect 6 Effect 5 Effect 4 Effect 3 Effect 2 Effect 1 Power (W) Fig. 8-3 ENDO CUT Q Properties The cut consists of alternating cutting and coagulating phases. The cut is easy to control and is characterised by a reproducible, preselectable coagulation property while cutting. -
Page 86: Endo Cut I
8 • Monopolar Optional Modes Performance diagram Fig. 8-4 ENDO CUT I Properties The cut consists of alternating cutting and coagulating phases. The cut is easy to control and is characterised by a reproducible, preselectable coagulation property while cutting. Applications Endoscopic interventions in which alternating cutting and coagulation with activa- tion is called for. -
Page 87: Precise Coag
8 • Monopolar Optional Modes Performance diagram Fig. 8-5 PRECISE COAG Properties Extremely fine adjustment, extremely fine precision power output in range from 1 to 50 watts. Applications Coagulation processes where stress for tissue or patient must be minimized, e.g. neurosurgery, ENT, dermatology. - Page 88 8 • Monopolar Optional Modes Performance diagrams Fig. 8-6 Fig. 8-7 / 144...
-
Page 89: Twin Coag
8 • Monopolar Optional Modes PRECISE COAG Effect 8 Effect 7 Effect 6 Effect 5 Effect 4 Effect 3 Effect 2 Effect 1 Power (W) Fig. 8-8 TWIN COAG Properties Fast, effective coagulation, which is highly suitable for preparation with high hemo- stasis owing to its limited tissue-cutting property. - Page 90 8 • Monopolar Optional Modes Max. HF peak voltage 2000 Vp Number of effects Constancy of effects automatic control of HF peak voltage HF power limitation 5 watts to 200 watts in 1 watt steps Max. power output at rated load resis- 200 watts ±...
- Page 91 8 • Monopolar Optional Modes TWIN COAG 2000 1800 Effect 8 1600 Effect 7 1400 Effect 6 1200 Effect 5 1000 Effect 4 Effect 3 Effect 2 Effect 1 Power (W) Fig. 8-11 / 144...
- Page 92 8 • Monopolar Optional Modes / 144...
-
Page 93: Bipolar Optional Modes
BiClamp Properties Special COAG mode for ERBE BiClamp (bipolar clamp). With four effect gradu- ations you can adjust the coagulation performance exactly to the type of tissue in- volved. The AUTO STOP function is adjusted to BiClamp and ends activation automatically when the best coagulation effect is achieved. -
Page 94: Bipolar Precise Cut
9 • Bipolar Optional Modes Performance diagram BiClamp Effect 4 Effect 3 Effect 2 Effect 1 1000 Resistance (Ohm) Fig. 9-1 BIPOLAR PRECISE CUT Properties Very fine adjustment, minimal necrosis at the cut edge, extremely precise power output in the 1 to 50 W range. Applications For example, incisions during procedures where stress for the tissue or patient must be minimised, e.g. - Page 95 9 • Bipolar Optional Modes Performance diagrams Fig. 9-2 Fig. 9-3 / 144...
-
Page 96: Bipolar Precise Coag
9 • Bipolar Optional Modes Fig. 9-4 BIPOLAR PRECISE COAG Properties Very fine adjustment, extremely precise power output in the 1 to 50 W range. Applications Coagulation processes where stress for tissue or patient must be minimised, e.g. neurosurgery, ENT, dermatology. Difference from BIPOLAR SOFT In the lower output range, you can set the coagulation degree to a lower and more precise value. - Page 97 9 • Bipolar Optional Modes Performance diagrams Fig. 9-5 Fig. 9-6 / 144...
- Page 98 9 • Bipolar Optional Modes Fig. 9-7 / 144...
-
Page 99: Apc Socket (Only Available With The Apc Module)
10 • APC socket (only available with the APC module) CHAPTER 10 APC socket (only available with the APC module) APC socket Standard Cutting and coagulation modes • FORCED APC • PRECISE APC • PULSED APC • Argon-assisted AUTO CUT Mode •... - Page 100 10 • APC socket (only available with the APC module) / 144...
-
Page 101: Apc Standard Modes (Only Available With An Apc Module)
11 • APC Standard Modes (Only Available with an APC Module) CHAPTER 11 APC Standard Modes (Only Available with an APC Module) FORCED APC Properties Standard setting for the APC with ignition assistance for safe ignition of the plasma. Areas of use Hemostasis of small, diffuse areas of bleeding. - Page 102 11 • APC Standard Modes (Only Available with an APC Module) Performance diagrams Fig. 11-1 Fig. 11-2 / 144...
-
Page 103: Precise Apc
11 • APC Standard Modes (Only Available with an APC Module) Fig. 11-3 PRECISE APC Properties APC with well controllable change of effect at the tissue surface, largely indepen- dent of the distance between applicator and tissue. Areas of use Hemostasis of diffuse areas of bleeding. -
Page 104: Pulsed Apc
11 • APC Standard Modes (Only Available with an APC Module) Constancy of effects automatic control of arc intensity Max. power output at rated load resis- 160 watts ± 20% Performance diagram PRECISE APC Effect 1-8 1000 10000 Resistance (Ohm) Fig. - Page 105 11 • APC Standard Modes (Only Available with an APC Module) Constancy of effects Restriction of HF peak voltage HF power limitation 1 W to 120 W in 1 W steps Max. power output at rated load resis- 120 watts ± 20% Performance diagrams PULSED APC = 500 Ohm...
-
Page 106: Argon-Assisted Auto Cut Mode
11 • APC Standard Modes (Only Available with an APC Module) PULSED APC 4000 3500 Effect 1-2 3000 2500 2000 1500 1000 Power (W) Fig. 11-7 Argon-assisted AUTO CUT Mode Properties Reproducible, extremely tissue-sparing cuts, minimal to medium hemostasis. The argon gas reduces the formation of smoke and the carbonization. - Page 107 11 • APC Standard Modes (Only Available with an APC Module) Performance diagrams AUTO CUT = 500 Ohm Effect 8 Effect 7 Effect 6 Effect 5 Effect 4 Effect 3 Effect 2 Effect 1 Power HF max. (W) Fig. 11-8 AUTO CUT Effect 8 Effect 7...
-
Page 108: Argon-Assisted High Cut Mode
11 • APC Standard Modes (Only Available with an APC Module) AUTO CUT Effect 8 Effect 7 Effect 6 Effect 5 Effect 4 Effect 3 Effect 2 Effect 1 Power (W) Fig. 11-10 Argon-assisted HIGH CUT Mode Properties Reproducible, tissue-sparing cuts, in particular in poorly conductive and varying tis- sue. - Page 109 11 • APC Standard Modes (Only Available with an APC Module) Performance diagrams HIGH CUT = 500 Ohm Effect 1 - 8 Power HF max. (W) Fig. 11-11 HIGH CUT Effect 8 Effect 7 Effect 6 Effect 5 Effect 4 Effect 3 Effect 2 Effect 1...
-
Page 110: Argon-Assisted Dry Cut Mode
11 • APC Standard Modes (Only Available with an APC Module) HIGH CUT Effect 8 Effect 7 Effect 6 Effect 5 Effect 4 Effect 3 Effect 2 Effect 1 Power (W) Fig. 11-13 Argon-assisted DRY CUT Mode Properties Intense hemostasis with somewhat slower cutting speed. The argon gas reduces the formation of smoke and the carbonization. - Page 111 11 • APC Standard Modes (Only Available with an APC Module) HF power limitation 10 W to 200 W in 1 watt steps Max. power output at rated load resis- 200 watts ± 20% Performance diagrams Fig. 11-14 Fig. 11-15 / 144...
-
Page 112: Argon-Assisted Dry Cut ° Mode
11 • APC Standard Modes (Only Available with an APC Module) DRY CUT 1600 1400 Effect 8 1200 Effect 7 Effect 6 1000 Effect 5 Effect 4 Effect 3 Effect 2 Effect 1 Power (W) Fig. 11-16 Argon-assisted DRY CUT ° Mode Properties Intense haemostasis with somewhat slower cutting speed. - Page 113 11 • APC Standard Modes (Only Available with an APC Module) Performance diagrams Fig. 11-17 Fig. 11-18 / 144...
-
Page 114: Argon-Assisted Swift Coag Mode
Suitable electrodes Ball electrodes only for coagulation. Knife or blade electrodes for preparation and coagulation. (Note: When using the ERBE VIO APC handpiece, a conventional 4 mm electrode can be used instead of the argon applicator. For this, the flow setting... - Page 115 11 • APC Standard Modes (Only Available with an APC Module) Performance diagrams SWIFT COAG = 500 Ohm Effect 8 Effect 7 Effect 6 Effect 5 Effect 4 Effect 3 Effect 2 Effect 1 Power HF max. (W) Fig. 11-20 SWIFT COAG Effect 8 Effect 7...
-
Page 116: Argon-Assisted Swift Coag ° Mode
Suitable electrodes Ball electrodes only for coagulation. Knife or blade electrodes for preparation and coagulation. (Note: When using the ERBE VIO APC handpiece, a conventional 4 mm electrode can be used instead of the argon applicator. For this, the flow setting... - Page 117 11 • APC Standard Modes (Only Available with an APC Module) Constancy of effects automatic control of HF peak voltage HF power limitation 5 watts to 200 watts in 1 watt steps Max. power output at rated load resis- 200 watts ± 20% Performance diagrams Fig.
-
Page 118: Argon-Assisted Forced Coag Mode
Suitable electrodes Ball electrodes for contact coagulation. Insulated monopolar forceps for clamp co- agulation. (Note: When using the ERBE VIO APC handpiece, a conventional 4 mm electrode can be used instead of the argon applicator. For this, the flow setting must... - Page 119 11 • APC Standard Modes (Only Available with an APC Module) Performance diagrams Fig. 11-26 FORCED COAG Effect 4 Effect 3 Effect 2 Effect 1 1000 10000 Resistance (Ohm) Fig. 11-27 / 144...
-
Page 120: Argon-Assisted Soft Coag Mode
Suitable electrodes Contact electrodes, for this in particular electrodes with large contact surface, e.g. ball electrodes for deep coagulation. (Note: When using the ERBE VIO APC hand- piece, a conventional 4 mm electrode can be used instead of the argon applicator. - Page 121 11 • APC Standard Modes (Only Available with an APC Module) Max. HF peak voltage 190 Vp Number of effects Constancy of effects automatic control of HF peak voltage HF power limitation 5 watts to 200 watts in 1 watt steps Max.
- Page 122 11 • APC Standard Modes (Only Available with an APC Module) SOFT COAG Effect 8 Effect 7 Effect 6 Effect 5 Effect 4 Effect 3 Effect 2 Effect 1 100 125 150 175 200 225 250 Power (W) Fig. 11-31 / 144...
-
Page 123: Apc Optional Modes (Only Available With An Apc Module)
12 • APC Optional Modes (Only Available with an APC Module) CHAPTER 12 APC Optional Modes (Only Available with an APC Module) Argon-assisted TWIN COAG Mode Properties Fast, effective coagulation, which is highly suitable for preparation with high hemo- stasis owing to its limited tissue-cutting property. Two monopolar instruments can be activated at the same time. - Page 124 12 • APC Optional Modes (Only Available with an APC Module) Performance diagrams TWIN COAG = 500 Ohm Effect 8 Effect 7 Effect 6 Effect 5 Effect 4 Effect 3 Effect 2 Effect 1 Power HF max. (W) Fig. 12-1 TWIN COAG Effect 8 Effect 7...
- Page 125 12 • APC Optional Modes (Only Available with an APC Module) TWIN COAG 2000 1800 Effect 8 1600 Effect 7 1400 Effect 6 1200 Effect 5 1000 Effect 4 Effect 3 Effect 2 Effect 1 Power (W) Fig. 12-3 / 144...
- Page 126 12 • APC Optional Modes (Only Available with an APC Module) / 144...
-
Page 127: Installation
WARNING! The supply voltage must match the voltage specified on the rating plate. Connect the unit / the equipment cart to a properly installed grounded outlet. Only use the ERBE power cord or an equivalent power cord for this purpose. The power cord must bear the national test symbol. -
Page 128: Install Electrosurgical Unit On Overhead Support
13 • Installation blown, the unit may not be used on the patient again until it has been checked by a competent technician. Only spare fuses with the values indicated on the unit rating plate may be used. Potential equalisation If necessary, connect the potential equalisation pin of the unit or of the equipment cart to the potential equalisation system of the operating room using a potential equalisation conductor. -
Page 129: Installing The Unit On An Erbe Equipment Cart
(5) Power connection Power connection Connect the unit to a properly installed grounded outlet. Only use the ERBE power cord or an equivalent power cord for this purpose. The power cord must bear the na- tional test symbol. - Page 130 13 • Installation / 144...
-
Page 131: Cleaning And Disinfection
CHAPTER 14 Cleaning and Disinfection Wipe disinfection For cleaning and disinfecting the surfaces of the unit or of the equipment cart, ERBE recommends a wipe disinfection. Use only disinfectant which complies with the rel- evant national standards. Instructions for cleaning and disinfection... - Page 132 14 • Cleaning and Disinfection / 144...
-
Page 133: Status Messages, Error Messages
15 • Status Messages, Error Messages CHAPTER 15 Status Messages, Error Messages The VIO system displays two different types of error messages: error messages which prompt you to take action and rectify the error, and error messages occurring with errors which can only be rectified by the Technical Service. You will then see one of the following messages: •... - Page 134 15 • Status Messages, Error Messages Error Messages B-16 Program memory full. Please delete programs no longer needed. B-17 Double activation. Two switches pressed simultaneously e.g. footswitch and fingerswitch. B-19 Line voltage fault. The unit has discontinued activation due to an insufficient supply voltage. If this recurs, please inform Technical Service.
- Page 135 15 • Status Messages, Error Messages Error Messages B-B1 NESSY contact. Please check contact between skin and neutral electrode (patient plate). B-B3 Recalibrating glass keyboard. Do not touch! B-B7 The AUTO START function is only permissible up to a max. power output of 50 W. B-BB Safety check due.
- Page 136 15 • Status Messages, Error Messages / 144...
-
Page 137: General Technical Data
16 • General Technical Data CHAPTER 16 General Technical Data Power connection Rated supply voltage 100 V - 120 V ± 10% / 220 V - 240 V ± 10% Rated supply frequency 50 / 60 Hz Line current 8 A / 4 A Power input in standby mode 40 watts Power input with max. - Page 138 16 • General Technical Data Standards Classification according to EC Directive 93/42/EEC II b Protection class as per EN 60 601-1 Type as per EN 60 601-1 / 144...
-
Page 139: Information On Electromagnetic Compatibility (Emc)
17 • Information on electromagnetic compatibility (EMC) CHAPTER 17 Information on electromagnetic compatibility (EMC) Where EMC is concerned, medical electrical equipment is subject to special safety measures and must be installed and commissioned according to the EMC instruc- tions stated herein. Guidelines for avoiding, recognising and rectifying unwanted elec- tromagnetic effects on other equipment or systems, which are the result of operating the VIO system. - Page 140 17 • Information on electromagnetic compatibility (EMC) Guidance and manufacturer's declaration - electromagnetic immunity The equipment is intended for use in the electromagnetic environment specified below. The customer or the user of the equipment should ensure that it is used in such an environment. Immunity test IEC 60601 test level Compliance level...
- Page 141 17 • Information on electromagnetic compatibility (EMC) Guidance and manufacturer's declaration - electromagnetic immunity The equipment is intended for use in the electromagnetic environment specified below. The customer or the user of the equipment should ensure that it is used in such an environment. Immunity test IEC 60601 test level Compliance level...
- Page 142 17 • Information on electromagnetic compatibility (EMC) Recommended separation distances between portable and mobile HF communications equipment and the equipment The equipment is intended for use in an electromagnetic environment in which radiated HF disturbances are controlled. The customer or the user of the equipment can help prevent electromagnetic interference. This can be achieved by main- taining the minimum distance recommended below between the communications equipment (transmitters) and the equip- ment.
-
Page 143: Maintenance, Customer Service, Warranty, Disposal
Authorized persons Modifications and repairs may be undertaken only by ERBE or by persons expressly authorized by ERBE. ERBE accepts no liability if modifications and repairs to the unit or accessories are made by unauthorized persons. This will also invalidate the warranty. -
Page 144: Warranty
Other claims, in particular claims for compensation, are excluded. The repair must be carried out only by ERBE Elektromedizin GmbH or by persons who have been expressly authorized by ERBE. Claims under warranty are void if improper modifications or repairs have been undertaken.
Need help?
Do you have a question about the VIO 300 D and is the answer not in the manual?
Questions and answers