Hunter X-Core Owners Manual And Programming Instructions
Residential irrigation controller
Hide thumbs
Also See for X-Core:
- Quick start manual ,
- Owners manual and programming instructions (372 pages) ,
- Instructions (3 pages)
Table of Contents
Advertisement
Quick Links
Advertisement
Table of Contents

Related Manuals for Hunter X-Core


Summary of Contents for Hunter X-Core
- Page 1 Residential Irrigation Controller Owner’s Manual and Programming Instructions Compatible with Hunter Remotes and Solar Sync Unit A110, Riverside Business Centre, Email: info@waterwell.co.uk | Phone: 020 8742 8855 Bendon Valley, London, SW18 4UQ...
- Page 2 Unit A110, Riverside Business Centre, Email: info@waterwell.co.uk | Phone: 020 8742 8855 Bendon Valley, London, SW18 4UQ...
-
Page 3: Table Of Contents
Programmable Delay Between Stations ........C O NNE C TIN G A H UNTE R RE MO TE ..........Clearing the Controller’ s Memory/ Connecting to a Hunter Remote (not included) ......Resetting the Controller .............. To install the SmartPort connector .......... -
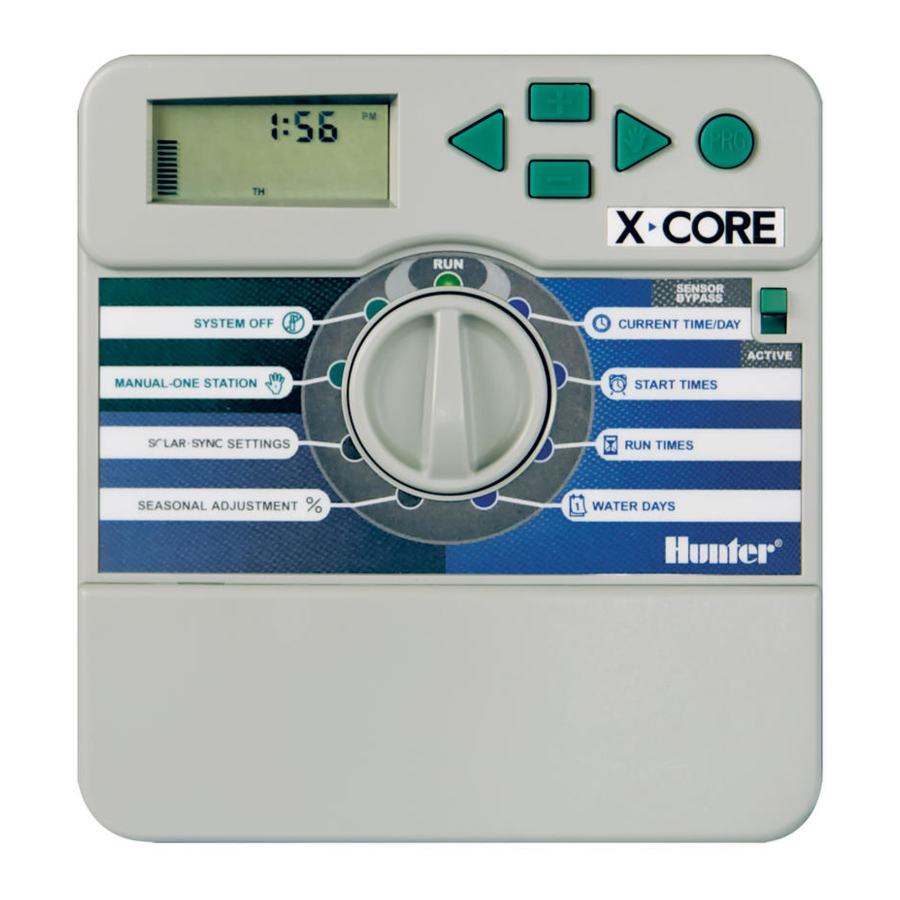
Page 4: X-Cor E Compo Nent S
X-COR E COMPO NENT S Indoor M odel O utdoor M odel (Internal Transformer Included) N ote: Plug may look di erent from illustration Terminal block for -E (International models only) Unit A110, Riverside Business Centre, Email: info@waterwell.co.uk | Phone: 020 8742 8855 Bendon Valley, London, SW18 4UQ... - Page 5 X-COR E COMPO NENT S LCD Display Allows user to set each valve station run time from 1 minute to 4 hours Run Times Allows 1 to 4 start times to be set in each program Start Times Station N umber Indicates currently selected station number Program Designator Day of the Week...
- Page 6 Use to attach transformer, sensor, and valve wires from their source to the controller Reset Button Use to reset the controller (located on side of controller) RE M Allows for connection of Hunter SmartPort and Hunter Remote Controls ® Sensor Bypass Switch Ignores “Clik”...
- Page 7 X-COR E COMPO NENT S Dial Settings Normal dial position for all controller automatic and manual operation Allows current day and clock time to be set Current Time/Day Allows 1 to 4 start times to be set in each program Start Times Allows user to set each valve station run time from 1 minute to 4 hours Run Times...
-
Page 8: Mou Nt In G The Co Nt Roll E R To Wall
MO UNTING THE C O NT ROLL E R T O W ALL Note: The indoor version of the X-Core is not water- proof or weather resistant, and must be installed indoors or in a protected area. 1. Secure one screw into the wall. Install screw anchors if attaching to drywall or masonry wall. -
Page 9: C O Nnecting Val Ve S A Nd T Ra N Sform E R
C O NNECTING V AL VE S A ND T RA N SFORM E R Installation of the X-Core should only be done by trained personnel. Valve 4 1. Route valve wires between the control valve location and controller. 2. At valves, attach a common wire to either solenoid wire on all valves. -
Page 10: Activ Ating The B Atte Ry
ACTIV ATING THE B ATTE RY After installing your X-Core, make sure to remove the battery contact insulator to allow the X-Core to keep time in the event of a power outage. C A UTI O N: RI SK OF E XPLO SIO N IF BA TTE RY I S R E PLAC E D B Y A N I N CORR E C T TY PE . -
Page 11: Co Nnectinga M As Te R Val Ve
CO NNECTING A M AS TE R VAL VE 1. At the Master Valve, attach the common wire to either solenoid wire of the valve. Attach a separate control wire to the remaining N O TE: Complete this section only if you have a solenoid wire. -
Page 12: C O Nnectinga Pump Star T R E Lay
C O NNECTING A PUMP STAR T R E LAY N O TE: Complete this section only if you have a pump start relay installed. A pump start relay is a device that uses a signal from the controller to actuate a separate electrical circuit to energize a pump to provide water to your system. -
Page 13: Co Nne C Tin G A H Unte R "C Lik" W E Athe R Sens Or
A H UNTE R “CL IK” WE ATHE R SEN SOR A Hunter weather sensor or other micro-switch type weather When the weather sensor has sensors can be connected to the X-Core. The purpose of this sensor deactivated automatic watering, is to stop automatic watering when weather conditions dictate. -
Page 14: Co Nnectinga H Unte R Solar Sy Nc Et Sen Sor
CO NNECTING A H UNTE R SOLAR SY NC ET SEN SOR The X-Core is compatible with the Solar Sync and Wireless Solar by using the buttons (refer to page 13 for explanation Sync systems. Solar Sync is a sensor system that will automatically of Solar Sync Region setting). -
Page 15: Region
CO NNECTING A H UNTE R SOLAR SY NC ET SEN SOR R egion Use the following table for choosing your region (reference below). You can use methods A , B or C to help you choose which region is For accurate Solar Sync measurements, the controller needs to best for your area: be programmed for the average peak season ET for your region. -
Page 16: Water Adjustment
Uninstalling a Solar Sync Sensor Water A djustment If a Solar Sync sensor has been installed on the X-Core controller The Water Adjustment is a 1 to 10 scale that allows for easy then the seasonal adjust value used by the controller will be adjustment of the Seasonal Adjust value from the Solar Sync calculated from the weather data supplied by the Solar Sync sensor. -
Page 17: Calibration/Setup
CO NNECTING A H UNTE R SOLAR SY NC ET SEN SOR Calibration/ Setup After Solar Sync has been installed and programmed, it is recommended to allow the system to run for a few days at the initial setting. surrounding structures, etc), the initial setting may require adjustment in order to arrive at the desired performance. The calibration of the Solar Sync to a particular site can easily be accomplished by adjusting the Region and/or Water Adjustment settings. -
Page 18: Co Nnectinga H Unte R Re Mo Te
® Red wire to left side “24VAC” terminal • Hunter Remotes) allows for fast and easy use of the Hunter controls. White wire to right side “24VAC” terminal • The Hunter remotes make it possible for you to operate the system Blue wire to “REM”... -
Page 19: Programmi N G The Co Nt Roll E R
PRO G RAMM ING THE C O NT ROLL E R The X-Core display shows the time and day when the controller is N O TE: A basic programming rule is that whatever idle. The display changes when the dial is rotated to indicate the when setting the time, the hour can be changed or programmed. -
Page 20: Setting The Program Start Time(S)
2. The display will show the last program morning, afternoon, or evening watering cycles. selected (A, B, or C). You can switch to Start times may be entered in any order. The X-Core another program by pressing the button. WATER DAYS will automatically sort them. -
Page 21: Selecting Odd Or Even Days To Water
PRO G RAMM ING THE C O NT ROLL E R Selecting S Selecting Interval Watering 1. With the With this option you can select (the cursor will always start with interval watering from 1 to 31 days. MO), press the button to activate 1. -
Page 22: Setting Event Day(S) O
PRO G RAMM ING THE C O NT ROLL E R Setting Event Day(s) System O The X-Core allows you to program a No Water Day(s). This feature Valves currently watering will be shut o after SYSTEM OFF the dial is turned to the SYSTE M OFF position always mow the lawn on Saturdays, you would designate Saturday for two seconds. -
Page 23: Seasonal Adjustment
PRO G RAMM ING THE C O NT ROLL E R Seasonal A djustment Seasonal Adjustment is used to make global run time changes When using a Hunter “Clik” weather sensor, the Seasonal without re-programming the entire controller. To use the Seasonal Adjustment value can be adjusted as described. -
Page 24: Manually Run A Single Station 1
PRO G RAMM ING THE C O NT ROLL E R M anually R un a Single Station O ne Touch M anual Start and A dvance 1. Turn dial to MA N UAL – O NE STATIO N position. You can also activate all stations to water without using the dial. -
Page 25: Adv A Nced Fe Atu R E S
Programmable Sensor O verride Test Program of A ll Stations The X-Core allows the user to program the controller so that the sensor disables watering on only desired stations. For example, test program. This feature will operate each station in numerical patio gardens that have pots under overhangs and roofs may not sequence, from the lowest to the highest. -
Page 26: Easy Retrieve™ Program Memory
Program M emory Programmable Delay B etween Stations The X-Core is capable of saving the preferred watering program This feature allows the user to insert a delay between stations into memory for retrieval at a later time. This feature allows for a between when one station turns o and the next one turns on. -
Page 27: Troubl Es Hoo Tin G Guid E
TRO UBL E SH OO TING GUIDE Problem Causes Solutions The controller is continuously watering Too many start times have been Only one start time is necessary to activate a program programmed (refer to Setting the Program Start Times on page 18) There is no display Check AC power wiring Correct any errors... - Page 28 TRO UBL E SH OO TING GUIDE Problem Causes Solutions Display shows a station is running but The sensor is interrupting irrigation, Check the sensor override status (see page 23) however the station has been programmed to override the sensor Automatic irrigation does not start at •...
- Page 29 TRO UBL E SH OO TING GUIDE Problem Causes Solutions Seasonal Adjust seems high • Region too low Decrease the value of the Water Adjustment setting. If you minimize the Water Adjustment scale at 1 and still • Water Adjustment setting too high require reduced seasonal adjustment, move up one Region (from 2 to 3, for example) and start at Water Adjustment setting 5.
-
Page 30: Sp E Cifica Tio Ns
• Sensor bypass switch Explanation of Symbols • X-Core-x00i for indoor use. X-Core-x00 for outdoor use = AC • Sea level to 6500 ft (2000 m) at -13˚ F to 140˚ F (-25° C to 60° C) = Consult Documentation... -
Page 31: Ce Rtifica Te Of C O N Formi Ty T O Europ E A N Dir E C Tiv Es
C E RTI F IC ATE OF CO N FORM IT Y TO E UROP E A N DI R ECTIVE S Hunter Industries declares that the irrigation controller Model X-Core complies with the standards of the European Directives of “electromagnetic compatibility”...
Need help?
Do you have a question about the X-Core and is the answer not in the manual?
Questions and answers
How do you stop a Zone when there is a leaking issue and continue to use the other zones
To stop a leaking zone on a Hunter X-Core while using other zones, follow these steps:
1. Turn Off the Specific Zone:
- Set the controller to the "Start Times" position.
- Use the left and right arrows to select the program that includes the leaking zone.
- Use the up and down arrows to adjust the start time past midnight until "OFF" appears.
2. Disable the Station Manually:
- Set the controller to the "Run Times" position.
- Use the arrows to find the leaking zone and set its runtime to "0" minutes.
3. Check for Sensor Overrides:
- If a sensor is installed, verify that the leaking zone is not set to override the sensor.
4. Shut Off the Valve Manually (If Needed):
- Locate the valve for the leaking zone and turn it off manually using the solenoid or flow control screw.
This will stop the leaking zone while allowing other zones to operate as scheduled.
This answer is automatically generated