Graco Magnum X5 Manual
Airless paint sprayer
Hide thumbs
Also See for Magnum X5:
- Owner's manual (56 pages) ,
- Repair and parts manual (52 pages) ,
- Operation manual (35 pages)
Table of Contents
Advertisement
Operation
Magnum X5, X7, ProX9 Airless Sprayer
For portable spray applications of architectural paints and coatings
Models 16J750, 16J751, 16W123
IMPORTANT SAFETY INSTRUCTIONS
Read all warnings and instructions in this manual
and on the sprayer cord. Save these
instructions.
See page 3 for model series information including
dispense rate, recommended hose length, guns, and
maximum working pressure.
Magnum X5
Model: 16J750
Series B
ti22084a
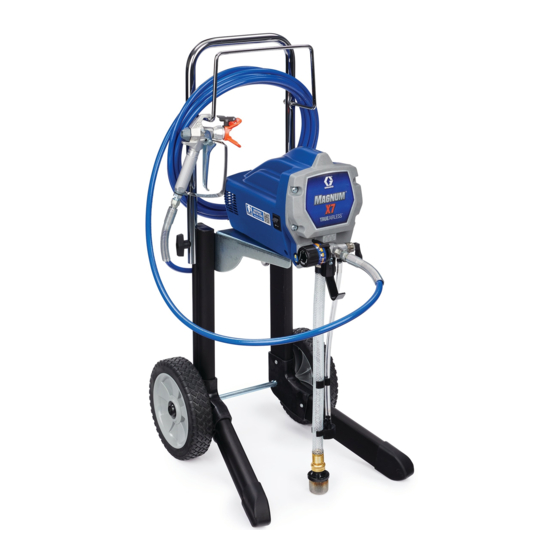
Magnum X7
Model: 16J751
Series B
WARNING
FIRE AND EXPLOSION HAZARD: Do not spray or clean
with flammable materials. Use water-based materials only.
ti22085a
332689D
ti22143a
Magnum ProX9
Model: 16W123
Series A
EN
Advertisement
Table of Contents

Related Manuals for Graco Magnum X5


Summary of Contents for Graco Magnum X5
- Page 1 Operation 332689D Magnum X5, X7, ProX9 Airless Sprayer For portable spray applications of architectural paints and coatings Models 16J750, 16J751, 16W123 IMPORTANT SAFETY INSTRUCTIONS WARNING Read all warnings and instructions in this manual and on the sprayer cord. Save these FIRE AND EXPLOSION HAZARD: Do not spray or clean instructions.
-
Page 2: Table Of Contents
Unclogging Spray Tip ....18 Graco Standard Warranty ....34 Choosing the Correct Tip . -
Page 3: Specifications
Dispense Hose Length and Pressure Model Name Series Rate lpm Diameter Model (gpm) Magnum X5 1.02 lpm 6.4 mm x 7.5 m 3000 (0.27 gpm) (1/4 in. x 25 ft) Magnum X7 1.17 lpm 6.4 mm x 15 m 3000 (0.31 gpm) -
Page 4: Warnings
Warnings Warnings The following warnings are for the setup, use, grounding, maintenance, and repair of this equipment. The exclama- tion point symbol alerts you to a general warning and the hazard symbols refer to procedure-specific risks. When these symbols appear in the body of this manual or on warning labels, refer back to these Warnings. Product-specific hazard symbols and warnings not covered in this section may appear throughout the body of this manual where applicable. - Page 5 • Check Hoses And Parts For Signs Of Damage. Replace Any Damaged Hoses Or Parts. • This System Is Capable Of Producing 3000 Psi. Use Graco Replacement Parts Or Accessories That Are Rated A Minimum Of 3000 Psi.
- Page 6 Warnings WARNING WARNING WARNING WARNING EQUIPMENT MISUSE HAZARD Misuse can cause death or serious injury. • Do not operate the unit when fatigued or under the influence of drugs or alcohol. • Do not exceed the maximum working pressure or temperature rating of the lowest rated system component.
- Page 7 Warnings WARNING WARNING WARNING WARNING MOVING PARTS HAZARD Moving parts can pinch, cut or amputate fingers and other body parts. • Keep clear of moving parts. • Do not operate equipment with protective guards or covers removed. • Pressurized equipment can start without warning. Before checking, moving, or servicing equipment, follow the Pressure Relief Procedure and disconnect all power sources.
-
Page 8: Component Identification X5
Component Identification X5 Component Identification X5 Airless spray gun Dispenses fluid. Power switch Turns sprayer ON and OFF. Pressure control knob Increases (clockwise) and decreases (counter-clockwise) fluid pressure in pump, hose, and spray gun. Setting Indicator To select function, align symbol on pressure control knob with setting indicator, page 13. - Page 9 Component Identification X5 Component Identification X5 ti22144c 332689D...
-
Page 10: Component Identification X7 And Prox9
Component Identification X7 and ProX9 Component Identification X7 and ProX9 Airless spray gun Dispenses fluid. Power switch Turns sprayer ON and OFF. Pressure control knob Increases (clockwise) and decreases (counter-clockwise) fluid pressure in pump, hose, and spray gun. Setting Indicator To select function, align symbol on pressure control knob with setting indicator, page 13. - Page 11 Component Identification X7 and ProX9 Component Identification X7 and ProX9 ProX9 Shown ti9346a ti22077a ti9670a ti22167a ti9669a ti22177a ti22176a 332689D...
-
Page 12: Grounding And Electric Requirements
Grounding and Electric Requirements Grounding and Electric Requirements Fluid supply container: follow local code. Pails used when flushing: follow local code. Use only conductive metal pails, placed on a grounded surface such as concrete. Do not place the pail on a Sprayer must be grounded. -
Page 13: Operation
Operation Operation Trigger Lock 1. Engage trigger lock. 2. Close the bleed-type master air valve. Always engage the trigger lock when you stop spraying to prevent the gun from being triggered accidentally by 3. Disengage the trigger lock. hand or if dropped or bumped. 4. -
Page 14: Setup
Setup Setup Prime and Flush Storage Fluid. 4. Turn Pressure Control Knob all the way left (counter-clockwise) to minimum pressure. Before you use your sprayer for the first time or begin a new spraying project, you need to prime the sprayer and flush the storage fluid out of the sprayer. - Page 15 Setup 9. Move Prime/Spray Valve to PRIME. 16. Transfer suction tube to paint pail and submerge suction tube in paint. PAINT ti9346a ti9653a 17. Turn power switch ON. 10. Plug sprayer in a grounded outlet. 11. Push pump priming button two times. ti5580a ti15972a X5 and X7 Only...
-
Page 16: Install Tip And Guard On Gun
Setup 18. When you see paint coming out of prime tube: Install Tip and Guard on Gun a. Point gun into waste pail. b. Unlock gun trigger lock. 1. Engage trigger lock. ti8909a c. Pull and hold gun trigger. ti8908a d. -
Page 17: Spraying Techniques
Setup Spraying Techniques Getting Started Use a piece of scrap cardboard to practice these basic Preventing Excessive Tip Wear spraying techniques before you begin spraying the sur- face. • Spray should be atomized (evenly distributed, no gaps at edges). Start at low pressure setting, •... -
Page 18: Unclogging Spray Tip
Setup Unclogging Spray Tip 3. Aim gun at piece of scrap or cardboard. 4. Unlock trigger lock. Pull trigger to clear clog. To avoid fluid splash back ti8909a • Never pull gun trigger when arrow-shaped handle is between SPRAY and UNCLOG positions. •... -
Page 19: Choosing The Correct Tip
Setup Choosing the Correct Tip Reversible Tip Selection Chart Consider coating and surface to be sprayed. Make sure Tip Part Fan Width 30 cm Hole Size you use best tip hole size for that coating and best fan (12 in.) from surface width for that surface. -
Page 20: Shutdown And Cleaning
Shutdown and Cleaning Shutdown and Cleaning Pail Flushing 7. Submerge suction tube in water • For short term shutdown periods (overnight to two days) refer to Short Term Storage, page 25. • Use only water for flushing. Read Priming and Flushing Storage Fluid, page 14 or Power Flush, WATER page 22. - Page 21 Shutdown and Cleaning NOTE: Step 12 is for returning paint in hose back to 14. Stop triggering gun. Engage the trigger lock. paint pail. One 50-ft hose holds approximately 1-quart (1-liter) of paint. 12. To preserve paint in hose: a. Point gun into paint pail. ti8908a b.
-
Page 22: Power Flush
Shutdown and Cleaning Power Flush 10. Unscrew inlet screen from suction tube. Place inlet screen in waste pail. Power flushing is a faster method of flushing after spray- ing water-based coatings. 1. Relieve pressure, page 13. ti2040a 2. Remove tip and guard assembly from gun and place in waste pail. - Page 23 Shutdown and Cleaning NOTE: Step 16 is for returning paint in hose back to 18. Stop triggering gun. Engage trigger lock. paint pail. One 50-ft (15-m) hose holds approximately 1-quart (1-liter) of paint. 16. To preserve paint in hose: a. Point gun into paint pail. b.
-
Page 24: Cleaning Instaclean™ Fluid Filter (Prox9 Only)
Shutdown and Cleaning Cleaning InstaClean™ Fluid Cleaning Gun Filter (ProX9 Only) • Clean gun fluid filter (d) with water or flushing sol- vent and a brush every time you flush the system. The InstaClean™ Fluid Filter prevents particles from Replace gun filter if damaged. entering paint hose. -
Page 25: Storage
Storage Storage Short Term Storage Long Term Storage (up to 2 days) (more than 2 days) 1. Relieve pressure, page 13. Always circulate Pump Armor storage fluid through sys- tem after cleaning. Water left in sprayer will corrode and 2. Leave suction tube and prime tube in paint pail. damage pump. - Page 26 Storage 5. When storage fluid comes out of prime tube (5-10 6. Move Prime/Spray valve to SPRAY to keep storage seconds) turn power switch OFF. fluid in sprayer during storage. ti2018a ti9345a Stowing Sprayer NOTICE • Before storing sprayer make sure all water is drained out of sprayer and hoses.
-
Page 27: Maintenance And Service
If sprayer continues to cycle (motor and pump run) after Paint Hoses you release gun trigger, pump valves may be obstructed or worn. Valve repair kits are available from Graco/Mag- Check hose for damage every time you spray. Do not num authorized service dealers. -
Page 28: Troubleshooting
Troubleshooting Troubleshooting Check everything in this Troubleshooting Table before you bring the sprayer to a Graco/M authorized AGNUM service center. Problem Cause Solution Power switch is on and sprayer is Pressure is set at zero pressure. Turn pressure control knob clockwise plugged in, but motor does not run, to increase pressure setting. - Page 29 Turn power switch ON and listen for “tap” in pump. If you do not hear “tap”, AutoPrime is dam- aged. Take sprayer to Graco/M authorized service center. Inlet valve check ball or seat is dirty Remove inlet fitting. Clean or replace ball and seat.
- Page 30 Tighten suction tube connection. Inspect for cracks or vacuum leaks. If cracked or damaged, replace suction tube. Prime/Spray Valve is worn or Take sprayer to Graco/M AGNUM obstructed with debris. authorized service center. Pump check ball is stuck. Read Pump does not prime section...
- Page 31 Troubleshooting Problem Cause Solution Pressure is set at maximum but can- Reversible spray tip is in UNCLOG Rotate arrow-shaped handle on not achieve a good spray pattern. position. spray tip so it points forward in SPRAY position, page 18. Spray tip is too large for sprayer. Select smaller spray tip.
- Page 32 Troubleshooting Problem Cause Solution Fan pattern varies dramatically while Pressure control switch is worn and Take sprayer to Graco/M AGNUM spraying. causing excessive pressure varia- authorized service center. tion. Sprayer does not turn on promptly when resuming spraying. Cannot trigger spray gun.
-
Page 33: Technical Data
Technical Data Technical Data ProX9 Working pressure range 0-207 BAR, 0-21 Mpa (0-3000 psi) Electric Motor 4.5A (open frame, universal) 6.5A (open frame, permanent magnet DC) Operating horsepower Maximum delivery (with tip) 1.02 lpm (.27 gpm) 1.17 lpm (.31 gpm) 1.44 lpm (.38 gpm) Paint hose 6.4mm X 7.5 m (1/4 in. -
Page 34: Graco Standard Warranty
With the exception of any special, extended, or limited warranty published by Graco, Graco will, for a period of twelve months from the date of sale, repair or replace any part of the equipment determined by Graco to be defective.
Need help?
Do you have a question about the Magnum X5 and is the answer not in the manual?
Questions and answers
my x5 is leaking paint from inside the housing
Your Graco Magnum X5 is leaking paint from inside the housing because the pump packings have worn out. When this happens, paint begins to leak down the outside of the pump. It is recommended to replace the pump at the first sign of leakage to prevent additional damage to the drive train.
This answer is automatically generated
my x5 isleaking paint from the housing
Your Graco Magnum X5 is leaking paint from the housing because the pump packings have worn out. When this happens, paint begins to leak down the outside of the pump. If you notice leakage, you should replace the pump immediately to prevent additional damage to the drive train.
This answer is automatically generated