
Related Manuals for Hitron CGNVM


Summary of Contents for Hitron CGNVM
- Page 1 CGNVM DOCSIS 3.0 eMTA WiFi Gateway User’s Guide Version 1.0 - 02/2015 SW Version CGNVM_4.5.10.10T3-MGCP-150429...
-
Page 2: About This User's Guide
About This User’s Guide Intended Audience This manual is intended for people who want to configure the CGNVM’s features via its Graphical User Interface (GUI). How to Use this User’s Guide This manual contains information on each the CGNVM’s GUI screens, and describes how to use its various features. -
Page 3: Document Conventions
Hitron CGNVM User’s Guide Online Help: each screen in the CGNVM’s Graphical User Interface (GUI) contains a Help button. Click this button to see additional information about configuring the screen. Document Conventions This User’s Guide uses various typographic conventions and styles to indicate content type: Bulleted paragraphs are used to list items, and to indicate options. -
Page 4: Table 1: Default Credentials
Customer Support For technical assistance or other customer support issues, please consult your Hitron representative. Default Login Details The CGNVM’s default IP address and login credentials are as follows. For more information, see Login to the CGNVM on page 25. - Page 5 This User’s Guide is provided “as is” without express or implied warranty of any kind. Neither Hitron Technologies nor its agents assume any liability for inaccuracies in this User’s Guide, or losses incurred by use or misuse of the information in this User’s Guide.
-
Page 6: Table Of Contents
1.3 Battery Installation (optional) ............. 19 1.4 LEDs ....................20 1.5 IP Address Setup ................24 1.5.1 Manual IP Address Setup ............24 1.6 Login to the CGNVM ................. 25 1.7 GUI Overview ..................26 1.8 Resetting the CGNVM ............... 28 Status ................... 29 2.1 Status Overview ................ - Page 7 Hitron CGNVM User’s Guide 2.1.7 Configuration Files ..............34 2.1.8 Downstream and Upstream Transmissions ......34 2.1.9 Cable Frequencies ..............34 2.1.10 Modulation ................35 2.1.11 TDMA, FDMA and SCDMA ............ 35 2.1.12 The Multimedia over Coax Alliance ........36 2.1.12.1 Horizontal vs.
- Page 8 Hitron CGNVM User’s Guide 4.1.1 Wireless Networking Basics ............. 75 4.1.2 Architecture ................75 4.1.3 Wireless Standards ..............76 4.1.4 Service Sets and SSIDs ............76 4.1.5 Wireless Security ..............77 4.1.5.1 WPS ................. 78 4.1.6 WMM ..................78 4.2 The Wireless: Basic Settings Screen ..........78 4.2.1 The Wireless: Basic Settings: 2.4G Screen ......
- Page 9 Hitron CGNVM User’s Guide 6.4.1 Adding or Editing a Managed Device ........113 6.5 The Security: Keyword Filter Screen ..........115 6.5.1 Adding or Editing a Keyword Filter Trusted Device Rule ..117 MTA ................... 119 7.1 The MTA: Status Screen ..............119 Troubleshooting .................
-
Page 10: List Of Figures
Hitron CGNVM User’s Guide List of Figures Figure 1: Application Overview ................14 Figure 2: Hardware Connections ................16 Figure 3: Power Cable ..................18 Figure 4: Battery Compartment (optional) ............19 Figure 5: Battery (optional) .................20 Figure 6: LEDs ....................21 Figure 7: Login ....................26 Figure 8: GUI Overview ..................27... - Page 11 Hitron CGNVM User’s Guide Figure 33: The Wireless: Basic Settings: 5G Screen ..........84 Figure 34: The Wireless: Basic Settings: WPS Screen ........89 Figure 35: The Wireless: Basic Settings: Guest Screen ........90 Figure 36: The Wireless: Access Control Screen ..........91 Figure 37: The Admin: Management Screen ............95 Figure 38: The Admin: Remote Management Screen ........96...
-
Page 12: List Of Tables
Hitron CGNVM User’s Guide List of Tables Table 1: Default Credentials ................4 Table 2: Hardware Connections ................17 Table 3: LEDs ....................21 Table 4: GUI Overview ..................27 Table 5: Private IP Address Ranges ..............31 Table 6: IP Address: Decimal and Binary ............31 Table 7: Subnet Mask: Decimal and Binary ............32... - Page 13 Hitron CGNVM User’s Guide Table 33: The Admin: Device Reset Screen ............101 Table 34: The Security: Firewall Screen ............104 Table 35: The Security: Service Filter Screen ..........106 Table 36: The Security: Service Filter Add/Edit Screen ........108 Table 37: The Security: Service Filter Trusted Device Add/Edit Screen ..110 Table 38: The Security: Device Filter Screen ..........111...
-
Page 14: Introduction
Hitron CGNVM User’s Guide Introduction This chapter introduces the CGNVM and its GUI (Graphical User Interface). CGNVM Overview Your CGNVM is a DOCSIS cable modem, router, embedded Multimedia Terminal Adapter (eMTA) and wireless access point that allows you to connect your cabled Ethernet, wireless devices and analog telephones to one another and to the Internet via your building’s cable connection. -
Page 15: Key Features
Full operator control via configuration file and SNMP TR-069 and HNAP ready for easy setup and remote management Hardware Connections This section describes the CGNVM’s physical ports and buttons. Version 1.0, 02/2015. Copyright 2012 Hitron Technologies Version 1.0, 02/2015. Copyright... -
Page 16: Figure 2: Hardware Connections
Hitron CGNVM User’s Guide Figure 2: Hardware Connections Version 1.0, 02/2015. Copyright 2012 Hitron Technologies Version 1.0, 02/2015. Copyright 2014 Hitron Technologies INTRODUCTION... -
Page 17: Table 2: Hardware Connections
Off: WPS is not active. on page for more information. The CGNVM provides two USB 2.0 host ports, allowing you to plug in USB flash disks for mounting and sharing through the LAN interfaces via the Samba protocol (network neighborhood). -
Page 18: Figure 3: Power Cable
Hitron CGNVM User’s Guide Table 2: Hardware Connections RESET Use this button to reboot or reset your CGNVM to its factory default settings. To reboot the CGNVM, press the button and hold it for less than five seconds. The CGNVM restarts, using your existing settings. -
Page 19: Battery Installation (Optional)
You can install and replace the CGNVM’s battery without disconnecting the power cable. NOTE: The CGNVM battery is intended for use as a backup to the main power source, not as a replacement for it. For optimal power performance you should use the battery in conjunction with the main power source. -
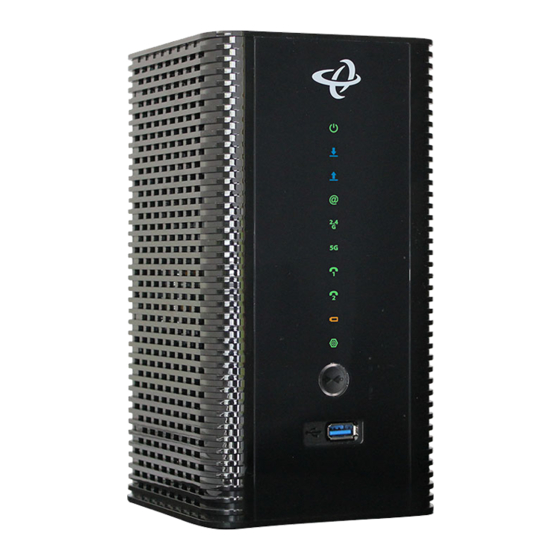
Page 20: Leds
Your battery may look somewhat different from the battery depicted, depending on the number of cells it contains. Insert the battery into the battery compartment. Replace the battery compartment door and return the CGNVM to an upright position. LEDs This section describes the CGNVM’s LEDs (lights). -
Page 21: Figure 6: Leds
Hitron CGNVM User’s Guide Figure 6: LEDs Table 3: LEDs STATUS DESCRIPTION Version 1.0, 02/2015. Copyright 2012 Hitron Technologies Version 1.0, 02/2015. Copyright 2014 Hitron Technologies INTRODUCTION... - Page 22 Hitron CGNVM User’s Guide Table 3: LEDs POWER Green, steady The CGNVM is running on AC power via the power cord. Green, blinking The CGNVM is running on battery power when AC power is disconnected. (optional) The CGNVM is not running on AC power via the power cord.
-
Page 23: Ip Address Setup
For information on the behavior of the WPS button LED, see Table 2 on page IP Address Setup Before you log into the CGNVM’s GUI, your computer’s IP address must be in the same subnet as the CGNVM. This allows your computer to communicate with the CGNVM. -
Page 24: Ip Address Setup
Try to log in again. NOTE: If you still cannot see the login screen, your CGNVM’s IP settings may have been changed from their defaults. If you do not know the CGNVM’s new address, you should return it to its factory defaults. See... -
Page 25: Login To The Cgnvm
255.255.255.0 (default). NOTE: If your CGNVM is not using the default IP address, enter an IP address and subnet mask that places your computer in the same subnet as the CGNVM. Click OK. The Internet Protocol (TCP/IP) window closes. In the Local Area Connection Properties window, click OK. -
Page 26: Gui Overview
The Username and Password are case-sensitive; “Password” is not the same as “password”. Click Login. The Status Overview screen displays (see Status Overview page 29). GUI Overview This section describes the CGNVM’s GUI. Version 1.0, 02/2015. Copyright 2012 Hitron Technologies Version 1.0, 02/2015. Copyright 2014 Hitron Technologies INTRODUCTION... -
Page 27: Figure 8: Gui Overview
Secondary Use this section to move from one related screen to another. Navigation Main Window Use this section to read information about your CGNVM’s configuration, and make configuration changes. Version 1.0, 02/2015. Copyright 2012 Hitron Technologies Version 1.0, 02/2015. Copyright... -
Page 28: Resetting The Cgnvm
When you reset the CGNVM to its factory defaults, all user-configured settings are lost, and the CGNVM is returned to its initial configuration state. To reset the CGNVM, click Admin > Device Reset. In the screen that displays, click the Factory Reset button. -
Page 29: Status
The Data Over Cable Service Interface Specification (DOCSIS) is a telecommunications standard that defines the provision of data services) Internet access) over a traditional cable TV (CATV) network. Your CGNVM supports DOCSIS version 3.0. Version 1.0, 02/2015. Copyright 2012 Hitron Technologies Version 1.0, 02/2015. -
Page 30: Ip Addresses And Subnets
In the case of the CGNVM: The public network (Wide Area Network or WAN) is the link between the cable connector and your Internet Service Provider. Your CGNVM’s IP address on this network is assigned by your service provider. Version 1.0, 02/2015. Copyright 2012 Hitron Technologies Version 1.0, 02/2015. -
Page 31: Subnets
The private network is your Local Area Network (LAN) and Wireless Local Area Network (WLAN), if enabled. You are free to assign IP addresses to computers on the LAN and WLAN manually, or to allow the CGNVM to assign them automatically via DHCP (Dynamic Host Configuration Protocol). IANA has... -
Page 32: Dhcp
By default, the CGNVM is a DHCP client on the WAN (the CATV connection). It broadcasts an IP address over the cable network, and receives one from the service provider. By default, the CGNVM is a DHCP server on the LAN; it provides IP addresses to computers on the LAN which request them. -
Page 33: Dhcp Lease
(or other device). For example, if a single computer has an Ethernet card (to connect to your CGNVM via one of the LAN ports) and also has a wireless card (to connect to your CGNVM over the wireless interface) the MAC addresses of the two cards will be different. -
Page 34: Routing Mode
LAN to access the Internet. The service provider assigns an IP address to the CGNVM on the WAN, and all traffic for LAN computers is sent to that IP address. The CGNVM assigns private IP addresses to LAN computers (when DHCP is active), and transmits the relevant traffic to each private IP address. -
Page 35: Modulation
Hitron CGNVM User’s Guide 2.1.10 Modulation Transmissions over the cable network are based on a strong, high frequency periodic waveform known as the “carrier wave.” This carrier wave is so called because it “carries” the data signal. The data signal itself is defined by variations in the carrier wave. -
Page 36: The Multimedia Over Coax Alliance
Hitron CGNVM User’s Guide SCDMA allows multiple users to share the same frequency channel by assigning a unique orthogonal code to each user. 2.1.12 The Multimedia over Coax Alliance The Multimedia over Coax Alliance (MoCA) is a non-profit technology alliance, which defines a set of specifications for the delivery of high-speed data, such as HD video, over your building’s existing co-axial cabling network. -
Page 37: Horizontal Vs. Vertical Communications
Hitron CGNVM User’s Guide Multi-room, multi-camera Digital Video Recording (DVR) Gaming (LAN or online multiplayer) Internet video Home automation Video conferencing 2.1.12.1 Horizontal vs. Vertical Communications Unlike traditional coax networking (TV, satellite, IPTV, etc.) MoCA devices do not need to receive data from a single source. It is “outlet-to-outlet”. Each MoCA network uses a Network Controller (NC) to manage the network’s communications, but any... -
Page 38: Example Moca Mesh Network
Hitron CGNVM User’s Guide Figure 10: Traditional Vertical CATV vs. Horizontal MoCA Networking 2.1.12.2 Example MoCA Mesh Network MoCA devices form a full “mesh”, or peer-to-peer network (where all devices communicate directly with one another). In the following example, four MoCA devices connect directly to and from one another, via ECBs, forming 12 unique MoCA links (or 6 bidirectional links). -
Page 39: The Status: Overview Screen
Hitron CGNVM User’s Guide Figure 11: Example MoCA Peer-to-Peer Network The Status: Overview Screen Use this screen to Click Status > Overview. The following screen displays. Version 1.0, 02/2015. Copyright 2012 Hitron Technologies Version 1.0, 02/2015. Copyright 2014 Hitron Technologies... -
Page 40: Figure 12: The Status: Overview Screen
Hitron CGNVM User’s Guide Figure 12: The Status: Overview Screen Version 1.0, 02/2015. Copyright 2012 Hitron Technologies Version 1.0, 02/2015. Copyright 2014 Hitron Technologies STATUS... -
Page 41: The Status: System Information Screen
Click this to see information about the fields in this screen. The Status: System Information Screen Use this screen to see general information about your CGNVM’s hardware, its software, and its connection to the Internet. Click Status > System Information. The following screen displays. -
Page 42: Figure 13: The Status: System Information Screen
CATV connection. System Time This displays the current date and time. Time Zone This displays the time zone in which the CGNVM is located. LAN Up Time This displays the amount of time that has elapsed since the CGNVM’s Local Area Network connection was last restarted. -
Page 43: The Status: Docsis Provisioning Screen
This screen displays the steps successfully taken to connect to the Internet over the Cable connection. Use this screen for troubleshooting purposes to ensure that the CGNVM has successfully connected to the Internet; if an error has occurred you can identify the stage at which the failure occurred.Click Status >... -
Page 44: The Status: Docsis Wan Screen
Figure 14: The Status: DOCSIS Provisioning Screen For each step: Process displays when the CGNVM is attempting to complete a connection step. Success displays when the CGNVM has completed a connection step. Disable displays when the relevant feature has been turned off. -
Page 45: Figure 15: The Status: Docsis Wan Screen
Hitron CGNVM User’s Guide Figure 15: The Status: DOCSIS WAN Screen Version 1.0, 02/2015. Copyright 2012 Hitron Technologies Version 1.0, 02/2015. Copyright 2014 Hitron Technologies STATUS... -
Page 46: Table 10: The Status: Docsis Wan Screen
IP address lease expires, and a new IP address is assigned to it by the DHCP server. Downstream Overview NOTE: The downstream signal is the signal transmitted to the CGNVM. Port ID This displays the ID number of the downstream connection’s port. -
Page 47: The Status: Docsis Event Screen
Click this to return the Forward Error Connection (FEC) columns (Correcteds and Uncorrectables). Upstream Overview NOTE: The upstream signal is the signal transmitted from the CGNVM. Port ID This displays the ID number of the upstream connection’s port. Frequency (Hz) -
Page 48: Figure 16: The Status: Docsis Event Screen
Hitron CGNVM User’s Guide Figure 16: The Status: DOCSIS Event Screen Version 1.0, 02/2015. Copyright 2012 Hitron Technologies Version 1.0, 02/2015. Copyright 2014 Hitron Technologies STATUS... -
Page 49: The Status: Wireless Screen
Click this to remove all DOCSIS event logs from the system. The Status: Wireless Screen Use this screen to view information about the CGNVM’s wireless network. Click Status > Wireless. The following screen displays. Version 1.0, 02/2015. Copyright 2012 Hitron Technologies Version 1.0, 02/2015. -
Page 50: Figure 17: The Status: Wireless Screen
Hitron CGNVM User’s Guide Figure 17: The Status: Wireless Screen Version 1.0, 02/2015. Copyright 2012 Hitron Technologies Version 1.0, 02/2015. Copyright 2014 Hitron Technologies STATUS... -
Page 51: Table 12: The Status: Wireless Screen
CGNVM’s 2.4GHz wireless network. SSID Overview (5GHz) (SSID) This displays the SSID (Service Set IDentifier) of the CGNVM’s 5GHz wireless network, and whether or not it is currently active. Version 1.0, 02/2015. Copyright 2012 Hitron Technologies Version 1.0, 02/2015. Copyright... -
Page 52: The Status: Moca Screen
Click this to display a list of the wireless devices currently connected to the CGNVM. The Status: MoCA Screen Use this screen to view general information about the CGNVM’s MoCA-related settings. Click Status > MoCA. The following screen displays. Version 1.0, 02/2015. Copyright 2012 Hitron Technologies Version 1.0, 02/2015. -
Page 53: Figure 18: The Status: Moca Screen
CGNVM on the cable network, from 0 (extremely weak) to 10 (extremely strong), or Disabled. Coax RX This displays the strength of the signal that the CGNVM is receiving (RX) on the cable network, from 0 (extremely weak) to 10 (extremely strong). -
Page 54: Basic
Hitron CGNVM User’s Guide Basic This chapter describes the screens that display when you click 1 in the toolbar. It contains the following sections: Basic Overview on page The Basic: LAN Setup Screen on page The Basic: Gateway Function Screen on page The Basic: Port Forwarding Screen... -
Page 55: Port Forwarding
LAN to access the Internet. The service provider assigns an IP address to the CGNVM on the WAN, and all traffic for LAN computers is sent to that IP address. The CGNVM assigns private IP addresses to LAN computers (when DHCP is active), and transmits the relevant traffic to each private IP address. -
Page 56: The Basic: Lan Setup Screen
Hitron CGNVM User’s Guide When the CGNVM is not in routing mode, the service provider assigns an IP address to each computer connected to the CGNVM directly. The CGNVM does not perform any routing operations, and traffic flows between the computers and the service provider. -
Page 57: Figure 19: The Basic: Lan Setup Screen
Table 14: The Basic: LAN Setup Screen Private LAN Setting Private LAN IP Use this field to define the IP address of the CGNVM on Address the LAN. Subnet Mask Use this field to define the LAN subnet. Use dotted decimal notation (for example, 255.255.255.0). - Page 58 Table 14: The Basic: LAN Setup Screen (continued) LAN DHCP Status Use this field to configure whether or not the CGNVM’s DHCP server is active. To turn the DHCP server on, click Enabled. To turn the DHCP server off, click Disabled.
-
Page 59: The Basic: Gateway Function Screen
Click this to refresh the information in this section. The Basic: Gateway Function Screen Use this screen to enable or disable the CGNVM’s residential gateway and Universal Plug n Play (UPnP) functions. Disabling the residential gateway feature sets the unit to use bridge mode only. Use this mode when your network is already using another router. -
Page 60: The Basic: Port Forwarding Screen
Hitron CGNVM User’s Guide Table 15: The Basic: Gateway Function Screen (continued) Save Changes Click this to save your changes to the fields in this screen. Help Click this to see information about the fields in this screen. The Basic: Port Forwarding Screen Use this screen to configure port forwarding between computers on the WAN and computers on the LAN. - Page 61 These fields display the ports to which the rule applies: Private The Public field displays the incoming port range. These are the ports on which the CGNVM received traffic from the originating host on the WAN. The Private field displays the port range to which the CGNVM forwards traffic to the device on the LAN.
-
Page 62: Adding Or Editing A Port Forwarding Rule
Hitron CGNVM User’s Guide 3.4.1 Adding or Editing a Port Forwarding Rule To add a new port forwarding rule, click Add in the Basic > Port Forwarding screen. To edit an existing port forwarding rule, select the rule’s radio button in the Basic >... - Page 63 Hitron CGNVM User’s Guide Table 17: The Basic: Port Forwarding Add/Edit Screen Protocol Use this field to specify whether the CGNVM should forward traffic via: Transmission Control Protocol (TCP) User Datagram Protocol (UDP) Transmission Control Protocol and User Datagram Protocol (TCP/UDP) Generic Routing Encapsulation (GRE)
-
Page 64: The Basic: Port Triggering Screen
This displays the name you assigned to the rule when you created it. Trigger This displays the range of outgoing ports. When the CGNVM detects activity (outgoing traffic) on these ports from computers on the LAN, it automatically opens the Target ports. Target This displays the range of triggered ports. -
Page 65: Adding Or Editing A Port Triggering Rule
This displays the protocol of the port triggering rule (TCP, UDP or Both). Timeout (ms) This displays the time (in milliseconds) after the CGNVM opens the Target ports that it should close them. Twoway Status Usually a port triggering rule works for two IP addresses;... -
Page 66: Figure 24: The Basic: Port Triggering Add/Edit Screen
To specify only a single port, enter its number in both fields. Target Port Range Use these fields to specify the target ports. The CGNVM opens these ports in expectation of incoming traffic whenever it detects activity on any of the Trigger ports. -
Page 67: The Basic: Dmz Screen
Hitron CGNVM User’s Guide Table 19: The Basic: Port Triggering Add/Edit Screen Protocol Use this field to specify whether the CGNVM should activate this trigger when it detects activity via: Transmission Control Protocol (TCP) User Datagram Protocol (UDP) Transmission Control Protocol and User Datagram... -
Page 68: The Basic: Dns Screen
Click this to see information about the fields in this screen. The Basic: DNS Screen Use this screen to configure the CGNVM’s LAN DNS settings, including its subnet mask, domain suffix and proxy hostname. Click Basic > DNS. The following screen displays. -
Page 69: Figure 26: The Basic: Dns Screen
Use this to turn DNS proxy on or off on the LAN. When DNS proxy is turned on (default) the DHCP server provides the CGNVM’s LAN IP address as the DNS server for name resolution. Selected Enabled to turn DNS proxy on. -
Page 70: The Basic: Moca Screen
NOTE: It is suggested that you make a note of your device’s Domain Suffix in case you ever need to access the CGNVM’s GUI without knowledge of its IP address. Proxy Hostname 1 When LAN DNS Obtain is set to Manual, enter the IP... -
Page 71: Figure 27: The Basic: Moca Screen
Hitron CGNVM User’s Guide Figure 27: The Basic: MoCA Screen Version 1.0, 02/2015. Copyright 2012 Hitron Technologies Version 1.0, 02/2015. Copyright 2014 Hitron Technologies BASIC... -
Page 72: Figure 28: Channel Plan Options
Channel Plan Options Channel Use this field to define the channel on which you want the CGNVM to communicate on the cable network, dependent on the Channel Plan that you selected. Select the channel plan that you wish to use from the dropdown list. -
Page 73: Figure 30: Scan Range (Start)
Figure 31: Scan Range (End) TxPower Use this field to set the power at which the CGNVM transmits (TX) over the cable network, from 0 to 10. Beacon Pwr Level Use this field to set the CGNVM’s beacon power on the cable network, from 0 to 10. - Page 74 To base NC status on merit, or if you have specified another device as “preferred” and do not want the CGNVM to compete with it, select Auto- negotiated. When one device is set to be the “preferred” NC, it will be the NC whenever it is available on the network (if multiple devices are “preferred”, the...
-
Page 75: Wireless
4.1.1 Wireless Networking Basics Your CGNVM’s wireless network is part of the Local Area Network (LAN), known as the Wireless LAN (WLAN). The WLAN is a network of radio links between the CGNVM and the other computers and devices that connect to it. -
Page 76: Wireless Standards
Hitron CGNVM User’s Guide The CGNVM is the access point, and the computers you connect to the CGNVM are the wireless clients. 4.1.3 Wireless Standards The way in which wireless devices communicate with one another is standardized by the Institute of Electrical and Electronics Engineers (IEEE). The IEEE standards pertaining to wireless LANs are identified by their 802.11 designation. -
Page 77: Wireless Security
(signal scrambling so that only authenticated users can decode the transmitted data). The sophistication of each security method varies, as does its effectiveness. The CGNVM supports the following wireless security protocols (in order of effectiveness): WEP (the Wired Equivalency Protocol): this protocol uses a series of “keys” or data strings to authenticate the wireless client with the AP, and to encrypt data sent over the wireless link. -
Page 78: Wps
The Wireless: Basic Settings Screen Use this screen to configure your CGNVM’s 2.4GHz, 5GHz, Wifi Protected Setup (WPS) and guest network wireless settings. Version 1.0, 02/2015. Copyright 2012 Hitron Technologies Version 1.0, 02/2015. -
Page 79: The Wireless: Basic Settings: 2.4G Screen
The Wireless: Basic Settings: 5G Screen on page 84. Use the WPS screen to enable WPS-capable wireless clients to connect to the CGNVM via a simple push-button, or by entering a password. See The Wireless: Basic Settings: WPS Screen on page 88. -
Page 80: Figure 32: The Wireless: Basic Settings: 2.4G Screen
Hitron CGNVM User’s Guide Figure 32: The Wireless: Basic Settings: 2.4G Screen The following table describes the labels in this screen. Table 23: The Wireless: Basic Settings: 2.4G Screen Basic Settings Select On to enable the 2.4GHz wireless network. Wireless Enabled Select Off to disable the 2.4GHz wireless network. - Page 81 If in doubt, use 11B/G/N Mixed (default). Wireless Channel Select the 2.4GHz wireless channel that you want to use, or select Auto to have the CGNVM select the optimum channel to use. NOTE: Use the Auto setting unless you have a specific reason to do otherwise.
- Page 82 Anyone with a wireless device in the coverage area can discover the SSID, and attempt to connect to the network. Select OFF if you do not want the CGNVM to broadcast the network name (SSID) to all wireless devices in the coverage area. Anyone who wants to connect to the network must know the SSID.
- Page 83 Select TKIP to use the Temporal Key Integrity Protocol. Select AES to use the Advanced Encryption Standard. Select TKIP/AES to allow clients using either encryption type to connect to the CGNVM. NOTE: Use of the TKIP encryption standard limits the wireless network speed to 54Mbps (802.11g speed).
-
Page 84: The Wireless: Basic Settings: 5G Screen
Hitron CGNVM User’s Guide Table 23: The Wireless: Basic Settings: 2.4G Screen (continued) Cancel Click this to return the fields in this screen to their last- saved values without saving your changes. Help Click this to see information about the fields in this screen. -
Page 85: Table 24: The Wireless: Basic Settings: 5G Screen
If in doubt, use 802.11n/ac Mixed (default). Wireless Channel Select the 5GHz wireless channel that you want to use, or select Auto to have the CGNVM select the optimum channel to use. NOTE: Use the Auto setting unless you have a specific reason to do otherwise. - Page 86 Anyone with a wireless device in the coverage area can discover the SSID, and attempt to connect to the network. Select OFF if you do not want the CGNVM to broadcast the network name (SSID) to all wireless devices in the coverage area. Anyone who wants to connect to the network must know the SSID.
- Page 87 Hitron CGNVM User’s Guide Table 24: The Wireless: Basic Settings: 5G Screen (continued) Security Mode Select the mode of security that you want to use on the 5GHz network. Select None to use no security. Anyone in the coverage area can enter your network.
-
Page 88: The Wireless: Basic Settings: Wps Screen
4.2.3 The Wireless: Basic Settings: WPS Screen Use the WPS screen to enable WPS-capable wireless clients to connect to the CGNVM via a simple push-button, or by entering a password. See The Wireless: Basic Settings: WPS Screen on page 88. -
Page 89: Figure 34: The Wireless: Basic Settings: Wps Screen
Click the PIN button to begin the PIN configuration process. In the screen that displays, enter the WPS PIN that you want to use for the CGNVM, or the WPS PIN of the client device you want to add to the network. -
Page 90: The Wireless: Basic Settings: Guest Screen
Hitron CGNVM User’s Guide 4.2.4 The Wireless: Basic Settings: Guest Screen Use the Guest Network screen to enable wireless clients to connect to the CGNVM with reduced privileges. See The Wireless: Basic Settings: Guest Screen on page 90. Click Wireless > Basic Settings > Guest. The following screen displays. -
Page 91: The Wireless: Access Control Screen
Click this to see information about the fields in this screen. The Wireless: Access Control Screen Use this screen to modify the CGNVM’s wireless networks’ Service Set Identifiers (SSIDs) and manage the devices that connect to the wireless network. Click Wireless > Access Control. The following screen displays. -
Page 92: Table 27: The Wireless: Access Control Screen
Use these buttons to control the action to be taken for the devices listed: Select Allow All to ignore the Managed Devices list and let all devices connect to the CGNVM. Select Allow Listed to permit only devices you added to the Managed Devices list to access the CGNVM and the network. - Page 93 Hitron CGNVM User’s Guide Table 27: The Wireless: Access Control Screen (continued) Action Click Manage to make changes to a managed device rule (see Adding or Editing a Managed Device on page 113). Add Managed Device Click this to add a new managed device rule (see Adding or Editing a Managed Device on page 113).
-
Page 94: Admin
This section describes some of the concepts related to the Admin screens. 5.1.1 Debugging (Ping and Traceroute) The CGNVM provides a couple of tools to allow you to perform network diagnostics on the LAN: Ping: this tool allows you to enter an IP address and see if a computer (or other network device) responds with that address on the network. -
Page 95: The Admin: Management Screen
Traceroute: this tool allows you to see the route taken by data packets to get from the CGNVM to the destination you specify. You can use this tool to solve routing problems, or identify firewalls that may be blocking your access to a computer or service. -
Page 96: The Admin: Remote Management Screen
Click this to see information about the fields in this screen. The Admin: Remote Management Screen Use this screen to configure remote management of the CGNVM via HTTP and/or HTTPS. Click Admin > Remote Management. The following screen displays. Figure 38: The Admin: Remote Management Screen Version 1.0, 02/2015. -
Page 97: The Admin: Diagnostics Screen
Remote IP Range protocols, from computers with IP addresses in the range specified. Select Disabled to allow computers with any IP address to manage the CGNVM remotely. Save Changes Click this to save your changes to the fields in this screen. -
Page 98: The Admin: Backup Screen
Click this to terminate a test in progress. The Admin: Backup Screen Use this screen to back up your CGNVM’s settings to your computer or load settings from a backup you created earlier. Click Admin > Backup. The following screen displays. -
Page 99: The Usb Storage Screen
The following table describes the labels in this screen. Table 31: The Admin: Backup Screen Back Up Your Settings Click this to create a backup of all your CGNVM’s Locally settings on your computer. Restore Settings From a Use these fields to return your CGNVM’s settings to Local File those specified in a backup that you created earlier. -
Page 100: The Admin: Device Reset Screen
Click this to see information about the fields in this screen. The Admin: Device Reset Screen Use this screen to reboot your CGNVM, or to return it to its factory default settings. Click Admin > Device Reset. The following screen displays. Version 1.0, 02/2015. Copyright 2012 Hitron Technologies Version 1.0, 02/2015. -
Page 101: Figure 42: The Admin: Device Reset Screen
The Admin: Device Reset Screen Reboot Device Click this to restart your CGNVM. Restore Factory Default Click this to return your CGNVM to its factory default Settings settings. When you do this, all your user-configured settings are lost, and cannot be retrieved. -
Page 102: Security
Firewall The term “firewall” comes from a construction technique designed to prevent the spread of fire from one room to another. Similarly, your CGNVM’s firewall prevents intrusion attempts and other undesirable activity originating from the WAN, keeping the computers on your LAN safe. You can also use filtering techniques to specify the computers and other devices you want to allow on the LAN, and prevent certain traffic from going from the LAN to the WAN. -
Page 103: Intrusion Detection System
Every networking device has a unique Media Access Control (MAC) address that uniquely identifies it on the network. When you enable MAC address filtering on the CGNVM’s firewall, you can set up a list of devices, identified by their MAC addresses, and then specify whether you want to: Deny the devices on the list access to the CGNVM and the network (in which... -
Page 104: Figure 43: The Security: Firewall Screen
Hitron CGNVM User’s Guide Figure 43: The Security: Firewall Screen The following table describes the labels in this screen. Table 34: The Security: Firewall Screen Firewall Level Select the level of firewall protection that you want to apply to your LAN. Details about the protection level display beneath the buttons. -
Page 105: The Security: Service Filter Screen
Hitron CGNVM User’s Guide Table 34: The Security: Firewall Screen (continued) Ping from WAN Use this field to permit or prohibit Internet Control Message Protocol (ICMP) echo requests from the WAN to the LAN. Select Allow to permit pinging from the WAN. -
Page 106: Figure 44: The Security: Service Filter Screen
Hitron CGNVM User’s Guide Figure 44: The Security: Service Filter Screen The following table describes the labels in this screen. Table 35: The Security: Service Filter Screen Managed Services Filter Enabled Use this field to turn service filtering on or off. -
Page 107: Adding Or Editing A Service Filter Rule
Hitron CGNVM User’s Guide Table 35: The Security: Service Filter Screen (continued) Managed Time This displays the start (From) and end (To) of the time period during which this rule applies, on the specified Managed Weekdays. Action Click Manage to make changes to a filtering rule (see Adding or Editing a Service Filter Rule on page 107). -
Page 108: Figure 45: The Security: Service Filter Add/Edit Screen
NOTE: This name is arbitrary, and does not affect functionality in any way. Protocol Use this field to specify whether the CGNVM should filter via: Transmission Control Protocol (TCP) User Datagram Protocol (UDP) NOTE: If in doubt, leave this field at its default (TCP). -
Page 109: Figure 46: Additional Service Filtering Options
Hitron CGNVM User’s Guide Table 36: The Security: Service Filter Add/Edit Screen Rule Status Use this field to select whether the filtering rule should be active or not. Select Enabled to activate the rule. Matching traffic will be blocked. Select Disabled to deactivate the rule. Matching traffic will not be blocked. -
Page 110: Adding Or Editing A Service Filter Trusted Device Rule
Hitron CGNVM User’s Guide 6.3.2 Adding or Editing a Service Filter Trusted Device Rule To add a new trusted device rule, click Add Trusted PC in the Security > Service Filter screen. To edit an existing trusted device rule, locate the rule in the Security > Service Filter screen and click its Manage button. -
Page 111: The Security: Device Filter Screen
Hitron CGNVM User’s Guide The Security: Device Filter Screen Use this screen to configure Media Access Control (MAC) address filtering on the LAN, and to configure IP filtering. NOTE: To configure MAC address filtering on the wireless network, see Wireless: Access Control Screen on page 91. -
Page 112: Version 1.0, 02/2015. Copyright 2012 Hitron Technologies 2014 Hitron Technologies
Use these buttons to control the action to be taken for the devices listed: Select Allow All to ignore the Managed Devices list and let all devices connect to the CGNVM. Select Allow Listed to permit only devices you added to the Managed Devices list to access the CGNVM and the network. -
Page 113: Adding Or Editing A Managed Device
Hitron CGNVM User’s Guide Table 38: The Security: Device Filter Screen (continued) Add Managed Device Click this to add a new managed device rule (see Adding or Editing a Managed Device on page 113). Help Click this to see information about the fields in this screen. -
Page 114: Table 39: The Security: Device Filter Add/Edit Screen
Hitron CGNVM User’s Guide The following table describes the labels in this screen. Table 39: The Security: Device Filter Add/Edit Screen Host Name If you are managing a device that already connected via the LAN, this field displays the device’s name. -
Page 115: The Security: Keyword Filter Screen
Hitron CGNVM User’s Guide Table 39: The Security: Device Filter Add/Edit Screen Manage All Day Use this field to specify whether the device should be managed on all days of the week, at all times, or whether the device should be managed only at certain times. -
Page 116: Figure 51: The Security: Keyword Filter Screen
Use this field to turn keyword filtering on or off. Select Enabled to turn keyword filtering on. Select Disabled to turn keyword filtering off. Keyword Enter the keyword that you want to block. The CGNVM examines both the page’s URL (Internet address) and its page content (text). Blocked Weekdays Use these fields to specify the times at which the keyword should be blocked. -
Page 117: Adding Or Editing A Keyword Filter Trusted Device Rule
Hitron CGNVM User’s Guide Table 40: The Security: Keyword Filter Screen (continued) Blocked Time Use these fields to specify the period during which the rule should be applied. Enter the start time in the From fields, using twenty-four hour notation, and enter the end time in the To fields. -
Page 118: Figure 52: The Security: Keyword Filter Trusted Device Add/Edit Screen
Hitron CGNVM User’s Guide Figure 52: The Security: Keyword Filter Trusted Device Add/Edit Screen The following table describes the labels in this screen. Table 41: The Security: Keyword Filter Trusted Device Add/Edit Screen Host Name Enter a name to identify the device. -
Page 119: Mta
Hitron CGNV4 User’s Guide This chapter describes the screens that display when you click MTA in the toolbar. It contains the following sections: The MTA: Status Screen on page The MTA: Status Screen Use this screen to see general information about the CVE-30360’s embedded Multimedia Terminal Adapter module. -
Page 120: Table 42: The Mta: Status Screen
Hitron CGNV4 User’s Guide The following table describes the labels in this screen. Table 42: The MTA: Status Screen Telephony Provisioning Procedure DHCP This field displays the status of the remote telephony DHCP server. Provisioning Flow This displays the type of security used for voice calls Type through the CGNV4. -
Page 121: Troubleshooting
Using a power source other than the one that came with your CGNVM can damage the CGNVM. If using the power cable, ensure that it is connected to the CGNVM and the wall socket (or other power source) correctly. Ensure that the power source is functioning correctly. Replace any broken fuses or reset any tripped circuit breakers. - Page 122 (see LEDs on page 20). Make sure that your computer is on the same subnet as the CGNVM; see Address Setup on page 23. If you are attempting to connect over the wireless network, there may be a problem with the wireless connection.
- Page 123 (other radio transmitters, microwave ovens, etc) reduce your CGNVM’s signal quality and coverage area. Ensure that the CGNVM and the wireless client are set to use the same wireless mode, SSID and security settings (see The Wireless: Basic Settings Screen page 78).
-
Page 124: Index
Hitron CGNVM User’s Guide Index Numbers channel plan clients, wireless configuration file 802.11a/b/g/n/ac connection status, cable conventions, document customer support access point accounts, login address, IP debugging address, IP, local default default IP address attached network devices default username and password... - Page 125 Hitron CGNVM User’s Guide Ethernet cables IP address setup Ethernet port IP address, default IP address, format IP address, local factory defaults factory reset FDMA forwarding, port frequencies, cable LAN 1~4 LAN gaming LAN setup LEDs lights Line 1~2 local IP address...
- Page 126 Hitron CGNVM User’s Guide navigation bar Network Controller radio links network devices, attached reboot network diagnostics reset network number RJ45 connectors routing mode rule, port forwarding online gaming outlet-to-outlet overview, GUI scan range SCDMA security, wireless service filter service set...
- Page 127 Hitron CGNVM User’s Guide upstream transmission user interface username username and password video Video on Demand videoconferencing WAN connection Wifi MultiMedia Wifi Protected Setup window, main Windows XP wireless access point wireless clients wireless connection wireless networking standards wireless security...
- Page 128 Hitron CGNVM User’s Guide XP, Windows Version 1.0, 02/2015. Copyright 2012 Hitron Technologies Version 1.0, 02/2015. Copyright 2014 Hitron Technologies INDEX...
Need help?
Do you have a question about the CGNVM and is the answer not in the manual?
Questions and answers
How to determine the age of my Hitron modem?
You can determine the age of your Hitron CGNVM modem by checking the hardware version and software version on the Status: System Information Screen. Additionally, you can look at the gateway serial number, which may provide manufacturing details. To access this information:
1. Navigate to the Status > System Information screen in the modem's interface.
2. Look for the hardware version, software version, and gateway serial number.
3. Compare this information with the modem's release date (Version 1.0, 02/2015) to estimate its age.
This answer is automatically generated
which port (4 of them shown) do I insert the cable from the extender (booster) supplied by Verizon