
Related Manuals for Computherm Q7


Summary of Contents for Computherm Q7
- Page 1 COMPUTHERM Q7 Programmable digital room thermostat design! Operating Instructions...
- Page 2 GENERAL DESCRIPTION OF THE THERMOSTAT COMPUTHERM Q7 type switched-mode room thermostat is suitable to regulate the overwhelming majority of boilers and conditioners. easily connected boiler conditioning device that has a double wire connector for a room thermostat, regardless of whether it has a 24V or 230V control circuit.
- Page 3 The device can be programmed according to customer-specific requirements so that the heating/cooling system heats/cools your residence or office to the required temperature at the dates and times specified by you, to reduce energy costs while maintaining comfort. Separate temperature programs can be prepared for each day of the week.
- Page 4 19.8°C or below, and switches it off at 20.2°C or above. Please refer to Section 3.4 for the modification of the factory default switching sensitivity of ±0.2°C. The thermostat is equipped with a pump protection function, which, to prevent the pump from sticking, switches on the boiler for a one minute period at 12:00 p.m.
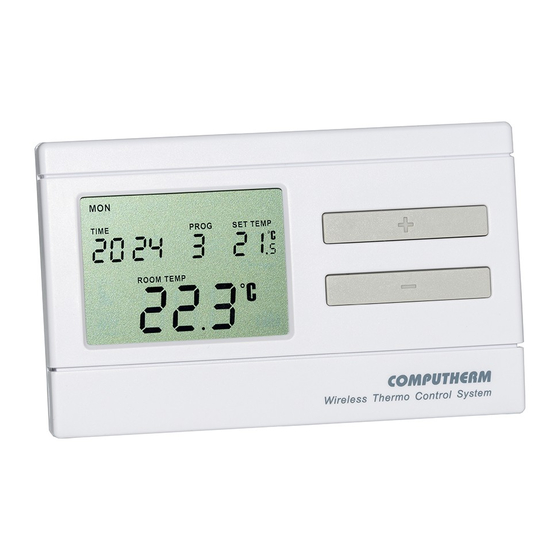
- Page 5 The information shown on the liquid crystal display of the thermostat includes the following: Programme number Manual control indicator The days of the week Set temperature Time Temperature modification until the next manual Low battery voltage interference Current temperature of the room Sign of the boiler/air Timed manual conditioner...
- Page 6 1. LOCATION OF THE DEVICE It is reasonable to locate it in a room used regularly or for many hours per day so that it is in the direction of natural ventilation in the room but protected from drought or extreme heat (e.g. direct sunlight, refrigerator, chimney, etc).
- Page 7 2. INSTALLATION OF THE THERMOSTAT Pressing the lock on the upper side of the housing of the thermo- stat, remove the back cover of the thermostat as shown in the figure. With the help of the screws provid- ed and some tools fasten the rear Latch panel of the device to the wall.
- Page 8 No. 1 (NO); No. 2 (COM) and No. 3 (NC). These con- nection points are located under an inner cover on the inner side of the rear panel. Connect the two connection points of the heating or cooling equipment to be controlled to terminals No.
- Page 9 ATTENTION! Always consider the loadability of the thermostat and follow the manufacturer’s instructions of the heating or cooling equipment. The device must be installed and connected by a qualified professional. The voltage appearing at terminals No. 1 (NO) and No. 2 (COM) depends only on the system being controlled, therefore the dimensions of the wire are determined by the type of the device to be controlled.
- Page 10 3. PUTTING THE THERMOSTAT INTO OPERATION, BASIC SETTINGS 3.1 Inserting batteries The battery compartment is in the inner side of the front panel of the housing. Insert 2 AA alkaline batteries (LR6 type) in accordance with the diagram in the battery compartment. After the batteries have been inserted, the display flashes the day, time and program number as well as the adjusted and measured temperatures.
- Page 11 3.2 Setting the current day and time Press the “SET” button to go to the main screen, then press the “DAY” button. At this time only the first three letters of the current day will flash on the display of the thermostat and the hour and minute values can be seen.
- Page 12 buttons on the front panel of the device, set the minute value of the current time. When you wish to continue modifying the settings, please press the “DAY” button again. If you wish to finish settings, confirm them by pressing the “SET” button. At this point adjusted data are recorded and the device goes back to the main screen (if no buttons are pressed for at least 15 seconds, the settings are automatically confirmed and the device goes back to the main screen).
- Page 13 of the output terminals No. 1 (NO) and No. 2 (COM) are indicated by icon in the bottom left corner of the display in case of heating, and by the icon in case of cooling. To switch between the two modes, first press the “SET” button to go to the main screen.
- Page 14 3.4 Setting the switching sensitivity (accuracy) The switching sensitivity means the temperature difference between the adjusted value and the actual temperature measured during the switching process. A smaller switching sensitivity results in steadier room temperature and therefore in higher comfort. The heat loss of the room (building) does not depend on the switching sensitivity.
- Page 15 sensitivity for heating systems with low thermal inertia (e.g. flat panel radiators). To change the switching sensitivity, first press the “SET” button to go to the main screen. Then press the “DAY” and “COPY” buttons one after the other. Following this, select the desired switching sen- „...
- Page 16 button to go to the main screen. Then press the “DAY” and “PROG” buttons one after the other. Following this, activate or deactivate this function using the large buttons. The notices „ ” „ ” indicate activated and deactivated state, respectively.
- Page 17 3.6 Calibrating the thermometer of the thermostat There is a possibility to calibrate the thermometer of the thermostat (to correct the measured temperature). In order to do this, first press the “SET” button to go to the main screen. Then press the “DAY” „...
-
Page 18: Programming The Thermostat
4. PROGRAMMING THE THERMOSTAT 4.1 A brief introduction to programming • Programming means the setting of switching times and selection of accompanying temperature levels. The device can be programmed for a one-week period. Its operation is automatic, and it will cyclically repeat the programs that have been keyed in. - Page 19 • The start time of switch , which cannot be PROG changed, only its temperature can be adjusted. So under the factory default settings, the thermostat performs only one switch ( ) every day, which is in effect from until PROG the next day.
- Page 20 using a stove, more gas is needed to keep a pan of water boiling than to just keep it warm.) – • The switches are deactivated by factory default PROG PROG (their start time is ), but they can be activated at need. Their start time can be freely set between at 10-minute intervals given the constraint, that their start time should be in...
- Page 21 • In order to enter the programming mode, press the “SET” button and hold it down and press the “PROG” button, too. During the programming the values being adjusted are flashing on the display. The modification of these values can always be done using the large buttons.
- Page 22 selection of days). But be aware: if the program of all the days are created together, than their program can only be modified together. Therefore, if a different program is needed for at least one day, then the program of the days should be created separately, and the repeated programs should be copied using the “COPY”...
- Page 23 23°C during the day. During that time of the day, when the family is at work or school, only a lower temperature is needed. As heating up and cooling down usually takes a long time, it is reasonable to set the start time of the switches 0.5-1 hour before the desired time of the modified temperature.
- Page 24 Temperature Time Program number...
- Page 25 4.3 Programming steps a. Press the “SET” button to go to the main screen. b. Press the “SET” button again and hold it down and press the “PROG” button, too. At this point the device gets into programming mode and the abbreviations indicating the days of the week (MON TUE WED THU FRI SAT SUN) are flashing on the display.
- Page 26 d. At this point the temperature of switch should be set, PROG which is indicated on the display of the device by flashing the temperature value to be set ( °C by default). Set the desired temperature using the large buttons, then press the “PROG”...
- Page 27 g. The next step in programming is the adjustment of the start time of switch , which is indicated on the display of the device PROG by flashing the time value to be adjusted ( by default). The – adjustment process of switches can be done PROG PROG...
- Page 28 offers another day to be programmed and the programming can be continued from step “c”. h. The adjusted program can be saved by pressing the “SET” button. After approximately 1 minute, the adjusted program is automatically saved. Afterwards, the device goes back to the main screen.
- Page 29 “ ” “COPY” function. The notice appearing in place of the time characters and the flashing abbreviation MON indicating Monday shows that conditions are ready for copying a program. • Select the day whose program you wish to copy to another day or other days using the large buttons on the front panel of the device.
- Page 30 • After selecting the abbreviation that indicates the day to which you wish to copy the program, press the “COPY” button to copy the program. Hereafter, the abbreviation indicating the day to which the program was copied will be visible continuously. Following this, you can select further days using the large buttons and copy the program to those days too by pressing the “COPY”...
- Page 31 4.5 Modifying the program • The previously set program can be modified any time by repeat- ing the steps of programming. • The number of activated switches can be increased at will as described in Section 4.3. • A previously activated switch can be deactivated by setting its start time to using the large buttons (or by...
- Page 32 onds. After this, the modification can be continued by selecting another day. When finished with all the modifications, press the “SET” button to save them. After approximately 1 minute, they are automatically saved. Afterwards, the device goes back to the main screen.
- Page 33 4.6 Program inspection • First, press the “SET” button to go to the main screen, then press the “PROG” button. At this point, the abbreviation indicating the day(s), the symbol of switch and the time and temperature PROG level set for switch of the selected day(s) will appear on the PROG display (none of the values is flashing).
- Page 34 5. TEMPORARY MODIFICATION OF THE TEMPERATURE CORRESPONDING TO THE PROGRAM If you wish to operate your device in a way that differs temporarily from the program that has been set (e.g. on bank holidays or the winter holidays), you can choose among the options described in Sections 5.1-5.4.
- Page 35 having to press the button several times in increments of 0.5°C. Following this, using the large buttons, the temperature can be further modified in increments of 0.5°C, in ac- cordance with current requirements. The economy and comfort temperature values assigned to buttons can be modified as follows: •...
- Page 36 • To set the comfort temperature, press the “SET” button and keep it depressed and press the button, too. Following this, with the help of the buttons, set the comfort temperature selected by you. After the temperature has been set, press the “SET” button to save the modification (after approximately 15 seconds, it is automatically saved).
- Page 37 During this temporary modification, the segments indicating the time on the display alternately show the exact time (TIME) and the time remaining in manual control (TIME LEFT, for example that is 4 hours and 2 minutes). After this time has elapsed, the icon disappears and the device resumes the program that has been set.
- Page 38 party program will start approximately 10 seconds after the adjust- ment. Following this, the device will keep the modified temperature for the given period of time. The adjusted temperature can be freely changed during the party program without exiting it. During this temporary modification, the segments indicating the time on the display alternately show the exact time (TIME) and the time remaining in manual control (TIME LEFT, for example...
- Page 39 and hold it down for at least 2 seconds. At this time, the icon appears on the display, along with the notice in place of the time characters, which indicates the duration of modification in days. Adjust this time to the desired length (between 1 and 99) using the large buttons (1 day means 24 hours).
- Page 40 to return to the set program before the time set for temperature modification has expired, please press the “SET” button. 5.4 Temperature modification until the next manual interference Set the required temperature using the large buttons on the front panel of the device. At this time, the icon appears on the display, indicating that the thermostat is operated with manual control.
- Page 41 6. TURNING ON THE BACKGROUND LIGHT When you press the “LIGHT” button, the background light of the display will turn on for 15 seconds. When you press another button while the display is illuminated, the background light will turn off only after 15 seconds have elapsed since the last button had been pushed.
- Page 42 buttons have successfully been locked, the notice “ ” appears in place of the time characters for a couple of seconds. Until the control buttons are locked, their normal function do not work; if any button is pressed, then only the notice “ ”...
- Page 43 8. CHANGING THE BATTERY The average lifetime of the batteries is 1 year, but frequent use of the background light may shorten this time considerably. If the icon indicating low battery voltage appears on the display, the batteries should be replaced (see Section 3.1). The exact time should be set again after the batteries have been replaced, but the device saves the program that has been loaded even without batteries therefore there is no need to reprogram the device.
- Page 44 9. RESETTING THE THERMOSTAT TO ITS FACTORY DEFAULT SETTINGS By pressing the “RESET” button located on the main panel of the thermostat, the thermostat can be reset to its factory default settings. This results in deleting the day, exact time, basic settings and the set program.
-
Page 45: Technical Data
TECHNICAL DATA — switchable voltage: 24V AC/DC to 250V AC, 50Hz — switchable current: 8A (2A inductive load) — temperature measurement range: 5 to 35°C (in 0. 1 °C increments) — adjustable temperature range: 5 to 35°C (in 0.5°C increments) —... - Page 46 A BRIEF DESCRIPTION OF PROGRAMMING • Setting the date and time: press the “DAY” button, then adjust values using the “DAY”, buttons. • Programming: press and hold down the “SET” button, while pressing the “PROG” button too, then adjust values with the “PROG”, buttons;...
- Page 48 The COMPUTHERM Q7 type thermostat complies with the requirements of standards EU EMC 2004/108/EC; LVD 2006/95/EC. Importer: Thermostats4U Email: sales@thermostats4u.co.uk For additional information visit: thermostats4U.co.uk For better reading download this Operating Instruction from our website!
Need help?
Do you have a question about the Q7 and is the answer not in the manual?
Questions and answers