
Related Manuals for Recsea WHS-RX1


Summary of Contents for Recsea WHS-RX1
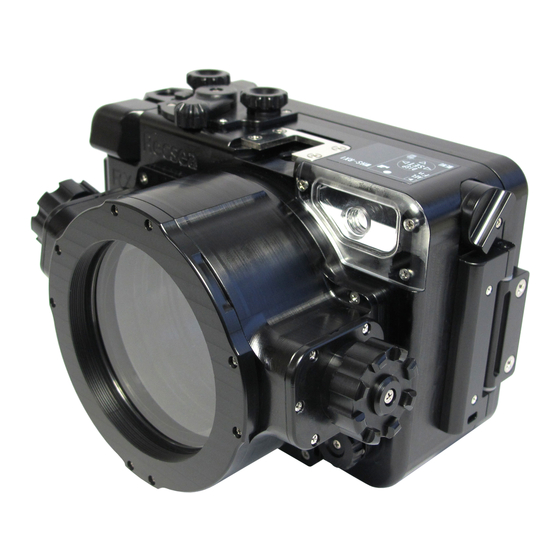
- Page 1 SONY CYBER-SHOT DSC- RX1 & RX1R Underwater Housing Recsea WHS-RX1 MANUAL Please read this manual before use. NTF CORPORATION UH Division http://www.seatool.net...
-
Page 2: Features Of This Product
INTRODUCTION SONY CYBER-SHOT DSC-RX1 & RX1R Underwater Housing WHS-RX1 ※ Thank you for purchasing the WHS-RX1 Underwater Housing. ※ To ensure proper and safe use, please thoroughly read this manual. ※ Improper use may cause leakage causing irreparable damage to your digital camera. -
Page 3: Package Contents
PACKAGE CONTENTS Be sure all items listed here were included with your housing: ・Diffuser ・Camera Extraction Tabs x 2 ・Strobe Mask ・External Strobe Connection Mount ・Hand Strap ・Reserve O-ring ・O-ring Removal Pick ・O-ring Grease GETTING TO KNOW YOUR WHS-RX1/RX1R HOUSING... -
Page 4: Warranty Information
※Dealer: Stamp your company name and contact information, purchase date, model and serial number. Recsea/Seatool Manufacturing & Sales NTF CORPORATION UH Division 390-1 Mii, Midori-Ku, Sagamihara-Shi Kanagawa 252-0151, Japan T: +81 (0)50-7541-0294 F: +81 (0)42-780-5720 http://www.seatool.net E-mail: info@seatool.net... - Page 5 ATTENTION! ※The housing Mode and Exposure Compensation Dials are designed to turn the camera's Mode and Exposure Compensation dials back and forth via friction from the o-rings that come in contact with theses dials inside the housing. When installing or removing camera pull both the housing Mode and Exposure Compensation Dials up.
-
Page 6: Installing Camera
INSTALLING CAMERA CAUTION! Before using, please be sure to test housing (without camera) in a bucket or aquarium if available. After use in salt water, rinse thoroughly in a bucket of fresh water without fail, pressing all buttons, turning all dials and levers several times to flush out salt deposits and other contaminants. -
Page 7: Removing Camera
IMPORTATNT: If steps 3. through 6. are not taken the camera may not seat properly into housing and which may caused dials, levers and button not to function as intended. 7. Slowly and carefully install camera making sure camera does not to hit housing's internal controls. - Page 8 ※Two (2) screw holes are provided at the bottom of the housing for use in attaching Seatool/Recsea genuine tray and grip assemblies. CAUTION! Seatool/Recsea STRONGLY recommends the use of Seatool/Recsea genuine tray and grip assemblies listed below under OPTIONS. Leakage or damages due to the use...
-
Page 9: Maintenance
Please be mindful of the weight of the light(s) you intend to use. For heavy lights and strobes please use Seatool/Recsea genuine tray and grip assemblies. ※ Please refrain from using lights attached to the Accessory Shoe as a carrying handle. -
Page 10: Specifications
Camera Extraction Tabs x 2, Hand Strap, Reserve O-ring, O-ring, Removal Pick, O-ring Grease INSURANCE INFORMATION ※ Seatool/Recsea strongly recommends insuring your camera. For more information please contact your dealer. CONSUMABLE PARTS ※ For replacement of consumable parts such as O-rings please contact your dealer or... -
Page 11: After-Sale Service
※ Warranty does not cover any losses resulting from an defect of this product, including those related to lost profits or any related expenses. ※ Seatool/Recsea will stock parts necessary for repair for five (5) years from stop of production. - Page 12 MEMO...
Need help?
Do you have a question about the WHS-RX1 and is the answer not in the manual?
Questions and answers