Epson DiscProducer PP-100N User Manual
Hide thumbs
Also See for DiscProducer PP-100N:
- User manual (174 pages) ,
- Administrator's manual (106 pages) ,
- Brochure & specs (2 pages)
Table of Contents
Advertisement
Advertisement
Table of Contents

Related Manuals for Epson DiscProducer PP-100N


Summary of Contents for Epson DiscProducer PP-100N
- Page 1 User’s Guide M00010603...
-
Page 2: Trademarks
Neither Seiko Epson Corporation nor its affiliates shall be liable to the purchaser of this product or third parties for damages, losses, costs, or expenses incurred by purchaser or third parties as a result of: accident, misuse, or abuse of this product or unauthorized modifications, repairs, or alterations to this product, or (excluding the U.S.) failure to... -
Page 3: Organization Of This Manual
The following instruction guides are included with this product. PP-100N Setup Guide Briefly describes how to set up this product with illustrations. See the PP-100N Administrator’s Guide for more information. PP-100N User’s Guide (PDF) Presents detailed information users need to know such as how to install the software, the product functions and operations, as well as maintenance information. -
Page 4: Table Of Contents
What is EPSON Total Disc Maker? ......42 For Canadian users ..........11 Starting EPSON Total Disc Maker ......42 For California customers only ........ 11 Screen configuration of EPSON Total Disc Maker .. Indication required for directive 2011/65/EU ..................43 (RoHS)................ 11 Displaying EPSON Total Disc Maker Help ..44... - Page 5 ■ Performing job operations ......106 Password problems ..........156 Checking job information ........106 Other problems ............156 Checking the job processing status......107 ■ Checking with EPSON Total Disc Monitor..Pausing jobs ............108 ................. 158 Resuming jobs............109 Canceling jobs............110 ■ When discs cannot be published ....160 Priority Publishing ..........
-
Page 6: Before Using This Product
Before Using This Product For safe use • To use this product safely, be sure to read this guide as well as the other instruction guides included with this product before using it. • Keep this guide at hand so that you can resolve any questions you have about this product. To prevent harm to customers and other people or damage to property, this guide contains the following symbols and warning displays for operations and use that may be dangerous. - Page 7 Before Using This Product • Do not use flammable gas sprays inside or around this product. There is a risk that gas will build up and a spark may cause a fire. • Do not install in a place where volatile substances, such as alcohol or paint WARNING thinner, are present or in a place where there is fire.
-
Page 8: Cautions For The Power Source
Cautions for the power source Do not connect or disconnect the power plug with wet hands. This may result in electric shock. WARNING Use only the type of power source indicated on the product’s label. Also, do not plug the power cord into an outlet with many other cords connected to it. -
Page 9: Cautions For Using
WARNING Immediately turn off the power, disconnect the power plug from the outlet, and contact your dealer or the Epson Repair Center about repairs. Servicing the product yourself is dangerous, so never attempt it. Do not insert or drop metal or flammable objects into the air vents or other openings. - Page 10 Do not step or place heavy objects on top of the product. Be especially careful in households with small children. There is a risk that it could fall over or break, resulting in injury. CAUTION Do not use the various cables (cords) to connect the product in a way other than that specified in the instruction guide.
-
Page 11: Warning
The connection of a non-shielded interface cable to this product will invalidate the EMC standards of this device. You are cautioned that changes or modifications not expressly approved by Seiko Epson Corporation could void your authority to operate the equipment. -
Page 12: Cautions For Cd/Dvd Discs
• During a malfunction or repair • When there is damage due to a natural disaster Even if the product is still under warranty, Epson accepts no responsibility for data that is lost or damaged due to causes not limited to those listed above. -
Page 13: Part Names And Functions
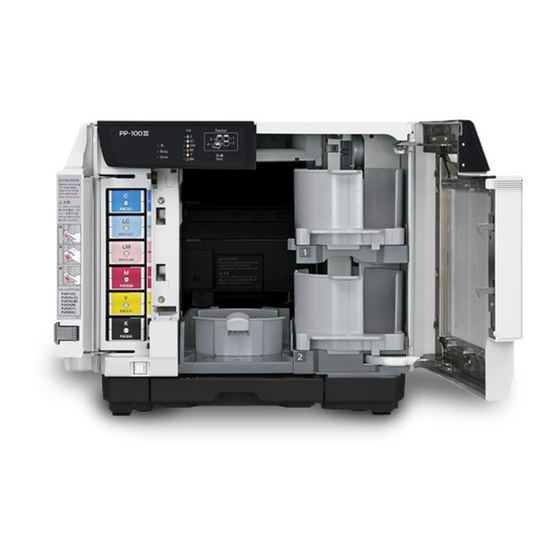
Part Names and Functions Part Names and Functions Front Control panel Use to control this product (PP-100N). It also shows the status of the product and menus. See “Control panel” on page 15 in this guide for details on the control panel. - Page 14 Inside Drive 1 Writes data on the recording surface of the discs. Drive 2 Writes data on the recording surface of the discs. Security lock switch Turns the disc cover lock function on and off. Printer Prints on the label surface of the discs. Stacker 3 Use as the disc output stacker.
-
Page 15: Control Panel
Part Names and Functions Control panel Power LED Flashes and turns on when the power is turned on. BUSY LED Flashes when a job is being processed or a job is being received. ERROR LED Flashes and turns on when an error occurs. Shows menus and messages. -
Page 16: Checking The Status Of This Product Using The Indicator Light Display
Checking the status of this product using the indicator light display This section describes the status of the product using the indicator lights displayed on the control panel. Indicator light Flashing/On Status The power is on. When only the power LED is on, the product is on standby for data. -
Page 17: Basic Operations
Part Names and Functions Basic operations This section describes how to perform basic operations on the product. Turning on the power Press the Power button to turn on the power. The power LED flashes, and then stays on. -
Page 18: Turning Off The Power
Turning off the power Press the Power button for 1 to 3 seconds. The power LED flashes and then turns off, indicating that the power is off. • If there are jobs being published or waiting to be published, the power is turned off after finishing all of the jobs. -
Page 19: Unlocking The Disc Cover
Part Names and Functions Unlocking the disc cover If the security lock switch is set to on, the disc cover is locked automatically each time it is closed. To unlock the disc cover lock, use the disc cover key or use the control panel. If the security lock switch is set to off, the disc cover lock always remains unlocked. -
Page 20: Opening The Disc Cover
Opening the disc cover If the disc cover is locked, unlock it. See “Unlocking the disc cover” on page 19 in this guide for the procedure to unlock the lock. Hold the handle, and open the disc cover in the direction indicated by the arrow in the illustration below. -
Page 21: Handling Stackers
Part Names and Functions Handling stackers Load the discs into the stacker. See “Loading discs” on page 83 in this guide. Or take out the published discs from the stacker. (See “Taking out discs” on page 104 in this guide.) Handle the stacker as shown below. Stacker 1/Stacker 2 Stacker 1 and Stacker 2 are the same. - Page 22 Stacker 3 Remove Hold the handle, lift it up, and then pull towards you to take out. Attach • When you insert Stacker 3, first check that there are no discs in Stacker 4, and then attach it. • When you use Stacker 3, set the lock to [LOCK], and do not pull out Stacker 4. Hold the handle, line up the indentations, and attach.
- Page 23 Part Names and Functions Stacker 4 • Do not apply strong force to Stacker 4 when handling it. • When the BUSY LED is flashing quickly, a disc is being ejected, so do not pull out Stacker 4. Discs may be damaged. •...
-
Page 24: Preparation
This section describes the installation procedure of the software required for using this product (PP-100N). After setup of this product (see the PP-100N Administrator’s Guide) is completed, use the procedure below to install the software onto the user’s client computer. - Page 25 Preparation Software operating requirements The minimum hardware and software requirements for using the supplied software are shown below. • Windows XP (32bit, SP3 or later) ∗ Home Edition/Professional • Windows Vista (32bit/64bit, SP2 or later) ∗ Home Basic/Home Premium/Business/Enterprise/Ultimate • Windows 7 (32bit/64bit, SP1 or later) ∗...
-
Page 26: Installation
Ethernet interface This interface must meet one of the standards below. Interfaces • 100Base-TX • 1000Base-T Windows Media Player 6.4 or higher already installed Software Windows Internet Explorer 6, 7, or 8 already installed Making music CD: Miscellaneous Requires sound device with appropriate driver installed. •... - Page 27 Preparation Click [EPSON Total Disc Maker] when the screen shown below is displayed. If the screen is not displayed. . . • Windows 7/Windows Vista/Windows Server 2008: Click [Start] ( in Windows 7 or Windows Vista) - [Computer], and double-click the DVD -ROM icon to open the DVD.
- Page 28 Carefully read the license agreement, and if you agree, select [I accept the terms of the license agreement], and click [Next]. Verify the folder where you want to install the software, and click [Next]. To change the folder, click [Change] and specify the folder, and then click [Next].
- Page 29 Preparation Insert a check mark for [EPSON PP-100N (Network connection)], and then click [Next]. Check that [Complete] is selected, and click [Next]. To install the printer drivers only, select [Printer Driver]. Notes...
- Page 30 Enter the IP address or host name of the product, and click [Next]. In this example, we enter http://192.168.192.168. If the IP address or host name of PP-100N is not entered, register this product after the installation is finished. (See “Registering the product” on page 32 in this guide.) Click [Install].
- Page 31 If multiple units of this product are connected on the same network, this product must be registered to the client computer using EPSON Total Disc Setup. See “Registering the product” on page 32 in this guide, and then register this product.
-
Page 32: Registering The Product
Registering the product To use EPSON Total Disc Maker, you must register this product to the client computer. However, if only one product is connected, product registration is performed during the software installation process, and so this procedure is not necessary. - Page 33 If the administrator is not already registered, the confirmation message shown below is displayed. Clicking [OK] continues with the registration process for the product, but this product cannot be used until an administrator is registered. Ask the administrator to perform administrator registration (see “Registering an administrator” in the PP-100N Administrator’s Guide).
- Page 34 Enter the name into [Name] and click [OK]. This name is displayed at [Output device] that is selected in the Publishing screen of EPSON Total Disc Maker. This completes the product registration.
-
Page 35: Checking And Changing User Information
Checking user information Log in to EPSON Total Disc Net Administrator. See “Logging in to EPSON Total Disc Net Administrator” on page 54 in this guide for the login procedure. Click the [User information] tab. The registered user information is displayed. -
Page 36: Changing User Information
Use the procedure below to change the full name and email address of a user. Log in to EPSON Total Disc Net Administrator. See “Logging in to EPSON Total Disc Net Administrator” on page 54 in this guide for the login procedure. Click [Edit user] in the [User information] screen. -
Page 37: Changing Password
Preparation Changing password The password is used to log in to EPSON Total Disc Net Administrator. Use the following procedure to change the password. Manage the password so that it cannot be used by anyone other than you. Log in to EPSON Total Disc Net Administrator. -
Page 38: Setting For Notification Of Job Completion
This setting is reflected for all the CD/DVD/BD publishers registered. Start EPSON Total Disc Setup. See “Starting EPSON Total Disc Setup” on page 45 in this guide for the start procedure. Click [Common Setting for Publishing] on the [Tool] menu. - Page 39 Check the checkbox for either one of the following options: • Notify after each job is finished: A message box (EPSON Total Disc Monitor) notifying that a job is finished appears everytime each job is finished. • Notify after all jobs are finished:...
-
Page 40: Uninstalling The Software
Double-click [Add or Remove Programs]. Delete EPSON Total Disc Maker. Windows 7/Windows Vista/Windows Server 2008: Select EPSON Total Disc Maker, and click [Uninstall/Change]. Windows XP/Windows Server 2003: Select EPSON Total Disc Maker, and click [Change/Remove]. If you cannot perform the uninstallation due to any problem, uninstall the software by Notes double-clicking setup.exe in the Discproducer Utility &... - Page 41 Preparation Select [Remove], and click [Next]. Follow the on-screen messages to complete the uninstallation process.
-
Page 42: Using Applications
EPSON Total Disc Maker What is EPSON Total Disc Maker? EPSON Total Disc Maker is software for editing the write data and the print data for the label surface, and publishing to this product (PP-100N). In EPSON Total Disc Maker, the execution of writing data to this product and printing labels is referred to as “publishing”. -
Page 43: Screen Configuration Of Epson Total Disc Maker
See EPSON Total Disc Maker Help for details on use. Disc view Starting EPSON Total Disc Maker or clicking [Disc] in another view displays the disc view. In the disc view, you can edit the data to write to the disc. -
Page 44: Displaying Epson Total Disc Maker Help
In the publish view, you can publish the writing data and label to this product. Displaying EPSON Total Disc Maker Help EPSON Total Disc Maker Help contains the procedures for using and specifications of EPSON Total Disc Maker. Click [Start] ( in Windows 7 or Windows Vista) - [All Programs] (or [Programs]) - [EPSON Total Disc Maker] - [EPSON Total Disc Maker Help]. -
Page 45: Epson Total Disc Setup
What is EPSON Total Disc Setup? EPSON Total Disc Setup is software for registering the product to the computer. It also allows you to check the Publish Mode, stacker to be used, drive, etc., as well as the basic settings for publishing discs with this product. -
Page 46: Screen Configuration Of Epson Total Disc Setup
Screen configuration of EPSON Total Disc Setup This section describes the screen configuration of EPSON Total Disc Maker. See Help of EPSON Total Disc Setup for details on use. Setup screen (2) (3) Registers this product. Remove Deletes the registration for the selected product. - Page 47 Using Applications [Properties] screen Click [Properties] in the Setup screen to display the [Properties] screen. Click the [General] tab, [Maintenance Info] tab, and [About] tab in the [Properties] screen to display each screen. [General] screen Item Description Name Displays the name of the product. The name can also be changed here. Do not use Unicode characters.
- Page 48 [Maintenance Info] screen Item Description Number of printed discs Displays the cumlative number of printed discs. Service life of Drive 1/ Displays the service life of the drive. When the value is close to 100%, it is time Drive 2 to replace it.
-
Page 49: Displaying Help Of Epson Total Disc Setup
Displays the firmware version of the product’s internal CD/DVD Drive 2. Displaying Help of EPSON Total Disc Setup Help of EPSON Total Disc Setup contains the procedures for using and specifications of EPSON Total Disc Setup. Start EPSON Total Disc Setup. -
Page 50: Epson Total Disc Monitor
EPSON Total Disc Monitor What is EPSON Total Disc Monitor? EPSON Total Disc Monitor is software for displaying the product’s current status, remaining ink, job information, and other information. You can also pause/cancel jobs or change the order of jobs to be processed. - Page 51 Using Applications Screen configuration of EPSON Total Disc Monitor This section describes the screen configuration of EPSON Total Disc Monitor. See Help of EPSON Total Disc Monitor for details on use. (1) (2) (3) (11) (10) Pause Pauses the selected job.
- Page 52 Item Description Job Name Displays the job name. The job name is set automatically from, for example, the volume label of writing data registered with EPSON Total Disc Maker. Status Displays the job status. Publisher Displays the publisher of the job.
-
Page 53: Screen Configuration Of Epson Total Disc Monitor
Displays the disc output stacker number. Displaying Help of EPSON Total Disc Monitor Help of EPSON Total Disc Monitor contains the procedures for using and specifications of EPSON Total Disc Monitor. Start EPSON Total Disc Monitor. See “Starting EPSON Total Disc Monitor” on page 50 in this guide for the start procedure. -
Page 54: Epson Total Disc Net Administrator
EPSON Total Disc Net Administrator What is EPSON Total Disc Net Administrator? EPSON Total Disc Net Administrator is an internal Web application of this product for performing tasks such as managing jobs, users, and data for maintenance. EPSON Total Disc Net Administrator displays different screens and functions depending on the authority of user logged in. -
Page 55: Logging Out From Epson Total Disc Net Administrator
Click [Logout] in the upper right of the screen. Screen configuration of EPSON Total Disc Net Administrator This section describes the screen configuration of EPSON Total Disc Net Administrator. See Help of EPSON Total Disc Net Administrator for details on use. - Page 56 [Job details] screen The [Job details] screen displays details on Jobs. You can use the job information of a finished disc to publish another disc with the same content.
- Page 57 Using Applications [User information]/[User management] screen The [User information (User management)] screen displays the user information for the currently logged in user. If an administrator is logged in, the screen displays the information of all registered users. Click [Change password] to display the [Change password] screen. Click [Edit] to display the [Edit user] screen. <When a user other than an administrator is logged in>...
- Page 58 [System settings] screen (administrator only) Click the [Output device] tab, [Network] tab, [Email] tab, and [Date/Time] tab to display each screen. [Output device] screen The [Output device] screen allows you to check and change the settings of this product such as the Publish Mode, drive, and adding of error marks.
-
Page 59: Screen Configuration Of Epson Total Disc Net Administrator
Help of EPSON Total Disc Net Administrator contains the procedures for using and specifications of EPSON Total Disc Net Administrator. Start EPSON Total Disc Net Administrator. See “Logging in to EPSON Total Disc Net Administrator” on page 54 in this guide for the start procedure. Click [Help] in the top right. -
Page 60: How To Use The Printer Driver
In the printer driver screen, you can change the printer driver settings and perform maintenance, such as running nozzle checks and cleaning the print head. The printer driver screen can be displayed from EPSON Total Disc Maker, EPSON Total Disc Setup, and the [Start] menu. -
Page 61: Displaying From Epson Total Disc Setup
How to Use the Printer Driver Displaying from EPSON Total Disc Setup Start EPSON Total Disc Setup. See “Starting EPSON Total Disc Setup” on page 45 in this guide for the start procedure. Select this product, and click [Properties]. You can also display the properties screen by clicking [Properties] in the [Edit] menu. -
Page 62: Displaying From The [Start] Menu
Windows XP Professional: Click [Start] - [Printers and Faxes], in this order. Windows XP Home Edition/Windows Server 2003: Click [Start] - [Control Panel] - [Printers and Faxes], in this order. Right-click [EPSON PP-100NPRN], and click [Printing Preferences]. The printer driver screen appears. -
Page 63: Setting Up The Printer Driver
If displayed from EPSON Total Disc Setup or the [Start] menu: The information you set is saved as the printer driver settings, and after this, it is reflected in the EPSON Total Disc Maker settings and other application print settings. - Page 64 1: Print quality is the priority. Quality/ 2: Printing speed is the priority. Speed This is set to [1] if [Label Type] is set to [EPSON Specified CD/DVD Label]. Mode If you check this, the printing speed increases because it prints when the High Speed Setting print head is moving either left or right.
-
Page 65: [Utility] Screen
How to Use the Printer Driver [Utility] screen In the [Utility] screen, you can run various maintenance functions to maintain the print quality as well as make settings for running the printer driver. Allows you to print a pattern for checking if the print head is clogged. Check the printed pattern to see whether or not the print head is clogged. -
Page 66: Printer Driver Basics
This section describes how to print labels using data created in Microsoft Office Word. Start WordPad. Click [Print] in the [File] menu. Select EPSON PP-100NPRN as the printer to use, and click [Apply]. Click [Cancel] to close the [Print] screen. Click [Page Setup] in the [File] menu. - Page 67 Allows you to set the values you want in [Width] and [Height]. [Margins] settings: Set each of [Left], [Right], [Top], and [Bottom] to 2 mm. When you print using software other than EPSON Total Disc Maker, create the print data using the following settings. Notes Paper size: 124×124 mm...
- Page 68 Click the [Preferences] button. Setup the printer driver and click [OK]. See “Setting up the printer driver” on page 63 in this guide for details on the printer driver settings. Click [Print]. Printing starts.
-
Page 69: Displaying The Printer Driver Help
How to Use the Printer Driver Displaying the printer driver Help This section describes how to display the printer driver Help. How to display the EPSON printer driver Help Click the [Help] button. How to display an explanation of an option... -
Page 70: Publishing Discs
Publishing Discs Types of Publish Mode This product has the following Publish Modes: Standard Mode, External Output Mode, and Batch Mode. Standard Mode This mode uses Stacker 1 as the input stacker for discs. You can select Stacker 2 or Stacker 4 as the output stacker. If you select Stacker 2 as the output stacker, you can publish up to 50 discs without having to replenish the discs or take out published discs. -
Page 71: External Output Mode
Publishing Discs External Output Mode You can select Stacker 3 or Stacker 4 as the output stacker. If you select Stacker 4 as the output stacker, you can easily take out published discs without even having to pause a job during publishing. The External Output Mode allows you to use the product in the following ways according to the application. -
Page 72: Batch Mode
Batch Mode This mode uses Stacker 1 and Stacker 2 as the input stackers for discs, and Stacker 2 and Stacker 3 as the output stackers. Loading 50 discs in each of Stacker 1 and Stacker 2 allows for the continuous publishing of 100 copies of the same disc without having to replenish the discs or take out published discs. -
Page 73: Compatible Disc Types
• Even if the same data is printed on identical discs, the same print results may not be able to be achieved because of the individual differences (variations) of each disc. Disc quality may affect print quality. We recommend using EPSON specified CDs/DVDs. Notes... -
Page 74: Writable Disc Types
If this happens, write at a slower speed. In particular, we recommend writing to DVD±R DL at a slow speed. • Disc quality may affect write quality. We recommend using EPSON specified CDs/DVDs. Epson offers the specified CD-R and DVD-R discs for all your printing needs. -
Page 75: Handling Discs
Publishing Discs Handling discs Notes on usage • Do not touch the recording surface when holding a disc. • Handle discs carefully to ensure fingerprints, dirt, dust, moisture, scratches, etc., do not get on the label surface and recording surface. Gently wipe off any dust, dirt, and the like with a soft dry cloth or a commercially available CD cleaner. -
Page 76: Notes On Storage
Notes on storage • Do not place discs in a location where they will be subject to high temperature and humidity such as locations under direct sunlight, near heating equipment. • Do not place discs in locations where temperatures vary greatly. Doing so may result in condensation. -
Page 77: Printable Area
116.0 mm Set the print area in [Set Inside/Outside Diameter] of EPSON Total Disc Maker or [Label Size] on the printer driver screen. Select from [Standard] and [Wide], or set an optional size. (See “Changing the print area” on page 78 in this guide for how to set an optional size.) -
Page 78: Changing The Print Area
EPSON Total Disc Maker: Use the following procedure to set an optional print area. Start EPSON Total Disc Maker. See “Starting EPSON Total Disc Maker” on page 42 in this guide for the start procedure. Click [Label]. The label view appears. - Page 79 Use the following procedure to register a user defined label size (label size not provided with the printer driver). Display the setting screen of the printer driver. See “Displaying from EPSON Total Disc Setup” on page 61 or “Displaying from the [Start] menu” on page 62 in this guide for the display procedure.
- Page 80 Enter the settings for [Name of Custom Label Size], [Inside diameter], and [Outside diameter], and click [Save]. Setting item Description Enter the name of the user defined label size (number of characters: up to 24 characters). Name of Custom Label Size If characters that are 4 bytes are used, the number of characters you can use becomes less than the above.
- Page 81 This section describes how to change and delete registered user defined label sizes. Display the setting screen of the printer driver. See “Displaying from EPSON Total Disc Setup” on page 61 or “Displaying from the [Start] menu” on page 62 in this guide for the display procedure.
- Page 82 Select the label size to change or delete from [Custom Label Size List] on the left of the screen. To change the registered settings, edit the settings on the right of the screen. Click [Save] to change the registered settings. Click [Delete] to delete the label size. Click [OK] when the confirmation message appears.
-
Page 83: Loading Discs
Publishing Discs Loading discs This section describes how to load discs in the stacker, and insert the stacker. Load the discs in a stacker. Do not load discs in the drives or printer. Furthermore, do not load discs between Drive 1 and Drive 2. They may become unable to be taken out. Fully separate the discs to prevent them from sticking together. - Page 84 • Do not load discs above the red line on the stacker. The product may malfunction, or the discs may be damaged. • Make sure that the bottom of the stacker is not dirty before loading the discs. • For Batch Mode and when Stacker 3 is set as the output stacker for External Output Mode, make sure that no discs are loaded in Stacker 3 and Stacker 4.
-
Page 85: Flow For Publishing Discs
Flow for publishing discs This section describes how to publish discs with EPSON Total Disc Maker. See “Screen configuration of EPSON Total Disc Maker” on page 43 in this guide for the screen configuration of EPSON Total Disc Maker. See “Printer Driver Basics” on page 66 in this guide for printing data created with other Notes software. - Page 86 Click [Change Setting]. Select [File system], and click [OK]. In this example, [Joliet (Windows compatible + ISO 9660)] is selected.
- Page 87 Publishing Discs Enter any name for [Volume Label]. In this example, we enter [20090101]. Click [Start Explorer]. Clicking [Auto Insert Data...] enables you to set for Merge data and burn. See EPSON Total Notes Disc Maker Help for details.
- Page 88 [File System Restrictions] dialog box appears. Furthermore, depending on the added data, the [File System Restrictions] dialog box may appear before you click [Format Check]. See EPSON Total Disc Maker Help for details on file system restrictions. Notes •...
-
Page 89: Creating Labels
Selecting a template EPSON Total Disc Maker is provided with various types of template. Using templates allows you to easily create labels with sophisticated designs. In the [Template] screen, you can select a template from [Data], [Photo], and [Music and Video] in accordance with the type of data to write. - Page 90 Select the template to use, and click [Apply]. In this example, we use the image in the top left of the screen. Check that the image in the top left of the thumbnail screen is selected, and click [Apply]. A print image of the template appears. Select a background (see page 91 in this guide), edit the items (see page 92 in this guide), and adjust the layout (see page 99 in this guide) as necessary.
- Page 91 Publishing Discs Selecting a background In the [Background] screen, you can select a background color and gradation. You can also insert an image you like as the background. Select [Type]. In this example, we select [Gradation]. Select the colors for [Start color] and [Finish color], and select the gradation type. In this example, we select black for [Start color], and gray for [Finish color].
-
Page 92: Editing Text
Editing items In the [Edit Item] screen, you can insert and edit items such as text, images, thumbnails, barcodes, folder trees, and shapes. In this example, we edit text, delete an item, and insert a thumbnail and barcode. Editing text Click [DISC TITLE] in the edit area. - Page 93 Publishing Discs Click [Sub Title] in the edit area, and set for the text. In this example, we set black for [Text Color]. Delete the “Sub Title” from [Text], and click [Auto Insert Data].
- Page 94 Set Auto Data and Properties, and click [OK]. For example, if today's date is December 2, 2008, and you want the date 01/01/2009 to appear, select “Date,” and set [Addition Unit] to “Day” and [Addition Time] to “30,” which will add 30 days to today's date. The date appears.
- Page 95 Publishing Discs Deleting items Right-click the item you want to delete in the edit area, and select [Delete Item]. In this example, we delete [Data Name]. The item is deleted. Inserting thumbnails Click a thumbnail in the edit area.
- Page 96 Click , specify the folder in which the image you want to insert as the thumbnail is stored or click [Auto Insert Data]. In this example, we click [Auto Insert Data]. Check that [Target Folder] is selected in [Auto Data], and click [OK].
- Page 97 Thumbnails of the image data registered in “Registering write data” on page 85 in this guide appear. Inserting barcodes • When printing barcodes and 2D codes, be sure to use Epson brand ink cartridges. • When printing barcodes and 2D codes on discs that are not EPSON specified CD/DVDs, check whether the printed barcodes or 2D codes can be read correctly by a scanner.
- Page 98 Click [Barcode], and click the location you want to place the barcode. Select [Type] and [Entry Method]. In this example, we select “QR Code” and enter text. The barcode appears.
-
Page 99: Adjusting Layout
Publishing Discs Adjusting layout In the [Layout] screen, you can make fine adjustments to the layout of the items you inserted. Select the item for which you want to adjust the layout. In this example, we select a barcode. Click [Align Vertical Center of Disc]. - Page 100 The barcode appears in the vertical center position of the disc. Once the settings for creating a label are complete, publish the disc.
-
Page 101: Publishing Discs
If this happens, write at a slower speed. In particular, we recommend writing to DVD±R DL at a slow speed. • If you print on the matte label type of Epson specified discs, set [Label Type] to [CD/ DVD Premium Label]. - Page 102 If [Compare] is set for [Write Verification], you can confirm whether data was written to Notes discs properly. Click [Publish]. Click [Yes] if you want to save the job data to enable you to use the published job to create the same disc again.
- Page 103 Publishing Discs EPSON Total Disc Monitor starts, and the disc publishing process begins. In Batch Mode, if Stacker 2 is taken out during the publishing process, when Stacker 2 is loaded again, it is always recognized as an input stacker even if it has been switched to an output stacker.
-
Page 104: Taking Out Discs
Taking out discs This section describes how to take out published discs. Open the disc cover (only when the output stacker is Stacker 2 or Stacker 3), and take out the stacker. • Do not open the disc cover while a job is being processed (while the BUSY LED flashes). This could adversely affect the writing or printing quality. - Page 105 • After printing on the label surface, allow EPSON specified CDs/DVDs to dry for at least one hour, and other types of discs for at least 24 hours. Do not insert discs into a drive or other device until they are completely dry.
-
Page 106: Performing Job Operations
Use the following procedure to check the history and details of jobs. Log in to EPSON Total Disc Net Administrator. See “Logging in to EPSON Total Disc Net Administrator” on page 54 in this guide for the login procedure. The [Job management] screen appears. -
Page 107: Checking The Job Processing Status
Use the following procedure to check the job processing status. Starts EPSON Total Disc Monitor. See “Starting EPSON Total Disc Monitor” on page 50 in this guide for the start procedure. Click the [Unfinished Job] tab or [Finished Job] tab. -
Page 108: Pausing Jobs
Only a job for which the status is Waiting, Publishing, Standby, or Recovering can be paused. Start EPSON Total Disc Monitor. See “Starting EPSON Total Disc Monitor” on page 50 in this guide for the start procedure. Select the job for which you want to pause processing, and click [Pause]. -
Page 109: Resuming Jobs
Only a job for which the status is Paused or Pausing can be resumed. Start EPSON Total Disc Monitor. See “Starting EPSON Total Disc Monitor” on page 50 in this guide for the start procedure. Select the job for which you want to resume processing, and click [Resume]. -
Page 110: Canceling Jobs
Only a job published by yourself for which the status is Waiting, Publishing, Paused, Pausing, Standby, or Recovering can be canceled. Start EPSON Total Disc Monitor. See “Starting EPSON Total Disc Monitor” on page 50 in this guide for the start procedure. Select the job you want to cancel, and click [Cancel]. -
Page 111: Priority Publishing
Only a job published by yourself can be canceled. Start EPSON Total Disc Monitor. See “Starting EPSON Total Disc Monitor” on page 50 in this guide for the start procedure. Select the job you want to give priority to, and click [Priority Publishing]. -
Page 112: Convenient Features
Creating label templates You can save a label that you have created as a template. Create a label in EPSON Total Disc Maker. See “Creating labels” on page 89 in this guide for the procedure to create labels. Click [Save As Template] on the [File] menu, and save the template file. -
Page 113: Creating Copies Directly From Discs
• Copying is not possible If the source disc is a packet-written CD. Insert the disc you want to create a copy of in the drive of the PC. Start EPSON Total Disc Maker. See “Starting EPSON Total Disc Maker” on page 42 in this guide for the start procedure. - Page 114 Select [Copy] for [Type], and click [Apply]. Select [Drive] for [Source], and select the name of the drive in which you inserted the disc. Next, follow the normal procedure for creating a disc, and create the label (see page 89 in this guide) and publish the disc (see page 101 in this guide).
-
Page 115: Creating Copies From Disc Image Files
Notes 85 in this guide), you can create a disc image file. Start EPSON Total Disc Maker. See “Starting EPSON Total Disc Maker” on page 42 in this guide for the start procedure. Select [Copy] for [Type], and click [Apply]. - Page 116 Select [Disc Image] for [Source], click [Browse], and specify the disc image file. Next, follow the normal procedure for creating a disc, and create the label (see page 89 in this guide) and publish the disc (see page 101 in this guide).
-
Page 117: Creating Same Discs As Published Discs
Log in to EPSON Total Disc Net Administrator. See “Logging in to EPSON Total Disc Net Administrator” on page 54 in this guide for the login procedure. Use the search options to find the job for which you want to create another disc. - Page 118 When a job can be created, is displayed. The same disc can only be created when the status of the job is Completed. Click [Details].
- Page 119 Publishing Discs Click [Republish]. Change [Number of discs to be published] as necessary, and click [Publish].
- Page 120 Click [OK]. The disc publishing process begins. If there are jobs waiting to be processed, the disc publishing process begins in the order with which jobs were published. When the publishing process finishes, take out the published discs. See “Taking out discs” on page 104 in this guide for details.
-
Page 121: Adjusting Print Colors
Publishing Discs Adjusting print colors This section describes how to adjust the colors of print data and then print a label. • You can just make color adjustments at the time of printing without making color adjustments to the actual data. Notes •... - Page 122 Vivid strengthen the intensity of colors. EPSON Standard Performs color processing to obtain the standard colors of Epson. Performs color processing with Adobe RGB for wider color space. Adobe RGB Select this options when, for example, printing print data that includes Adobe RGB color space information.
-
Page 123: Maintenance
Use the following procedure to check the usage status of the internal drives and the number of published discs. Log in to EPSON Total Disc Net Administrator. See “Logging in to EPSON Total Disc Net Administrator” on page 54 in this guide for the login procedure. Click the [Maintenance] tab. -
Page 124: Downloading Operation Log
Use the following procedure to download the operation log file. Log in to EPSON Total Disc Net Administrator. See “Logging in to EPSON Total Disc Net Administrator” on page 54 in this guide for the login procedure. Click the [Data] tab of the [Maintenance] screen. -
Page 125: Changing The Ink Cartridge
You can check the ink levels in EPSON Total Disc Monitor. See the Help file for EPSON Total Disc Monitor for details. • When the ink cartridges are installed for the first time (during setup), ink is consumed for filling, and so the time to replace the cartridges is earlier than normal. -
Page 126: Replacing The Ink Cartridges
• Epson cannot guarantee the quality and reliability of non-Epson brand products. Repairs for any damage or breakdown of this product due to the use of non-Epson brand products will not be free of charge even if the warranty period is still valid. - Page 127 Maintenance Take the ink cartridge out of its package. • For optimum printing quality, only open the clear plastic package immediately before installing. After opening the cartridge, try to use it up within six months. If you use an ink cartridge that has been left open for a long time, the print quality may decline.
- Page 128 Close the ink cartridge cover. • Do not turn off the power or open the ink cartridge cover while the power LED is flashing. These actions make the ink be charged again, which results in a noticeable consumption of ink. In addition, there is a risk that you will not be able to print properly. •...
-
Page 129: Checking The Print Head Nozzles
Maintenance Checking the print head nozzles If the print head nozzles are clogged, the printing may be faint even though there is ink, or unusual colors may be printed. The nozzle check prints a pattern for checking the status of the nozzles, and you can check if the nozzles are clogged by looking at this pattern. - Page 130 Running it using the control panel on the product Turn on the power of this product. Press the [MENU] button. The top menu appears. Use the ▲/▼ buttons to display the maintenance screen, and then press the button. Top menu Maintenance Use the ▲/▼...
-
Page 131: Checking The Nozzle Check Results
Maintenance Checking the nozzle check results Look at the pattern printed during the nozzle check, and see whether or not print head cleaning is necessary. If it is normal, all of the lines are printed as shown in the illustration on the left below. If there are lines that were not printed, as shown in the illustration on the right below, the nozzles are clogged. -
Page 132: Cleaning The Print Head
Cleaning the print head If the print head nozzles are clogged, the printing may be faint even though there is ink, or unusual colors may be printed. If this happens, run print head cleaning. (See “How to clean the print head” on page 133 in this guide.) Print head cleaning consumes ink. -
Page 133: How To Clean The Print Head
Maintenance How to clean the print head Head cleaning is a function for cleaning the surface of the print head to maintain the print quality. Run head cleaning if the printing becomes faint or gaps appear in the printing. There are the following two ways to run head cleaning. •... - Page 134 Running it using the control panel on the product Turn the product on. Press the [MENU] button. The top menu appears. Use the ▲/▼ buttons to display the maintenance screen, and then press the button. Top menu Maintenance Use the ▲/▼ buttons to display [Head Cleaning], and then press the button.
-
Page 135: Print Head Alignment
Maintenance Print head alignment If the print position when the print head moves from right to left is not aligned with the print position when the print head moves from left to right, gaps may appear in vertical lines, and the print results may become blurry. If this happens, run print head alignment. - Page 136 Click the [Print] button. The disc on which the print head alignment pattern was printed is output to Stacker 3 or Stacker 4. Check the printed print head alignment pattern. Print head alignment pattern Select the number of the pattern with the fewest vertical lines. In the illustration above, the pattern with the fewest vertical lines is “5”, so select “5.”...
-
Page 137: Correcting The Printing Position
Maintenance Correcting the printing position Adjust the printing position if it has shifted towards the top, bottom, left, or right. Turn the product on. Set one unprinted disc into Stacker 1. Display the printer driver setup screen. See “Displaying the printer driver screen” on page 60 in this guide for how to display the printer driver screen. Click [Correcting the Printing Position] in the [Utility] screen. - Page 138 Click the [Print] button. The disc on which there are five lines printed on the top, bottom, left and right respectively as well as one blue upward-pointing arrow is output to Stacker 3 or Stacker 4. Click [Finish] if the lines on the top, bottom, left and right are evenly printed on the label surface.
- Page 139 Maintenance Set one unprinted disc into Stacker 1, and click [Reconfirm]. After this, repeat Steps 6 through 8 until the lines are printed evenly on the disc on the top, bottom, left, and right. Click [Finish]. • If you reconfirm and enter a correction value after the first adjustment, the printing position is corrected using a correction value combined with the adjusted value from the first time.
-
Page 140: Cleaning Your Product
Cleaning your product To keep your product operating at its best, clean it by using the following procedure. Cleaning the exterior Turn the product off. When the power LED is off, unplug the power plug from the outlet. Use a soft cloth to wipe off the dust and dirt. When the exterior is very dirty, soak a soft cloth in water with a small amount of mild detergent, wring it out, and then wipe off the dirt. -
Page 141: Cleaning The Air Vents
Maintenance Cleaning the air vents Press the power button to turn off the power. When the power LED is off, unplug the power plug from the outlet. Open the filter cover. Take the filter off the filter cover. Use a vacuum cleaner to clean the dust off the filter. Put the filter back on the filter cover. - Page 142 Close the filter cover. Plug the power plug into the outlet, and turn the power on. Clean the air vents regularly (once every six months).
-
Page 143: Replacing The Ink Pad
You can replace the ink pad in one of the following two ways. • In EPSON Total Disc Monitor, a message says “It is almost time to replace the ink pad. Early replacement is recommended. For information on replacement, please contact customer support.“ The message is displayed once per day when EPSON Total Disc Monitor starts up. -
Page 144: Precautions For Transporting Your Product
When transporting your product, be sure to use the original box and protective materials to protect it from an impact or the like. See the PP-100N Setup Guide for details on the handling of protective materials. • Make sure that no discs remain inside the product. - Page 145 Maintenance Press the power button to turn off the power. When the power LED goes out, disconnect the power cord and Ethernet cable. Attach protective materials to the arm, and secure them with tape. Attach Stacker 1, Stacker 2, and Stacker 3, and secure them with tape. Open the ink cartridge cover, and secure the ink cartridges with tape.
-
Page 146: Troubleshooting
Troubleshooting Refer to this information together with the Help file for EPSON Total Disc Monitor and the Notes information available on the Epson website. Error messages and remedies When a problem occurs with this product, the ERROR LED turns on or flashes, and an error message appears on the LCD. - Page 147 Troubleshooting Notification Error Message Remedy Sound Disc feed error The disc was not transferred properly to the drive. DRV1/2 Perform the procedure below. 1. Remove the discs from the drive tray. 2. Fully separate and reload the discs in the input stacker. 3.
- Page 148 Turn off the power, and then turn it on again. If the drive trays still does not come out, see “Drive tray does not come out” in PP-100N Administrator’s Guide. If the same error message appears again, repair is required. Please contact Epson Information Center.
- Page 149 Print tray -When the printer tray does not come out- open/close error See “Printer Tray Does Not Come Out” in the PP-100N Administrator’s Guide. -When the printer tray does not close- Remove any remaining discs, turn off the power, and then turn on the power again.
- Page 150 Notification Error Message Remedy Sound Printer maint. Repair is required. error Please contact Customer Support. Replace ink The ink in the cartridge is out. (C,LC,LM,M,Y,K) Replace the cartridge of the displayed color. (See “Changing the ink cartridge” on page 125 in this guide.) Replace inkpad It is time to replace the ink pad.
-
Page 151: Problems And Their Remedies
Press the power button to turn off the power, and then open the disc cover and check that there are no foreign objects inside. “EPSON PP- 100N” remains Repair is required. displayed and the product Please contact Epson Information Center. does not work when the power is turned on. - Page 152 Symptom/Problem Status Check/Remedy Procedure ERROR LED flashes/turns on. An error has occurred. See “Error messages and remedies” on page 146 in this guide.
-
Page 153: Disc Writing Problems
Also, do not open the cover during publishing. This could adversely affect the printing and writing quality of the disc. Before opening the cover, pause the job in EPSON Total Disc Maker. See “Pausing jobs” on page 108 in this guide for the procedure for pausing jobs. -
Page 154: Label Printing Problems
Are you using a recommended ink cartridge (Epson brand product)? • Printing is grainy (jagged) This product performs color adjustment based on use of Epson brand ink cartridges. Use of non-Epson brand products can result in poor printing quality. Use of Epson brand ink cartridges is recommended. - Page 155 When the disc recording surface is stained by ink, the printer tray may be dirty. Clean the printer tray. See “Ink Is Smeared on the Disc Recording Surface” in the PP-100N Administrator’s Guide for the printer tray cleaning procedure. • After printing, the label surface...
-
Page 156: Password Problems
When a write error occurs based on a preset retry write count, use of the drive is automatically stopped, and [Drive operation paused DRV 1/2] is displayed on the LCD. Setting Output Devices in the PP-100N Administrator’s Guide for the drive use restarting procedure. - Page 157 Troubleshooting Symptom/Problem Status Check/Remedy Procedure Head cleaning does not work. Has an error occurred in the product? If an error has occurred, clear the error. Is there enough ink? Head cleaning cannot be performed unless there is enough ink. Replace with a new ink cartridge. See “Changing the ink cartridge”...
-
Page 158: Checking With Epson Total Disc Monitor
Checking with EPSON Total Disc Monitor EPSON Total Disc Monitor is a utility that enables checking of the status of this product (PP-100N) and the remedy procedures for errors. See “Starting EPSON Total Disc Monitor” on page 50 in this guide for EPSON Total Disc Monitor start procedure. - Page 159 Troubleshooting Printer Status This displays the printer status. When is displayed on the printer icon, check the product printer by referring to the displayed message. Stacker Status This displays the stacker status. When is displayed, either the number of discs in the input stacker is low, or the discs in the output stacker are nearly full.
-
Page 160: When Discs Cannot Be Published
When discs cannot be published If the disc is not published by clicking [Publish] in the Publish view of EPSON Total Disc Maker, or if the product does not work, check the points below. Check 1: Check of EPSON Total Disc Monitor... - Page 161 Is the Print Manager status set to Pause? If [Paused] is displayed for the product’s icon (EPSON PP-100NPRN), right-click the icon and click [Resume Printing]. If performing all of the above checks still does not resolve the problem, the software may not be installed correctly.
- Page 162 Please contact Customer Support if this still does not resolve the problem. When making inquiries, please provide information about your operating environment (including the computer model, names and versions of software applications, and other peripheral models), name of this product, and its serial number.
-
Page 163: Appendix
Appendix Appendix Product specifications Basic specifications External dimensions and weight Item Description External dimensions 377 mm (W) x 514 mm (D) x 348 mm (H) Approx. 25.0 kg (including the stackers and ink Weight cartridges, but not including the power cord and discs) Since this product uses galvanized sheet metal, rusting may occur at the edges, but this will not harm the functionality of the product. -
Page 164: Overall Specifications
Overall specifications Item Description 30 discs per hour Conditions: When using Epson specified CD-Rs, drive speed of 40x, writing data of 600 MB, and speed/bidirectional printing Write and print 17 discs per hour Conditions: When using Epson specified DVD-Rs, processing drive speed of 12x, writing data of 3.8 GB, and... -
Page 165: Ink Cartridge
Appendix Ink cartridge Item Description Form Separate ink cartridge for each color Color Black, cyan, magenta, yellow, light cyan, light magenta Recommended expiration date Use within the expiration date written on each individual packaging box. Use within 6 months of opening the package. -
Page 166: Electrical Specifications
EN61000-3-3 EN55024 Lifetime Epson estimates lifetime for components of this product to be as follows: Expected Lifetime: Ink pad life: About 30,000 discs printed The ink pad is estimated to need replacing after about 30,000 discs. Based on printing 2,000 discs per month, bi-directional. -
Page 167: Environmental Conditions
Appendix Environmental conditions Item Description During 10°C~35°C operation Within 1 month at 40°C During storage -20°C~40°C Within 120 hours at 60°C During -20°C~60°C transportation During 20%~80%RH No condensation operation During storage 5%~85%RH No condensation During 5%~85%RH No condensation transportation Temperature/ humidity Based on the following conditions 27°C... -
Page 168: Ink And Disc
To purchase a Discproducer Series exclusive ink cartridge, check with the dealer where you purchased your product or access either of the following urls: http://www.epson-europe.com (Europe) http://www.discproducer.epson.com (United States and Canada) Discs Epson offers the specified CD-R and DVD-R discs for all your writing and printing needs.