Epson Discproducer PP-100N Administrator's Manual
Network disc publisher
Hide thumbs
Also See for Discproducer PP-100N:
- User manual (174 pages) ,
- Brochure & specs (2 pages) ,
- Setup manual (2 pages)
Table of Contents
Advertisement
Advertisement
Table of Contents

Related Manuals for Epson Discproducer PP-100N


Summary of Contents for Epson Discproducer PP-100N
- Page 1 Administrator’s Guide M00011302...
-
Page 2: Trademarks
Neither Seiko Epson Corporation nor its affiliates shall be liable to the purchaser of this product or third parties for damages, losses, costs, or expenses incurred by purchaser or third parties as a result of: accident, misuse, or abuse of this product or unauthorized modifications, repairs, or alterations to this product, or (excluding the U. -
Page 3: Organization Of This Manual
Briefly describes how to set up this product with illustrations. See the PP- 100N Administrator’s Guide for more information. PP-100N User’s Guide (PDF) Presents detailed information users need to know such as how to install the software, the product functions and operations, as well as maintenance information. -
Page 4: Table Of Contents
Table of Contents ■ Setting the language........43 Trademarks..............2 Marks used in this guide...........2 Screens appearing in this guide .......2 Organization of this manual........3 Administration and ■ Table of Contents ..........4 Management ......44 ■ Managing jobs..........44 Before Using This Product ..6 Checking job information........44 Checking the job processing status ......45 ■... - Page 5 ■ Checking with EPSON Total Disc Monitor ............. 86 ■ When discs cannot be published ....88 ■ Disc does not come out ........91 Drive tray does not come out ......... 91 Printer tray does not come out....... 92 ■...
-
Page 6: Before Using This Product
Before Using This Product For safe use • To use this product safely, be sure to read this guide as well as the other instruction guides included with this product before using it. • Keep this guide at hand so that you can resolve any questions you have about this product. To prevent harm to customers and other people or damage to property, this guide contains the following symbols and warning displays for operations and use that may be dangerous. - Page 7 Before Using This Product • Do not use flammable gas sprays inside or around this product. There is a risk that gas will build up and a spark may cause a fire. • Do not install in a place where volatile substances, such as alcohol or paint WARNING thinner, are present or in a place where there is fire.
-
Page 8: Cautions For The Power Source
Cautions for the power source Do not connect or disconnect the power plug with wet hands. This may result in electric shock. WARNING Use only the type of power source indicated on the product’s label. Also, do not plug the power cord into an outlet with many other cords connected to it. -
Page 9: Cautions For Using
WARNING Immediately turn off the power, disconnect the power plug from the outlet, and contact your dealer or the Epson Repair Center about repairs. Servicing the product yourself is dangerous, so never attempt it. Do not insert or drop metal or flammable objects into the air vents or other openings. - Page 10 When storing or transporting this product, do not tilt it, stand it on end, or turn it upside down. When transporting the product, be sure to package it in the original box to CAUTION protect it from any impact. For safety reasons, if you move this product, first check that the power is off, the power plug is disconnected from of the outlet, and all of the wires are disconnected.
-
Page 11: Warning
The connection of a non-shielded interface cable to this product will invalidate the EMC standards of this device. You are cautioned that changes or modifications not expressly approved by Seiko Epson Corporation could void your authority to operate the equipment. -
Page 12: Cautions For Cd/Dvd Discs
• During a malfunction or repair • When there is damage due to a natural disaster Even if the product is still under warranty, Epson accepts no responsibility for data that is lost or damaged due to causes not limited to those listed above. -
Page 13: Preparation
Preparation Preparation Installation Install this product in a suitable location with adequate space. • Make sure that the product is lifted by two people. CAUTION • The weight of this product is approximately 25.0 kg. When this product is lifted, it should be lifted on both sides by two people holding the recesses on the sides as shown in the illustration on the left. -
Page 14: Installation Location Requirements
Installation location requirements Install this product in the following type of location. • Flat, stable location that can fully support the product weight (approx. 25.0 kg) • Location that is wide enough to fully hold the product base • Location where the air vents on the product are not blocked •... -
Page 15: Setup Procedure
This section describes the setup procedure for this product (PP-100N). Before starting setup, check that all protective tape and protective materials attached to this product have been removed. See PP-100N Setup Guide for the procedure to remove the protective materials. -
Page 16: Connecting The Ethernet Cable
Connecting the Ethernet cable Connect the Ethernet cable to the Ethernet interface connector on the rear side. Connecting the power cord Connect the power cord connector to the AC inlet on the product rear side. (See (1) in the figure below.) Insert the power plug into the outlet. -
Page 17: Installing The Ink Cartridges
Installing the ink cartridges This section describes the procedure for installing the ink cartridges for the first time. See “Changing the ink cartridge” in the PP-100N User’s Guide for the procedure to change the ink cartridge in daily operation. • Use of Epson brand ink cartridges is recommended. Use of non-Epson brand ink cartridges can result in problems that will not be covered by the warranty. - Page 18 Remove the ink cartridge from its package. • The first time you install ink cartridges, use the ink cartridges supplied with the product or use ink cartridges in which there is a sufficient amount of ink remaining. • For optimum printing quality, do not open the transparent plastic package until immediately before installation.
- Page 19 • If printing cannot be performed properly even though the ink cartridges are installed, perform head cleaning. See “Head cleaning” in the PP-100N User’s Guide for details on the head cleaning procedure. • When the power is turned off using the power button on the main unit, the print head is automatically capped to prevent drying of the ink.
-
Page 20: Setting The Security Lock Switch
Setting the security lock switch Set the security lock switch for automatically locking the disc cover. In the initial state, the security lock switch is set to off. Open the disc cover. Set the security lock switch to on or off. When set to on: The disc cover is locked automatically each time it is closed. -
Page 21: Setting The Publish Mode
Preparation Setting the Publish Mode This product has the following Publish Modes: Standard Mode, External Output Mode, and Batch Mode. Select the mode that is used based on the disc publishing quantity and application. Mount the stackers based on the selected mode, and set the Publish Mode. -
Page 22: External Output Mode
External Output Mode You can select Stacker 3 or Stacker 4 as the output stacker. If you select Stacker 4 as the output stacker, you can easily take out published discs without even having to pause a job during publishing. The External Output Mode allows you to use the product in the following ways according to the application. -
Page 23: Batch Mode
Preparation Batch Mode This mode uses Stacker 1 and Stacker 2 as the input stackers for discs, and Stacker 2 and Stacker 3 as the output stackers. Loading 50 discs in each of Stacker 1 and Stacker 2 allows for the continuous publishing of 100 copies of the same disc without having to replenish the discs or take out published discs. -
Page 24: Installing The Stackers
Installing the stackers After the Publish Mode is determined, use the procedure below to install the stackers for the selected mode. Insert Stacker 1 by aligning with the recesses. Insert Stacker 2 by aligning with the recesses. - Page 25 Preparation If using Batch Mode, or when Stacker 3 is set as the output stacker in External Output Mode, grasp the handle of Stacker 3, and insert by aligning with the recesses. • When using Stacker 3, set the lock lever to the [LOCK] position, and do not pull out Stacker 4.
-
Page 26: Setting Procedure
Setting procedure After installing the stackers, use the procedure below to set the Publish Mode. In the mode selection screen displayed on the LCD, use ▲/▼ to display the Publish Mode to use, and press the button. Mode selection Standard When the confirmation message appears, press the button. -
Page 27: Network Settings
Preparation Network settings The network can be set in the following two ways. • Performing an operation from a PC • Performing an operation with the product’s control panel When performing the setup for the first time, carry out the network setup using the control panel. The network settings cannot be made using a computer until an administrator is Notes registered. - Page 28 Use the ▲/▼ buttons to display the change settings (“Change settings IP address”) screen for the IP address, and press the button. Change settings IP address Use the ▲/▼ buttons to select the setting method, and press the button. When “Manual” is selected: The settings are made manually. Proceed to step 6. When “Auto”...
- Page 29 Preparation Use the ▲/▼/ buttons to enter the default gateway, and press the button. Default gateway XXX. XXX. XXX. XXX When the change setting confirmation message (“Change network settings?”) appears, press the button. Change network settings? • If necessary, set the Jumbo Frame. (“Top menu” - “Network” - “Change Settings” - “JUMBO FRAME”) In the initial state, Jumbo Frame is set to off.
- Page 30 (“Top menu” – “Network” – “Change settings” – “Link speed/JUMBO FRAME”). Log in to EPSON Total Disc Net Administrator. See “Logging in to EPSON Total Disc Net Administrator” in the PP-100N User’s Guide for the login procedure. Click the [Network] tab in the [System settings] screen.
- Page 31 Preparation Click [OK].
-
Page 32: Registering An Administrator
• Manage the password so that it cannot be used by anyone other than you. • The user name and password that were set are used to log in to EPSON Total Disc Net Administrator. • Enter a full name and email address if necessary. An email address needs to be entered if notification email transmission is set. - Page 33 Preparation Click [OK]. After registration of the administrator is completed, the administrator is automatically logged in to EPSON Total Disc Net Administrator, and the top screen ([Job management] screen) is displayed. Clicking the [User management] tab displays the user list where you can check that the administrator is registered correctly.
-
Page 34: System Settings
Log in to EPSON Total Disc Net Administrator. See “Logging in to EPSON Total Disc Net Administrator” in the PP-100N User’s Guide for the login procedure. Click the [System settings] tab. Set the information for each item, and click [Save]. -
Page 35: Drive Settings
Preparation Device name: The name of the connected product can be set. Publish Mode • Mode: This displays the Publish Mode that was set. The Publish Mode can also be changed. • Stacker 1: Select the type of disc that is used. •... - Page 36 The error mark will not be printed in the following cases. • The job was cancelled in the EPSON Total Disc Monitor. Notes • Not enough ink was left to print the error mark •...
-
Page 37: Notification Email Transmission Settings
Preparation Notification email transmission settings Settings can be made for sending emails, which pertain to disc publishing, notify when the ink must be replaced, or notify about problems that have occurred, to the administrator. • When a notification email is received, measures must be taken by following the instructions contained in the email. - Page 38 <Example of a notification email>...
- Page 39 Use the procedure below to make the notification email settings. Log in to EPSON Total Disc Net Administrator. See “Logging in to EPSON Total Disc Net Administrator” in the PP-100N User’s Guide for the login procedure. Click the [Email] tab in the [System settings] screen.
- Page 40 Email settings • Language for outgoing mail: Select the language to use in notification email from the languages below. Japanese, German, English, Spanish, French, Italian, Dutch, Portuguese • SMTP server: Enter the IP address or host name and port number of the SMTP server that is used to send notification email.
-
Page 41: Setting The Date And Time
This sets the product’s internal clock. Log in to EPSON Total Disc Net Administrator. See “Logging in to EPSON Total Disc Net Administrator” in the PP-100N User’s Guide for the login procedure. Click the [Date/Time] tab in the [System settings] screen. - Page 42 Select[Time zone], and if daylight saving time is used, select the check box for [Daylight Saving Time], and click [Save]. Click [OK].
-
Page 43: Setting The Language
Preparation Setting the language After you set the Publish Mode (see page 21 in this guide), you can change the language setting for messages displayed on the LCD of this product from English to Spanish, French, Italian, Dutch, Portuguese, Japanese, or German. -
Page 44: Administration And Management
You can check the history and detailed information of jobs on the [Job management] screen after logging in to EPSON Total Disc Net Administrator. See “Logging in to EPSON Total Disc Net Administrator” in the PP-100N User’s Guide for the login procedure. -
Page 45: Checking The Job Processing Status
Use the following procedure to check the job processing status. Start EPSON Total Disc Monitor. See “Starting EPSON Total Disc Monitor” in the PP-100N User’s Guide for the start procedure. Click the [Unfinished Job] tab or [Finished Job] tab. The [Unfinished Job] screen or [Finished Job] screen appears. -
Page 46: Pausing Jobs
Only a job for which the status is Waiting, Publishing, Standby, or Recovering can be paused. Start EPSON Total Disc Monitor. See “Starting EPSON Total Disc Monitor” in the PP-100N User’s Guide for the start procedure. Select the job for which you want to pause processing, and click [Pause]. -
Page 47: Resuming Jobs
Only a job for which the status is Paused or Pausing can be resumed. Start EPSON Total Disc Monitor. See “Starting EPSON Total Disc Monitor” in the PP-100N User’s Guide for the start procedure. Select the job for which you want to resume processing, and click [Resume]. -
Page 48: Canceling Jobs
Only a job for which the status Waiting, Publishing, Paused, Pausing, Standby, or Recovering can be canceled. Start EPSON Total Disc Monitor. See “Starting EPSON Total Disc Monitor” in the PP-100N User’s Guide for the start procedure. Select the job you want to cancel, and click [Cancel]. -
Page 49: Priority Publishing
If you need to process a job before the others when more than one job is being published, use the following procedure. Start EPSON Total Disc Monitor. See “Starting EPSON Total Disc Monitor” in the PP-100N User’s Guide for the start procedure. Select the job you want to give priority to, and click [Priority Publishing]. -
Page 50: Deleting Jobs
Log in to EPSON Total Disc Net Administrator. See “Logging in to EPSON Total Disc Net Administrator” in the PP-100N User’s Guide for the login procedure. Click [Delete job]. Use the search options to find the job you want to delete. - Page 51 Administration and Management Select the check box for the job you want to delete, and click [Delete spool data] or [Delete spool data and job history]. Click [OK] in the deletion confirmation message that appears.
-
Page 52: Managing Users
Use the following procedure to check registered user information. Log in to EPSON Total Disc Net Administrator. See “Logging in to EPSON Total Disc Net Administrator” in the PP-100N User’s Guide for the login procedure. Click the [User management] tab. -
Page 53: Registering Users
56 in this guide for the procedure to perform a batch registration of multiple users. Log in to EPSON Total Disc Net Administrator. See “Logging in to EPSON Total Disc Net Administrator” in the PP-100N User’s Guide for the login procedure. Click the [User management] tab. - Page 54 Enter the user name and password, and then enter the password again for confirmation, and click [Save]. • To add an administrator, select the [Administrator] check box. • Enter 5 to 16 alphanumeric characters for the user name. • Enter 5 to 16 alphanumeric characters or symbols (“.”, “ -”, “_”) for the password. •...
- Page 55 Administration and Management Click [OK] in the confirmation message that appears. The user list of the [User management] screen appears. Check that the user is registered correctly. Inform the user of the set user name and password. The user changes the password after logging in.
-
Page 56: Batch Registering Users
See “Notification email transmission settings” on page Notes 37 in this guide for details on the notification email transmission settings. Log in to EPSON Total Disc Net Administrator. See “Logging in to EPSON Total Disc Net Administrator” in the PP-100N User’s Guide for the login procedure. - Page 57 Administration and Management Click [User management] tab. Click [User import]. Click [Browse], specify the CSV file, and click [Import]. Click [OK]. When the registration is finished, the user list of the [User management] screen appears. If the registration of even one user fails, the line number of each user that could not be registered and the corresponding cause is displayed.
-
Page 58: Changing User Information
Use the following procedure to change registered user information. Log in to EPSON Total Disc Net Administrator. See “Logging in to EPSON Total Disc Net Administrator” in the PP-100N User’s Guide for the login procedure. Click the [User management] tab. - Page 59 Administration and Management Change the full name, mail address, and authority of the user as necessary, and click [Save]. Click [OK] in the update confirmation message that appears.
-
Page 60: Deleting User Information
Use the following procedure to delete registered user information. Log in to EPSON Total Disc Net Administrator. See “Logging in to EPSON Total Disc Net Administrator” in the PP-100N User’s Guide for the login procedure. Click the [User management] tab. -
Page 61: Changing Password
Manage the password so that it cannot be used by anyone other than the user. Log in toEPSON Total Disc Net Administrator. See “Logging in to EPSON Total Disc Net Administrator” in the PP-100N User’s Guide for the login procedure. Click the [User management] tab. - Page 62 Click [Change password]. Enter the new password, and click [Save]. • Enter 5 to 16 alphanumeric characters or symbols (“.”, “ -”, “_”) for the password. • The password is case-sensitive. • Do not set a date of birth, employee number, or anything else that is easy to guess for the password.
-
Page 63: Changing The Publish Mode
See “Checking the job processing status” on page 45 in this guide for details on the check procedure. Log in to EPSON Total Disc Net Administrator. See “Logging in to EPSON Total Disc Net Administrator” in the PP-100N User’s Guide for the login procedure. Click the [System settings] tab. - Page 64 Click [OK]. Insert a stacker in accordance with the Publish Mode. See “Installing the stackers” on page 24 in this guide. The operation of this product differs depending on the Publish Mode setting. To prevent the occurrence of an unexpected warning or error, check that the correct Publish Mode has been set after you change the Publish Mode.
-
Page 65: Maintaining Your Product
[Save As] of the [File] menu for files of EPSON Total Disc Maker. Log in to EPSON Total Disc Net Administrator. See “Logging in to EPSON Total Disc Net Administrator” in the PP-100N User’s Guide for the login procedure. Click the [Data] tab on the [Maintenance] screen. - Page 66 Click [Backup]. Click [OK]. Specify the save location for the backup file, and then save the backup file.
-
Page 67: Restoring Data
• A backup file of a different Publish Mode cannot be restored. Log in to EPSON Total Disc Net Administrator. See “Logging In to EPSON Total Disc Net Administrator” in the PP-100N User’s Guide for the login procedure. Click the [Data] tab on the [Maintenance] screen. -
Page 68: Restoring To Initial State
See “Checking the job processing status” on page 45 in this guide for details on the check procedure. Log in to EPSON Total Disc Net Administrator. See “Logging in to EPSON Total Disc Net Administrator” in the PP-100N User’s Guide for the login procedure. Click the [Data] tab on the [Maintenance] screen. - Page 69 Maintaining Your Product Click [Factory reset]. Click [OK]. The BUSY LED flashes, and initialization begins. Initialization takes two to three minutes. Never turn the power off during initialization. When initialization is finished, the mode selection screen appears on the LCD.
- Page 70 Performing an operation with the product’s control panel Check that all jobs are finished. See “Checking the job processing status” on page 45 in this guide for details on the check procedure. Press the MENU button. The top menu appears. Use the ▲/▼...
-
Page 71: Checking Maintenance Information
Use the following procedure to check the usage status of the internal drives and the number of published discs. Log in to EPSON Total Disc Net Administrator. See “Logging in to EPSON Total Disc Net Administrator” in the PP-100N User’s Guide for the login procedure. Click the [Maintenance] tab. -
Page 72: Downloading Operation Log
Use the following procedure to download the operation log file. Log in to EPSON Total Disc Net Administrator. See “Logging in to EPSON Total Disc Net Administrator” in the PP-100N User’s Guide for the login procedure. Click the [Data] tab on the [Maintenance] screen. -
Page 73: Troubleshooting
Troubleshooting Troubleshooting Refer to this information together with the Help file for EPSON Total Disc Monitor. Notes Error messages and remedies When a problem occurs with this product, the ERROR LED turns on or flashes, and an error message appears on the LCD. - Page 74 2. Remove the disc that cannot be written or the disc that is already written from the input stacker (Stacker 1 or Stacker 3. Load a disc that can be written. (See “Writable Disc Types” in the PP-100N User’s Guide.) 4. Close the disc cover. Processing of the job is automatically resumed.
- Page 75 An invalid ink cartridge is installed. (C,LC,LM,M,Y,K) Replace the cartridge of the displayed color. (See “Changing the Ink Cartridge” in the PP-100N User’s Guide.) Internal drive Turn off the power, and then turn it on again. If the same error error (DRV 1/2) message still appears, repair is required.
- Page 76 The ink cartridge of the displayed color is not installed, or is (C,LC,LM,M,Y,K) not installed correctly. Correctly install the cartridge of the displayed color. (See “Changing the Ink Cartridge” in the PP-100N User’s Guide.) No stacker Load the displayed stacker, and close the disc cover. (See ST1, ST2, ST3 “Installing the stackers”...
- Page 77 The ink in the cartridge is out. (C,LC,LM,M,Y,K) Replace the cartridge of the displayed color. (See “Changing the Ink Cartridge” in the PP-100N User’s Guide. Replace inkpad It is time to replace the ink pad. Please contact Customer Support. The ink pad cannot be replaced by the customer.
- Page 78 Notification Error Message Remedy Sound Wait a moment Press the button or CANCEL button. Do not unlock the and try again disc cover repeatedly within a short time. Wait a moment before unlocking. Write error Processing of the job is paused. See “Disc writing problems” on page 81 in this guide, and after removing the cause of the error, restart the job.
-
Page 79: Problems And Their Remedies
Press the power button to turn off the power, and then open the disc cover and check that there are no foreign objects inside. “EPSON PP-100N” remains Repair is required. displayed and the product Please contact Customer Support. - Page 80 Symptom/Problem Status Check/Remedy Procedure ERROR LED flashes/turns on. An error has occurred. See “Error messages and remedies” on page 73 in this guide.
-
Page 81: Disc Writing Problems
Replace with another disc and try again. Is there dust adhering to the filter of the product rear fan? Clean the filter. See “Cleaning the Air Vents” in the PP-100N User’s Guide for the filter cleaning procedure. Unable to write to disc/... -
Page 82: Label Printing Problems
Use the print head alignment function to check and adjust for differences in the gap. See “Print Head Alignment” in the PP-100N User’s Guide for details. Are you using discs with different thicknesses? The thickness varies depending on the disc product. When discs with different thicknesses are used, the gaps of the print head can be shifted. - Page 83 The ink drying time is the time after label printing is completed until the disc ink is dried in the printer tray. Set a longer ink drying time. See “Printer Driver Settings” in the PP-100N User’s Guide for details. Are you comparing the display on the computer to the printing...
-
Page 84: Password Problems
Available HDD space needs to be enough to enable the software to run normally. See "Before installation" in the PP-100N User's Guide for software operating requirements. Are you logged on to Windows with a “computer administrator” account (user with administrator privileges)? When installing the software, log on as a user with administrator privileges (belonging to the administrator group). - Page 85 Is there enough ink? Head cleaning cannot be performed unless there is enough ink. Replace with a new ink cartridge. See “Changing the ink cartridge” in the PP-100N User’s Guide for the ink cartridge changing procedure. The printing speed slowed...
-
Page 86: Checking With Epson Total Disc Monitor
Checking with EPSON Total Disc Monitor EPSON Total Disc Monitor is a utility that enables checking of the status of this product (PP-100N) and the remedy procedures for errors. See “Starting EPSON Total Disc Monitor” in the PP-100N User’s Guide for details on the EPSON Total Disc Monitor startup procedure. - Page 87 Troubleshooting Printer Status This displays the printer status. When is displayed on the printer icon, check the product printer by referring to the displayed message. Stacker Status This displays the stacker status. When is displayed, either the number of discs in the input stacker is low, or the output stacker is nearly full of discs.
-
Page 88: When Discs Cannot Be Published
When discs cannot be published If the disc is not published by clicking [Publish] in the Publish view of EPSON Total Disc Maker, or if the product does not work, check the points below. Check 1: Check of EPSON Total Disc Monitor... - Page 89 Check that this product icon (EPSON PP-100NPRN) is found in [Printers and Faxes] (or [Printers]). If the icon is not found, the printer driver is not installed. See “Installation” in the PP-100N User’s Guide to install the printer driver. Is the Print Manager status set to Pause? If [Paused] is displayed for the product’s icon (EPSON PP-100NPRN), right-click the icon and click [Resume...
- Page 90 Please contact Customer Support if this still does not resolve the problem. When making inquiries, please provide information about your operating environment (including the computer model, names and versions of software applications, and other peripheral models), name of this product, and its serial number.
-
Page 91: Disc Does Not Come Out
Troubleshooting Disc does not come out Perform the procedure below if the disc cannot be ejected because the drive tray or printer tray does not come out. Drive tray does not come out Turn the power of the product off and then on again. If the drive tray still does not come out, perform the procedure below. -
Page 92: Printer Tray Does Not Come Out
Printer tray does not come out Turn the power of the product off and then on again. If the printer tray still does not come out, perform the procedure below. Press the power button to turn off the power. After the power LED goes off, disconnect the power plug from the outlet. Open the disc cover. - Page 93 Troubleshooting Grasp the fixture inside the product top, and slide it backwards slightly. Remove the top plate.
- Page 94 Remove the four screws on the product rear, and then remove the air vent cover. Remove the screw, and then remove the rear printer cover. If the disc can be removed, eject the disc and attach the rear printer cover. If the disc cannot be removed, proceed to the procedure below.
- Page 95 Troubleshooting Pull out the printer tray. Remove the disc, and close the disc cover. The printer tray automatically closes when the power is turned on. Reattach the rear printer cover, air vent cover, and top plate. Insert the power plug into the outlet, and turn on the power.
-
Page 96: Disc Recording Surface Is Stained With Ink
Disc recording surface is stained with ink When the disc recording surface is stained with ink, the printer tray may be dirty. Clean the printer tray by following the procedure below. Press the power button to turn off the power. After the power LED is off, disconnect the power plug from the outlet. - Page 97 Troubleshooting Grasp the fixture on the top plate, and slide it backwards slightly. Remove the top plate.
- Page 98 Remove the four screws on the product rear, and then remove the air vent cover. Remove the screw, and then remove the rear printer cover. Grasp the fixture as shown in the figure below, and pull out the printer tray towards you.
- Page 99 Troubleshooting Pull out the printer tray. Use a soft cloth to wipe off any dirt on the printer tray. Close the disc cover. The printer tray automatically closes when the power is turned on. Reattach the rear printer cover, air vent cover, and top plate. Insert the power plug into the outlet, and turn on the power.
-
Page 100: Appendix
Where to get help Before contacting Epson If your Epson product is not operating properly and you cannot solve the problem using the troubleshooting information in your product documentation, contact customer support services for assistance. If customer support for your area is not listed below, contact the dealer where you purchased your product. -
Page 101: Product Specifications
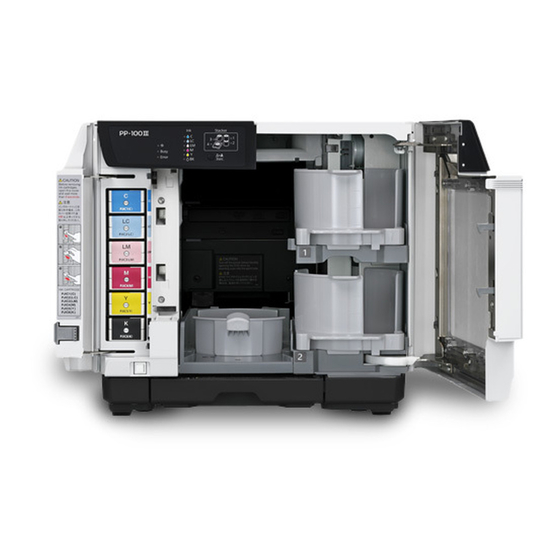
<External View> Overall specifications Item Description 30 discs per hour Conditions: When using Epson specified CD-Rs, drive speed of 40x, writing data of 600 MB, and speed/bidirectional printing Write and print 17 discs per hour Conditions: When using Epson specified DVD-Rs, drive speed processing of 12x, writing data of 3.8 GB, and speed/bidirectional printing... -
Page 102: Printing Specifications
Printing specifications Item Description Printing method On demand inkjet Black : 180 nozzles Cyan : 180 nozzles Magenta : 180 nozzles Head Number of nozzles Yellow : 180 nozzles Light cyan : 180 nozzles Light magenta : 180 nozzles Print Mode Setting (Quality/Speed) [1]: 1,440 x 1,440 dpi Printing resolution [2]: 1,440 x 720 dpi... - Page 103 Appendix Drive specifications Item Description Number of drives 2 drives installed Loading type Tray CD-R 40x/32x/24x/16x/10x/4x DVD-R 12x/8x/6x/4x/2x/1x Write speed DVD+R 12x/8x/6x/4x/2.4x DVD-R DL 8x/6x/4x/2x DVD+R DL 8x/6x/4x/2.4x • CD/DVD discs created with this product’s drive may not be able to be recognized, played, and read depending on the compatibility of the drive or player.
-
Page 104: Standards And Approvals
EN61000-3-3 EN55024 Lifetime Epson estimates lifetime for components of this product to be as follows: Expected Lifetime: • Ink pad life: About 30,000 discs printed The ink pad is estimated to need replacing after about 30,000 discs. Based on printing 2,000 discs per month, bi- directional. - Page 105 Appendix Environmental conditions Item Description During 10°C~35°C operation Within 1 month at 40°C During storage -20°C~40°C Within 120 hours at 60°C During -20°C~60°C transportation During 20%~80%RH No condensation operation During storage 5%~85%RH No condensation During 5%~85%RH No condensation transportation Temperature/ humidity Based on the following conditions 27°C...
-
Page 106: Ink And Disc
C13S020450 Yellow C13S020451 Black C13S020452 To purchase a PP-100 Series exclusive ink cartridge, check with the dealer where you purchased your PP-100N or access either of the following urls: http://www.epson-europe.com (Europe) http://www.discproducer.epson.com (United States and Canada) Discs Epson offers the specified CD-R and DVD-R discs for all your printing needs.