Table of Contents
Advertisement
Quick Links
Advertisement
Table of Contents

Related Manuals for Bosch DVR-3000


Summary of Contents for Bosch DVR-3000
- Page 1 DIVAR 3000/5000 Digital Video Recorder DVR-3000/5000 Operator Manual...
-
Page 3: Table Of Contents
Record 4.4.6 Network Shutdown/Logout Hardware setup Camera connections Audio connections Monitor connections 5.3.1 VGA output 5.3.2 CVBS 5.3.3 HDMI Keyboard connection (only DIVAR 5000) Ethernet connection Bosch Security Systems Operator Manual 2013.05 | 1.0 | DIVAR 3000/5000 Digital Video Recorder... - Page 4 6.16 Record 6.17 Account/Users 6.17.1 Add user 6.17.2 Modify/Delete a user 6.17.3 Modify password 6.18 Auto maintain 6.19 TV adjust 6.20 Text data overlay 6.21 Configuration/Backup 2013.05 | 1.0 | DIVAR 3000/5000 Digital Video Operator Manual Bosch Security Systems Recorder...
-
Page 5: Divar 3000/5000 Digital Video Table Of Contents | En
System requirements 9.1.2 Installation 9.1.3 Starting the Player 9.1.4 Setting Camera Views Checking authenticity (Watermark) Exit button Troubleshooting Maintenance 11.1 Attach ESD strap 11.2 Replace internal battery Bosch Security Systems Operator Manual 2013.05 | 1.0 | DIVAR 3000/5000 Digital Video Recorder... - Page 6 Software licenses 13.1.1 Bosch software 13.1.2 Other licenses — copyright notices 13.1.3 Warranties and disclaimer of warranties 13.2 DVD compatibility 13.3 USB memory sticks 13.4 HDD compatibility 2013.05 | 1.0 | DIVAR 3000/5000 Digital Video Operator Manual Bosch Security Systems Recorder...
-
Page 7: Safety
Never spill liquid of any kind on the unit. Do not place objects filled with liquids, such as vases or cups, on the unit. Bosch Security Systems Operator Manual 2013.05 | 1.0 | DIVAR 3000/5000 Digital Video... - Page 8 17. Attachments, changes or modifications - Only use attachments/accessories specified by the manufacturer. Any change or modification of the equipment, not expressly approved by Bosch, could void the warranty or, in the case of an authorization agreement, authority to operate the equipment.
-
Page 9: Important Notices
Disposal - Your Bosch product was developed and manufactured with high-quality material and components that can be recycled and reused. This symbol means that electronic and electrical appliances, which have reached the end of their working life, must be collected and disposed of separately from household waste material. - Page 10 NOTE: Wear required grounded wrist straps and observe proper ESD safety precautions when handling the electrostatic-sensitive printed circuit boards. Environmental statement - Bosch has a strong commitment towards the environment. This unit has been designed to respect the environment as much as possible.
-
Page 11: Fcc And Ul
Safety | en Recorder Video loss - Video loss is inherent to digital video recording; therefore, Bosch Security Systems cannot be held liable for any damage that results from missing video information. To minimize the risk of lost digital information, Bosch Security Systems recommends multiple, redundant recording systems, and a procedure to back up all analog and digital information. - Page 12 Bosch Security Systems accepts no liability for damage resulting directly or indirectly from faults, incompleteness or discrepancies between the user guide and the product described.
-
Page 13: Short Information
Recorder Short information The Bosch Video Recorder DIVAR 3000/5000 is a multi-channel digital recorder that uses the latest 960H high resolution technology, plus modern compression techniques. Simultaneous monitoring, recording and playback are guided remote or local by simple menu selections and operator commands. -
Page 14: Introduction
960H resolution. Dome Control The DIVAR can control pan/tilt/zoom (PTZ) equipment via RS‑485 / RS‑232 serial communications. PTZ devices, including the Bosch AutoDome and a number of third party domes, are supported. Alarms All models have extensive alarm handling functions and telemetry control. Alarm functions include local inputs and relay outputs, plus motion detection in user-defined areas. -
Page 15: Features
If any items are missing, notify your customer service representative or Bosch Security Systems sales representative. The shipping carton is the safest container in which to transport the unit. Save it and all packing materials for future use. -
Page 16: Installation Environment
– Bosch keyboard (only for DIVAR 5000) – RJ11 adaptor to connect Bosch keyboard (only for DIVAR 5000) Warranty Failure to follow the Safety Instructions, Installation Instructions, and any other instructions in this manual may result in damage to the unit and void the warranty. -
Page 17: Quick Install
The 4- and 8-channel DIVAR 3000 models have a slightly different back panel. Video in connectors 5 to 16 for 4-channel are covered, and video out connectors 9 to 16 for 8-channel are covered. Bosch Security Systems Operator Manual 2013.05 | 1.0 | DIVAR 3000/5000 Digital Video... - Page 18 15 CVBS output - Monitor B 7 Alarm inputs 16 Video out (loop through) 8 RS485 and keyboard connectors 17 Power connector 9 RJ45 ethernet connector 2013.05 | 1.0 | DIVAR 3000/5000 Digital Video Operator Manual Bosch Security Systems Recorder...
-
Page 19: Primary Connections
Connect up to 16 ALARM IN inputs (via the supplied terminal blocks). Connect up to 6 ALARM OUT outputs (via the supplied terminal blocks). Connect a pan/tilt/zoom control unit to the RS-485 or RS-232 port. Bosch Security Systems Operator Manual 2013.05 | 1.0 | DIVAR 3000/5000 Digital Video... -
Page 20: Powering Up
Connect extra video out cables to the VIDEO OUT ports if loop through is required to other devices (only for DIVAR 5000). 10. If required, connect a Bosch Intuikey keyboard cable to the KEYBOARD connector using the supplied adaptor (only for DIVAR 5000). -
Page 21: Login
When required, you can logout from the user interface using the Shutdown menu – see Shutdown/Logout, page 26. Startup Wizard The Startup Wizard opens automatically after you log in for the first time. See following screen: Bosch Security Systems Operator Manual 2013.05 | 1.0 | DIVAR 3000/5000 Digital Video Recorder... -
Page 22: Startup Wizard
<Previous step> return to the previous Startup wizard screen – <Default> assign the factory defaults for the current setup screen – <Copy> copy the current screen settings for a channel to other channels 2013.05 | 1.0 | DIVAR 3000/5000 Digital Video Operator Manual Bosch Security Systems Recorder... -
Page 23: Reset Startup Wizard
General screen. Click <Next step> for the next Startup wizard screen (General settings). 4.4.2 General Figure 4.4: Startup general Bosch Security Systems Operator Manual 2013.05 | 1.0 | DIVAR 3000/5000 Digital Video Recorder... -
Page 24: Encoder
Assign here the encoder settings and click <Next step> for the next Startup wizard screen (Schedule settings). To save time when setting up channels, use <Copy> to copy settings from one channel to other(s). 2013.05 | 1.0 | DIVAR 3000/5000 Digital Video Operator Manual Bosch Security Systems Recorder... -
Page 25: Schedule
(Network settings): – Schedule: The selected channels will record according to the schedule setup (see previous setup screen) – Manual: selected channels will automatically begin recording Bosch Security Systems Operator Manual 2013.05 | 1.0 | DIVAR 3000/5000 Digital Video Recorder... -
Page 26: Network
Right-click the-mouse to access the Quick menu; from here choose the option Main menu. Select <Shutdown> on the main menu for the Shutdown dialog box. Choose Logout user from the drop-down options. 2013.05 | 1.0 | DIVAR 3000/5000 Digital Video Operator Manual Bosch Security Systems Recorder... - Page 27 Start up the system again by turning on the power button on the rear panel – a new login screen will appear. Auto Resume after Power Failure The system will automatically backup video recordings and resume the previous working status after a power failure. Bosch Security Systems Operator Manual 2013.05 | 1.0 | DIVAR 3000/5000 Digital Video Recorder...
-
Page 28: Hardware Setup
17” monitors or larger when using LCD. Specifications Output signal: VGA Resolution: 1024x768 (4:3), 1280x720 (5:4), 1280x1024 and 1920x1080 for Monitor A Color: True color (32 bit) Connector type: D-SUB 2013.05 | 1.0 | DIVAR 3000/5000 Digital Video Operator Manual Bosch Security Systems Recorder... -
Page 29: Cvbs
Connector type: HDMI Keyboard connection (only DIVAR 5000) The keyboard connection is used to connect a Bosch Intuikey keyboard to a DIVAR 5000 unit. For short distances (up to 30 m), standard 6-core telecom flat cable can be used to supply signal connections for the keyboard (LTC 8558/00). -
Page 30: Ethernet Connection
100 meters (300 feet). Specifications – 1000 Base-T IEEE 802.3ab compliant, 100Base-TX IEEE 802.3u Compliant, 10Base-T IEEE 802.3 Compliant – IEEE 802.3 Compliant RGMII/MII – DSP processing 2013.05 | 1.0 | DIVAR 3000/5000 Digital Video Operator Manual Bosch Security Systems Recorder... -
Page 31: Rs485 Port Connection
Figure 5.3: RJ-45 Ethernet connector RS485 port connection Use the RS485 connector to connect Bosch, Pelco-P or Pelco-D controllable cameras to the unit for pan, tilt, and zoom control. RS485 is a single-direction protocol; the PTZ device can’t return any data to the unit. -
Page 32: Usb Connectors
Note: The connected hard disks must be Bosch approved. See technical Specifications for a list of compatible HDDs models that can be connected to the e-SATA connection. 2013.05 | 1.0 | DIVAR 3000/5000 Digital Video... -
Page 33: Alarm I/O Connections
Use the same ground as the DVR if external power is used for the alarm device – When connecting two DVRs (or one DVR and one other device), use a relay to separate them Bosch Security Systems Operator Manual 2013.05 | 1.0 | DIVAR 3000/5000 Digital Video Recorder... -
Page 34: Connecting The Alarm Output
Power is supplied from an AC power supply. The unit has its own on/off switch to turn power supply off and on. Specifications: Power supply: AC input: 100-240 VAC; 1.7 A; 50/60 Hz 2013.05 | 1.0 | DIVAR 3000/5000 Digital Video Operator Manual Bosch Security Systems Recorder... -
Page 35: Configuration
Administrator rights are required to access many of the functions in the menus. For more information on all configurable items for the DIVAR: – See Setting, page 36 – See Advanced, page 66 Bosch Security Systems Operator Manual 2013.05 | 1.0 | DIVAR 3000/5000 Digital Video Recorder... -
Page 36: Setting
Serial port, page 45 – Network, page 46 – Alarm, page 55 – Detect, page 57 – Pan/Tilt/Zoom, page 62 – Display, page 63 – Default, page 65 2013.05 | 1.0 | DIVAR 3000/5000 Digital Video Operator Manual Bosch Security Systems Recorder... -
Page 37: General
Start/End times for daylight saving click <Set> and assign the relevant times as a set ‘Date’ or as a set ‘Day of the week’. Date separator Choose here between . / - Time format Choose here between 12- and 24-hour. Bosch Security Systems Operator Manual 2013.05 | 1.0 | DIVAR 3000/5000 Digital Video Recorder... - Page 38 Set here a time for automatic logout if a user is inactive for a period of time: 1 to 60 minutes (default is 10 minutes). If you choose ‘Never’, the user remains permanently logged on until logout or shutdown. 2013.05 | 1.0 | DIVAR 3000/5000 Digital Video Operator Manual Bosch Security Systems Recorder...
-
Page 39: Encode
Audio/Video: Enable or disable the audio (main stream); video and/or audio (extra stream) – Audio format: G711a (default), PCM or G711u – <Overlay> - see Overlay, page 40 Bosch Security Systems Operator Manual 2013.05 | 1.0 | DIVAR 3000/5000 Digital Video Recorder... -
Page 40: Overlay
Channel display: You can select system displays channel number or not when you playback. Please click set button and then drag the title to the corresponding position in the screen. 6.3.2 Snapshot Click <Snapshot> for the following interface: 2013.05 | 1.0 | DIVAR 3000/5000 Digital Video Operator Manual Bosch Security Systems Recorder... -
Page 41: Copy
This obviously saves repeating common settings for each channel. The channel setups that can be copied are: – schedule – encoder – Alarm – Detect – Pan/Tilt/Zoom For example: Bosch Security Systems Operator Manual 2013.05 | 1.0 | DIVAR 3000/5000 Digital Video Recorder... - Page 42 1 to all channels, click the box All.) Click <OK> to save the copied setup. Click <OK> in the Encoder or Schedule screen to complete the copy function. 2013.05 | 1.0 | DIVAR 3000/5000 Digital Video Operator Manual Bosch Security Systems Recorder...
-
Page 43: Schedule
24-hour period: – green for regular recording – yellow for MD – red for alarm recording – blue for MD and alarm recording Bosch Security Systems Operator Manual 2013.05 | 1.0 | DIVAR 3000/5000 Digital Video Recorder... - Page 44 Repeat steps 4 to 6 to assign the holiday settings. After completing the setup, click <OK> to save the settings and return to the previous menu. See also – Copy, page 41 2013.05 | 1.0 | DIVAR 3000/5000 Digital Video Operator Manual Bosch Security Systems Recorder...
-
Page 45: Serial Port
Use the Serial port menu to configure the connections for a Console connected to the RS232 port, and an optional Bosch keyboard (Intuikey series) connected to the extra RS485 port (DIVAR 5000 only). Configure the settings for Console or Bosch keyboard as described below. -
Page 46: Network
Important: The system always needs to reboot if any of the above ports are changed. Make sure the port values here do not conflict. – Max connection: System supports maximal 128 users (default). 0 means there is no connection limit. 2013.05 | 1.0 | DIVAR 3000/5000 Digital Video Operator Manual Bosch Security Systems Recorder... -
Page 47: Network Settings
This example screen shows an example Network setting interface. Please check a box to enable the corresponding function, and then double-click current item to go to setup interface. See the following sections for examples of possible network functions. Bosch Security Systems Operator Manual 2013.05 | 1.0 | DIVAR 3000/5000 Digital Video... -
Page 48: Ip Filter
64 IP addresses). If you input the IPv6 address format, system needs to check its validity and optimize its format. For example, it can optimize IP:”fe80::0054:0cff:fefa:1682” to ”fe80::54:cff:fefa:1682”. 2013.05 | 1.0 | DIVAR 3000/5000 Digital Video Operator Manual Bosch Security Systems Recorder... -
Page 49: Ntp
Enter here your PPPoE ‘User name’ and ‘Password’ supplied by your internet service provider, and click <OK>. You will need to restart your system to automatically connect to the internet (the IP address will be automatically assigned). Bosch Security Systems Operator Manual 2013.05 | 1.0 | DIVAR 3000/5000 Digital Video Recorder... -
Page 50: Ddns
After rebooting, open the IE and input as follows: http://(DDNS server IP)/(virtual directory name)/webtest.htm (e.g.: http://10.6.2.85/DVR _DDNS/webtest.htm.) Now you can open the DDNS Server web search page. 2013.05 | 1.0 | DIVAR 3000/5000 Digital Video Operator Manual Bosch Security Systems Recorder... -
Page 51: Upnp
Select a port and click <Delete> to remove a port setting – Click <Add to the list> to open a ‘Port info’ dialog box to add a new port setting Bosch Security Systems Operator Manual 2013.05 | 1.0 | DIVAR 3000/5000 Digital Video... -
Page 52: Email
This is the e-mail address that will appear as the sender of all e-mail originating from the unit. Subject This is the subject that will appear in all e-mail sent by the unit. 2013.05 | 1.0 | DIVAR 3000/5000 Digital Video Operator Manual Bosch Security Systems Recorder... -
Page 53: Ftp Server
(see Encode, page 39) so the system can correctly upload the image file to the FTP server. The snapshot can be triggered in the following settings – Schedule – Detect (motion, camera masking, video loss) Bosch Security Systems Operator Manual 2013.05 | 1.0 | DIVAR 3000/5000 Digital Video Recorder... -
Page 54: Snmp
Here you require software tools (MIB Builder and MG-SOFT MIB Browser), plus two MIB files to connect to the device (contact Bosch and your system administrator for more details where required). Use the following steps to configure: Select the ‘SNMP enable’... -
Page 55: Alarm
If the system detects another local alarm signal during this period (e.g. at the fifth second), the buzzer, tour, PTZ activation, snapshot, record channel will start Bosch Security Systems Operator Manual 2013.05 | 1.0 | DIVAR 3000/5000 Digital Video... - Page 56 Buzzer: Select here to activate the buzzer when an alarm occurs. After completing setup, click <Save> to save your settings and go back to the previous menu. 2013.05 | 1.0 | DIVAR 3000/5000 Digital Video Operator Manual Bosch Security Systems Recorder...
-
Page 57: Detect
Anti-dither: Set here how much time the DVR will delay before starting to record. – Latch: when detection is complete, the system automatically delays detecting again for this specified time: 1 to 300 seconds (default is 10) Bosch Security Systems Operator Manual 2013.05 | 1.0 | DIVAR 3000/5000 Digital Video Recorder... - Page 58 Note: In the Detect menu, the Copy function is only valid for the same event type, which means you cannot copy a channel setup in video loss mode to camera masking mode. 2013.05 | 1.0 | DIVAR 3000/5000 Digital Video Operator Manual Bosch Security Systems Recorder...
-
Page 59: Motion Detect Region Setup
(or click the ‘Enter’ button). If you click the ESC button to exit the region setup screen, the zone setup will not be saved. Note: Always remember to click <Save> on the ‘Detect’ interface to save the current setup. Bosch Security Systems Operator Manual 2013.05 | 1.0 | DIVAR 3000/5000 Digital Video... -
Page 60: Period
– choose either Work day or Free day from the drop down menu and press <Setup> – the following screen appears: 2013.05 | 1.0 | DIVAR 3000/5000 Digital Video Operator Manual Bosch Security Systems Recorder... -
Page 61: Ptz Activation
Repeat these steps for each of the PTZ cameras that require a preset. If required, access the Pan/Tilt/Zoom menu (Main menu > Setting > Pan/Tilt/Zoom) to setup the video channel, baud rate, dome protocol, etc. See Pan/Tilt/Zoom, page 62. Bosch Security Systems Operator Manual 2013.05 | 1.0 | DIVAR 3000/5000 Digital Video... -
Page 62: Pan/Tilt/Zoom
– Channel - select first the applicable channel (these settings can later be copied to other channels using <Copy>. – Protocol: Select corresponding PTZ protocol such as BOSCH or PELCOD. – Address: input corresponding PTZ address. – Baud rate: Select baud rate. -
Page 63: Display
Monitor tour type: System supports 1/8-window tour. – Alarm tour type: System supports 1/8-window tour. When ready, click <Save> to save settings and return to previous menu. Bosch Security Systems Operator Manual 2013.05 | 1.0 | DIVAR 3000/5000 Digital Video Recorder... -
Page 64: Tour Setup
Split: Choose here which tour combination is displayed (1, 4, 8, 9 and 16 windows). If required, use the Add, Delete, Move up or Move down buttons to adjust the view settings. 2013.05 | 1.0 | DIVAR 3000/5000 Digital Video Operator Manual Bosch Security Systems Recorder... -
Page 65: Default
Select the check box for the settings you wish to return to the factory default (or choose the checkbox Select All to return all the settings to the factory default. Click <OK> to reset the chosen defaults. Bosch Security Systems Operator Manual 2013.05 | 1.0 | DIVAR 3000/5000 Digital Video... -
Page 66: Advanced
– Auto maintain, page 75 – TV adjust, page 76 – Text data overlay, page 77 – Configuration/Backup, page 79 – Sequence Mon B, page 79 2013.05 | 1.0 | DIVAR 3000/5000 Digital Video Operator Manual Bosch Security Systems Recorder... -
Page 67: Hard Disk (Hdd)
You must reboot the system to activate any modifications The bottom half of the screen shows the current HDD type, status, capacity and the recording time(s). Bosch Security Systems Operator Manual 2013.05 | 1.0 | DIVAR 3000/5000 Digital Video Recorder... -
Page 68: System Events
Alarm upload: system will upload the alarm signal to the network. – Send email: system will send an email to alert you when an alarm occurs. – Buzzer: the buzzer alerts you when an alarm occurs. 2013.05 | 1.0 | DIVAR 3000/5000 Digital Video Operator Manual Bosch Security Systems Recorder... -
Page 69: Alarm Output
Manual: Set the alarm to react to a manual input. – Stop: Set the alarm out. – Status: displays the current status of the external alarm (a checked box means the alarm is activated) Bosch Security Systems Operator Manual 2013.05 | 1.0 | DIVAR 3000/5000 Digital Video Recorder... -
Page 70: Record
– Schedule: The selected channels will record according to the schedule setup (see Schedule, page 43). – Stop: Stop recording on the selected channels. 2013.05 | 1.0 | DIVAR 3000/5000 Digital Video Operator Manual Bosch Security Systems Recorder... -
Page 71: Account/Users
Search/Play (all channels) Search/Play (all channels) Playback on all channels Playback on all channels Playback on all channels Sequence on/off Sequence on/off Sequence on/off Alarm output Bosch Security Systems Operator Manual 2013.05 | 1.0 | DIVAR 3000/5000 Digital Video Recorder... -
Page 72: Add User
Enter a Password up to 6 characters, and confirm this by entering the password again. Control access to the system by selecting a user Group (Administrator, Advanced or Normal user). If required, adjust the Authority (permissions) for the user. 2013.05 | 1.0 | DIVAR 3000/5000 Digital Video Operator Manual Bosch Security Systems Recorder... -
Page 73: Modify/Delete A User
Change the user authority by (de)selecting the check boxes. Click <Save>. Delete a user as follows: Choose the User name from the drop-down list. Click <Delete>. Confirm the delete by clicking <OK>. Bosch Security Systems Operator Manual 2013.05 | 1.0 | DIVAR 3000/5000 Digital Video Recorder... -
Page 74: Modify Password
Select the relevant user. Enter the Old password. Enter the New password. Enter the New password again in the Confirm field. Click <Save> to save the new password setting. 2013.05 | 1.0 | DIVAR 3000/5000 Digital Video Operator Manual Bosch Security Systems Recorder... -
Page 75: Auto Maintain
– Customized: A new screen appears where you can assign the number of days that old files are retained on the system before they are automatically deleted Bosch Security Systems Operator Manual 2013.05 | 1.0 | DIVAR 3000/5000 Digital Video... -
Page 76: Tv Adjust
Adjust here the TV output settings by dragging the slide bar for each item. When ready, click <OK> to save changes and go back to the previous menu. 2013.05 | 1.0 | DIVAR 3000/5000 Digital Video Operator Manual Bosch Security Systems Recorder... -
Page 77: Text Data Overlay
NET Type The network type interface is shown below. Figure 6.39: Text data overlay NET – Protocol: Currently only the BOSCH protocol is available – Setting: Click this button to access the ATM/POS screen – see below. – Overlay mode: Choose from: –... - Page 78 Bridge IP / Host IP: destination ports (you may need to input the corresponding port number) – Record channel set: assign the correct channels See also – Text data overlay, page 77 2013.05 | 1.0 | DIVAR 3000/5000 Digital Video Operator Manual Bosch Security Systems Recorder...
-
Page 79: Configuration/Backup
Use the same procedure here to setup the tour sequence as used for Monitor A - see Tour setup, page 64. Note that playback items are not available for Monitor B. Bosch Security Systems Operator Manual 2013.05 | 1.0 | DIVAR 3000/5000 Digital Video... -
Page 80: Operating Instructions
Access to many menu options is only possible with a User Account at the Administrator User Level. Use the mouse, front keys or remote control to access the menu. 2013.05 | 1.0 | DIVAR 3000/5000 Digital Video Operator Manual Bosch Security Systems Recorder... -
Page 81: Mouse Controls
Middle scroll In numeral input box, increase or decrease numeric value wheel Switch items in a check box Page up or page down in a list Bosch Security Systems Operator Manual 2013.05 | 1.0 | DIVAR 3000/5000 Digital Video Recorder... -
Page 82: Front Panel Controls
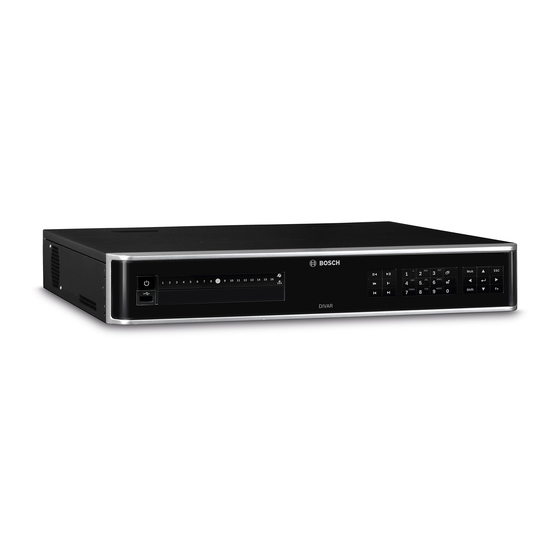
7.1.2 Front panel controls All functions controlled by the USB mouse can, alternatively, be accessed using the front panel buttons. Figure 7.1: Front panel DIVAR 3000 2013.05 | 1.0 | DIVAR 3000/5000 Digital Video Operator Manual Bosch Security Systems Recorder... - Page 83 Select a submenu or menu item, or confirm selections made in menus Go to default button Go to Quick menu Window switch Mult Click to switch between one-window and multiple-window (2, 4, 9, and 16) Bosch Security Systems Operator Manual 2013.05 | 1.0 | DIVAR 3000/5000 Digital Video Recorder...
- Page 84 In text mode, enter characters in a field (use the Shift button to change the input mode) The front panels also have the following status lights and a USB connector: 2013.05 | 1.0 | DIVAR 3000/5000 Digital Video Operator Manual Bosch Security Systems Recorder...
-
Page 85: Remote Control
Press the Enter button to set the unit ID. Figure 7.3: Remote control See the following table for detailed information on each of the remote control buttons. Bosch Security Systems Operator Manual 2013.05 | 1.0 | DIVAR 3000/5000 Digital Video... - Page 86 In motion detection mode, use together with the direction keys to complete setup 0-9 number key Switch camera channels (for channels 10 to 16, press 1 then second number within 2013.05 | 1.0 | DIVAR 3000/5000 Digital Video Operator Manual Bosch Security Systems Recorder...
-
Page 87: Quick Menu
The Pan/Tilt/Zoom and Color setting applies for the currently selected channel. If you are in multiple-window mode, the system automatically switches to the corresponding channel. For more information, see: – Search/Play – see Search/Play, page 93 Bosch Security Systems Operator Manual 2013.05 | 1.0 | DIVAR 3000/5000 Digital Video Recorder... -
Page 88: Main Menu
– Right-click the mouse for the Quick menu and select ‘Main menu’ The Main menu has six menu selections, each with further submenus. See following figure. 2013.05 | 1.0 | DIVAR 3000/5000 Digital Video Operator Manual Bosch Security Systems Recorder... -
Page 89: Live And Playback
The unit has four monitor outputs, three for monitor A (see Monitor A, page 93) and one for monitor B (see Monitor B, page 93). Refer to the descriptions below, and to Display, page 63 to see how to configure the monitor displays. Bosch Security Systems Operator Manual 2013.05 | 1.0 | DIVAR 3000/5000 Digital Video... -
Page 90: Live Mode
From live mode, you can switch to playback mode or access the main menu as described below. Changing the display Bring up the Quick menu. 2013.05 | 1.0 | DIVAR 3000/5000 Digital Video Operator Manual Bosch Security Systems Recorder... - Page 91 Right-click the mouse to exit the zoomed area. Exit the digital zoom function at any time by clicking on the icon again – it will change back to Bosch Security Systems Operator Manual 2013.05 | 1.0 | DIVAR 3000/5000 Digital Video...
-
Page 92: Ptz
Aux Off: switch off the special Aux definition 7.2.3 Sequence Setup the camera sequence and interval times in the following configuration screens: – For monitor A - see Tour setup, page 64 2013.05 | 1.0 | DIVAR 3000/5000 Digital Video Operator Manual Bosch Security Systems Recorder... -
Page 93: Monitor A
B. Search/Play Click Search/Play in the Main Menu (or from the Quick menu) for the following interface. See following figure Figure 7.10: Search screen Bosch Security Systems Operator Manual 2013.05 | 1.0 | DIVAR 3000/5000 Digital Video Recorder... - Page 94 In 9-window playback mode, you can switch between 1-8 and 9-16 channels. – In 16-window playback mode, you can switch between1-16 and 17-32 channels. The time bar changes if you modify playback mode or channel option. 2013.05 | 1.0 | DIVAR 3000/5000 Digital Video Operator Manual Bosch Security Systems Recorder...
- Page 95 Double click a valid period in the time bar – Double click a file in the file list In slow play mode, click it to switch between play/pause. ■ Stop Bosch Security Systems Operator Manual 2013.05 | 1.0 | DIVAR 3000/5000 Digital Video Recorder...
- Page 96 Left-click the mouse in the screen and hold down the mouse button. Drag to select a section then release the mouse button. Left-click in the selection for digital zoom of the selection. Right-click to exit zoom. 2013.05 | 1.0 | DIVAR 3000/5000 Digital Video Operator Manual Bosch Security Systems Recorder...
- Page 97 During motion detect play, you cannot implement operations such as change time bar, begin backward playback, or frame-by-frame playback. – System supports 396 (22x18 PAL) and 330 (22x15 NTSC) zones. Bosch Security Systems Operator Manual 2013.05 | 1.0 | DIVAR 3000/5000 Digital Video Recorder...
-
Page 98: Backup
The backup menu is accessed from the main menu (or by pressing the Backup key on the Front Panel or from the System Control Bar). It allows writing segments of recorded video and audio to a USB storage device or recordable DVD. 2013.05 | 1.0 | DIVAR 3000/5000 Digital Video Operator Manual Bosch Security Systems Recorder... - Page 99 Format will ask to confirm a format of the selected memory device – Stop halt the backup – Log save to save ‘Export history log file’ to the selected memory device Bosch Security Systems Operator Manual 2013.05 | 1.0 | DIVAR 3000/5000 Digital Video Recorder...
- Page 100 Click <Backup> to backup the selected files. If the total size of the video segments is greater than the memory device’s free space, then only the first segments that fit are archived. 2013.05 | 1.0 | DIVAR 3000/5000 Digital Video Operator Manual Bosch Security Systems Recorder...
-
Page 101: Info
DIVAR 3000/5000 Digital Video Operating instructions | en Recorder Info Figure 7.13: Info menu Refer to the following sections for a description of these System information menus. Bosch Security Systems Operator Manual 2013.05 | 1.0 | DIVAR 3000/5000 Digital Video Recorder... -
Page 102: Hdd Info
Check the hard disk time and system time are the same (if necessary, modify system time in Setting > General and reboot the system). If error persists, format the HDD and reboot the system. See also – HDD compatibility, page 158 2013.05 | 1.0 | DIVAR 3000/5000 Digital Video Operator Manual Bosch Security Systems Recorder... -
Page 103: Bps
View here the current video data stream for each channel. The stream is shown real-time in Kb/s and occupied hard disk storage (MB/h). A graphical representation of the stream is shown in the ‘Wave’ field. Bosch Security Systems Operator Manual 2013.05 | 1.0 | DIVAR 3000/5000 Digital Video... -
Page 104: Log
To save the log file to a USB stick, click <Backup> and enter the required fields in the Log backup dialog box. 2013.05 | 1.0 | DIVAR 3000/5000 Digital Video Operator Manual Bosch Security Systems Recorder... -
Page 105: Version
Insert a USB stick with a preloaded update file (must be called update.bin). Click <Start>to begin the update. Wait until the update is complete and the system is restarted. Bosch Security Systems Operator Manual 2013.05 | 1.0 | DIVAR 3000/5000 Digital Video... -
Page 106: Online Users
The system refreshes every five seconds to detect any newly added or deleted users. 7.5.6 Network info Choose from information screens Network test or Net load. See below for more details. 2013.05 | 1.0 | DIVAR 3000/5000 Digital Video Operator Manual Bosch Security Systems Recorder... - Page 107 Enter a Device name (click <Refresh> if the device is not shown). Enter an Address (click <Browse> to search for the correct path). When the correct sniffer packet is shown, click to start the backup. Bosch Security Systems Operator Manual 2013.05 | 1.0 | DIVAR 3000/5000 Digital Video Recorder...
-
Page 108: Triggers And Alarms
Alarm, page 55). Possible settings are: – A beeper sounds. – A status message is displayed. – An alarm icon is displayed. – Recording behavior changes. 2013.05 | 1.0 | DIVAR 3000/5000 Digital Video Operator Manual Bosch Security Systems Recorder... - Page 109 (see Log, page 104). The unit can also be configured to record upon the activation of an alarm input. A trigger may change the way the camera images are displayed on the monitors without requiring intervention. Bosch Security Systems Operator Manual 2013.05 | 1.0 | DIVAR 3000/5000 Digital Video...
-
Page 110: Web Client Software
To avoid putting your devices and personal information at risk, always consult your network specialist for advice on network security infrastructure (i.e. MAC filtering, Access Control List). Bosch accepts no responsibility for possible damage caused by unauthorized access See also –... -
Page 111: Connecting To The Divar The First Time
The system pops up a warning to ask if you want to install webrec.cab control; click <Yes>. If you can’t download the ActiveX file, modify your settings as follows: In your browser, choose <Tools> <Internet Options>. Bosch Security Systems Operator Manual 2013.05 | 1.0 | DIVAR 3000/5000 Digital Video... - Page 112 DIVAR 3000/5000 Digital Video en | Web Client Software Recorder Figure 8.1: Internet options 2013.05 | 1.0 | DIVAR 3000/5000 Digital Video Operator Manual Bosch Security Systems Recorder...
- Page 113 DIVAR 3000/5000 Digital Video Web Client Software | en Recorder Figure 8.2: Security settings After successful installation, the following WEB SERVICE interface is shown. Bosch Security Systems Operator Manual 2013.05 | 1.0 | DIVAR 3000/5000 Digital Video Recorder...
-
Page 114: Menu Structure Differences
Figure 8.4: WEB live window The Live window is built up of four main areas: – A mode bar across the top, containing buttons for changing between: 2013.05 | 1.0 | DIVAR 3000/5000 Digital Video Operator Manual Bosch Security Systems Recorder... - Page 115 Setup interface. This improves search speed. See also – Search/Play, page 93 Bosch Security Systems Operator Manual 2013.05 | 1.0 | DIVAR 3000/5000 Digital Video Recorder...
-
Page 116: Playback Mode
All of these possibilities are described extensively in Search/Play, page 93. 8.3.2 Setup mode Click <Setup> to enter the Setup menu where you can configure the settings for the unit. 2013.05 | 1.0 | DIVAR 3000/5000 Digital Video Operator Manual Bosch Security Systems Recorder... -
Page 117: Alarm
Alarm Figure 8.7: Web alarm Here you can set device alarm type and alarm sound setup. Always make sure the current device can upload the alarm. Bosch Security Systems Operator Manual 2013.05 | 1.0 | DIVAR 3000/5000 Digital Video Recorder... -
Page 118: About
Select an alarm sound file from the list. 8.3.4 About Figure 8.8: About View here the current web client information. 8.3.5 Logout Click Logout to go back to the log in interface. 2013.05 | 1.0 | DIVAR 3000/5000 Digital Video Operator Manual Bosch Security Systems Recorder... -
Page 119: Archive Player Operation
Current play progress. Left click mouse and drag bar to control play progress The text under the bar displays current play time and the file total time Bosch Security Systems Operator Manual 2013.05 | 1.0 | DIVAR 3000/5000 Digital Video Recorder... - Page 120 Click to start frame-by-frame backward play. Click again to play frame-by-frame previous frame Slow Slow the play speed; possible speeds are1/2x,1/4x,1/8x,1/16x Previous file Click to view previous video file 2013.05 | 1.0 | DIVAR 3000/5000 Digital Video Operator Manual Bosch Security Systems Recorder...
- Page 121 This is useful when playing a file in full-screen view and the player interface is hidden. Most menu selections here are similar to the control functions available directly on the player interface – see following figure. Bosch Security Systems Operator Manual 2013.05 | 1.0 | DIVAR 3000/5000 Digital Video...
-
Page 122: Setting
Player from a keyboard) – About – Player firmware version history See also – Camera Views, page 125 9.1.4 Setting Choose <Setting> from the menu for the following screen. 2013.05 | 1.0 | DIVAR 3000/5000 Digital Video Operator Manual Bosch Security Systems Recorder... - Page 123 Set – see below – Color Setting – here you open a dialog box where you can use sliders to adjust the brightness, contrast, saturation and hue Bosch Security Systems Operator Manual 2013.05 | 1.0 | DIVAR 3000/5000 Digital Video Recorder...
- Page 124 (if necessary, click on <Change Path> and select a new path) Note: If you are using the player for the first time, double-click the player icon for the following dialog box: 2013.05 | 1.0 | DIVAR 3000/5000 Digital Video Operator Manual Bosch Security Systems Recorder...
-
Page 125: Camera Views
Select Full screen (here you can only return to the normal screen mode by right-clicking the screen again and de-select Full screen). Checking authenticity (Watermark) To check the authenticity of individual frames: Select Watermark for the following interface. Bosch Security Systems Operator Manual 2013.05 | 1.0 | DIVAR 3000/5000 Digital Video Recorder... -
Page 126: Exit Button
If the record is original, the correct watermark is displayed in the Watermark Info field; if the record is false, a warning message is displayed. Exit button Click the Exit button (X) to exit the Archive Player interface. 2013.05 | 1.0 | DIVAR 3000/5000 Digital Video Operator Manual Bosch Security Systems Recorder... -
Page 127: Troubleshooting
Program read error, bit data is too small. There is mosaic in the full screen. Please restart the DVR to solve this problem. – HDD malfunction or HDD cable connection is faulty. Bosch Security Systems Operator Manual 2013.05 | 1.0 | DIVAR 3000/5000 Digital Video Recorder... - Page 128 Password or user name is invalid. – Client-end is not compatible with DVR program. No video (only mosaic) during remote preview or playback of video file – Network fluency is poor. 2013.05 | 1.0 | DIVAR 3000/5000 Digital Video Operator Manual Bosch Security Systems Recorder...
- Page 129 Camera quality is too low. – Lens is dirty – Camera is installed facing the light – Camera aperture setup is incorrect. – HDD capacity is insufficient. Bosch Security Systems Operator Manual 2013.05 | 1.0 | DIVAR 3000/5000 Digital Video Recorder...
- Page 130 – No DivX503Bundle.exe or ffdshow-2004 1012.exe in Windows XP OS. Forgotten local menu operation password or network password Please contact your local service engineer or Bosch sales group for help. 2013.05 | 1.0 | DIVAR 3000/5000 Digital Video Operator Manual...
-
Page 131: Maintenance
The following figures show the DIVAR 3000 and the DIVAR 5000 (with top covers removed) and installed positions of the battery (1), DVD (2) and HDD (3): Figure 11.1: DIVAR 3000 HDD and DVD installed Bosch Security Systems Operator Manual 2013.05 | 1.0 | DIVAR 3000/5000 Digital Video... - Page 132 Notice also that some cables for both the DIVAR 3000 and DIVAR 5000 have a lock which must be pressed and held when inserting/removing the cable. See following figures. 2013.05 | 1.0 | DIVAR 3000/5000 Digital Video Operator Manual Bosch Security Systems Recorder...
- Page 133 When installing/removing a DVD/HDD, be careful that you do not damage vulnerable components (e.g. when using a screwdriver, make sure it cannot slip off the screw and damage the processor or wiring). See following figures. Bosch Security Systems Operator Manual 2013.05 | 1.0 | DIVAR 3000/5000 Digital Video...
-
Page 134: Attach Esd Strap
DVR operation causing it to reset at every power-up. A log message appears when the battery needs replacing (it should not be replaced unless required). If the battery needs replacing, contact Bosch for assistance. Take note of the following precautions: –... -
Page 135: Install Hdd In Divar 3000
This DVR can fit a maximum two SATA HDDs. See the following components and steps for installating HDD 1 (brackets and screws included in package): Figure 11.4: Install HDD 1 (DIVAR 3000) Bosch Security Systems Operator Manual 2013.05 | 1.0 | DIVAR 3000/5000 Digital Video Recorder... - Page 136 Recorder (12) (10) (11) Figure 11.5: Install HDD 1 Install HDD 2 Install HDD 2 in the position of the optional DVD – see following figure: 2013.05 | 1.0 | DIVAR 3000/5000 Digital Video Operator Manual Bosch Security Systems Recorder...
- Page 137 DIVAR 3000/5000 Digital Video Maintenance | en Recorder Figure 11.6: Install HDD 2 Use the same install steps described for installing HDD 1. Bosch Security Systems Operator Manual 2013.05 | 1.0 | DIVAR 3000/5000 Digital Video Recorder...
-
Page 138: Install Hdd In Divar 5000
Install HDD in DIVAR 5000 See the following components and steps for installing HDD 1 (brackets and screws included in package): Figure 11.7: HDD install components (DIVAR 5000) 2013.05 | 1.0 | DIVAR 3000/5000 Digital Video Operator Manual Bosch Security Systems Recorder... - Page 139 (11) Figure 11.8: Install HDD 1 Install HDD 1 and 2 Use the same procedure as for installing HDD 1, but include the following extra steps: Bosch Security Systems Operator Manual 2013.05 | 1.0 | DIVAR 3000/5000 Digital Video Recorder...
- Page 140 Install HDD 3 and 4 Use the same install steps as for HDD 1 and 2, but install HDD 3 and 4 at the optional DVD location. See following figure. 2013.05 | 1.0 | DIVAR 3000/5000 Digital Video Operator Manual Bosch Security Systems Recorder...
- Page 141 DIVAR 3000/5000 Digital Video Maintenance | en Recorder Figure 11.10: Install HDD 3 and 4 Bosch Security Systems Operator Manual 2013.05 | 1.0 | DIVAR 3000/5000 Digital Video Recorder...
-
Page 142: Install Dvd In Divar 3000
Install DVD in DIVAR 3000 See the following components and steps required for this installation (screws included in package): Figure 11.11: Install DVD components (DIVAR 3000) 2013.05 | 1.0 | DIVAR 3000/5000 Digital Video Operator Manual Bosch Security Systems Recorder... - Page 143 DIVAR 3000/5000 Digital Video Maintenance | en Recorder Figure 11.12: Install DVD in DIVAR 3000 Bosch Security Systems Operator Manual 2013.05 | 1.0 | DIVAR 3000/5000 Digital Video Recorder...
-
Page 144: Install Dvd In Divar 5000
Install DVD in DIVAR 5000 See the following components and steps required for this installation (spacers and screws included in package): Figure 11.13: Install DVD components (DIVAR 5000) 2013.05 | 1.0 | DIVAR 3000/5000 Digital Video Operator Manual Bosch Security Systems Recorder... - Page 145 DIVAR 3000/5000 Digital Video Maintenance | en Recorder (10) (12) (11) Figure 11.14: Install DVD in DIVAR 5000 Bosch Security Systems Operator Manual 2013.05 | 1.0 | DIVAR 3000/5000 Digital Video Recorder...
-
Page 146: Technical Specifications
CVBS (PAL): 704x576 CVBS (NTSC): 704x480 VGA: 1920x1080, 1280x1024, 1280x720, 1024x768 HDMI: 1920x1080, 1280x1024, 1280x720, 1024x768 960H camera: 960x576 (PAL), 960x480 (NTSC) 720H camera: 704x576 (PAL), 704x480 (NTSC) 2013.05 | 1.0 | DIVAR 3000/5000 Digital Video Operator Manual Bosch Security Systems Recorder... - Page 147 PTZ control port interface Output signals according to EIA/TIA-232-F, max input voltage ±10 V Supported protocols Pelco P and D (over RS-485) Bosch OSRD (over RS-485 or RS-232) Alarms Inputs 16 inputs configurable NO/NC, max. input voltage 5 VDC Outputs...
- Page 148 Simultaneous 1/4/9/16 channels Mode Frame-by-frame, slow play, fast play, reverse Search Time, channel, type, smart Network Bosch Video Client or Web Client software Alarm Handling Motion detection Detection zones: 396 (PAL) / 330 (NTSC) Video loss External alarm and screen prompt 2013.05 | 1.0 | DIVAR 3000/5000 Digital Video...
-
Page 149: Divar 5000
DVD (optional) Built-in DVD+R/RW writer Flash memory or external HDD (FAT32) Network Bosch Video Client or Web Client software Mechanical Dimensions (WxDxH) 375 x 290 x 50 mm (14.8 x 11.4 x 2.0 in) excluding cabling and feet (5 mm) Weight 2.5 kg (5.51 lb) approx. - Page 150 Mono RCA, 200 to 3000 mV, 5 kOhm (RCA) MIC input Mono talk input RCA, 200 to 3000 mV, 10 kOhm (RCA) Compression G.711A Sample rate 8 kHz per channel Bit rate 8-bit 2013.05 | 1.0 | DIVAR 3000/5000 Digital Video Operator Manual Bosch Security Systems Recorder...
- Page 151 PTZ control port interface Output signals according to EIA/TIA-232-F, max input voltage ±10 V Supported protocols Pelco P and D (over RS-485) Bosch OSRD (over RS-485 or RS-232) Alarms Inputs 16 inputs configurable NO/NC, max. input voltage 5 VDC Outputs...
- Page 152 Simultaneous 1/4/9/16 channels Mode Frame-by-frame, slow play, fast play, reverse Search Time, channel, type, smart Network Bosch Video Client or Web Client software Alarm Handling Motion detection Detection zones: 396 (PAL) / 330 (NTSC) Video loss External alarm and screen prompt...
-
Page 153: Standards And Directives
Flash memory or external HDD (FAT32) e-SATA Flash memory or external HDD (FAT32) Network Bosch Video Client or Web Client software Mechanical Dimensions (WxDxH) 440 x 420 x 70 mm (17.3 x 16.5 x 2.8 in) excluding cabling and feet (5 mm) Rack mount kit (included) For mounting one unit in an EIA 19”... - Page 154 * Clause 8 (mains supply voltage dips and short interruptions): to meet the requirements of this clause, auxiliary equipment (such as a UPS) must be used. 2013.05 | 1.0 | DIVAR 3000/5000 Digital Video Operator Manual Bosch Security Systems Recorder...
-
Page 155: Appendix
13.1.1 Bosch software All Bosch software © Bosch Security Systems. Bosch software is licensed under the terms of the End User License Agreement (EULA) of Bosch Security Systems B.V. or Bosch Security Systems Inc, as available together with the physical carrier (CD or DVD). Any use is subject to agreement and compliance with such EULA, as applicable. -
Page 156: Warranties And Disclaimer Of Warranties
Bosch is entitled to charge fees for any services in relation thereto. -
Page 157: Usb Memory Sticks
256M Maxell USB Flash Stick 512M Maxell USB Flash Stick Maxell USB Flash Stick Kingax Super Stick 128M Kingax Super Stick 256M Kingax Super Stick 512M Bosch Security Systems Operator Manual 2013.05 | 1.0 | DIVAR 3000/5000 Digital Video Recorder... -
Page 158: Hdd Compatibility
The following portable HDDs have been tested on the DIVAR for USB port connection. Brand Model Capacity YDStar YDstar HDD box 40 GB Netac Netac 80 GB Iomega Iomega RPHD-CG" RNAJ50U287 250 GB 2013.05 | 1.0 | DIVAR 3000/5000 Digital Video Operator Manual Bosch Security Systems Recorder... - Page 159 Expansion Kits (see listed order numbers). Warranty and support issues: Bosch can not be held liable for any loss or damages or system malfunction resulting from the use of non-Bosch HDDs in the DIVAR. Bosch provides advance exchange and carry-in service on Bosch products only. Non-Bosch hard drives should be removed from DIVAR recorders when returning these units for repair.
- Page 160 No representation or warranty, express or implied, is or will be made in relation to, and no responsibility or liability is or will be accepted by Bosch or its subsidiaries as to the accuracy or completeness of the given Information included here or any other written or oral information made available to any.
- Page 162 Bosch Security Systems B.V. Torenallee 49 5617 BA Eindhoven The Netherlands www.boschsecurity.com © Bosch Security Systems B.V., 2013...