
Related Manuals for Breville VIN067


Summary of Contents for Breville VIN067
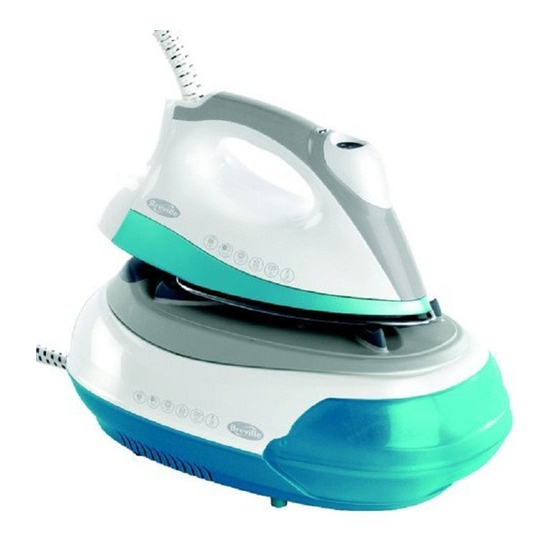
- Page 1 Steam Generator Iron Steam Generator Iron Instructions for Use PLEASE RETAIN THESE INSTRUCTIONS FOR FUTURE REFERENCE. These instructions refer to the Breville Steam Generator Iron VIN067 / IR70 / IR72.
- Page 2 FEATURES The illustrations used in these instructions may differ slightly from the actual unit supplied.
- Page 3 FEATURES Steam Generator Base unit Temperature settings display The base unit is large and should The selected temperature light will always be positioned on a stable flash when iron is heating. When work surface. the iron has reached the desired temperature, the light will stop flashing and light continuously.
-
Page 4: The Control Panel
THE CONTROL PANEL Power On/Off Steam level selector Steam level indicator On/Off indicator Change anti-calc cartridge indicator Pump active indicator Heat indicator Temperature settings display Standby indicator Temperature setting indicators One dot = Coolest heat Two dots = Medium heat Three dots = High heat Maximum heat setting indicator... -
Page 5: Before Use
BEFORE USE Remove all packaging materials Fill with cold tap water and including any soleplate empty. This will rinse out any protection, taking care not to foreign particles which may damage the soleplate or hot remain from the manufacturing water pipe. Position the steam process. -
Page 6: Using Your Iron
USING YOUR IRON First time use Press the steam button for 30 seconds to clean the steam When the iron is connected to the generating system. mains supply and the power ON/ NOTE: OFF button is pressed you will You will hear a repeated hear a single beep. -
Page 7: Steam Ironing
USING YOUR IRON Steam ironing IMPORTANT Ensure that the soleplate has reached the correct operating temperature before steam ironing garments. Too low a temperature will result in water dripping from the soleplate. NOTE: For correct steam operation, always ensure that the iron temperature is ••... -
Page 8: Dry Ironing
USING YOUR IRON Adjusting the amount of steam Dry ironing The steam setting defaults to You may see this ‘Do not LOW each time the iron is steam’ symbol on certain switched on. The LOW steam delicate fabrics. indicator will be illuminated. If you intend to dry iron fabrics, Press the steam level selector there is no need to fill the water... -
Page 9: Anti-Calc System
USING YOUR IRON Anti-calc system Fig 1 The anti-calc cartridge should be replaced when the ‘change cartridge’ indicator illuminates. If a new cartridge is not immediately available, you may continue ironing, using distilled water in place of tap water. Release Button IMPORTANT Fig 2 When the anti-calc... -
Page 10: Fabric Chart
FABRIC CHART If the ironing instructions are missing from the garment, but you know the type of fabric, the following table may help you. Note: This symbol means the item of clothing should not be ironed (e.g. chlorofibre, elastodiene) Label Textile Fibre Temperature... -
Page 11: Care And Cleaning
CARE AND CLEANING 11 11 Care and Cleaning CAUTION! Do not use harsh abrasives, WARNING! chemical cleaners, or Disconnect the unit from the solvents to clean the exterior electrical mains before of your iron, as these will cleaning. damage the surface. Cleaning the Stainless Steel NOTE: Soleplate... - Page 12 STORAGE Storage Always allow the iron to cool fully on the iron rest before storing away. Once the iron is cool, empty the water tank and store the iron in a cool, dry, safe place out of the reach of children. NEVER wrap the cord around the iron, but store it coiled safely by the side of the iron.
-
Page 13: Hints And Tips
HINTS AND TIPS 13 13 Cotton: iron slightly damp on the right side with a hot iron. Linen: iron damp on the right side with a hot iron. Silk: iron slightly damp on the right side with a warm iron. Wool (knitted): iron dry or nearly dry on the wrong side with a warm iron or steam. -
Page 14: General Advice
HINTS AND TIPS General Advice WARNING! Take care to avoid skin coming into contact with the iron’s soleplate or steam. Sort your washing into different temperature groups before you start ironing. Start with the low temperature items then work your way up to those which require a higher temperature. - Page 15 HINTS AND TIPS 15 15 Velvets Velvet should be ironed in one direction only, and with a light pressure. Always keep the iron moving. To help raise the nap, finish by holding the steam iron above the fabric and allow the steam to penetrate without applying pressure. Finally, shake or brush the fabric gently.
-
Page 16: Replacement Parts
Pulse Home Products Ltd, with one of the order forms printed below (or a copy) to our Customer Service Department. PLEASE COMPLETE THIS FORM IN BLOCK CAPITALS Your name: Your address: Postcode: Product: Part No: Description Quantity VIN067/IR70/72 91208 Cartridge I enclose a cheque for £ in full payment. -
Page 17: Important Instructions
IMPORTANT INSTRUCTIONS 17 17 Please read these instructions before operating this appliance and retain for future use. This product is not suitable for use by children, and may not be suitable for persons requiring supervision unless they receive instruction by a competent person on how to safely use the product. -
Page 18: Connecting To The Power
CONNECTING TO THE POWER When using electrical appliances, basic safety precautions should always be followed. WARNING: THIS APPLIANCE MUST BE EARTHED If this appliance is fitted with a rewirable BS1363, 13 amp plug, the fuse should be rated at 13 amps and be ASTA approved to BS1362. However if the plug is unsuitable, it should be dismantled and removed from the supply cord and an appropriate plug fitted as detailed below. -
Page 19: After Sales Service
AFTER SALES SERVICE 19 19 These appliances are built to the very highest of standards. There are no user- serviceable parts. Follow these steps if the unit fails to operate: Check instructions have been followed correctly. Check fuse has not blown. Check mains supply is functional. - Page 20 This product is manufactured to comply with the radio interference requirements of EEC directive 93/68 EEC. Vine Mill, Middleton Road, Royton, Oldham, OL2 5LN, UK. www.breville.co.uk Breville is a registered trademark of Pulse Home Products Limited © Pulse Home Products Limited 92532-3 VIN067/IR70/IR72_Rev4_07/08...