Cisco 7945 User Manual
Hide thumbs
Also See for 7945:
- Quick start manual (30 pages) ,
- Quick reference manual (8 pages) ,
- User manual (6 pages)
Advertisement
Quick Links
Drury Technology Services -
1
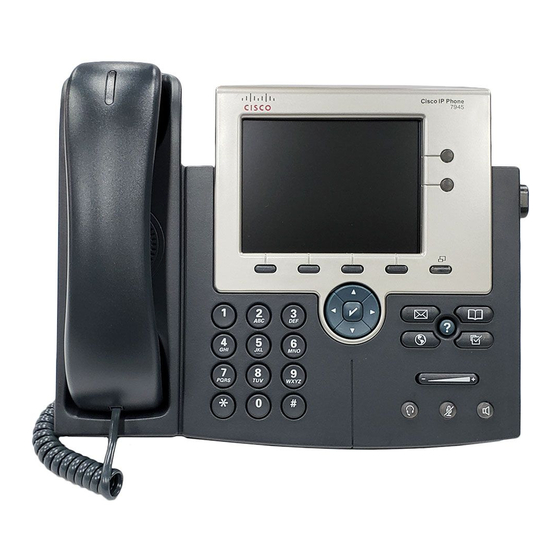
Programmable
buttons
2
Phone screen
3
Footstand
button
4
Messages button
5
Directories
button
6
Help button
7
Settings button
8
Services button
9
Volume button
10
Speaker button
11
Mute button
12
Headset button
13
Navigation
button
14
Keypad
15
Softkey buttons
16
Handset light
strip
Cisco 7945 User Guide
Depending on the configuration, these can be configured as phone lines, intercom lines, speed
dials feature buttons, or services. Configured by the system administrator.
Shows phone features.
Allows you to adjust the angle of the phone base.
Auto‐dials your voice message service.
Opens or closes the Directories menu. Use it to access call logs and directories.
Activates the Help menu.
Opens/closes the Settings menu. Use it to control phone screen contrast and ring sounds.
Opens/closes the Services menu.
Controls the handset, headset, and speakerphone volume (off‐hook) and the ringer volume (on‐
hook).
Toggles the speakerphone on or off. When the speakerphone is on, the button is lit.
Toggles the microphone on or off. When the microphone is muted, the button is lit.
Toggles the headset on or off. When the headset is on, the button is lit.
Allows you to scroll through menus and highlight items. When the phone is on‐hook, displays
phone numbers from your Placed Calls log.
Allows you to dial phone numbers, enter letters, and choose menu items.
Each activates a softkey option (displayed on your phone screen).
Indicates an incoming call or new voice message.
Advertisement

Related Manuals for Cisco 7945


Summary of Contents for Cisco 7945
- Page 1 Drury Technology Services - Cisco 7945 User Guide Programmable Depending on the configuration, these can be configured as phone lines, intercom lines, speed buttons dials feature buttons, or services. Configured by the system administrator. Phone screen Shows phone features. Footstand Allows you to adjust the angle of the phone base.
-
Page 2: Basic Features
Basic Features Place A Call • There are several ways you can initiate a call o Pick up the Handset to begin making the call o Press the Speaker button to begin making the call (Speakerphone) o Press the New Call soft key to begin making the call (Speakerphone) o Dial phone number and press the Dial soft key (Speakerphone) - Page 3 • You may immediately press the Trnsfer soft key to complete the transfer or when the party answers, announce the call and press the Trnsfer soft key again • If the person refuses the call or if the phone rings without an answer, press the End Call soft key, then press the Resume soft key to return to the original call Transfer A Call Direct To Voicemail:...
- Page 4 • The LCD display will show an extension number to which the call is parked. The number will be between 180 and 199. Make a note of this number. • Hang up the handset • To retrieve the parked call, from any IP telephone, dial the displayed Park Number. •...
-
Page 5: Advanced Features
not a member of a configured group. Please contact the system administrator if you desire the use of this feature. Enabling Headset Mode • If you use a headset, press the Headset button to enable it’s function • To turn off headset mode, press the Headset button to disable Advanced Features Direct Transfer –... - Page 6 • Use the Scroll button to select the Corporate Directory option on the menu. • Press the Select soft key to display the directory search options • Use the Scroll key to select the search option: First Name, Last Name or Number. •...
-
Page 7: Phone Settings
Phone Settings Adjusting The Ring Volume • With the handset in the cradle, press the Volume button to adjust how loud or soft you would like your phone to ring. It will adjust the volume automatically Adjusting The Handset Volume •... - Page 8 Voicemail Accessing Voicemail From Your Cisco Telephone • Press the Messages button on your telephone • Enter your password o Call our help desk at extension 7300 for default temporary password First Time Mailbox Setup • The first time you access your mailbox, you will need to run through the initial enrollment to activate your mailbox.