Samsung OfficeServ SMT-i5210 User Manual
Officeserv 7000 series
Hide thumbs
Also See for OfficeServ SMT-i5210:
- User manual (54 pages) ,
- Quick reference manual (53 pages) ,
- User manual (626 pages)
Table of Contents
Advertisement
Quick Links
Advertisement
Table of Contents

Related Manuals for Samsung OfficeServ SMT-i5210


Summary of Contents for Samsung OfficeServ SMT-i5210
- Page 1 SMT-i5210 Keyset User Guide For OfficeServ 7000 Series Systems ™ /2010...
-
Page 2: Table Of Contents
Samsung Telecommunications America reserves the right without prior notice to revise information in PLACING A CALL ON HOLD this guide for any reason. Samsung Telecommunications America also reserves the right without prior ................20 notice to make changes in design or components of equipment as engineering and manufacturing TRANSFERRING CALLS ..................20... - Page 3 TRANSFERRING WITH CAMP-ON Group Call Pickup......................48 ..............21 My Group Pickup ......................48 CALL WAITING ......................21 Privacy Release ......................48 CONFERENCE CALLS ....................21 DIALING FEATURES ....................49 FORWARDING CALLS Speed Dialing........................49 ....................22 Programming Personal Speed Dial Numbers ..........49 OTHER FEATURES AND FUNCTIONS ..........22-25 Directory Dialing......................50 Last Number Redial ....................51 SECTION 4.
- Page 4 Viewing the Next Caller ID Call ................72 Inquire Caller ID Park/Hold Info ................72 FEATURE ACCESS CODES ..................73 SECTION 6. APPLICATIONS ................74 SAMSUNG VOICEMAIL ..................75 SVMi E-Series Subscriber Services Menu Diagram ........76–77 Accessing Your Mailbox ....................78 Getting Started ......................79 Listen to your Messages ...................79 Subscriber Services Menu ..................79...
-
Page 5: About This Book
The new Samsung Multimedia Telephone SMT-i5210 keyset is part of the OfficeServ 7000 Series. The SMT-i5210 keyset represents a new concept of Internet phone, in that it uses an IP address to Send/Receive voice and data. For voice communications, the SMT- i5210 uses the data network line already in place in most offices and increasing number of homes. -
Page 6: Section 1. Caution And Preparation
CAUTION • Read the installation instructions before connecting the system to its power source. • If there is dirt or moisture on the pin contact surface of a power plug, pull out the plug and wipe it away with a cloth. If dirt or moisture remains on the prod- uct even after wiping, contact the service center. -
Page 7: Preparation
Connect the LAN cable (connected through the middle hole of the base to a PREPARATION network) to the LAN port of the phone, as shown in the figure. CHECK THE CONTENTS OF THE BOX When power is supplied from the LAN port (PoE), the phone is booted upon LAN connection. -
Page 8: Section 2. Phone Functions
The power adaper is sold separately. CAUTION The input power of the SMT-i5210 needs 5.0vDC and 3000mA. The SMT-i5210 phone needs to be powered by using Samsung’s SMT-A53PW power adapter. Failure to use the appropriate power supply will cause permanent damage to... -
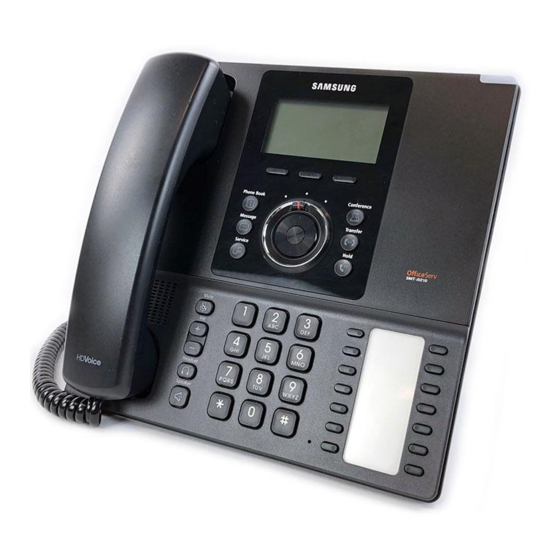
Page 9: Smt-I5210 Layout
Button Function SMT-i5210 LAYOUT 14 Buttons used to set up function buttons through Programmable Buttons interworking with a system. Dial Button Used to dial the phone number. LED (TSI) Speaker Button Used to enable/disable the use of a speaker phone. -
Page 10: Key Functions
Using the dial and direction buttons on the phone, you can enter and modify the English characters, numeric and special characters. NETWORK: The SMT-i5210 uses VoIP communication through an already- Whenever you press the dial button [, , ] on a text input screen, the input mode is installed data network. -
Page 11: Description Of Icons
Once they are read, it disappears. Shows that a LAN cable is connected to the PC port. The SMT-i5210 phone has a navigation button and a Selector Switch for FWD/DND/ABSENT MESSAGE to allow users to use its functions easily. -
Page 12: Smt-I5210 Setup
If you want to set up these parameters individually, fol- INITIALIZING THE SMT-i5210 low the instructions below. Initially the SMT-i5210 IP keyset will need to be setup to operate within the users • From the idle phone press Menu, scroll to Phone, and press OK button. Scroll network. -
Page 13: Configuration Menu Structure
TFTP Server: The IP address of the TFTP server containing the IP software. Upgrade: Starts the IP software upgrade process. 7. FACTORY RESET This option resets the SMT-i5210 to factory default settings. 8. PHONE RESTART This option reboots the SMT-i5210 phone. -
Page 14: Extension Log In & Out
Wait for the party to answer. If you hear a brief tone burst instead of ringback tone, the station called is set for Voice Announce or Auto Answer. Begin speak- If enabled, your SMT-i5210 telephone may require you to log in before making or ing after the tone. -
Page 15: Answering Calls
ANSWERING CALLS TRANSFERRING WITH CAMP-ON When you transfer a call to another station and receive a busy signal, you can OUTSIDE/INTERNAL/VOICE ANNOUNCE CALLS To answer these camp the call on to this station. Hang up when you hear the busy signal.The called three types of calls: party is alerted that a call is waiting. -
Page 16: Forwarding Calls
Message Service (SMS). Short Message Service is similar to sending text messag- VOLUME CONTROL Vol button is used to adjust the volume of a handset, ing [Function only supported on Samsung IP phones]. speaker and ringing sound. SERVICE BUTTON [Scheduler]... - Page 17 • Move down, use the dial pad to enter name (for example: John Dow). Refer to FUNC. SOFT BUTTON - This function allows a user Text Input Method. one touch easy access to many of the system features. • Press the Save soft button to exit and save the setting. When pressed, the following options are displayed: Last Number Redial, Save/Repeat, Speed Dial, Directory, OK/ENTER BUTTON...
-
Page 18: Section 4. Phone Features
BASIC MENUS The basic menus screen is displayed if you select the Menu from the soft menu at the left bottom of a idle screen. Using the Navigation button, move to a desired function, and press the OK button to execute the function. SOFT BUTTON STRUCTURE SECTION 4. - Page 19 Item Sub-Item Description Item Sub-Item Description Allows a user to setup (show, add, and edit) a conference group This function is used to allow station users to set application 4. Conference 7. Settings to call multiple parties simultaneously to join the conference call. settings, call forwarding, absent messaging, AOM setting, view station network information, view phone firmware or initialize Allows a user to set the alarm clock function.
- Page 20 1. PHONEBOOK • Press the Search soft button from the dial pad enter the characters of the name (case sensitive) or number to search and press the OK button, the NOTE: Personal phonebook is stored locally in phone matching phone number is displayed. Move to a desired name/number using memory.
- Page 21 4. Short Message (SMS) DELETE / DELETE ALL This is the function used to delete an entry or all entries in the Call Log. This function is used to send and create internal short messages or text messaging. • Press the Menu soft button, scroll to Call Log, press OK. •...
- Page 22 OK. Set the following Time Format, Font, and LCD Power Saving of the • Press the Menu soft button, scroll to Conference button, and press OK. SMT-i5210 phone, select the option and adjust the screen settings. • Scroll to the Name of the Group to be edited and press Edit soft button.
-
Page 23: Func. Soft Button
AOM SOFT BUTTON 4. Language • Press the Menu soft button. Scroll to Phone and press OK. Select Language This function is used to display all 99 programmable fea- and press OK. Select English (Default English). ture buttons of the phone. The Navigation button can be •... -
Page 24: Section 5. Officeserv 7000 System Features
OUTSIDE CALLS MAKING CALLS FROM AOM Note: When making calls, internal or outside calls, in order to access the program- mable button screens, press the AOM soft button. Then you can utilize the Navigation button to scroll the list. SECTION 5. •... -
Page 25: Busy Station Callback
NOTES: • The called station must release its first call or place it on hold before answer- A callback will be canceled if not answered within 30 seconds. If you have set ing your camp-on. a callback, the cursor associated with the Callback button will be solid black. NOTES: If the Hot Keypad feature has been turned off, you must first lift the handset If you receive No More Calls tone, that station has no available button to... -
Page 26: Intercom Calls
INTERCOM CALLS CALL PROCESSING VOICE ANNOUNCE MODE SYSTEM HOLD When another station calls you, your keyset will sound a brief attention tone and When you are connected to any call, press Hold. The call will flash at the keyset. If you will hear the caller’s announcement. -
Page 27: Hold Recall
HOLD RECALL CALL TRANSFER If you leave a call on hold longer than the hold timer, it will recall your station. The Transfer is used to send any calls to another extension in one of two ways.You can button that the call appears on will have a slow flashing indicator. do a screened transfer by informing the other extension who is calling or you can do a blind transfer without notification. -
Page 28: Transfer To Voice Mail
TRANSFER TO VOICE MAIL To Forward ALL Calls to Another Station • Dial 601 plus the extension or group number. This feature is used to send a call directly to a voice mailbox.Your keyset must have • Receive a confirmation tone and hang up. a correctly programmed VT button to accomplish this. -
Page 29: Group Call Pickup
GROUP CALL PICKUP DIALING FEATURES To pick up (answer) a call ringing in any pickup group, lift the handset and dial 66 plus the desired group number (01-10 on the OfficeServ 7030, 01-20 on the OfficeServ 7200-S, 01-99, and 01-99 on the OfficeServ 7000 Series) or press the All “DIALING FEATURES”... -
Page 30: Directory Dialing
For the purposes of programming LAST NUMBER REDIAL speed dial numbers, the programma- To redial the last outgoing telephone number you dialed, press the Func. soft but- ble buttons are know as A, B, C, D, E, ton, scroll to Last Redial, or dial 19. and F. -
Page 31: Paging And Messaging
NOTES: PAGING AND MESSAGING The LED on the Page button will only light when an All Page is in progress. If allowed by your system administrator you may be able to initiate a page from a speakerphone by pressing the Page key or dialing 55 without lifting MAKING AN INTERNAL PAGE the handset. -
Page 32: Returning Messages
AUTOMATIC PARK WITH PAGE BUTTON —OR— • Press Message button, scroll to Station Messages, press OK. • While in conversation, press the Page button. The call is automatically parked • Press Func. soft button, scroll to Clear, press OK. at your station. •... -
Page 33: Convenience Features
• Press the Mute button. The Mute button indicator will be lit steady. If enabled, your SMT-i5210 telephone may require you to log in before making or • To resume speaking, press the Mute button again. The Mute button indicator receiving calls. -
Page 34: Executive/Secretary Hotline
CALLING THE DOOR PHONE/ GROUP LISTENING ROOM MONITOR When you are engaged on a call and you are using the handset, you may want other people to hear the distant party’s voice over the speaker: You may call the door phone and listen to what may be happening outside or in another room. -
Page 35: Locking Your Keyset
LOCKING YOUR KEYSET OFF-HOOK VOICE ANNOUNCE You can lock your keyset to control misuse of your phone while you are away. You Keysets may receive a voice announcement while on another call. The calling sta- can unlock it when you return. tion must have an OHVA button. -
Page 36: In Group/Out Of Group
The passcode is the same as your station passcode. This feature only applies if when your keyset is in the group. there is a Samsung Voicemail card installed in the system and your keyset has a • Press the IO GRP (IN/OUT GRP) button again to exit the group and the indi- programmed AME button. -
Page 37: Set Answer Mode (Intercom)
• Redial the new passcode. If successful, you will hear two beeps. Four beeps tor to be lit solid to indicate this. Pressing the button while the button indicator is indicate an incorrect code to confirm, reenter the code again. lit solid will cause the keyset to return to handset mode and the button indicator •... -
Page 38: Display Speed Dial Name
DISPLAY SPEED DIAL NAME • Dial the number of a C.O. line or trunk group to use when making calls to this MOBEX port. This option allows you to view the name associated with a speed dial number as • Dial the phone number you can be reached at by users calling this MOBEX it is dialed. -
Page 39: Display Features
TIMER FUNCTION DISPLAY FEATURES Display keyset users may use this feature as a simple stopwatch. • When the keyset is idle, press the Timer button to start timing. DIRECTORY INFORMATION • Press the Timer button again to stop timing. • Read the elapsed time in the display. -
Page 40: Managing Programmable Key Assignments
• Enter Station Name. Use the Volume Up [+] or Volume Down [-] buttons to CALLER ID move cursor. • Press Save soft button and then End soft button to store the name. SELECTING YOUR CALLER ID DISPLAY MANAGING PROGRAMMABLE Simultaneous display of Caller ID name and number on incoming CO calls on both KEY ASSIGNMENTS lines of display keysets is supported on all OfficeServ systems. -
Page 41: Viewing The Next Caller Id Call
VIEWING THE NEXT CALLER ID CALL FEATURE ACCESS CODES In the event that you have a call waiting or a camped-on call at your keyset, you can press the Next button to display the Caller ID information associated with the call in queue at your keyset. -
Page 42: Section 6. Applications
This section describes how to setup and use the various features available to a Subscriber. A Subscriber is a person that has been authorized access to the various features and services available in the Samsung Voicemail. Please review this sec- tion carefully before you use your Authorized Features and Services, known as Subscriber Services. - Page 43 Subscriber Services Menu SVMi-8 Subscriber Services Menu SVMi-8 Subscriber Services Menu Calais Executary Services Menu Calais Executary Services Menu Group New Group Saved Listen to New Review Saved Record & Send Access Access Personal Personal Mailbox Mailbox Private Access Personal Pause, Resume Play Menu Exit...
-
Page 44: Accessing Your Mailbox
ACCESSING YOUR MAILBOX GETTING STARTED [Also known as Subscriber Services Menu] Using your new Samsung Voicemail Subscriber Services is as simple as following a few simple spoken instructions. First time users should read this section as a tuto- Inside Callers [Subscriber logging in from their Desk] rial. -
Page 45: Listening To Old Or New Messages
Play options. Pressing this key will play all the menu options available to you from this point. LISTENING TO OLD OR NEW MESSAGES Hear the time and date, and sender's information of the message you just heard. Sender information is not available on outside calls. Play / replay the message you just heard. -
Page 46: Access Manager
Caller will hear “Forwarding to”“{Subscriber Name}” before actually being for- warded. Call Screening If this is turned on, the caller will be asked their name and the Samsung Voicemail will play this name to you before the transfer, giving you an option to accept or reject the call. -
Page 47: Personal Greetings
Example:“Hi this is John Smith. I'm sorry I am not available to answer your call. Night Intercept is active the Samsung Voicemail will first ring your extension If someone else can help you, please enter the extension number now. Or, to then play your primary, No Answer greeting during the day (when you are leave me a message, press 1.”... -
Page 48: Mailbox Administration
Message Alert Edit Personal Greetings When this function is activated, the Samsung Voicemail will call any outside or You may also edit/record each one of the greetings (1-9) at any time. inside telephone number, after each message is left in your voice mailbox. -
Page 49: Message Broadcast
Undelivered Retrieval n From the Subscriber Services Menu press [6] for Mailbox Administration. When this function is activated, the Samsung Voicemail will allow you to recall n Press [9] for Broadcast Messages. any messages you have sent that have NOT yet been picked up by the recipi- This option will only be available if your mailbox has been assigned ent. -
Page 50: Personal Administration Settings
Place a Direct Call Allows you to place a direct call out of the Samsung Voicemail from anywhere. This must be done in order for the directory feature to work correctly. You may either dial the number or dial a single digit 1-5 that corresponds to a... -
Page 51: Shortcuts
To activate this feature press the AME button. The associated indicator will be lit SHORTCUTS steady. Press again to turn off. If this key is pressed while a station is ringing (dur- ing forward no answer), the feature will be turned on for the current call only. Calling While the caller is leaving a message or ringing you may: Calling a station that is busy or does not answer you can press [#] to immediately... - Page 52 • Some will allow you to edit the subject field to help you find a particular mes- "From" field. Otherwise, the "From" field will display the name of the Samsung sage quickly in a large archive of messages. voice mail system (SVMi-8E, SVMi-16E, or SVMi-20E) sending the message.
-
Page 53: Personal Speed Dial Numbers
PERSONAL SPEED DIAL NUMBERS PERSONAL SPEED DIAL NUMBERS CODE NAME TELEPHONE NUMBER CODE NAME TELEPHONE NUMBER _________________________ _________________________ _________________________ _________________________ _________________________ _________________________ _________________________ _________________________ _________________________ _________________________ _________________________ _________________________ _________________________ _________________________ _________________________ _________________________ _________________________ _________________________ _________________________ _________________________ _________________________ _________________________ _________________________ _________________________ _________________________ _________________________ _________________________...