Table of Contents
Advertisement
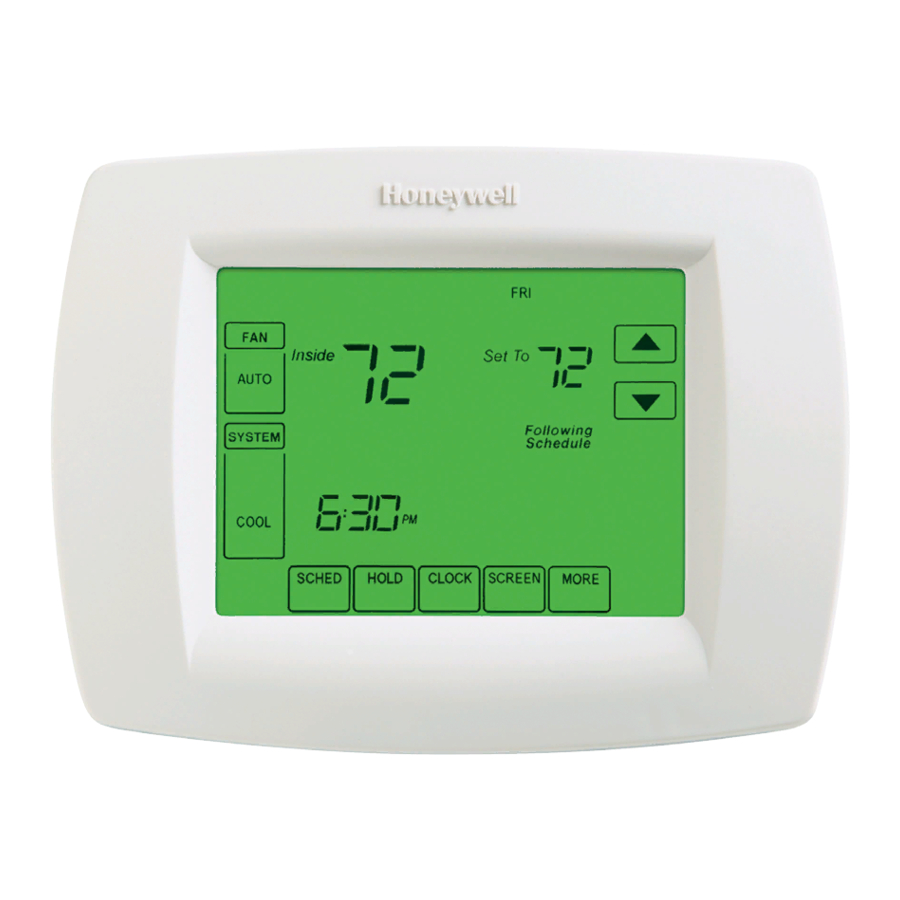
VisionPRO
Total Home Comfort System
APPLICATION
®
The VisionPRO
IAQ Total Home Comfort System features an
effortless, 7-Day programmable touchscreen thermostat that
provides control of temperature, humidification,
dehumidification, and ventilation.
®
IAQ
FEATURES
• Large, clear display with backlight shows the current
and set temperature and time-even in the dark.
• Touchscreen interaction
• Real-time clock keeps time during power failures and
automatically updates to daylight savings.
• Change/check reminders let you know when to service
or replace filters.
• Various Hold options allow you to override the
program schedule, as desired.
• Controls humidification to increase homeowner
comfort while protecting woodwork and furnishings.
• Controls dehumidification using air conditioner with
high or low speed fan or a whole house dehumidifier.
• Controls ventilation with other HRV, ERV, or Freshair
damper. Vent on demand and automatically using
patented advanced ventilation control.
• Advanced heat pump control featuring balance point
plus temperature droop control to increase
homeowner comfort.
Application/Features..........................................................
Specifications/Ordering Information ..................................
Installation ........................................................................
Wiring ...............................................................................
Power the Thermostat ......................................................
Installer Setup .................................................................. 12
Operation .......................................................................... 20
Programming .................................................................... 26
Troubleshooting ................................................................ 36
PRODUCT DATA
Contents
1
2
4
5
8
68-0287-04
Advertisement
Table of Contents

Related Manuals for Honeywell VISIONPRO 68-0287-04


Summary of Contents for Honeywell VISIONPRO 68-0287-04
-
Page 1: Table Of Contents
Total Home Comfort System APPLICATION ® The VisionPRO IAQ Total Home Comfort System features an effortless, 7-Day programmable touchscreen thermostat that provides control of temperature, humidification, dehumidification, and ventilation. FEATURES • Large, clear display with backlight shows the current and set temperature and time—even in the dark. -
Page 2: Specifications/Ordering Information
Interstage Differential: ® VisionPRO IAQ Comfort Systems operate with droopless control. Once the thermostat senses that 1st stage is run- ning at 90% capacity, the thermostat energizes 2nd stage. Mounting Means: ® VisionPRO... - Page 3 WALLPLATE 3-3/8 (86) THERMOSTAT 6 (152) ® Fig. 1. VisionPRO IAQ Comfort System dimensions in in. (mm). 7-9/32 (185) 6-57/64 (175) 4-35/64 (116) FRONT VIEW Fig. 2. THM5421C1008 Equipment Interface Module dimensions in in. (mm). VISIONPRO 3-3/8 (86) THERMOSTAT Fig. 3. C7089U1006 Outdoor Sensor Mounting Clip...
-
Page 4: Installation
4. After completing installation, use these instructions to verify the product operation. Selecting Location Install the thermostat about 5 ft. (1.5m) above the floor in an area with good air circulation at average temperature. See Fig. 6. 5 FEET [1.5 METERS] Fig. -
Page 5: Wiring
3. Securely tighten each screw. 4. Push excess wire back into the hole. 5. Plug the hole with nonflammable insulation to prevent drafts from affecting the thermostat. 6. See Fig. 10–20 for typical wiring hookups. Table 1. Selecting Terminal Identifications for System Type. - Page 6 Rc and Rh. If used on a two-transformer sys- tem, remove metal jumper wire between Rc and Rh. If thermostat is configured for a heat pump system in the Installer Setup, configure changeover valve for cool (O-factory setting) or heat (B).
- Page 7 24 VAC FACTORY INSTALLED JUMPER BETWEEN R, RC AND RH WIRE TO TERMINALS ON THERMOSTAT. Fig. 12. Typical hookup of conventional system with up to three-stage heat and two-stage cool with one transformer (3H/2C, 2H/2C, 2H/1C, 1H/2C, 1H/1C conventional). COMMUNICATION LED...
-
Page 8: Power The Thermostat
BLUE YELLOW DH90 GREEN WHITE FRESH DAMPER Fig. 20. Hookup of Honeywell DH90 with fresh air intake for ventilation. 68-0287—04 POWER THE THERMOSTAT • 24 Vac common wire only to EIM or zone panel. Wiring 24 Vac Common 24 VAC •... - Page 9 PLUG WIRING HOLE WITH NON-HARDENING CAULK OR PUTTY. Fig. 24. Wire C7089U1006 Outdoor Sensor to the EIM. If an outdoor temperature sensor is installed, the thermostat displays the outside temperature in the lower right corner of the Home Screen. ®...
- Page 10 Set To AUTO Following SYSTEM Schedule HEAT SCHED HOLD CLOCK SCREEN If thermostat is set to Auto Changeover System mode, press the More key until the outside temperature is shown on the screen. SCHED SCHED HOLD HOLD CLOCK SCREEN DONE...
- Page 11 C7189 C7189 Set Calendar and Time Thermostat keeps current time and day for up to ten years under normal use after the calendar is set. C7189 C7189 When the thermostat is first powered, the display is ready to set the calendar and time.
-
Page 12: Installer Setup
The equipment interface module is preprogrammed at the factory as a one heat one cool product and the thermostat will “auto discover” those settings. The equipment interface module will be reprogrammed when the installer manually changes the configuration in the installer set up. -
Page 13: Installer Setup Menu
4. See screen below to review how the thermostat keys are used during Installer Setup. See Table 3–4 for the Installer Setup Numbers and Settings. Parameter Installer Setup Number Name Zone Number 1–9 Date (Year Upper) Date (Year 01-99 Lower) - Page 14 Light changes to full brightness after pressing any key. Auto Changeover allows user to choose heat, cool, off or auto. When set to Auto the thermostat will automatically choose heat or cool based on room temperature and heat/cool set points. Manual changeover allows the user to manually toggle between heat, cool and off.
- Page 15 The temperature sensor in the thermostat is disabled when using remote indoor temperature sensor(s). An outdoor temperature sensor is required for heat...
- Page 16 If there is a remote sensor installed and the setting is either auto discover or “remote” the internal thermostat humidity sensor is disabled. If set to “internal” the internal thermostat sensor is presented on the screen. If set to “disabled” the...
- Page 17 Only shown if ISU372 and ISU400 are not set to 0. When set to On will use ventilation to remove humidity when thermostat is in the heat mode. Outdoor temperature sensor required for high and low temperature lockouts.
- Page 18 ® VISIONPRO IAQ TOTAL HOME COMFORT SYSTEM Parameter Installer Setup Number Name Humidifier Pad Replacement Reminder UV Lamp Replacement Reminder Adaptive Intelligent Recovery Number of Periods Number of Periods: Weekdays Number of Periods: Weekend Days Min Compressor Off Time Heat Temp Range Stops 40-90 Cool Temp...
-
Page 19: Installer System Test
Setup. 2. Note that the test appears at the end of the Installer Setup Numbers. 3. See Fig. 28 to review how the thermostat buttons are used during the Installer System Test. See Table 6 for available Installer System Tests. -
Page 20: Operation
Press the Next button to go to the beginning of the Installer Setup or press the Done button to exit the Installer System Test. When VisionPRO® IAQ is used in a zoning system you must exit the installer test on one thermostat before entering the installer test on another thermostat. - Page 21 (AUTO/OFF) With Air Conditioner The set range for dehumidification is 40 to 80%, and can be set in 5% increments. The thermostat must be in Cool mode or Auto mode when the previous call was a call for cooling. FROST...
-
Page 22: Ventilation Control
It is only visible when lighted. When the L terminal is wired to an equipment monitor, the LED signals when a check or fail signal is sent to the thermostat from the system. This is operational in the Heat, Off, Cool or Auto positions. - Page 23 The thermostat uses a red LED indicator that lights when the thermostat is in the Emergency Heat mode. The LED is located in the upper right corner of the thermostat. It is visible only when on. Heat Pump Temperature Lockouts...
- Page 24 If installer setup (ISU 176) is configured for one or more stages of Auxiliary Heat. If installer setup (ISU 176) is configured for two stages of Auxiliary Heat. If thermostat is controlling backup heat, see temperature lockout section (page 23). 68-0287—04...
- Page 25 In a multi-stage system, while maintaining setpoint, several factors affect when the next stage energizes, such as load conditions, environmental conditions, P+I control, and home insulation. The next stage energizes when the thermostat senses the previous stage is running at 90% capacity. This operation is droopless control.
-
Page 26: Programming
® VISIONPRO IAQ TOTAL HOME COMFORT SYSTEM 4. See the screen below to review how the thermostat keys are used during the User Setup. See Table 8 for the User Setup numbers and settings. ADVANCE TO NEXT USER SETUP USER SETUP... -
Page 27: Cancel A Schedule Period
NOTE: Schedule times are in 15-minute intervals. Edit Schedule 1. Press Sched key. Inside AUTO SYSTEM HEAT SCHED HOLD CLOCK SCREEN 2. Press Edit key. OK TO PICK MULTIPLE DAYS SCREEN LOCKED Inside Set To AUTO CANCEL SYSTEM PERIOD EM HEAT HEAT COOL AUTO... -
Page 28: Set Time
® VISIONPRO IAQ TOTAL HOME COMFORT SYSTEM OK TO PICK MULTIPLE DAYS DONE WAKE LEAVE RETURN 7. Press Done key. Fan Schedule Press Fan key while in the Scheduling Screen to program the System Fan. Choices available from the Scheduling Screen: Auto (default position)—fan runs with equipment. -
Page 29: Set Temperature Overrides
The current day of the week should already be set correctly. If not, see Installer Setup to set the day. Set Temperature Overrides The thermostat has four temperature override options: Hold Temperature Until, Permanent Hold, Vacation Hold, and Southern Dehumidification Away Setting. - Page 30 Clean Thermostat Screen The thermostat has a touch screen interaction. Follow these steps to clean the screen without making thermostat changes: 1. Press the Screen key. Thermostat locks out all touch keys for 30 seconds to allow for cleaning. OK TO...
-
Page 31: Filter Change Reminder
3. Press DONE to save and exit, or press CANCEL to exit without saving changes. If programmed for auto-ventilation by the installer, the thermostat will ventilate your home as needed. Indoor Air Quality Reminders Filter Change Reminder The filter change reminder must be turned on from the Installer Setup. - Page 32 70°F. Set the Wake period for 6:00 AM and 70°F. The SLEEP CANCEL thermostat then turns on the heat before 6:00 AM to raise the M23516 temperature to 70°F by 6:00 AM. The thermostat alerts that the heating or cooling system is coming on before a scheduled time by showing “Recovery”...
- Page 33 NOTE: It takes about a week for the thermostat to adjust to local weather, the schedule, the construction of the home and the heating and/or cooling system. Each day it adjusts the next day’s recovery start time accordingly. P+I Control...
-
Page 34: C7189U1005 Remote Indoor Temperature Sensor
® VisionPRO IAQ Thermostat. The C7089U1006 Outdoor Sensor converts outdoor ambient temperature to a resistance that the thermostat can interpret. The C7089U1006 has a negative temperature coefficient (NTC), which means that resistance decreases as the temperature increases. See Table 12. -
Page 35: Checkout/Calibration
Thermostat Installer Setup Number 340 set to 2, the temperature displayed on the thermostat home screen as Inside Temperature will be a 50/50 average between the temperature sensed at the remote sensor location and the temperature sensed at the thermostat location. -
Page 36: Troubleshooting
EIM and heating equipment. End the call for heat at the thermostat then repeat the call for heat. Check the communication LED on the EIM board. — If the LED does not blink, check communication wiring (wire between terminal 1 on both the EIM and thermostat. - Page 37 EIM and cooling equipment. End the call for cool at the thermostat then repeat the call for cool. Check the communication LED on the EIM board. — If the LED does not blink, check communication wiring (wire between terminal 1 on both the EIM and thermostat.
- Page 38 ® VISIONPRO IAQ TOTAL HOME COMFORT SYSTEM Symptom Heat On is not in the display. System setting is not set to Heat and/or temperature setting is not set above room temperature. Cool On is not in the display. System setting is not set to Cool and/or the temperature setting is not set below room temperature.
- Page 39 L7224C1004—120VAC Electronic Aquastat L7248—Aquastat R7184—Oil Primary * T8635L thermostats used with TH9421C thermostats must be used with a W8835A Zone Panel and the TH9421C must be the Master Zone Controller (zone 1 thermostat) Table 20. UV Lights UV100E2009 UV100E1043 UV100E3007 ®...
- Page 40 Honeywell Limited-Honeywell Limitée 35 Dynamic Drive Toronto, Ontario M1V 4Z9 customer.honeywell.com ® U.S. Registered Trademark © 2011 Honeywell International Inc. US Patent No. 6,208,263; 6,373,376; 6,448,901; 6,926,076; 7,044,397; D509151; H25192; H25193 and other patents pending 68-0287—04 M.S. Rev. 03-11 Printed in U.S.A.