Table of Contents
Advertisement
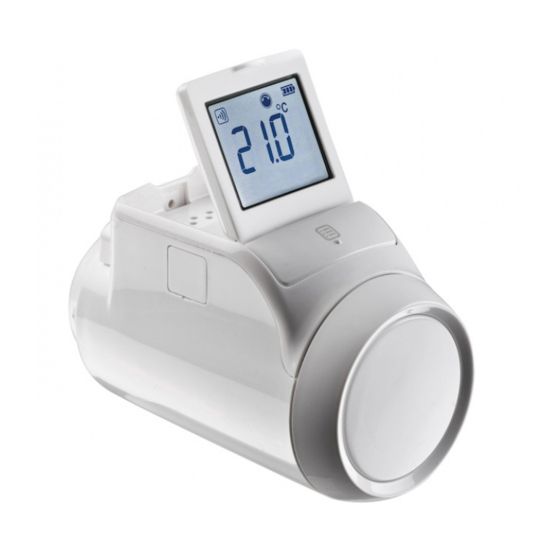
HR92
Radiator Controller
1. Scope of delivery
The radiator controller packaging contains:
1
1 Radiator controller with valve baseplate M30 x 1.5;
batteries included
2 Display support
3 Valve adapter type Danfoss RA
4 Screws for securing radiator controller and battery
compartment
Danger of suffocation!
f Keep packaging materials away from
children.
WARNING
Wireless
2
4
3
2. Brief description
HR92 is an electronic radiator controller with a modern
design. Because of the wireless communication with
a frequency of 868 MHz the controller can be easily
integrated in heating systems such as evohome to
control the room temperature.
User-friendly
• Large adjustable display with backlight.
• Display of information in the display using symbols
and text.
• Parameters can be set individually.
• Manual temperature modification (effective until the
next switching point) possible at any time.
Mounting
• The radiator controller fits on the most common
radiator valves of the type M30x1.5.
• Further adapters are available as accessories.
• An external window contact can be connected
optionally.
Energy saving features
• With the window function, the radiator valve is closed
when ventilating the room.
• If an external window contact is used, the radiator
valve is closed when a window is open.
f Use the radiator controller only in
accordance with these operating
instructions.
CAUTION
f Do not let children play with the radiator
controller.
UK
1
Advertisement
Table of Contents

Related Manuals for Honeywell HR92


Summary of Contents for Honeywell HR92
- Page 1 2. Brief description HR92 is an electronic radiator controller with a modern design. Because of the wireless communication with a frequency of 868 MHz the controller can be easily integrated in heating systems such as evohome to control the room temperature.
-
Page 2: Device Overview
Radio signal display 3. Device overview Display Meaning Operating elements and display Field strength excellent signal Field strength good signal Field strength weak signal 4. Mounting Ready to operate in three steps: • Insert batteries and set language • Establish radio connection 1 Adjustment dial •... -
Page 3: Establishing Radio Connection
Binding must first be activated at the HR92 so that the radio signal can be received. Subsequently binding has to be activated at the central operating device. Please read the operating instructions of your central 1. - Page 4 (flashing) in the display. device. checking HR92 receives the data from the central operating device. Synchronization can take up to 4 minutes until the current room setpoint temperature is displayed at the checking HR92.
-
Page 5: Mounting Radiator Controller
MNG, Heimeier, during radio communication. Oventrop valves M30 x 1.5 • The room setpoint temperature of the HR92 radiator controller is changed automatically to 20 °C. Danfoss RA Supplied fRestore radio communication to the central operating device, see Section 7. - Page 6 Mounting the valve baseplate 3. Lock the radiator controller in the end position. To do so, push the slide towards After approx. 1 minute (self-test) is displayed. cycl Afterwards the radiator controller changes to normal operation. °C 1. Separate the valve baseplate from the radiator The radiator controller only operates if it is locked correctly in the end position.
-
Page 7: Securing Radiator Controller
Connecting an external window contact The floating external window contacts HCA30 can be The radiator controller and the batteries can be connected to the HR92 radiator controller. secured against removal by using the supplied screws. The cable ACS90 is required to connect the external window contact. -
Page 8: Basic Setting Overview
5. Basic settings Set- Par. Meaning ting Battery type Overview Alkaline Lithium If required, the 12 basic settings (parameters) can be NiMH (accumulator chargeable) adjusted. Display of the valve position * Factory settings have a grey background. No display of the valve position Parameters marked with an * are described in more Momentary display of the valve position detail below. -
Page 9: Description Of Parameters
Description of the parameters Parameter 10 – Display of the valve position When this parameter is activated (setting "1"), the calculated valve position (0 ... 100% opened) is Parameter 2 – Backlight displayed momentarily. The display has a backlight for reading the information. The main display is shown again after approx. -
Page 10: Help With Problems
You can also open the radiator valve beforehand by are flashing HR92 and the central turning the adjustment dial. operating device (radio The sensitivity of the radiator controller to a temperature test). drop or temperature rise can be set, see Section 5, Repeat the binding Parameters 3 to 5. -
Page 11: Declaration Of Conformity
Do not burn the product. – 10. Declaration of Conformity Hereby Honeywell declares that this HR92UK is in Restoring the factory setting compliance with the essential requirements and other relevant provisions of Directive 1999/5/EC. 1. Keep the button pressed for approximately 5 seconds until Parameter 1 flashes (left-hand digit). -
Page 12: Binding And Radio Test/Overview
Turn adjustment dial to the right Only at operating devices with 2-way communication, e.g. evotouch. Manufactured for and on behalf of the Environmental and Combustion Controls Division of Honeywell Technologies Sàrl, Rolle, Z. A. La Pièce 16, Switzerland by its Authorized Representative...