Kenwood DPX308U Quick Start Manual
Dual din sized cd receiver
Hide thumbs
Also See for DPX308U:
- Quick start manual (44 pages) ,
- Instruction manual (41 pages) ,
- Service manual (59 pages)
Table of Contents
Advertisement
KENWOOD
Made for
~
iPod
Take the time to read through this instruction manual.
Familiarity with installation and operation procedures will help you obtain the best
performance from your new CD-Receiver.
For your records
Record the serial number, found on the back of the unit in the spaces designated on the
warranty card, and in the space provided below. Refer to the model and serial numbers
whenever you call upon your Kenwood dealer for information or service on the product.
Model DPX308U Serial number
2010 Kenwood Corporation All Rights Reserved.
©
DPX308U
DUAL DIN SIZED CD RECEIVER
Quick Start Guide
AMPLI-TUNER LECTEUR DE CD
Guide de demarrage rapide
REPRODUCTOR DE DISCOS COMPACTOS
Guia de inicio rapido
Kenwood Corporation
iPhone
CJ
((t
Designed for
Windows
Media™
_
AAC
859-2069-00/00 (K)
Advertisement
Table of Contents

Related Manuals for Kenwood DPX308U


Summary of Contents for Kenwood DPX308U
-
Page 1: Quick Start Guide
Record the serial number, found on the back of the unit in the spaces designated on the warranty card, and in the space provided below. Refer to the model and serial numbers whenever you call upon your Kenwood dealer for information or service on the product. Model DPX308U Serial number 2010 Kenwood Corporation All Rights Reserved. - Page 2 & CAUTION relevant Instruction Manual which can be Keep battery out of reach of children downloaded at http://manual.kenwood. and in original package until ready to comledition/im328. use. Dispose of used batteries promptly. To refer to the Instruction Manual, a PC If swallowed contact physician loaded with Microsoft®...
- Page 3 Kenwood dealer. Do not stick tape etc. on the disc, or use a When you purchase optional accessories, check with your Kenwood dealer to make disc with tape stuck on it. Do not use any accessories for the disc.
- Page 4 [B.BOOST] Adjusting the Clock Canceling the Demonstration Mode [8.80051] Press the button for at least Cancel the demonstration mode 1 second. when you use it for the first time after Turn the [VOL] knob to adjust the hour, installation. and then press the [VOL] knob. Press the [VOL] knob to cancel the Turn the [VOL] knob to adjust the demonstration mode when the...
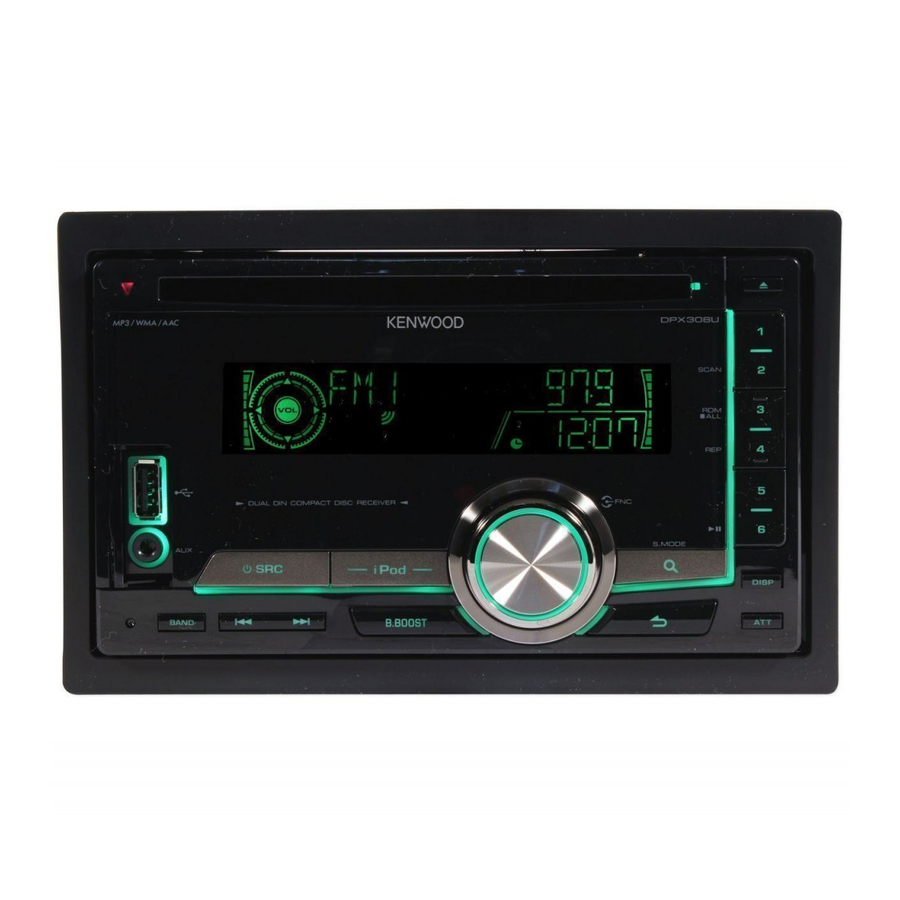
- Page 5 [S~C] [iPod] [VOL] I]~. USB terminal I - - Auxiliary input < Il~~ ~l~~l ..I :':: [B.BOOST] USB terminal Power USB device or iPod can be connected. Turns the power ON by pressing the CA-U1EX or KCA-iP10l/iP102 (optional [SRC] button.
- Page 6 Playing Disc Music Search Searching for the song you want to play. Insert the disc in the Disc slot. When inserted, the source is switched Press the [ button. automatically and a song starts playing. Search for music. Playing USB device Connect a USB device or iPod to the Movement between items Turn the [VOL] knob.
- Page 7 KENWOOD [SRC] ..-r:: [1] - [6] · · I-,--{Q'; 0«- · [BAND] a:::=: ::=:oJ \ .. - e:=J \"1 "- __ = - , -~-- ..[~]/[~] Selecting a Tuner source Station preset memory Press the [SRC] button to select "TUNER"_...
- Page 8 USB mass storage class • Playable USB device file system FAT16, FAT32 An online manual about Audio files is put on the site, ..1 www.kenwood.com/cs/ce/audiofilel. iPod/iPhone that can be connected to this unit Made for ..2 • iPod touch (4th generation) •...
- Page 9 After the unit is installed, check whether If you experience problems during the brake lamps, blinkers, wipers, etc. on installation, consult your Kenwood dealer. the car are working properly. Disconnect the battery's negative terminal Mount the unit so that the mounting and make all electrical connections before angle is 30°...
- Page 10 • Speaker Impedance: 4 - 80 • USB terminal Maximum Supply current: White }>--- To front left speake/±) White/Black 8---------', ® Gray ---J}>---- To front rig ht speaker _G_r..:ay;..-/_B_la_ck ® Green To rear left speaker Green/Black ® Pur!2le }>---- To rear right speaker Purple/Black Ignition key switch...
- Page 11 Connect to the terminal that is grounded Brown (Mute control wire) when either the telephone rings or during MUTE conversation. To connect the Kenwood navigation system, consult your navigation Orangel White manual. (Dimmer control wire) To car light control switch...
- Page 12 · •. ·.I . . • 11..·1' II' · ·1111-1· ..•. . . , · . . - . . , . " .•. """"I·I~"".",.=.I-.?< " I~'.· · .-.·~.I· ·~.-I ~ ,~.ii 1 .•.•.••..' > .. ~~: ~ ''''.o;;.~ •." . .
- Page 13 Installing in Japanese-Made Cars Installation and General Motors Cars Install onto the car bracket using the supplied screws (M5 6 mm, M5 7 mm). The holes of the car bracket to use will differ depending on the car model. Car Bracket \p~I~ Bend the tabs of the mounting sleeve with a screwdriver or similar utensil...
- Page 14 Removing the hard rubber frame Removing the Unit Engage the catch pins on the removal Remove the hard rubber frame by tool @ and remove the two locks on the referring to the removal procedure in lower level. the section <Removing the Hard Rubber Lower the frame and pull it forward as Frame>.
- Page 15 Kenwood Corporation 2967-3, ISHIKAWA-MACHI, HACHIOJI-SHI TOKYO, JAPAN KENWOOD CORP. CERTIFIES THIS EQUIPMENT CONFORMS TO DHHS REGULATIONS NO.21 CFR 1040. 10, CHAPTER 1, SUBCHAPTER Location: Top plate FCC WARNING This equipment may generate or use radio frequency energy.
- Page 16 - - - - - - - - - - KENWOOD...
-
Page 17: Instruction Manual
Record the serial number, found on the back of the unit, in the spaces designated on the warranty card, and in the space provided below. Refer to the model and serial numbers whenever you call upon your Kenwood dealer for information or service on the product. -
Page 18: Table Of Contents
Music Search Play function Direct music search Tuner Operation Basic Operation Tuner Setting Station Preset Memory Auto Memory Entry Preset Tuning Direct access tuning Display Settings Display Setting Text Display Selection Illumination Color Selection Auxiliary Input Display Setting Text scroll DPX308U... - Page 19 Appendix Troubleshooting Guide Specifications English...
-
Page 20: Before Use
Kenwood dealer. Reset button is pressed. • When you purchase optional accessories, check with your Kenwood dealer to make sure that they work with your model and in your area. • Characters that conform to ISO 8859-1 can be displayed. - Page 21 English...
-
Page 22: Component Names And Functions
To boost the bass tone in two steps (LV1, LV2, OFF). p [iPod] button Select the iPod source. q [4] / [¢] button To select a station, song and setting items. w [BAND] button To select the receiving band, and the folder for Audio file. DPX308U... - Page 23 English...
-
Page 24: General Operation
Turn the [VOL] knob to select “YES” and press the Volume [VOL] knob. Turning the [VOL] knob adjusts the sound volume. ⁄ • Demonstration mode can also be cancelled in “DEMO MODE” of Function setting mode. Refer to <Demonstration mode Setting> (page 29). DPX308U... -
Page 25: Function Setting Operation
Function setting Operation The basic operating procedure for using this function is described below. The individual function items are covered in the operating procedures. Select the source Press the [SRC] button. Function items vary from source to source. Enter Function setting mode Press the [VOL] knob. -
Page 26: Ipod/Iphone Operation
Set the ratio with “Skip Search” in <iPod Setting> (page 12). Select a source other than the iPod Press the [SRC] button. Remove the iPod. ⁄ • Removing the iPod with it selected as a source can damage the data stored in the iPod. DPX308U... -
Page 27: Play Function
Play function iPod Control by Hand Mode Allowing you to operate iPod with the control on Repeat play the iPod. Press the [4] button. Press the [iPod] button for at least 1 second. Switches between Repeat (“FILE REPEAT”) and off When the iPod control by hand mode is selected, (“REPEAT OFF”) when pressed. -
Page 28: Ipod Setting
Press the [ ] button for at least 1 second. ⁄ • The setting of “SKIP SEARCH” in <iPod Setting> (page 12) and that in <USB Setting> (page 17) are always the same. Changing the setting of one reflects the other. DPX308U... -
Page 29: Related Search
Related Search Alphabet Search Searches for music of the same artist or genre as the You can select a song by alphabet. This function one being played. searches songs whose name contain the specified character(s) in the list of the selected Search item Select iPod source (artist, album, etc). -
Page 30: My Playlist
Select Delete Playlist mode Turn the [VOL] knob and press it when the desired item is displayed. Select “DELETE ONE” or “DELETE ALL”. Turn the [VOL] knob to select “YES”, and then press the [VOL] knob. “COMPLETED” is displayed. DPX308U... - Page 31 English...
-
Page 32: Usb Device Operation
Remove USB device Select a source other than the USB Press the [SRC] button. Remove the USB device. ⁄ • Removing the USB device with it selected as a source can damage the data stored in the USB device. DPX308U... -
Page 33: Play Function
Play function USB Setting You can select the following USB Setting items. Scan play Select USB source Press the [2] button. Press the [SRC] button. Successively plays the intro of the music in the folder. Select the “USB” display. When Scan Play is turned on, “FILE SCAN” is Enter Function setting mode displayed. -
Page 34: Music Cd/ Audio File Operation
Press the [4] or [¢] button. Fast Forwards or Fast Backwards Hold down the [4] or [¢] button. ⁄ • No sound is output while playing Audio file. Pause and Play Press the [6] button to pause or resume playback. DPX308U... -
Page 35: Play Function
Play function Function of remote control Direct music search Scan play Searching the music by entering the track number. Press the [2] button. Successively plays the intro of the music in the disc Enter Direct Music search mode or folder. Press the [DIRECT] button on the remote When Scan Play is turned on, “TRACK SCAN”/ “FILE control. -
Page 36: Tuner Operation
Press the [ ] button for at least 1 second. Remarks • FORCED MONO Strong electrical fields (such as from power lines) may cause unstable sound quality when it is set to ON. In such a situation, turn it OFF. DPX308U... -
Page 37: Station Preset Memory
Station Preset Memory Auto Memory Entry Putting a station in the memory. Putting stations with good reception in the memory automatically. Select the frequency to put in the memory Select the radio band you wish to store in the Press the [4] or [¢] button. preset memory Select the number to put in the memory Enter Function setting mode... -
Page 38: Preset Tuning
Press button 92.1 MHz (FM) [9], [2], [1] 810 kHz (AM) [8], [1], [0] Search the frequency Press the [4] or [¢] button on the remote control. Cancelling Direct access tuning Press the [ ] button on the remote control. DPX308U... - Page 39 English...
-
Page 40: Display Settings
“OFF” : Dims the button illumination. “DISP DIMMER” Reduces the display Illumination brightness. “AUTO”: Dims the illumination in conjunction with the Light switch of the vehicle. “MANUAL1”: Dims the illumination constantly. “MANUAL2”: Dims the illumination darker than Manual1. “OFF”: Does not dim the illumination. DPX308U... -
Page 41: Display Setting
Text Display Selection Illumination Color Selection Changing displayed information on each source Selecting the Illumination Color of the panel. following; Enter Function setting mode Press the [DISP] button. Press the [VOL] knob. In Tuner source Enter Illumination color selection mode Information Display Turn the [VOL] knob and press it when the... -
Page 42: Auxiliary Input Display Setting
> Select “SETTINGS” “AUX NAME SET”. Select the Auxiliary input display Turn the [VOL] knob. Select “AUX”, “DVD”, “PORTABLE”, “GAME”, “VIDEO”, or “TV” Exit Function setting mode Press the [ ] button for at least 1 second. DPX308U... - Page 43 English...
-
Page 44: Clock And Other Functions
Fine-tuning so that the System Q value is optimal when setting the speaker type as follows; “SP OFF”: Off “SP 5/4”: For 5 & 4 in. speaker “SP 6* 9/6”: For 6 & 6x9 in. speaker “SP OEM”: For the OEM speaker DPX308U... -
Page 45: Demonstration Mode Setting
Turning the demonstration mode ON/OFF. starts upgrading the firmware. For how to update the firmware, access our web Enter Function setting mode site. http://www.kenwood.com/cs/ce/ Press the [VOL] knob. : Factory setting) Enter Demonstration mode setting Turn the [VOL] knob and press it when the Make a setting desired item is displayed. -
Page 46: Muting Volume Upon Reception Of Phone Call
ON. ⁄ • To use the TEL Mute feature, you need to hook up the MUTE wire to your telephone using a commercial telephone accessory. Refer to <Connecting Wires to Terminals> (page 10) of Quick start guide. DPX308U... - Page 47 English...
-
Page 48: Audio Adjustments
(Left) “L15” — “0” — “R15” (Right) “FADER” Adjusts front/rear speaker balance. (Rear) “R15” — “0” — “F15” (Front) “SUB-W LEVEL” You can set subwoofer level. “–15” — “0” — “+15” DPX308U... - Page 49 English...
-
Page 50: Basic Operations Of Remote Control
When the button is pressed again, the volume • Return to previous item: [ returns to the previous level. • Return to previous item: [ • Exit from mode: [EXIT] • Selection of item: [5]/[∞] • Determination: [ENT] • Enter Audio Control mode: [AUD] DPX308U... - Page 51 Preparing the remote control unit Pull the battery sheet out from the remote control unit to the direction of the arrow. Changing the battery of the remote control unit Keep on slide CR2025 Pull out (+side) Use a commercially available button battery (CR2025). Insert the battery with the + and –...
-
Page 52: About Audio File
¡% ¡P An online manual about Audio files is put on the site, www.kenwood.com/cs/ce/audiofile/. On this online manual, detailed information and notes which are not written in this manual are provided. Make sure to read through the online manual as well. - Page 53 In this case, “RESUMING” is displayed without displaying a folder name, etc. Changing the browse item will display a correct title, etc. • You cannot operate iPod if “KENWOOD” or “✓” displayed on iPod. English...
-
Page 54: Troubleshooting Guide
The media is scratched or dirty. Clean the media, referring to the CD cleaning of the section on <Handling discs> (page The recording condition is bad. Record the media again or use another media. DPX308U... - Page 55 The messages shown below display your NA DEVICE: • An unsupported USB device is connected. systems condition. • Connection to the iPod has failed. Remove the USB device and then reconnect it. TOC ERROR: • No disc has been loaded in the disc magazine.
-
Page 56: Specifications
: Compliant with Windows Media Audio : 10 A AAC decode Installation Size (W x H x D) : AAC-LC “.m4a” files : 182 x 111 x 158 mm Weight : 1.5 kg Specifications subject to change without notice. DPX308U... - Page 57 However, there is no guarantee that interference will not occur in a particular installation. If this equipment does cause This symbol mark indicates that Kenwood harmful interference to radio or television reception, manufactured this product so as to...
- Page 58 Vous aurez besoin de cette carte et du re~u (ou de la facture) pour acheter un nouveau Dear Customer, panneau en cas de vol ou d'endommagement. Thank you for purchasing this kenwood product. As mentioned in the pages of this booklet, our warranty is only Atenc;ao: valid in the countries listed,...
- Page 59 Any producl which is not distributed in the U.S.A. by NOTICE TO CONSUMER 2. Allhough you must payanyshipping charges if it is necessary Kenwood or which is nol purchased in the U.S.A. from an WARRANTY PERIOD TO OBTAIN WARRANTY SERVICE...