Tripp Lite SmartRack SR12UB Owner's Manual
12u smartrack enclosure
Hide thumbs
Also See for SmartRack SR12UB:
Table of Contents
Advertisement
Quick Links
12U SmartRack
Table of Contents
Owner's Manual
Model: SR12UB
1111 W. 35th Street, Chicago, IL 60609 USA
www.tripplite.com/support
Copyright © 2010 Tripp Lite. All trademarks are the sole property of their respective owners.
™
Enclosure
2
2
3
4
4
4
Español
4
Français
4
5
5
6
6
6
6
6
7
7
8
8
8
9
17
Advertisement
Table of Contents

Related Manuals for Tripp Lite SmartRack SR12UB


Summary of Contents for Tripp Lite SmartRack SR12UB
-
Page 1: Table Of Contents
Owner’s Manual ™ 12U SmartRack Enclosure Model: SR12UB Table of Contents 1. Important Safety Instructions 6. Equipment Installation 6.1 Installing or Removing Cage Nuts 2. Overview 7. Specifications 3. Feature Identification 8. Storage and Service 4. Enclosure Installation 9. Warranty & Warranty Registration 4.1 Preparation... -
Page 2: Important Safety Instructions
1. Important Safety Instructions SAVE THESE INSTRUCTIONS This Manual contains instructions and warnings that must be followed during the installation and operation of the product described in this manual. Failure to comply may invalidate the warranty and cause property damage or personal injury. •... -
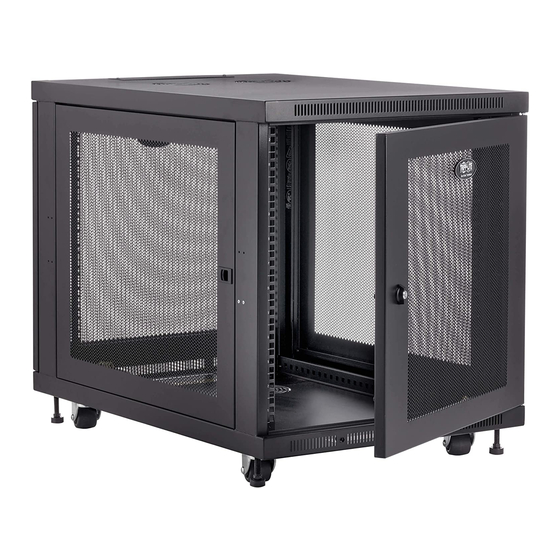
Page 3: Feature Identification
3. Feature Identification Locking/Reversible Front Door Locking/Reversible Back Door Horizontal Rails Vertical Mounting Rails Vents Locking/Removable Side Panels Casters Leveling Feet Removeable Cable Access Hole Covers... -
Page 4: Enclosure Installation
4. Enclosure Installation Caution! Read All Instructions and Warnings Before Installation! Warning: Rack enclosures can be extremely heavy. Do not attempt to unpack, move or install the enclosure without assistance. Use extreme caution when handling the enclosure and be sure to follow all handling and installation instructions. Do not attempt to install equipment without first stabilizing the enclosure. -
Page 5: Leveling The Enclosure
4. Enclosure Installation ( continued ) 4.5 Leveling WARNING: Level the enclosure before attempting to install equipment. Install the enclosure in a structurally sound area with a level floor that is able to bear the weight of the enclosure, all equipment that will be installed in the enclosure and any other enclosures and/or equipment that will be installed nearby. -
Page 6: Enclosure Configuration
5. Enclosure Configuration 5.1 Door Locks All enclosure doors (including front and back doors, as well as both side panels) have locks that are accessible by included keys. 5.2 Reversing the Doors The doors of the enclosure are held in position on the enclosure’s frame with two spring-loaded pins. To reverse the door’s swing direction, simply release the pins by pulling them up (lower pin) or down (upper pin) and remove them from the mounting holes on the frame of the enclosure. -
Page 7: Equipment Installation
6. Equipment Installation Warning: Do not install equipment until you have stabilized the enclosure. Install heavier equipment first and install it towards the bottom of the enclosure. Install equipment starting from the bottom of the enclosure and proceeding toward the top of the enclosure - never the reverse. If using sliding equipment rails, be careful when extending the rails. -
Page 8: Specifications
7. Specifications Model SRW12UB Dimensions (H x W x D) 27 x 23.63 x 33.5” (686 x 600 x 850 mm) Unit Weight 105 lb (48 kg) Load Capacity 250 lb (113 kg) Stationary or Rolling Mounting Depth (Adjustable) 3” to 32.5” (76 to 826 mm) 8.