AEG DF 6260 Operating And Installation Manual
Hide thumbs
Also See for DF 6260:
- User manual (129 pages) ,
- Operating and installation instructions (22 pages) ,
- Operating and installation manual (21 pages)

Related Manuals for AEG DF 6260


Summary of Contents for AEG DF 6260
- Page 1 DF 6260 Köksfläkt Ventilator Liesituuletin Emhætte Cooker Hood Instruktionsbok Bruksanvisning Käyttöohje Brugsvejledning Operating and Installation Instructions...
-
Page 2: Table Of Contents
Contents Safety instructions ................63 Description of the cooker hood ............65 Using the cooker hood ..............66 Maintenance and cleaning ..............67 If the cooker hood will not operate ............. 70 Guarantee conditions ................ 70 Technical data ................... 71 Special accessories ................ - Page 3 Use of cooker hood • This appliance is for domestic use only in a normal household. • Never leave any deep-frying, melting fat, paraffin or any other inflammable liquid unattended on the hob. In the event of fire: Immediately switch off the cooker hood and the cooker. Note! Cover the fire.
-
Page 4: Description Of The Cooker Hood
Description of the cooker hood Functions There are two possible systems: • Extraction of air to the outside using an optional venting kit and evacuation duct. • Recirculation using an optional charcoal filter. The air outlet must not be connected to chimney flues or combustion gas ducts. -
Page 5: Using The Cooker Hood
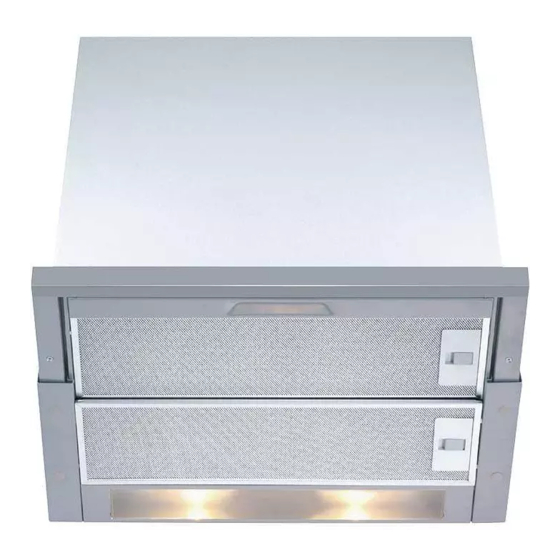
Using the cooker hood The control panel • The switches are arranged on the upper right side of the vapour catcher. (Fig. 1 - E). = Continuously variable The numbers and symbols blower control have the following meanings (from left to right): = Intensive setting The blower is controlled by shifting the sliding switch. -
Page 6: Maintenance And Cleaning
Maintenance and cleaning Disconnect the cooker hood from the power supply prior to cleaning the appliance, either by removing the plug from the mains or removing the fuse. Clean the filter regularly. The grease deposits in the filter and discharge tube are fire hazards where a hotplate (or another heat source) is left on by error. -
Page 7: Carbon Filter
Carbon filter • The activated carbon filter should only be used if you want to use the hood in its filtering function. • To do this you will need an original AEG activated carbon filter (see special accessories). • The carbon filters absorb smells and odours. •... -
Page 8: Changing The Light Bulb
Changing the light bulb • Disconnect the unit from the mains power supply. • Unlock the lighting cover (D) by twisting the bolts to the left and fold down the bulb cover. Fig. 4. Replace the old light bulb(s) with a new light bulb of the same kind. •... -
Page 9: If The Cooker Hood Will Not Operate
If the cooker hood will not operate Check the following prior to calling after sales service: • Has a fuse burnt? Check both fuses and replace if necessary. • Is the power supply plug inserted properly in the power outlet? •... -
Page 10: Technical Data
European Guarantee If you should move to another country within Europe then your guarantee moves with you to your new home subject to the following qualifications: The guarantee starts from the date you first purchased your product. The guarantee is for the same period and to the same extent for labour and parts as exists in the new country of use for this brand or range of products. -
Page 11: Special Accessories
Special accessories Charcoal KLF 60/80 E-Nr. 610 899 421 Charcoal KF 8 942 120 399 Installation Unpacking Check that the cooker hood is not damaged. Transportation damages should immediately be reported to the transport company. Damages, faults and missing parts should immediately be reported to the retailer. Dispose carefully of the packaging material so that it is out of the way of small children. - Page 12 Installation Preparing the wall unit - Extractor version • The hood is supplied as an extractor unit. Before installing the hood, drill a hole in the roof of the wall unit (see Fig. 5). This hole is to allow passage of the outlet pipe and the power cable, and to facilitate servicing.
- Page 13 Outlet hole (extractor-filter version) • When used as an extractor unit, the hood must be fitted with a 150mm diameter hose. Fix the flange on the hood outlet hole, using 2 screws. Fig. 6a. Filter version only • Fix the deflector to the flange. Fig. 6b. Fig.
- Page 14 Installing the fume extractor hood in the wall unit - extractor version (Filter version with charcoal filter) • Apply the drilling template to the inside wall of the wall unit on the right and left sides, and mark out and predrill Ø 2 mm mounting holes as well as 2 x Ø...
- Page 15 • If the cupboard is deeper than 300 mm, cover the gap between the hood and the wall with a finishing strip (special accessory). To install it, proceed as follows: Measure the wall distance and apply the covenng strip over the necessary width (wall distance plus 5 to 8 mm), kinking the covering strip at the appropriate notches and tearing off the surplus material (removing the protective foil).
- Page 16 Removing the hood from the wall unit If, for technical reasons (extractor version/filter version conversion) the fume extractor hood has to be removed from the wall unit, proceed as follows: • Fully withdraw the vapour catcher and remove the grease filter. •...
- Page 17 Installing the front panel (see also “Special accessories”) • Remove first the rear then the front grease filters. • Remove the internal cover pressing both unlocking devices (press and pull). Fig. 12. Fig. 12 • Predrill the front panel as per template and fix it to the vapour catcher with 3 screws.
- Page 19 AEG Hausgeräte GmbH Postfach 1036 D-90327 Nürnberg http://www.aeg.hausgeraete.de © Copyright by AEG LI1YSB Ed. 05/02...