Honeywell Performance HRG4 User Manual
Performance series embedded dvr
Hide thumbs
Also See for Performance HRG4:
- User manual (136 pages) ,
- Getting started manual (21 pages)

Related Manuals for Honeywell Performance HRG4


Summary of Contents for Honeywell Performance HRG4
- Page 1 Performance Series Embedded DVR HRG4 HRG8 HRG16 User Guide Document 800-12005 – Rev A – 06/2012...
- Page 3 User Guide...
- Page 4 Revisions Issue Date Revisions 06/2012 New document.
-
Page 5: Table Of Contents
Contents | 5 Contents Introduction ..........Overview . - Page 6 6 | Performance Series DVR User Guide Alarm Settings..........Configuring Alarms .
- Page 7 Figure 1-1 System Diagram (HRG4 DVR shown) ....... 16 Figure 1-2 HRG4 Front Panel .
- Page 8 8 | Performance Series DVR User Guide Figure 6-1 Record Backup Menu ........53 Figure 6-2 Video Search Results .
- Page 9 Figures | 9 Figure 10-3 Image Settings ......... . . 88 Figure 10-4 Advanced Camera Settings Menu.
- Page 10 10 | Performance Series DVR User Guide www.honeywellvideo.com...
- Page 11 Tables Table 1-1 HRG4 Front Panel Controls and Indicators ......17 Table 1-2 IR Remote Control .
- Page 12 12 | Performance Series DVR User Guide www.honeywellvideo.com...
-
Page 13: Introduction
DVRs) combine the latest in advanced H.264 video encoding and decoding technologies to deliver high performance, rock-solid reliability, and longer recording times. The Honeywell HRG DVRs can be used either as standalone video surveillance products or used to build a powerful surveillance network. This flexibility makes them perfect for small business applications. -
Page 14: Recording Features
14 | Performance Series DVR User Guide Local Monitoring Features • Up to 1280 × 1024 resolution for VGA output display. • Simultaneous VGA and CVBS output. • Multi-camera video live view, with an adjustable camera order. • Group switch, manual switch, and automatic cycles modes that are selectable for video live view, with a configurable auto-cycle period. -
Page 15: System Diagram
Introduction | 15 Alarm and Exception Features • Configurable arming time for alarm in/out. • Support of various exception alarm types, including: alarms for video loss, motion detection, video tampering, unmatched video in/out format, illegal access, network disconnection, IP conflict, hard disk error, and hard disk full. •... -
Page 16: Operating The Hrg Dvr
16 | Performance Series DVR User Guide Figure 1-1 System Diagram (HRG4 DVR shown) Alarm Out Alarm Sensors IR Remote Control Alarm Input/Output Web Browser Multi-site Software Internet Analog Router Cameras HRG4 DVR Video In USB Mouse Support Video Out... -
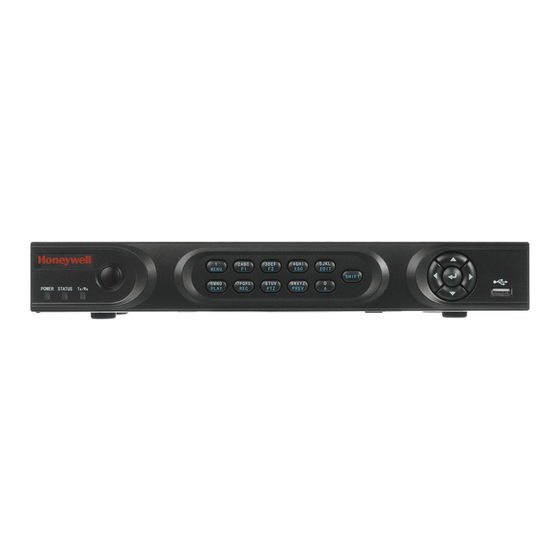
Page 17: Figure 1-2 Hrg4 Front Panel
Introduction | 17 HRG4 Front Panel Figure 1-2 HRG4 Front Panel Table 1-1 HRG4 Front Panel Controls and Indicators Position Control/Indicator Function Status Indicators POWER Turns green when the HRG DVR is on. STATUS Illuminates when the compound key switches to numeric/letter input mode. -
Page 18: Figure 1-3 Hrg8 And Hrg16 Front Panel
18 | Performance Series DVR User Guide HRG8 and HRG16 Front Panel Figure 1-3 HRG8 and HRG16 Front Panel Position Button/Indicator Function USB Port Connection for a USB mouse or USB flash memory device. Status Indicators POWER Turns green when the HRG DVR is on. READY Turns green when the device is running normally. -
Page 19: Using The Ir Remote Control
The F2 button is used to cycle through tab pages. It can also be used to enter the Channel and OSD Position settings. HRG4 Front Panel on page 17 HRG8 and HRG16 Front Panel on page 18 for more about front panel controls. -
Page 20: Using A Usb Mouse
20 | Performance Series DVR User Guide Using a USB Mouse A regular 3-button (Left/Right/Scroll-wheel) USB mouse can also be used with this HRG DVR. Connecting a USB Mouse • Plug the USB mouse into one of the USB ports on the front panel of the HRG DVR. The mouse should automatically be detected. -
Page 21: Using The Virtual Keyboard
Enter Confirm selection. Exit out of the virtual keyboard. Rear Panel Use these diagrams to make the rear panel connections. HRG4 Rear Panel Connections and Switches Figure 1-6 HRG4 Rear Panel Connections and Switches 800-12005 - A - 06/2012... - Page 22 22 | Performance Series DVR User Guide Table 1-5 HRG4 Rear Panel Connections and Switches Position Connection/Switch Function Video In BNC connectors for analog video input. Video Out BNC connectors for video output. Audio In RCA connectors for analog audio input.
- Page 23 Introduction | 23 HRG8 Rear Panel Connections and Switches HRG16 Rear Panel Connections and Switches Table 1-6 HRG8 and HRG16 Rear Panel Connections and Switches Position Connection/Switch Function Main Video Out BNC connectors for analog video input. Spot Video Out BNC connectors for spot video out Video In BNC connectors for analog video input.
- Page 24 24 | Performance Series DVR User Guide www.honeywellvideo.com...
-
Page 25: Getting Started
Getting Started This chapter covers: • Starting and shutting down the HRG DVR • Rebooting and locking the HRG DVR • Using the Setup Wizard • Setting the date and time Starting and Shutting Down the HRG DVR Proper startup and shutdown procedures are crucial to maintaining the life of your HRG DVR. Starting the HRG DVR Note Ensure that the input voltage meets the requirements of the HRG DVR, and that... -
Page 26: Rebooting And Locking The Hrg Dvr
26 | Performance Series DVR User Guide Figure 2-1 .Shutdown Menu Click ShutDown. Click Yes in the pop-up window to confirm that you want to shut down the HRG DVR. Rebooting and Locking the HRG DVR While in the Shutdown menu, you can also reboot or lock your HRG DVR. Locking your HRG DVR will return you to the Live View mode, which requires a user name and password to exit out of it. -
Page 27: Figure 2-2 Setup Wizard
Getting Started | 27 Figure 2-2 Setup Wizard Click Next to open the User Permission window (see Figure 2-3). Figure 2-3 User Permission Window Navigate to the Admin Password input field. Enter the admin password into the Admin Password input field. By default, the password is 12345. Select the New Admin Password check box to change the admin password. -
Page 28: Figure 2-4 Entering The Hdd Management Window
28 | Performance Series DVR User Guide Figure 2-4 Entering the HDD Management Window At the prompt, click Enter to open the HDD Management window (see Figure 2-5). If a new hard drive was recently installed, select the HDD from the list, and then click Init to initialize it. -
Page 29: Figure 2-6 Entering The Record Settings Window
Getting Started | 29 Figure 2-6 Entering the Record Settings Window At the prompt, click Enter to open the Record Settings window (see Figure 2-7). 10. Select the Schedule tab. Figure 2-7 Schedule Tab 11. Click Edit. A new recording schedule opens (see Figure 2-8). -
Page 30: Figure 2-8 Entering A New Recording Schedule
30 | Performance Series DVR User Guide Figure 2-8 Entering a New Recording Schedule 12. Select both the Enable Schedule and All Day check boxes to enable the recording schedule and allow it to record continuously all day. 13. Click OK to return to the Schedule tab. Note To copy the schedule to a different channel, select the channel or all under Copy To, and then click Copy (see... -
Page 31: Figure 2-10 Entering The Network Settings Window
Getting Started | 31 Figure 2-10 Entering the Network Settings Window 15. At the prompt, click Enter to open the Network Settings window (see Figure 2-11). Figure 2-11 Network Settings Window 16. Enter the IP Address, Subnet Mask, and Default Gateway. 17. -
Page 32: Setting The Date And Time
32 | Performance Series DVR User Guide Setting the Date and Time You must set up the system date and time to accurately timestamp recordings and events. To set up the date and time: Open the General Settings Menu by doing one of the following: •... -
Page 33: Live View
Live View This chapter describes the Live View on-screen display and how to operate and configure the Live View display. On-screen Display in Live View Live View mode starts automatically when the HRG DVR is turned on. You can return to Live View mode from any submenu by pressing ESC multiple times. -
Page 34: Operating Live View
34 | Performance Series DVR User Guide Operating Live View In Live View mode, you can select the following options: Display Single Camera • Front Panel/Remote: Use the alphanumeric buttons. • Mouse: Right-click anywhere in the window, and then click Single Camera. Multi-camera Live View •... -
Page 35: Using The Digital Zoom
Live View | 35 Menu items include: • Single Camera: Switch to a full-screen display of the selected camera by drop-down submenu. • Multi Camera: Switch between different multi-camera display modes by drop-down submenu. • Next Screen: When displaying less than the maximum number of cameras in Live View, select this option to switch to the next camera display. -
Page 36: Configuring The Live View Display
36 | Performance Series DVR User Guide Configuring the Live View Display Click Menu Settings Display to enter the Display Settings Menu (see Figure 3-3). Figure 3-3 Display Settings Menu Configure the following settings: • Video Output: Set the video output modes, including VGA, Aux Output, and Main CVBS. •... -
Page 37: Setting The Camera Order
Live View | 37 Setting the Camera Order The Camera Order settings allow you to set camera sequence in selectable Live View display mode (see Figure 3-4). Figure 3-4 Camera Order Settings To set the camera order, do the following: ... - Page 38 38 | Performance Series DVR User Guide www.honeywellvideo.com...
-
Page 39: Recording Settings
Recording Settings This chapter explains how to configure recording settings for the HRG DVR, including setting scheduled recording. Configuring Recording Settings There are multiple ways to set up your HRG DVR for recording. These include setting up a recording schedule, triggering a recording by motion detection and/or a sensor alarm, and starting a recording manually. -
Page 40: Figure 4-2 More Record Settings
40 | Performance Series DVR User Guide Configure the following settings: • Encoding Parameters: Set the encoding parameters to be Normal or Event. • Stream Type: Set the stream type to be Video or Video & Audio. • Resolution: Set recording resolution at 4CIF, 2CIF, CIF, or QCIF. •... -
Page 41: Scheduling Recording
Recording Settings | 41 Figure 4-3 Advanced Record Settings Next to Overwrite, select Yes or No to enable or disable the overwrite setting. Enabling the overwrite setting causes recorded files to be overwritten once the HDD is full. Click Apply, and then click OK to exit the menu. Scheduling Recording The Schedule Record Settings menu allows you to set up flexible recording schedules for daily or weekly recording. -
Page 42: Starting A Manual Recording
42 | Performance Series DVR User Guide Select the Enable Schedule check box. Select the day you want to record or select All Week to record the entire week. Click All Day to enable recording for the entire day, or select different periods for each day. -
Page 43: Protecting Recorded Files
Recording Settings | 43 Protecting Recorded Files Two methods are provided to prevent recorded files from being deleted from the HDD or from being overwritten during cycle recording. You can set the recorded files to be locked or you can set the HDD that the files reside on to be read-only. -
Page 44: Setting The Hard Drive To Read-Only
44 | Performance Series DVR User Guide Figure 4-7 Video Search Result List Select the file you want to lock/unlock. Click Lock to lock the file. If the file is already locked, click Unlock to unlock file. Locked files are shown with a closed lock, while unlocked files are shown with an opened lock. -
Page 45: Figure 4-9 Hdd Property Settings Menu
Recording Settings | 45 Figure 4-9 HDD Property Settings Menu Set the HDD Status to Read-only, and then click OK to save the settings. Note Once set to read-only, the HDD cannot be written to until it is set back to read/write (R/W). - Page 46 46 | Performance Series DVR User Guide www.honeywellvideo.com...
-
Page 47: Playback
Playback This chapter describes the playback controls and the various methods of playing back recorded video, including playback from a search and playing back frame-by-frame. Video Playback The Client application allows all users to play back record files of the specified period. Multi-camera simultaneous playback is supported. -
Page 48: Playback By Search
48 | Performance Series DVR User Guide Figure 5-2 Playback Control Panel Note A blue bar refers to the Normal recording (scheduled, manual), while the red indicates Event recording. Playback by Search To play back record files by video search: ... -
Page 49: Playback In Live View Mode
Playback | 49 Figure 5-4 Playback Interface Playback in Live View Mode The Client application also allows you to play back recorded files in Live View mode. To play back by channel in Live View mode: Right-click on the desired channel, and then click Playback. Recorded video from the selected channel will start playing back in the Playback window. -
Page 50: Playback By System Log
50 | Performance Series DVR User Guide Multi-camera Playback Select the cameras from the list for which you want simultaneous playback. Click to stop the ongoing video playback. Click to start multi-camera simultaneous playback. Note • Up to 16 cameras can be played back simultaneously. •... -
Page 51: Playback Frame-By-Frame
Playback | 51 Playback Frame-by-Frame To play back frame-by-frame in the Playback interface: Using a Mouse Click Slow Forward on the Playback Control Panel until the speed changes to single frame. Click Pause to advance the video frame by frame. Using the Front Panel/Remote Control Press the down arrow to change the playback speed to single frame. - Page 52 52 | Performance Series DVR User Guide www.honeywellvideo.com...
-
Page 53: Backup
Backup This chapter describes how to back up recorded files, including exporting files and video clips. Backing Up Recorded Files Recorded files can be backed up to various devices, such as USB flash drives, USB hard drives, or a DVD writer. Exporting Files To export recorded files: ... -
Page 54: Figure 6-2 Video Search Results
54 | Performance Series DVR User Guide Figure 6-2 Video Search Results Select the recorded files you want to export. You can also click Play to confirm the recorded file you want to export. The size of the currently selected files is displayed at the lower-left corner of the window. Click Next to enter the Export menu (see Figure 6-3). -
Page 55: Exporting Video Clips
Backup | 55 Figure 6-4 Backup Progress Screen After the backup process has completed (Figure 6-5), select a file from your device and click Play to verify that it has been exported successfully. Figure 6-5 Export Successful Screen Note Video Player software will automatically be copied to the device that the recorded files were exported to. -
Page 56: Managing Backup Devices
56 | Performance Series DVR User Guide Exporting Video Clips Using the Mouse To export video clips during Playback using the mouse: Enter the Playback interface (see Video Playback on page 47). Click Start/Stop Clip on the Playback Control Panel (see Figure 5-2), and select the start and end of the video clip during playback. -
Page 57: Figure 6-7 Export Menu
Backup | 57 Figure 6-7 Export Menu From the Export menu, you can select the following options: • New Folder: Create a new folder on the export device. • Delete: Delete a file or folder from the export device. • Play: Play the selected video file on the export device. - Page 58 58 | Performance Series DVR User Guide www.honeywellvideo.com...
-
Page 59: Alarm Settings
Alarm Settings This chapter describes how to configure the HRG DVR to detect and respond to alarms. Configuring Alarms Motion Detection Alarm To configure Motion Detection recording, do the following: Click Menu Settings Camera to enter the Camera Settings menu (see Figure 7-1). -
Page 60: Figure 7-2 Advanced Camera Settings - Motion Detection
60 | Performance Series DVR User Guide Figure 7-2 Advanced Camera Settings - Motion Detection Select the Motion Detection check box, and then click Area Settings to enter the Motion Detection Area Settings interface. Mask the Motion Detection area by dragging the grid with your mouse (see Figure 7-3). -
Page 61: Figure 7-4 Motion Detection Sensitivity Settings
Alarm Settings | 61 Figure 7-4 Motion Detection Sensitivity Settings Click OK to return to the Motion Detection Area Settings interface. Right-click anywhere in the window, and then click Exit to return to the Advanced Camera Settings menu. Click Handle to enter the Exception Handle menu (see Figure 7-5). -
Page 62: Sensor Alarm Settings
62 | Performance Series DVR User Guide Figure 7-6 Schedule Settings Note After you have configured the schedule, the HRG DVR must be restarted for the new settings to take effect. 11. Select the Handle tab to configure exceptions handling (see Figure 7-7). -
Page 63: Figure 7-8 Alarm Settings Menu
Alarm Settings | 63 Figure 7-8 Alarm Settings Menu Select the Alarm Input Number, and then click Set to enter the Alarm Input Settings menu (see Figure 7-9). Figure 7-9 Alarm Input Settings Menu Set Type to Normally Opened (N.O) or Normally Closed (N.C). Select the Setting check box, and then click Handle to enter the Alarm Input Handle menu (see Figure... -
Page 64: Figure 7-10 Alarm Input Handle Menu
64 | Performance Series DVR User Guide Figure 7-10 Alarm Input Handle Menu Select the Triggered Camera tab. Select cameras to trigger for recording when an alarm occurs by selecting the check boxes under the desired cameras (see Figure 7-10). You can select a PTZ camera to link with the alarm input and then set the call up of preset, patrol, and pattern for alarm-linked actions. -
Page 65: Manual Alarm Triggering
Alarm Settings | 65 Figure 7-12 Alarm Output Settings Configure the settings for the selected output. Click OK to save the settings. Note If Hold For is set as Manually Stop, the alarm will only stop when you manually turn it off (see Manual Alarm Triggering). -
Page 66: Video Loss Detection
66 | Performance Series DVR User Guide Configure the following settings in the Manual Alarm menu: • Trigger: Select an alarm from the list and click Trigger to trigger its output. • Trigger All: Trigger all alarm outputs at once. •... -
Page 67: Figure 7-15 Advanced Camera Settings - Video Loss Detection
Alarm Settings | 67 Figure 7-15 Advanced Camera Settings - Video Loss Detection Next to Video Loss Detection, click Handle to enter the Exception Handle menu. Select the Schedule tab to set when you want video loss detection to be enabled (see Figure 7-16). -
Page 68: Video Tampering Detection
68 | Performance Series DVR User Guide Figure 7-17 Handle Settings Click OK to save the settings. Repeat step 3 step 8 to configure settings for other channels. Video Tampering Detection The video tampering can also be detected and set to trigger an action on your DVR. Note The video tampering detection area is in full-screen mode by default and cannot be configured. -
Page 69: Figure 7-19 Advanced Camera Settings - Tamper Detection
Alarm Settings | 69 Figure 7-19 Advanced Camera Settings - Tamper Detection Next to Tamper Detection, click Handle to enter the Exception Handle menu. Select the Schedule tab to set when you want video tampering detection to be enabled (see Figure 7-20). -
Page 70: Exception Settings
70 | Performance Series DVR User Guide Figure 7-21 Handle Settings Click OK to save the settings. Repeat step 3 step 8 to configure settings for other channels. Exception Settings The exception setting allows the DVR to alert you when irregular events occur. These events include: •... -
Page 71: Understanding Exception Trigger Options
Alarm Settings | 71 Figure 7-22 Exception Menu Understanding Exception Trigger Options When setting up exception handles for such features as motion detection and relay alarms, you can select triggering options to alert you of these exceptions. The triggering options include: •... - Page 72 72 | Performance Series DVR User Guide www.honeywellvideo.com...
-
Page 73: Network Settings
Network Settings This chapter covers how to configure network settings. Configuring Network Settings The network settings must be configured if the HRG DVR is used for monitoring over a network. Configuring General System Settings To configure the general network settings: ... -
Page 74: Configuring Pppoe Settings
74 | Performance Series DVR User Guide If you want to configure your own settings, enter the settings for: • IP Address: IP address you would like to use for your HRG DVR. • Subnet Mask: Subnet Mask of network. •... -
Page 75: Configuring Ddns
Network Settings | 75 Figure 8-3 Advanced Network Settings Menu Click Set next to PPPOE to enter the PPPoE Settings menu (see Figure 8-4). Figure 8-4 PPPoE Settings Select the PPPOE check box to enable this feature. Fill in the User Name, Password, and Confirm Password boxes, and then click OK. PPPOE credentials can be obtained from your network administrator. -
Page 76: Configuring Ntp Server Settings
76 | Performance Series DVR User Guide To set up DDNS: Click Menu Settings Network to enter the Network Settings menu. Select the Advanced tab. Next to DDNS, click Set to enter the DDNS settings menu (see Figure 8-5). -
Page 77: Configuring Remote Alarm Host Settings
Network Settings | 77 To set up an NTP server: Click Menu Settings Network to enter the Network Settings menu. Select the Advanced tab. Next to NTP, click Set to enter the NTP Settings menu (see Figure 8-7). Figure 8-7 NTP Settings Menu Select the NTP check box to enable this feature. -
Page 78: Configuring Multicast
78 | Performance Series DVR User Guide Figure 8-8 Host/Others Menu Enter the Alarm Host IP and Alarm Host Port. Alarm Host IP is the IP of the remote PC that has the Network Video Surveillance software installed. The Alarm Host Port must be the same as software's alarm monitor port (default port is 7200). -
Page 79: Configuring Server And Http Ports
Network Settings | 79 Click OK to save the settings and exit the menu. Configuring Server and HTTP Ports If you would like to change the server and HTTP ports from the default settings, you can do so in the Network Settings menu. The default server port is 8000 while the default HTTP port is 80. To change the default ports: ... - Page 80 80 | Performance Series DVR User Guide www.honeywellvideo.com...
-
Page 81: Ptz Control
PTZ Control This chapter describes how to configure and use the HRG Performance Series DVR to control PTZ Dome cameras in your network system. Navigating the PTZ Menu PTZ menus can be navigated using either the mouse or the front panel/remote. For quick access to certain PTZ settings, click the right mouse button in Live View mode, and then click PTZ to enter PTZ control mode (see Using the Mouse in Live View on page... -
Page 82: Configuring Ptz Settings
82 | Performance Series DVR User Guide Menu items include: • Camera: Select a PTZ camera. • Call Preset: Call a PTZ preset. • Call Patrol: Call a PTZ sequence. • Call Pattern: Call a PTZ pattern. • Preset Settings: Enter PTZ preset configuration menu. •... -
Page 83: Setting Ptz Presets, Patrols And Patterns
PTZ Control | 83 Setting PTZ Presets, Patrols and Patterns The HRG DVR allows you to program presets, patrols, and patterns for a connected PTZ camera. Understanding PTZ Controls The PTZ control panel provides a series of PTZ controls (see Figure 9-3). -
Page 84: Customizing Patrols
84 | Performance Series DVR User Guide Figure 9-4 Preset Management Menu Note Only valid presets can be called and deleted. Customizing Patrols Patrols can be programmed to move the PTZ to different key points and make it stay there for a defined duration before moving on to the next point. -
Page 85: Figure 9-6 Patrol Configuration Menu
PTZ Control | 85 In the Patrol Management menu, you can configure a patrol: Select a Patrol Number to set. Select valid presets (See Customizing Presets), and then click Set to enter the Patrol Configuration menu. A sequence should have at least two valid presets. Set the KeyPoint No., Duration, and Speed (see Figure 9-6). -
Page 86: Customizing Patterns
86 | Performance Series DVR User Guide Figure 9-7 Patrol Management Menu Customizing Patterns Patterns can be set up by recording the movement of the PTZ. To set up and call PTZ patterns: Open the PTZ Control panel (Figure 9-3), by clicking PTZ in the mouse menu or by pressing PTZ on the front panel of the DVR. -
Page 87: Camera Management
Camera Management This chapter covers OSD settings, image settings, and privacy mask settings. OSD Settings Use the Camera Management menu to configure on-screen display (OSD) settings. The OSD is shown in each display during Live View mode and includes the time and date as well as the camera name. -
Page 88: Image Settings
88 | Performance Series DVR User Guide Image Settings Image settings such as the brightness, contrast, saturation and hue can also be adjusted in the Camera Management menu. To adjust image settings: Click Menu Settings Camera to enter the Camera Settings menu (see Figure 10-1). -
Page 89: Privacy Mask Settings
Camera Management | 89 Privacy Mask Settings You can set up privacy mask to mask off sensitive or private areas in the field of view of a camera. To set up a privacy mask: Click Menu Settings Camera to enter the Camera Settings menu. Select the Advanced tab to enter the Advanced Camera Settings menu (see Figure 10-4). - Page 90 90 | Performance Series DVR User Guide www.honeywellvideo.com...
-
Page 91: Hard Drive Management
Hard Drive Management This chapter covers how to configure and manage the hard drive(s) of the HRG Performance Series DVR. Managing Hard Drives Initializing Hard Drives A newly installed hard disk drive (HDD) must be first initialized before it can be used with your HRG DVR. -
Page 92: Setting Hdd Groups
92 | Performance Series DVR User Guide Click OK to start the initialization process. After the HDD has been initialized, the status of the HDD will change from Abnormal to Normal. Setting HDD Groups Your HRG DVR can separate multiple HDDs into groups. Video from specified channels can be recorded to a particular HDD group. -
Page 93: Checking Hdd Status
Hard Drive Management | 93 Click Property to enter the Property Settings menu (see Figure 11-3). Figure 11-3 HDD Property Settings Menu Set HDD Status to Read-Only. Click OK to save the settings and exit the current menu. Note Once set to read-only, the HDD cannot be written to until it is set back to read/write (R/W). -
Page 94: Figure 11-4 Log Search Menu
94 | Performance Series DVR User Guide Figure 11-4 Log Search Menu Set the Major Type field to Information. Set the Minor Type field to HDD SMART. Enter the desired times in the Start Time and End Time fields. Click Search to begin the log search. A list of results similar to that of Figure 11-5 are displayed. -
Page 95: Configuring Hdd Alarms
Hard Drive Management | 95 Figure 11-6 HDD SMART Information You can also click Menu HDD to enter the HDD management menu (see Figure 11-2), and then select the Advance option to enter the SMART menu (see Figure 11-7). You can enable the SMART function and view the SMART information as well. -
Page 96: Figure 11-8 Exception Menu, Hdd Error
96 | Performance Series DVR User Guide Figure 11-8 Exception Menu, HDD Error Set the Exception Type drop-down list to HDD Error. Select the Trigger Action Output check box. Trigger actions are further explained in Understanding Exception Trigger Options on page www.honeywellvideo.com... -
Page 97: Hrg Dvr Management
HRG DVR Management This chapter describes how to configure system settings and manage user accounts. It also covers how to update system firmware, restore default settings, and view system information. Configuring System Settings Configuring General Settings Use the General Settings menu to configure general settings such as the system language. To configure general settings: ... -
Page 98: Configuring Advanced Settings
98 | Performance Series DVR User Guide Configure general settings, including: • Language: Default language used in all the HRG DVR menus. • CVBS Output Standard: Video output standard: NTSC and PAL. • VGA Resolution: VGA output resolution. 1024 × 768/60HZ and 1280 × 1024/60HZ resolution is selectable. -
Page 99: Setting The Rs-232 Port
HRG DVR Management | 99 Configure the following settings: • Device Name: Name of the HRG DVR used. • Device No.: Device number of the HRG DVR. • CVBS Output Brightness: Video output brightness. Level 0 to 63 can be configurable. -
Page 100: Managing User Accounts
100 | Performance Series DVR User Guide The RS-232 port can be used in two ways: • Parameter Control: Connect a PC to the HRG DVR using the PC serial port. You can then set device parameters using software such as HyperTerminal. The serial port parameters must be the same as the DVR's when connecting with the PC serial port. -
Page 101: Figure 12-5 Add User Menu
HRG DVR Management | 101 Figure 12-5 Add User Menu Enter information for the new user, including User Name, Password, Level, and User's MAC Address. The Level is the user level and is separated into two tiers: • Operator: By default, the Operator user level has the authority to configure two-way audio in network settings and all parameters in channel settings. -
Page 102: Figure 12-7 Network Permission Settings Menu
102 | Performance Series DVR User Guide The local settings include: • Local Log Search: Search and view logs of HRG DVR. • Local Configuration: Configure and restore parameters to factory defaults. Introduce settings to or export settings from HRG DVR. •... -
Page 103: Deleting A User
HRG DVR Management | 103 Figure 12-8 Camera Permission Settings Menu The channel settings include: • Remote Live View: Select and view live video over the network. • Local Manual Record: Locally start and stop manual recording on any of the channels. -
Page 104: Modifying A User
104 | Performance Series DVR User Guide Note The Administrator cannot be deleted. Modifying a User To modify a user: Click Menu Settings User to enter the User Settings menu. Select the user you want to modify. Click Modify to enter the Modify menu (see Figure 12-9). -
Page 105: Importing And Exporting The Configuration File
HRG DVR Management | 105 Importing and Exporting the Configuration File Configuration information from your HRG DVR can be exported to a USB device and imported into another DVR. This will allow you to efficiently setup the same configuration on numerous HRG DVRs. -
Page 106: Figure 12-11 Firmware Update Menu
106 | Performance Series DVR User Guide Figure 12-11 Firmware Update Menu Select the Local Upgrade tab. Select the firmware on the USB device. Click Upgrade to begin the update process. After the system firmware has been updated, reboot the DVR to complete the upgrade process. -
Page 107: Restoring The Default Settings
HRG DVR Management | 107 Input the FTP server address. Click Upgrade to begin the update process. After the system firmware has been updated, reboot the HRG DVR to complete the update process. Note If the HRG DVR fails to update, please contact your system supplier for further assistance. -
Page 108: Viewing The System Information
108 | Performance Series DVR User Guide Viewing the System Information To view system information: Click Menu Maintenance Information to enter the System Information menu (see Figure 12-14). Figure 12-14 System Information Click OK to exit to the previous screen. Viewing the System Log Many DVR events are logged in the system log. -
Page 109: Figure 12-15 Log Search Menu
HRG DVR Management | 109 Figure 12-15 Log Search Menu Set the search parameters. Click Search to start the search. If logs matching the search conditions are found, they will be displayed in a list of search results (see Figure 12-16). -
Page 110: Figure 12-17 Log Search Export Menu
110 | Performance Series DVR User Guide Exporting Log Files to a USB Device Log files can also be exported to a USB device. To export a log file: Connect a USB device to the HRG DVR. Select the log file to export, and then click Export to enter the Log Search Export menu (see Figure 12-17). -
Page 111: Appendix A Glossary
Glossary This appendix provides an explanation for commonly used terms in this guide. DDNS: (Dynamic DNS) A method, protocol, or network service that provides the capability for a networked device, such as a router or computer system using the Internet Protocol Suite, to notify a domain name server to change, in real time the active DNS configuration of its configured host names, addresses, or other information stored in DNS. - Page 112 112 | Performance Series DVR User Guide www.honeywellvideo.com...
-
Page 113: Appendix B Solutions
Solutions This Appendix provides possible solutions for resolving system malfunctions that may occur from time to time. Troubleshooting the HRG DVR If this happens … Try this … The DVR makes a beeping The HRG DVR gives a warning beep after booting if: sound after booting. - Page 114 114 | Performance Series DVR User Guide If this happens … Try this … The HRG DVR does not There is a chance that the HRG DVR and your USB device are not compatible. Please detect my USB export device refer to the following list of tested compatible/incompatible USB devices: when I try to export recorded files.
-
Page 115: Troubleshooting The Ir Remote Control
Solutions | 115 Troubleshooting the IR Remote Control If this happens … Try this … The Status indicator does not Check the following: turn green and there is still no • Ensure that the batteries are properly installed, and that the polarities of the response from the remote. - Page 116 116 | Performance Series DVR User Guide www.honeywellvideo.com...
-
Page 117: Index
HRG front panel exception HRG8/16 front panel local monitoring playback network overview remote control recording USB mouse firmware, updating virtual keyboard frame rate, setting front panel controls, HRG4 controls, HRG8/16 date/time, setting 800-12005 - A - 06/2012... - Page 118 HRG4, rear panel connections HTTP HTTP ports, configuring multicast remote alarm host server setup setting NTP server image, setup setting PPPoE importing, config file...
- Page 119 HRG4 connections user rebooting the dvr adding recorded files deleting backing up modifying exporting setting password/permissions...
- Page 120 120 | Performance Series DVR User Guide www.honeywellvideo.com...
- Page 122 Document 800-12005 – Rev A – 06/2012 © 2012 Honeywell International Inc. All rights reserved. No part of this publication may be reproduced by any means without written permission from Honeywell. The information in this publication is believed to be accurate in all respects. However, Honeywell cannot assume responsibility for any consequences resulting from the use thereof.